本文主要是介绍ML-Decoder: Scalable and Versatile Classification Head,希望对大家解决编程问题提供一定的参考价值,需要的开发者们随着小编来一起学习吧!
1、引言
论文链接:https://openaccess.thecvf.com/content/WACV2023/papers/Ridnik_ML-Decoder_Scalable_and_Versatile_Classification_Head_WACV_2023_paper.pdf
因为 transformer 解码器分类头[1] 在少类别多标签分类数据集上表现得很好,但由于其查询复杂度为 O(n^2),n 为类别数量,故 transformer 解码器分类头对于多类别数据集是不可行的,且 transformer 解码器分类头只适用于多标签分类任务,故 Tal Ridnik 等引入了一种新的基于多头注意力机制的分类头——ML-Decoder[2]。ML-Decoder 可以用于单标签分类、多标签分类和多标签 ZSL(zero shot learning) 任务,它提供更好的精度-速度 trade-off,可以用于上万类别的数据集,可以作为各种分类头的 drop-in 替代品,结合词查询可以用于 ZSL。
2、方法

图1 transformer-decoder vs. ML-Decoder
2.1 移除自注意力机制
通过删除自注意力机制将 ML-Decoder 的查询复杂度由 O(n^2) 降至 O(n),并未影响表示能力。
2.2 组解码
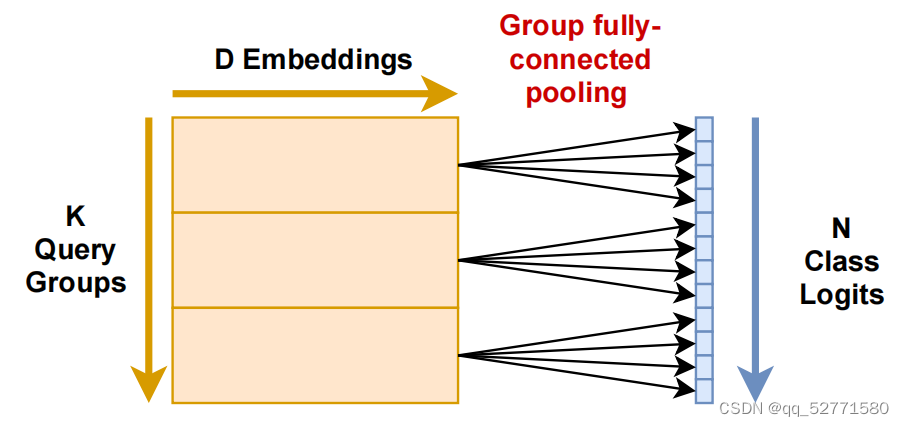
为了使查询数量与类别数量无关,使用固定的 k 组查询,而不是一个类别对应一个查询。在前馈神经网络后,通过组全连接层在将每个组查询扩展到 g=n/k 个输出的同时池化嵌入维度。如图 2 所示。

图2 组全连接方案(g=4)
2.3 固定查询
查询总是被输入到一个多头注意力层,该注意力层会先对查询应用一个可学习的投影计算。因此,将查询权重设置为可学习的是多余的——可学习的投影可以将任何固定值查询转换为可学习查询获得的任何值。
3、模块介绍
3.1 Cross-Attention
Cross-Attention 的核心其实就是多头注意力机制,输入的 q 为固定查询,k 和 v 均为图像嵌入。Cross-Attention 和 Feed-Forward 模块构成所谓的 TransformerDecoder(Layer),python 代码如下所示:
class TransformerDecoder(nn.Module):def __init__(self, d_model, nhead=8, dim_feedforward=2048, dropout=0.1) -> None:super().__init__()self.dropout = nn.Dropout(dropout)self.norm0 = nn.LayerNorm(d_model)self.multihead_attn = nn.MultiheadAttention(d_model, nhead, dropout, batch_first=True)# Implementation of Feedforward modelself.feed_forward = nn.Sequential(nn.LayerNorm(d_model),nn.Linear(d_model, dim_feedforward),nn.ReLU(),nn.Dropout(dropout),nn.Linear(dim_feedforward, d_model))self.norm1 = nn.LayerNorm(d_model)def forward(self, tgt: Tensor, memory: Tensor) -> Tensor:tgt = tgt + self.dropout(tgt)tgt = self.norm0(tgt)tgt0 = self.multihead_attn(tgt, memory, memory)[0]tgt = tgt + self.dropout(tgt0)tgt0 = self.feed_forward(tgt)tgt = tgt + self.dropout(tgt0)return self.norm1(tgt)3.2 Group Fully Connected Pooling
Group Fully Connected Pooling的目的是将每个组查询扩展到 g=n/k 个输出的同时池化嵌入维度。即将每组查询结果与对应的可学习的 (hidde_dim, g) 维矩阵相乘,python 代码如下所示:
class GroupFC(object):def __init__(self, groups: int):self.groups = groupsdef __call__(self, h: torch.Tensor, duplicate_pooling: torch.Tensor, out_extrap: torch.Tensor):"""计算每组类的 logits 值(未加偏置):param h: shape=(b, groups, hidden_dim):param duplicate_pooling: shape=(groups, hidden_dim, duplicate_factor), duplicate_factor 每组的类别数:param out_extrap: shape=(b, groups, duplicate_factor):return:"""for i in range(h.shape[1]):h_i = h[:, i, :]w_i = duplicate_pooling[i, :, :]out_extrap[:, i, :] = torch.matmul(h_i, w_i)4、总结
作者开源的 ML-Decoder 的 python 实现代码在:https://github.com/Alibaba-MIIL/ML_Decoder/blob/main/src_files/ml_decoder/ml_decoder.py
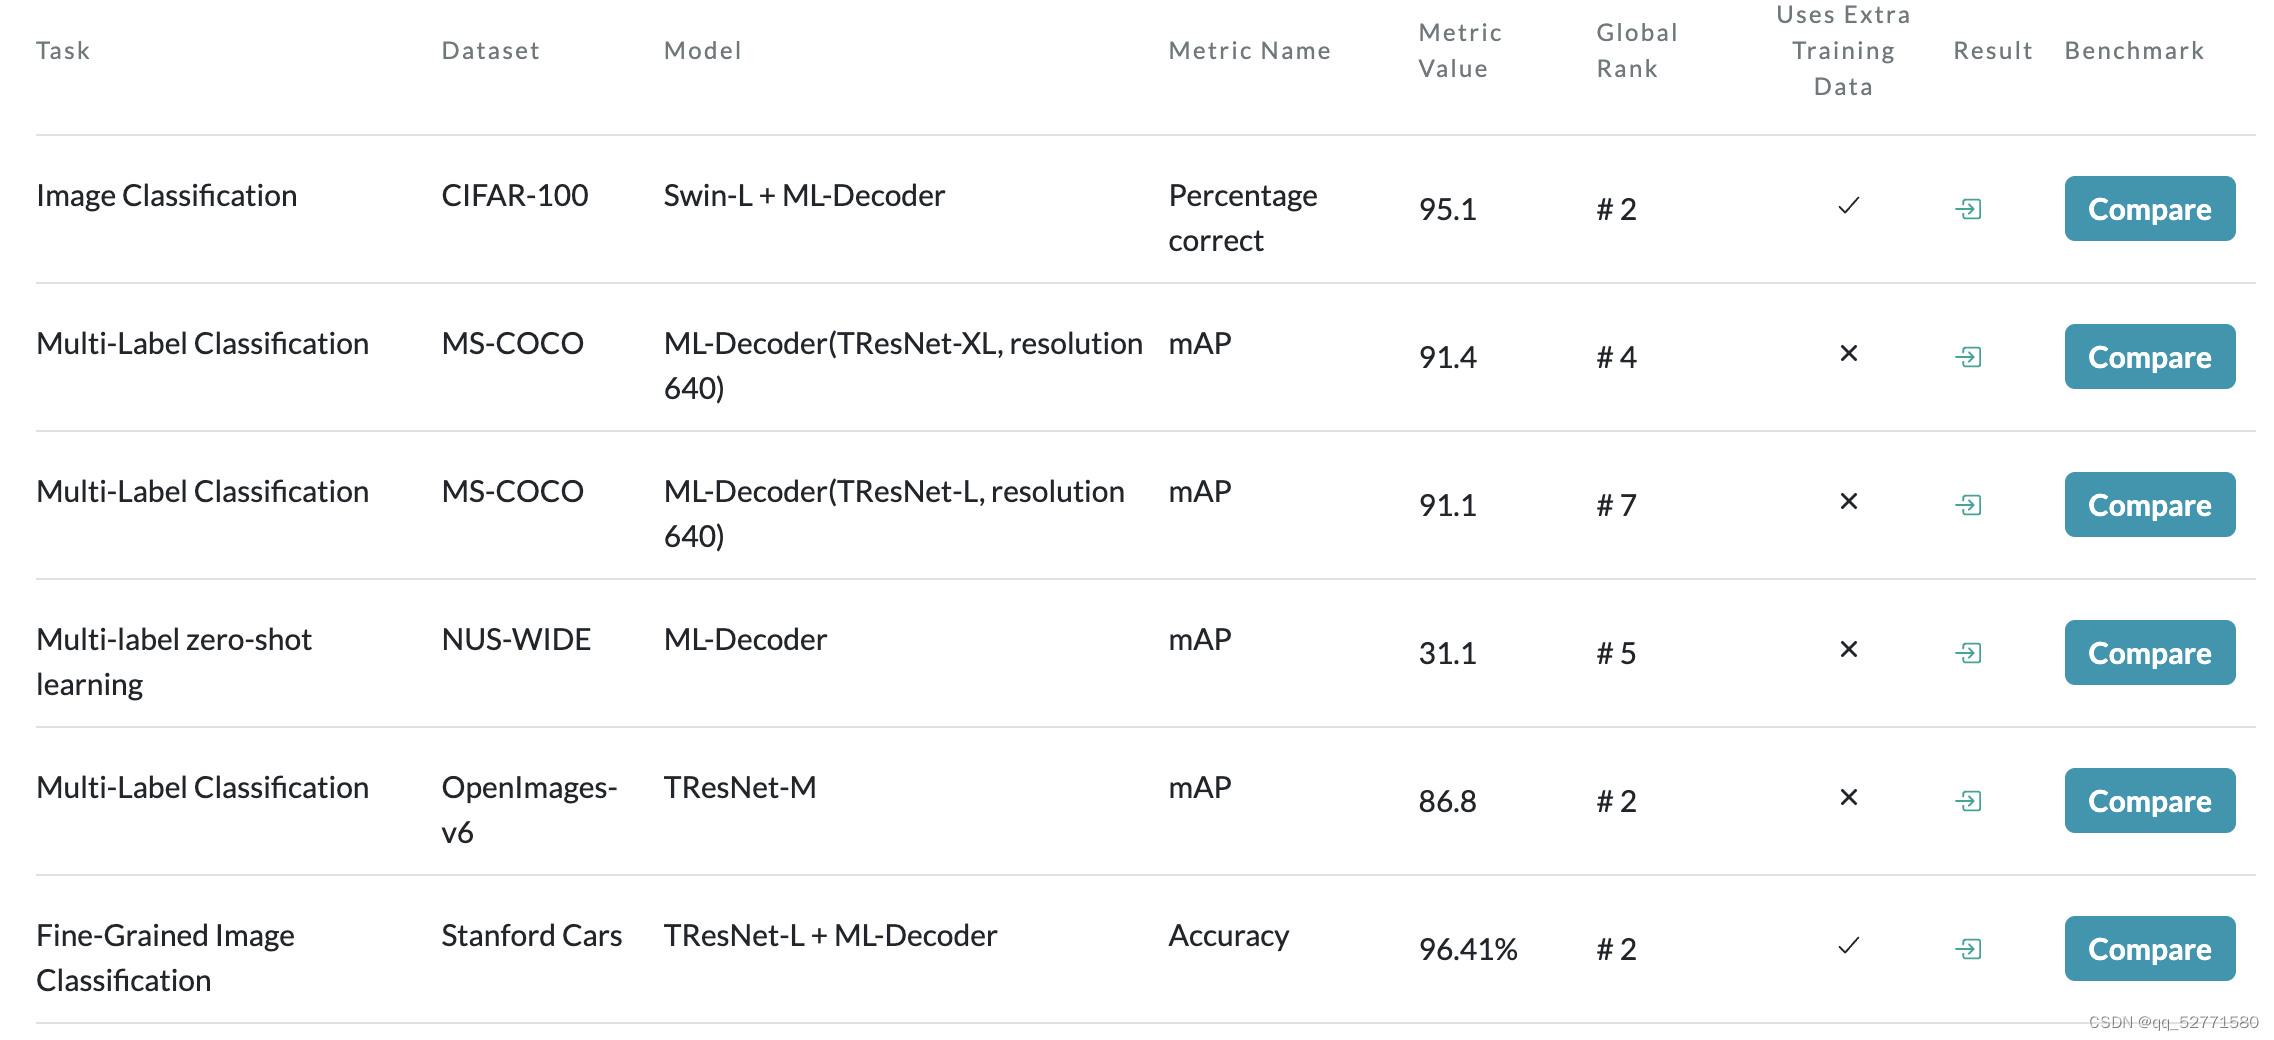
论文[2] 在 paper with code 上的战绩如图 3 所示,表现还是不错的。

图3 来自论文[2] 的结果
由于当参数 zsl != 0 时 wordvec_proj 的输入 query_embed = None,本人还未学习过 ZSL 领域,且使用该代码时报错(zsl = 0,当然应该是我的原因,但懒得排错了),于是参考作者的代码写了一个 MLDecoder 类(只考虑 zsl = 0),剩下的代码如下所示。
class MLDecoder(nn.Module):"""Args:groups: 查询/类别组数hidden_dim: Transformer 解码器特征维度in_dim: 输入 tensor 特征维度(CNN 编码器输出为通道数,Transformer 编码器输出为最后一个维度)"""def __init__(self, num_classes, groups, in_dim=2048, hidden_dim=768, mlp_dim=2048, nhead=8, dropout=0.1):super().__init__()self.proj = nn.Linear(in_dim, hidden_dim)# non-learnable queriesself.query_embed = nn.Embedding(groups, hidden_dim)self.query_embed.requires_grad_(False)self.num_classes = num_classesself.decoder = TransformerDecoder(d_model=hidden_dim, nhead=nhead, dim_feedforward=mlp_dim, dropout=dropout)# group fully-connectedself.duplicate_factor = math.ceil(num_classes / groups) # 每组类别数量,math.ceil: 向上取整self.duplicate_pooling = torch.nn.Parameter(torch.zeros((groups, hidden_dim, self.duplicate_factor)))self.duplicate_pooling_bias = torch.nn.Parameter(torch.zeros(num_classes))torch.nn.init.xavier_normal_(self.duplicate_pooling)self.group_fc = GroupFC(groups)def forward(self, x):# 确保解码器输入 shape 为 [b, h * w, c]if len(x.shape) == 4:x = x.flatten(2).transpose(1, 2)x = F.relu(self.proj(x), True) # (b, h * w, hidden_dim)# Cross-Attention + Feed-Forwardquery_embed = self.query_embed.weight # (groups, hidden_dim)# tensor.expend: 增大一个维度至指定大小, 不增大的维度为-1,例如将 shape 由 (b, n, c)->(b, 2n, c), 参数 size=(-1, 2n,-1)tgt = query_embed[None].expand(x.shape[0], -1, -1) # (b, groups, hidden_dim)h = self.decoder(tgt, x) # (b, groups, hidden_dim)# Group Fully Connected Poolingout_extrap = torch.zeros(h.shape[0], h.shape[1], self.duplicate_factor, device=h.device, dtype=h.dtype)self.group_fc(h, self.duplicate_pooling, out_extrap)h_out = out_extrap.flatten(1)[:, :self.num_classes] # (b, num_classes)return h_out + self.duplicate_pooling_bias参考文献
[1] Shilong Liu, Lei Zhang, Xiao Yang, Hang Su, and Jun Zhu. Query2label: A simple transformer way to multi-label classification. arXiv preprint arXiv:2107.10834, 2021.
[2] Tal Ridnik, Gilad Sharir, Avi Ben-Cohen, Emanuel Ben Baruch, and Asaf Noy. Ml-decoder: Scalable and versatile classification head. In IEEE/CVF Winter Conference on Applications of Computer Vision, WACV 2023, Waikoloa, HI, USA, January 2-7, 2023, pages 32–41. IEEE, 2023.
这篇关于ML-Decoder: Scalable and Versatile Classification Head的文章就介绍到这儿,希望我们推荐的文章对编程师们有所帮助!


