本文主要是介绍(算法版)基于二值图像数字矩阵的距离变换算法,希望对大家解决编程问题提供一定的参考价值,需要的开发者们随着小编来一起学习吧!
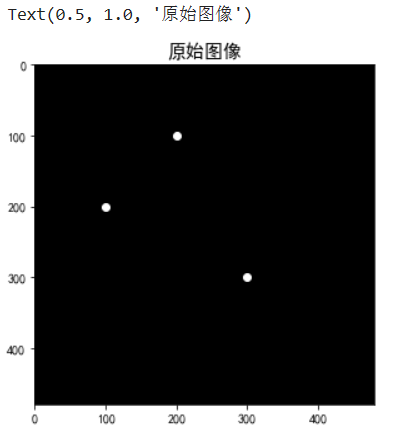
Hi,大家好,我是半亩花海。本项目展示了欧氏距离、城市街区距离和棋盘距离变换的实现方法。通过定义一个距离变换类,对输入图像进行距离变换操作,并生成对应的距离矩阵。在示例中,展示了在一个480x480的全黑背景图像上设置三个前景像素点的距离变换结果。
文章目录
- 一、距离的定义及分类
- 二、导入必要库
- 三、距离变换算法
- 四、定义距离变换类
- 五、显示原始图像
- 六、计算并输出距离变换矩阵
- 七、可视化距离变换结果
- 八、完整代码
一、距离的定义及分类
距离是描述图像两点像素之间的远近关系的度量,常见的度量距离有欧式距离、城市街区距离、棋盘距离。以下以两坐标点 a = ( i , j ) a = (i, j) a=(i,j) 和 b = ( k , l ) b = (k, l) b=(k,l) 的距离为例,来说明各种距离的定义方式:
(1)欧式距离 D e D_e De: 欧式距离的定义源于经典的几何学,与我们数学中所学的简单几何的两点之间的距离一致,为两个像素点坐标值的平方根。欧式距离的优点在于其定义非常地直观,是显而易见的,但缺点在于平方根的计算是非常耗时的。
D e ( a , b ) = ( ( i − k ) 2 ) + ( j − l ) 2 D_e(a, b)=\sqrt{\left((i-k)^2\right)+(j-l)^2} De(a,b)=((i−k)2)+(j−l)2
(2)城市街区距离 D 4 D_4 D4: 距离描述的是只允许像素坐标系平面中横向和纵向的移动距离,4表示在这种定义下,像素点是 4 邻接的,即每个点只与它的上、下、左、右相邻的 4 个点之间的距离为 1。
D 4 ( a , b ) = ∣ i − k ∣ + ∣ j − l ∣ D_4(a, b)=|i-k|+|j-l| D4(a,b)=∣i−k∣+∣j−l∣
(3)棋盘距离 D 8 D_8 D8: 如果允许在图像坐标系中像素点的对角线方向的移动,就可以得到棋盘距离,8 表示在这种定义下,像素点是 8 邻接的,即每个点只与它的上、下、左、右、四个对角线方向相邻的 8 个点之间的距离为 1。
D 8 ( a , b ) = max { ∣ i − k ∣ , ∣ j − l ∣ } D_8(a, b)=\max \{|i-k|,|j-l|\} D8(a,b)=max{∣i−k∣,∣j−l∣}
二、导入必要库
import numpy as np
import matplotlib.pyplot as plt# 设置字体样式以正常显示中文标签
plt.rcParams['font.sans-serif'] = ['SimHei']
plt.rcParams['axes.unicode_minus'] = False
三、距离变换算法
- 距离变换是图像中像素点与某个区域块的距离。区域块中的像素点值为 0,临近区域块的像素点有较小的值,离它越远值越大。
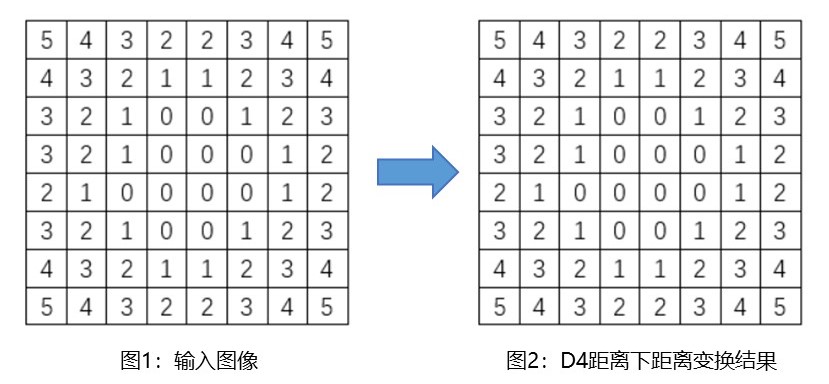
以二值图像为例,其中区域块内部的像素值为 1,其他像素值为 0。距离变换给出每个像素点到最近的区域块边界的距离,区域块内部的距离变换结果为0。输入图像如图 1 所示, D 4 D_4 D4 距离的距离变换结果如图 2 所示。

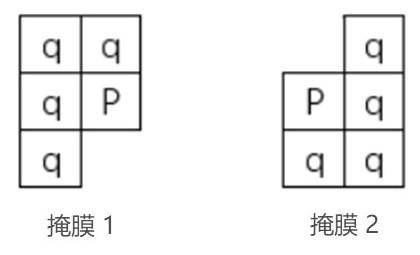
- 距离变换算法核心是利用两个小的局部掩膜对图像进行遍历。第一遍利用掩模1,左上角开始,从左往右,从上往下;第二遍利用第二个掩模,右下角开始,从右往左,从下往上。掩模形状如下图所示:

按照某种距离(如: D 4 D_4 D4 距离或 D 8 D_8 D8 距离)对大小为 M × N M×N M×N 的图像中的区域块作距离变换,算法过程如下:
(1) 建立一个大小为 M × N M×N M×N 的数组 F F F,作如下的初始化:将区域块中的元素设置为 0,其余元素设置为无穷;
(2) 利用掩模1(mask1),左上角开始,从左往右,从上往下遍历数组,将掩模中P点对应的元素的值作如下更新:
F ( P ) = min q ∈ mask1 { F ( P ) , D ( P , q ) + F ( q ) } F(P)=\min _{q \in \operatorname{mask1}}\{F(P), D(P, q)+F(q)\} F(P)=q∈mask1min{F(P),D(P,q)+F(q)}
(3) 利用掩模2(mask2),右下角开始,从右往左,从下往上遍历数组,将掩模中P点对应的元素的值作如下更新:
F ( P ) = min q ∈ mask2 { F ( P ) , D ( P , q ) + F ( q ) } F(P)=\min _{q \in \operatorname{mask2}}\{F(P), D(P, q)+F(q)\} F(P)=q∈mask2min{F(P),D(P,q)+F(q)}
最终得到的更新后的数组即为距离变换的结果。
因在边界处掩模不能全部覆盖图像,可以将掩模中没有对应元素的位置的值当作 0 来处理,以此对图像边界处做出调整,即maskSize=0。
四、定义距离变换类
在距离变换类当中分别初始化距离变换类、定义欧氏距离和城市街区距离及棋盘距离的函数。
# 定义距离变换类
class DistanceTransform:# 初始化距离变换类def __init__(self, image):self.image = imageself.height, self.width = image.shape# 定义欧氏距离变换def Euclidean_distance_transform(self):distance_matrix = np.zeros_like(self.image, dtype=float)# 获取前景像素点的坐标yy, xx = np.argwhere(self.image == 1).Tfor y in range(self.height):for x in range(self.width):if self.image[y, x] == 1:distance_matrix[y, x] = 0else:# 计算当前像素到前景像素点的欧氏距离distances = np.sqrt((y - yy) ** 2 + (x - xx) ** 2)# 取最小值作为当前像素的距离值distance_matrix[y, x] = np.min(distances)return distance_matrix# 定义城市街区距离变换def D4_distance_transform(self):distance_matrix = np.zeros_like(self.image, dtype=float)yy, xx = np.argwhere(self.image == 1).Tfor y in range(self.height):for x in range(self.width):if self.image[y, x] == 1:distance_matrix[y, x] = 0else:# 计算当前像素到前景像素点的曼哈顿距离distances = np.abs(y - yy) + np.abs(x - xx)# 取最小值作为当前像素的距离值distance_matrix[y, x] = np.min(distances)return distance_matrix# 定义棋盘距离变换def D8_distance_transform(self):distance_matrix = np.zeros_like(self.image, dtype=float)yy, xx = np.argwhere(self.image == 1).Tfor y in range(self.height):for x in range(self.width):if self.image[y, x] == 1:distance_matrix[y, x] = 0else:# 计算当前像素到前景像素点的棋盘距离distances = np.maximum(np.abs(y - yy), np.abs(x - xx))# 取最小值作为当前像素的距离值distance_matrix[y, x] = np.min(distances)return distance_matrix
五、显示原始图像
# 初始化输入图像:480x480的全黑背景
image = np.zeros((480, 480), dtype=np.uint8)
# 取三个前景像素点
image[100, 200] = 1
image[200, 100] = 1
image[300, 300] = 1# 显示原始图像
plt.figure(figsize=(5, 5))
plt.scatter([100, 200, 300], [200, 100, 300], color='white', marker='o')
plt.imshow(image, cmap='gray')
plt.title('原始图像', fontsize=15)

六、计算并输出距离变换矩阵
# 计算距离变换矩阵
dt = DistanceTransform(image)
euclidean_distance_matrix = dt.Euclidean_distance_transform()
manhattan_distance_matrix = dt.D4_distance_transform()
chessboard_distance_matrix = dt.D8_distance_transform()# 输出欧氏、城区和棋盘的距离矩阵
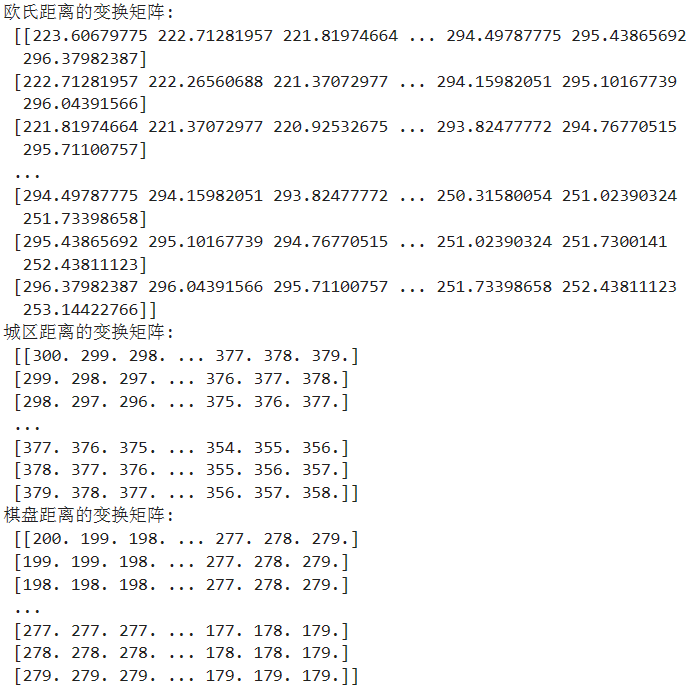
print("欧氏距离的变换矩阵:\n", euclidean_distance_matrix)
print("城区距离的变换矩阵:\n", manhattan_distance_matrix)
print("棋盘距离的变换矩阵:\n", chessboard_distance_matrix)

七、可视化距离变换结果
# 可视化距离变换结果
plt.figure(figsize=(15, 5))# 欧氏距离变换
plt.subplot(1, 3, 1)
plt.imshow(euclidean_distance_matrix, cmap='gray')
plt.colorbar(shrink=0.8)
plt.title('欧氏距离', fontsize=15)
plt.axis('off')# 城区距离变换
plt.subplot(1, 3, 2)
plt.imshow(manhattan_distance_matrix, cmap='gray')
plt.colorbar(shrink=0.8)
plt.title('城区距离', fontsize=15)
plt.axis('off')# 棋盘距离变换
plt.subplot(1, 3, 3)
plt.imshow(chessboard_distance_matrix, cmap='gray')
plt.colorbar(shrink=0.8)
plt.title('棋盘距离', fontsize=15)
plt.axis('off')plt.tight_layout()
plt.show()

八、完整代码
import numpy as np
import matplotlib.pyplot as plt# 设置字体样式以正常显示中文标签
plt.rcParams['font.sans-serif'] = ['SimHei']
plt.rcParams['axes.unicode_minus'] = False# 定义距离变换类
class DistanceTransform:# 初始化距离变换类def __init__(self, image):self.image = imageself.height, self.width = image.shape# 定义欧氏距离变换def Euclidean_distance_transform(self):distance_matrix = np.zeros_like(self.image, dtype=float)# 获取前景像素点的坐标yy, xx = np.argwhere(self.image == 1).Tfor y in range(self.height):for x in range(self.width):if self.image[y, x] == 1:distance_matrix[y, x] = 0else:# 计算当前像素到前景像素点的欧氏距离distances = np.sqrt((y - yy) ** 2 + (x - xx) ** 2)# 取最小值作为当前像素的距离值distance_matrix[y, x] = np.min(distances)return distance_matrix# 定义城市街区距离变换def D4_distance_transform(self):distance_matrix = np.zeros_like(self.image, dtype=float)yy, xx = np.argwhere(self.image == 1).Tfor y in range(self.height):for x in range(self.width):if self.image[y, x] == 1:distance_matrix[y, x] = 0else:# 计算当前像素到前景像素点的曼哈顿距离distances = np.abs(y - yy) + np.abs(x - xx)# 取最小值作为当前像素的距离值distance_matrix[y, x] = np.min(distances)return distance_matrix# 定义棋盘距离变换def D8_distance_transform(self):distance_matrix = np.zeros_like(self.image, dtype=float)yy, xx = np.argwhere(self.image == 1).Tfor y in range(self.height):for x in range(self.width):if self.image[y, x] == 1:distance_matrix[y, x] = 0else:# 计算当前像素到前景像素点的棋盘距离distances = np.maximum(np.abs(y - yy), np.abs(x - xx))# 取最小值作为当前像素的距离值distance_matrix[y, x] = np.min(distances)return distance_matrix# 初始化输入图像:480x480的全黑背景
image = np.zeros((480, 480), dtype=np.uint8)
# 取三个前景像素点
image[100, 200] = 1
image[200, 100] = 1
image[300, 300] = 1# 显示原始图像
plt.figure(figsize=(5, 5))
plt.scatter([100, 200, 300], [200, 100, 300], color='white', marker='o')
plt.imshow(image, cmap='gray')
plt.title('原始图像', fontsize=15)# 计算距离变换矩阵
dt = DistanceTransform(image)
euclidean_distance_matrix = dt.Euclidean_distance_transform()
manhattan_distance_matrix = dt.D4_distance_transform()
chessboard_distance_matrix = dt.D8_distance_transform()# 输出欧氏、城区和棋盘的距离矩阵
print("欧氏距离的变换矩阵:\n", euclidean_distance_matrix)
print("城区距离的变换矩阵:\n", manhattan_distance_matrix)
print("棋盘距离的变换矩阵:\n", chessboard_distance_matrix)# 可视化距离变换结果
plt.figure(figsize=(15, 5))# 欧氏距离变换
plt.subplot(1, 3, 1)
plt.imshow(euclidean_distance_matrix, cmap='gray')
plt.colorbar(shrink=0.8)
plt.title('欧氏距离', fontsize=15)
plt.axis('off')# 城区距离变换
plt.subplot(1, 3, 2)
plt.imshow(manhattan_distance_matrix, cmap='gray')
plt.colorbar(shrink=0.8)
plt.title('城区距离', fontsize=15)
plt.axis('off')# 棋盘距离变换
plt.subplot(1, 3, 3)
plt.imshow(chessboard_distance_matrix, cmap='gray')
plt.colorbar(shrink=0.8)
plt.title('棋盘距离', fontsize=15)
plt.axis('off')plt.tight_layout()
plt.show()
这篇关于(算法版)基于二值图像数字矩阵的距离变换算法的文章就介绍到这儿,希望我们推荐的文章对编程师们有所帮助!


