本文主要是介绍单目3D目标检测——MonoCon 模型训练 | 模型推理,希望对大家解决编程问题提供一定的参考价值,需要的开发者们随着小编来一起学习吧!
本文分享 MonoCon 的模型训练、模型推理、可视化3D检测结果、以及可视化BEV效果。
模型原理,参考我这篇博客:【论文解读】单目3D目标检测 MonoCon(AAAI2022)_一颗小树x的博客-CSDN博客
源码地址:https://github.com/2gunsu/monocon-pytorch

一、环境搭建
1.1 需要用到Conda来搭建环境,首先创建一个MonoCon环境;
conda create --name MonoCon python=3.8
conda activate MonoCon
1.2 下载代码到本地;
git clone https://github.com/2gunsu/monocon-pytorch
cd monocon-pytorch-main
1.3 安装pytorch和对应CUDA,这里以为示例;
conda install pytorch==1.12.0 torchvision==0.13.0 torchaudio==0.12.0 cudatoolkit=11.3 -c pytorch
其他版本安装,或使用pip安装的,参考pytorch官网:Previous PyTorch Versions | PyTorch
1.4 安装MonoCon的依赖库;
cd monocon-pytorch
pip install -r requirements.txt -i https://pypi.tuna.tsinghua.edu.cn/simple
在 pip 命令中使用 -i 参数来指定清华镜像地址,加速安装
二、准备数据集
官网链接:The KITTI Vision Benchmark Suite
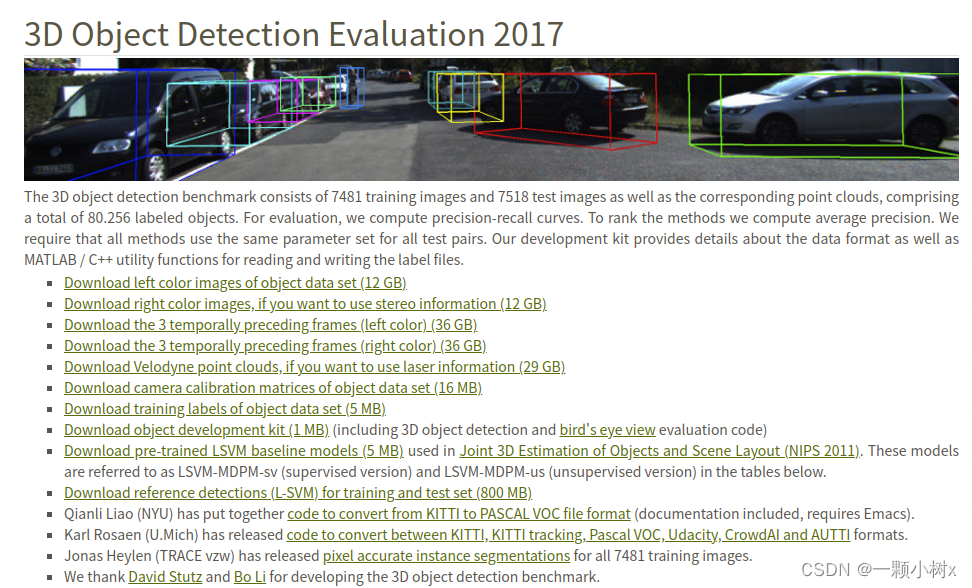
需要下载的文件:
- Download left color images of object data set (12 GB) 这是图片,包括训练集和测试集
- Download camera calibration matrices of object data set (16 MB) 这是相机的标定相关的文件
- Download training labels of object data set (5 MB) 这是图片训练集对应的标签
下载后的文件放在dataset目录中,存放的目录结构:
dataset
│
├── training
│   ├── calib
│   │   ├── 000000.txt
│   │   ├── 000001.txt
│   │   └── ...
│   ├── image_2
│   │   ├── 000000.png
│   │   ├── 000001.png
│   │   └── ...
│   └── label_2
│       ├── 000000.txt
│       ├── 000001.txt
│       └── ...
│
└── testing├── calib└── image_2
需要对数据集划分:train训练集、val验证集,在dataset目录下新建一个文件to_train_val.py
用于将training 带标签数据(7481帧),划分为train(3712帧)、val(3769帧),代码如下
import os
import shutil# 【一】、读取train.txt文件
with open('./ImageSets/train.txt', 'r') as file:# 逐行读取train.txt文件中的文件名IDfile_ids = [line.strip() for line in file]# 【1】calib
# 指定路径A和路径B
path_A = './training/calib'
path_B = './train/calib'# 如果路径B不存在,创建它
if not os.path.exists(path_B):os.makedirs(path_B)# 遍历文件名ID并复制文件到路径B
for file_id in file_ids:source_file = os.path.join(path_A, f"{file_id}.txt")destination_file = os.path.join(path_B, f"{file_id}.txt")if os.path.exists(source_file):shutil.copy(source_file, destination_file)else:print(f"文件未找到:{file_id}.txt")# 【2】image_2
# 指定路径A和路径B
path_A = './training/image_2'
path_B = './train/image_2'# 如果路径B不存在,创建它
if not os.path.exists(path_B):os.makedirs(path_B)# 遍历文件名ID并复制文件到路径B
for file_id in file_ids:source_file = os.path.join(path_A, f"{file_id}.png")destination_file = os.path.join(path_B, f"{file_id}.png")if os.path.exists(source_file):shutil.copy(source_file, destination_file)else:print(f"文件未找到:{file_id}.txt")# 【3】label_2
# 指定路径A和路径B
path_A = './training/label_2'
path_B = './train/label_2'# 如果路径B不存在,创建它
if not os.path.exists(path_B):os.makedirs(path_B)# 遍历文件名ID并复制文件到路径B
for file_id in file_ids:source_file = os.path.join(path_A, f"{file_id}.txt")destination_file = os.path.join(path_B, f"{file_id}.txt")if os.path.exists(source_file):shutil.copy(source_file, destination_file)else:print(f"文件未找到:{file_id}.txt")# 【二】、读取valtxt文件
with open('./ImageSets/val.txt', 'r') as file:# 逐行读取val.txt文件中的文件名IDfile_ids = [line.strip() for line in file]# 【1】calib
# 指定路径A和路径B
path_A = './training/calib'
path_B = './val/calib'# 如果路径B不存在,创建它
if not os.path.exists(path_B):os.makedirs(path_B)# 遍历文件名ID并复制文件到路径B
for file_id in file_ids:source_file = os.path.join(path_A, f"{file_id}.txt")destination_file = os.path.join(path_B, f"{file_id}.txt")if os.path.exists(source_file):shutil.copy(source_file, destination_file)else:print(f"文件未找到:{file_id}.txt")# 【2】image_2
# 指定路径A和路径B
path_A = './training/image_2'
path_B = './val/image_2'# 如果路径B不存在,创建它
if not os.path.exists(path_B):os.makedirs(path_B)# 遍历文件名ID并复制文件到路径B
for file_id in file_ids:source_file = os.path.join(path_A, f"{file_id}.png")destination_file = os.path.join(path_B, f"{file_id}.png")if os.path.exists(source_file):shutil.copy(source_file, destination_file)else:print(f"文件未找到:{file_id}.txt")# 【3】label_2
# 指定路径A和路径B
path_A = './training/label_2'
path_B = './val/label_2'# 如果路径B不存在,创建它
if not os.path.exists(path_B):os.makedirs(path_B)# 遍历文件名ID并复制文件到路径B
for file_id in file_ids:source_file = os.path.join(path_A, f"{file_id}.txt")destination_file = os.path.join(path_B, f"{file_id}.txt")if os.path.exists(source_file):shutil.copy(source_file, destination_file)else:print(f"文件未找到:{file_id}.txt")
此时dataset目录下的结构:

三、训练模型
训练模型的配置在config/monocon_configs.py:
- 需要修改数据集的路径。
- 模型训练保存的路径,比如./checkpoints_train,新建一个checkpoints_train文件夹。
- 如果GPU显存小于16G,要将_C.USE_BENCHMARK 设置为False;如果大约16G,设置为True。
- 设置BATCH_SIZE的大小,默认 _C.DATA.BATCH_SIZE = 8
- 设置CPU线程数,默认 _C.DATA.NUM_WORKERS = 4
- 设置验证模型和保存模型的间隔轮数,默认_C.PERIOD.EVAL_PERIOD = 10
from yacs.config import CfgNode as CN_C = CN()_C.VERSION = 'v1.0.3'
_C.DESCRIPTION = "MonoCon Default Configuration"_C.OUTPUT_DIR = "./checkpoints_train"                               # Output Directory
_C.SEED = -1                                     # -1: Random Seed Selection
_C.GPU_ID = 0                                    # Index of GPU to use_C.USE_BENCHMARK = False                          # Value of 'torch.backends.cudnn.benchmark' and 'torch.backends.cudnn.enabled'# Data
_C.DATA = CN()
_C.DATA.ROOT = r'./dataset'                  # KITTI Root
_C.DATA.BATCH_SIZE = 8
_C.DATA.NUM_WORKERS = 4
_C.DATA.TRAIN_SPLIT = 'train'
_C.DATA.TEST_SPLIT = 'val' _C.DATA.FILTER = CN()
_C.DATA.FILTER.MIN_HEIGHT = 25
_C.DATA.FILTER.MIN_DEPTH = 2
_C.DATA.FILTER.MAX_DEPTH = 65
_C.DATA.FILTER.MAX_TRUNCATION = 0.5
_C.DATA.FILTER.MAX_OCCLUSION = 2# Model
_C.MODEL = CN()_C.MODEL.BACKBONE = CN()
_C.MODEL.BACKBONE.NUM_LAYERS = 34
_C.MODEL.BACKBONE.IMAGENET_PRETRAINED = True_C.MODEL.HEAD = CN()
_C.MODEL.HEAD.NUM_CLASSES = 3
_C.MODEL.HEAD.MAX_OBJS = 30# Optimization
_C.SOLVER = CN()_C.SOLVER.OPTIM = CN()
_C.SOLVER.OPTIM.LR = 2.25E-04
_C.SOLVER.OPTIM.WEIGHT_DECAY = 1E-05
_C.SOLVER.OPTIM.NUM_EPOCHS = 20        # Max Training Epochs 200_C.SOLVER.SCHEDULER = CN()
_C.SOLVER.SCHEDULER.ENABLE = True_C.SOLVER.CLIP_GRAD = CN()
_C.SOLVER.CLIP_GRAD.ENABLE = True
_C.SOLVER.CLIP_GRAD.NORM_TYPE = 2.0
_C.SOLVER.CLIP_GRAD.MAX_NORM = 35 # Period
_C.PERIOD = CN()
_C.PERIOD.EVAL_PERIOD = 10                      # In Epochs / Set -1 if you don't want validation 10
_C.PERIOD.LOG_PERIOD = 50                       # In Steps 50
然后执行命令 python train.py,开始训练。
训练会打印一些信息(这里训练20轮,只是为了走通模型训练和验证流程,建议默认的训练200轮)
[2023-10-14 15:52:59] Using Random Seed 729445219==================== Engine Info ====================
- Root: ./checkpoints_train
- Version: v1.0.3
- Description: MonoCon Default Configuration- Seed: 729445219
- Device: GPU 0 (NVIDIA GeForce GTX 1080 Ti)- Model: MonoConDetector (# Params: 19620261)
- Optimizer: AdamW
- Scheduler: CyclicScheduler- Epoch Progress: 1/20
- # Train Samples: 3712
- # Test Samples: 3769
=====================================================[2023-10-14 15:53:01] Training will be proceeded from epoch 1 to epoch 20.
[2023-10-14 15:53:01] Result files will be saved to './checkpoints_train'.
==================================== Epoch   1 /  20 =====================================
| Progress [##                  ][10.78%] | LR 0.000226 | Loss  25.4260 (721.0474) |
| Progress [####                ][21.55%] | LR 0.000229 | Loss  17.2905 (371.2354) |
| Progress [######              ][32.33%] | LR 0.000233 | Loss  16.1168 ( 19.6029) |
| Progress [########            ][43.10%] | LR 0.000240 | Loss  14.2096 ( 16.5191) |
| Progress [##########          ][53.88%] | LR 0.000248 | Loss  14.2127 ( 14.4836) |
| Progress [############        ][64.66%] | LR 0.000258 | Loss  11.6645 ( 13.4507) |
| Progress [###############     ][75.43%] | LR 0.000269 | Loss  11.5625 ( 13.1914) |
| Progress [#################   ][86.21%] | LR 0.000283 | Loss  12.2610 ( 13.2794) |
| Progress [################### ][96.98%] | LR 0.000298 | Loss  14.5919 ( 13.3250) |- Average Loss: 91.130
- Epoch Time: 0:08:09
- Remain Time: 2:35:01
- Estimated End-Time: 2023-10-14 18:36:11
==================================== Epoch   2 /  20 =====================================
| Progress [#                   ][ 7.76%] | LR 0.000315 | Loss  10.3478 ( 12.9630) |
| Progress [###                 ][18.53%] | LR 0.000333 | Loss  11.1136 ( 12.7164) |
| Progress [#####               ][29.31%] | LR 0.000353 | Loss  11.2275 ( 12.5311) |
| Progress [########            ][40.09%] | LR 0.000375 | Loss  12.8767 ( 12.3347) |
| Progress [##########          ][50.86%] | LR 0.000398 | Loss  10.9840 ( 12.4795) |
| Progress [############        ][61.64%] | LR 0.000423 | Loss  10.6545 ( 12.4311) |
| Progress [##############      ][72.41%] | LR 0.000449 | Loss  11.1646 ( 12.1970) |
| Progress [################    ][83.19%] | LR 0.000476 | Loss  10.6329 ( 12.2642) |
| Progress [##################  ][93.97%] | LR 0.000505 | Loss  11.2371 ( 12.2401) |- Average Loss: 12.390
- Epoch Time: 0:08:10
- Remain Time: 2:26:56
- Estimated End-Time: 2023-10-14 18:36:17
==================================== Epoch   3 /  20 =====================================
| Progress [                    ][ 4.74%] | LR 0.000536 | Loss  11.9816 ( 11.9349) |
| Progress [###                 ][15.52%] | LR 0.000567 | Loss  11.9809 ( 11.6493) |
| Progress [#####               ][26.29%] | LR 0.000600 | Loss  12.4710 ( 11.5947) |
训练中会有模型的验证结果,和保存模型权重
checkpoints 目录 保存模型权重
tf_logs 目录 记录训练数据
config.yaml 文件 记录模型训练配置
补充:训练了200轮,模型最好精度在180轮左右
[2023-10-17 07:50:01] Evaluating on Epoch 180...
Collecting Results...: 100%|███████████████████████████████████████████████████████████████████████████████████████████████████████████████████████████████████| 472/472 [02:49<00:00, 2.79it/s]----------- Eval Results ------------
Pedestrian AP40@0.50, 0.50, 0.50:
bbox AP40:61.3971, 50.7311, 42.1121
bev AP40:11.3598, 8.2899, 6.5858
3d AP40:10.0661, 7.7717, 6.1436
aos AP40:51.96, 42.51, 35.23
Pedestrian AP40@0.50, 0.25, 0.25:
bbox AP40:61.3971, 50.7311, 42.1121
bev AP40:30.5299, 24.7112, 19.6932
3d AP40:28.9825, 23.2350, 19.2469
aos AP40:51.96, 42.51, 35.23
Cyclist AP40@0.50, 0.50, 0.50:
bbox AP40:65.8960, 39.1806, 36.8262
bev AP40:8.7939, 4.5218, 3.7880
3d AP40:7.8889, 4.2369, 3.6355
aos AP40:61.52, 36.18, 33.90
Cyclist AP40@0.50, 0.25, 0.25:
bbox AP40:65.8960, 39.1806, 36.8262
bev AP40:21.2973, 12.0213, 10.8432
3d AP40:19.8434, 10.9273, 10.3842
aos AP40:61.52, 36.18, 33.90
Car AP40@0.70, 0.70, 0.70:
bbox AP40:98.7443, 90.0380, 82.7698
bev AP40:32.3859, 23.8785, 20.5442
3d AP40:23.3036, 17.7727, 15.1053
aos AP40:98.52, 89.52, 81.57
Car AP40@0.70, 0.50, 0.50:
bbox AP40:98.7443, 90.0380, 82.7698
bev AP40:68.0290, 50.1426, 45.4181
3d AP40:63.7541, 46.7086, 40.8562
aos AP40:98.52, 89.52, 81.57Overall AP40@easy, moderate, hard:
bbox AP40:75.3458, 59.9832, 53.9027
bev AP40:17.5132, 12.2301, 10.3060
3d AP40:13.7529, 9.9271, 8.2948
aos AP40:70.67, 56.07, 50.23
-------------------------------------
四、模型推理与可视化结果
模型推理的命令含义如下:
python test.py --config_file [FILL] # Config file (.yaml file)
--checkpoint_file [FILL] # Checkpoint file (.pth file)
--visualize # Perform visualization (Qualitative Results)
--gpu_id [Optional] # Index of GPU to use for testing (Default: 0)
--save_dir [FILL] # Path where visualization results will be saved to
4.1 使用刚才训练的权重,模型推理示例:
python test.py --config_file checkpoints_train/config.yaml --checkpoint_file checkpoints_train/checkpoints/epoch_010.pth --visualize --save_dir save_output --gpu_id 0会打印信息
file checkpoints_train/checkpoints/epoch_020.pth --visualize --save_dir save_output --gpu_id 0
[2023-10-14 19:03:21] Using Random Seed 729445219
[2023-10-14 19:03:23] Checkpoint is loaded from 'checkpoints_train/checkpoints/epoch_020.pth'.
[2023-10-14 19:03:23] Mode: Visualization
[2023-10-14 19:03:23] Model is converted to eval mode.
Collecting Results...: 100%|██████████████████████████████████████████████████████████████████| 472/472 [01:25<00:00, 5.51it/s]
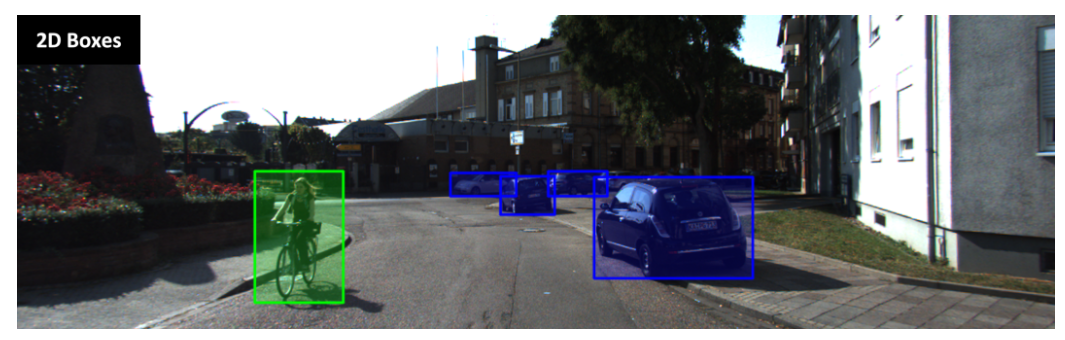
Visualizing '2D'...: 100%|██████████████████████████████████████████████████████████████████| 3769/3769 [06:26<00:00, 9.76it/s]
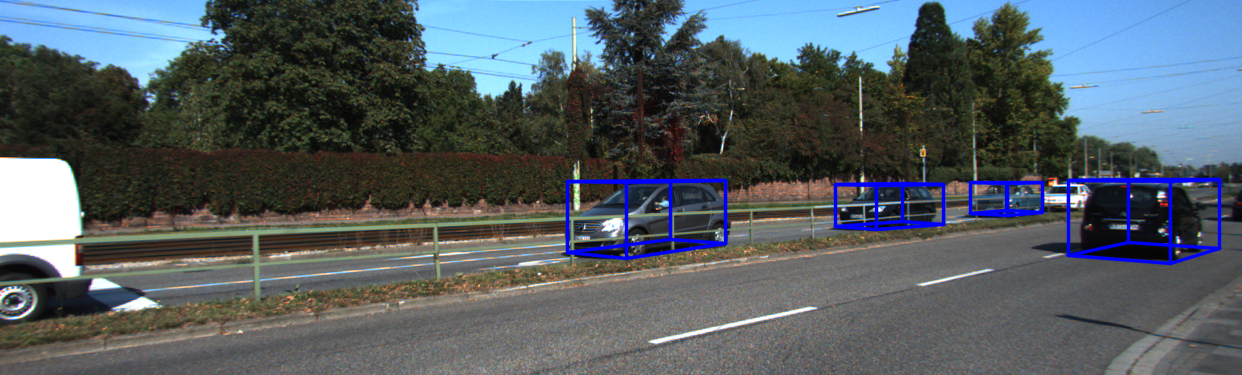
Visualizing '3D'...: 100%|██████████████████████████████████████████████████████████████████| 3769/3769 [06:17<00:00, 9.97it/s]
Visualizing 'BEV'...: 100%|█████████████████████████████████████████████████████████████████| 3769/3769 [03:43<00:00, 16.85it/s]
[2023-10-14 19:21:16] Model is converted to train mode.
会在save_output目录下保存检测的结果。

4.2 或在使用作者预训练的权重:https://drive.google.com/drive/folders/1yVgt8cU-aHtoteATha_7_2U4TxseSrBX
新建一个文件夹pretrained_model,存放下载后的文件

模型推理命令:
python test.py --config_file pretrained_model/config.yaml --checkpoint_file pretrained_model/best.pth --visualize --save_dir save_output --gpu_id 0会打印信息:
(MonoCon) root@8677bec7ab74:/guopu/monocon-pytorch-main# python test.py --config_file pretrained_model/config.yaml --checkpoint_file pretrained_model/best.pth --visualize --save_dir save_output --gpu_id 0
[2023-10-15 01:42:40] Using Random Seed 1120286965
[2023-10-15 01:42:42] Checkpoint is loaded from 'pretrained_model/best.pth'.
[2023-10-15 01:42:42] Mode: Visualization
[2023-10-15 01:42:42] Model is converted to eval mode.
Collecting Results...: 100%|██████████████████████████████████████████████████████████████████████████████████████████████████████████████| 472/472 [01:25<00:00, 5.49it/s]
Visualizing '2D'...: 100%|██████████████████████████████████████████████████████████████████████████████████████████████████████████████| 3769/3769 [06:31<00:00, 9.62it/s]
Visualizing '3D'...: 100%|██████████████████████████████████████████████████████████████████████████████████████████████████████████████| 3769/3769 [06:17<00:00, 9.99it/s]
Visualizing 'BEV'...: 100%|█████████████████████████████████████████████████████████████████████████████████████████████████████████████| 3769/3769 [03:40<00:00, 17.13it/s]
[2023-10-15 02:00:37] Model is converted to train mode.
如果遇到CUDA ID问题:
问题:File "/root/anaconda3/envs/SMOKE/lib/python3.7/site-packages/torch/serialization.py", line 143, in validate_cuda_device
raise RuntimeError('Attempting to deserialize object on CUDA device '
RuntimeError: Attempting to deserialize object on CUDA device 1 but torch.cuda.device_count() is 1. Please use torch.load with map_location to map your storages to an existing device.问题分析:这个错误是由PyTorch引发的,它表明尝试将一个在不同CUDA设备上训练的模型加载到只有一个CUDA设备的环境中。要解决这个问题,可以使用
torch.load函数的map_location参数来指定一个设备,将模型的参数映射到这个设备上解决方案:修改engine/base_engine.py 文件,
在195行代码,把原来的engine_dict = torch.load(ckpt_file),修改为:
map_location = 'cuda:0' # 指定将模型参数映射到CUDA设备0
engine_dict = torch.load(ckpt_file, map_location=map_location)
模型效果1:


模型效果2:


效果3:(重点看一下行人和骑车的人,感觉有待改进)


效果4:远距离目标的检测效果


分享完成~
【数据集】单目3D目标检测:
3D目标检测数据集 KITTI(标签格式解析、3D框可视化、点云转图像、BEV鸟瞰图)_kitti标签_一颗小树x的博客-CSDN博客
3D目标检测数据集 DAIR-V2X-V_一颗小树x的博客-CSDN博客
【论文解读】单目3D目标检测:
【论文解读】SMOKE 单目相机 3D目标检测(CVPR2020)_相机smoke-CSDN博客
【论文解读】单目3D目标检测 MonoDLE(CVPR2021)_一颗小树x的博客-CSDN博客
【论文解读】单目3D目标检测 MonoCon(AAAI2022)_一颗小树x的博客-CSDN博客
【实践应用】
单目3D目标检测——SMOKE 环境搭建|模型训练_一颗小树x的博客-CSDN博客
单目3D目标检测——SMOKE 模型推理 | 可视化结果-CSDN博客
后面计划分享,实时性的单目3D目标检测:MonoFlex、MonoEF、MonoDistillI、GUPNet、DEVIANT等
这篇关于单目3D目标检测——MonoCon 模型训练 | 模型推理的文章就介绍到这儿,希望我们推荐的文章对编程师们有所帮助!


