本文主要是介绍GTDB-Tk v2: memory friendly classification with the Genome Taxonomy Database, 物种注释和进化树构建工具使用及介绍,希望对大家解决编程问题提供一定的参考价值,需要的开发者们随着小编来一起学习吧!
资源介绍:GTDB-Tk v2: memory friendly classification with the genome taxonomy database | Bioinformatics | Oxford Academic (oup.com)
GTDB - Genome Taxonomy Database (ecogenomic.org)
大家自己看吧,不在解释了,直接上安装和配置,然后再使用。
github地址: GitHub - Ecogenomics/GTDBTk: GTDB-Tk: a toolkit for assigning objective taxonomic classifications to bacterial and archaeal genomes.
国内地址:
环境需求
基本都能看懂吧,这里估计full_tree需要410GB的内存,建议512的大服务器了。这里明确了64个线程1小时估计能跑1000个基因组,不算快吧。
| Domain | Memory | Storage | Time |
|---|---|---|---|
| Archaea | ~45 GB | ~85 GB | ~1 hour / 1,000 genomes @ 64 CPUs |
| Bacteria | ~65GB (410 GB when using –full_tree) | ~85 GB | ~1 hour / 1,000 genomes @ 64 CPUs |
环境依赖:
看起来都是我们经常用的几个软件,所以可以借鉴开发自己的分析流程。
| Software | Version | Reference |
|---|---|---|
| Prodigal | >= 2.6.2 | Hyatt D, et al. 2010. Prodigal: prokaryotic gene recognition and translation initiation site identification. BMC Bioinformatics, 11:119. doi: 10.1186/1471-2105-11-119. |
| HMMER | >= 3.1b2 | Eddy SR. 2011. Accelerated profile HMM searches. PLOS Comp. Biol., 7:e1002195. |
| pplacer | >= 1.1 | Matsen FA, et al. 2010. pplacer: linear time maximum-likelihood and Bayesian phylogenetic placement of sequences onto a fixed reference tree. BMC Bioinformatics, 11:538. |
| FastANI | >= 1.32 | Jain C, et al. 2019. High-throughput ANI Analysis of 90K Prokaryotic Genomes Reveals Clear Species Boundaries. Nat. Communications, doi: 10.1038/s41467-018-07641-9. |
| FastTree | >= 2.1.9 | Price MN, et al. 2010. FastTree 2 - Approximately Maximum-Likelihood Trees for Large Alignments. PLoS One, 5, e9490. |
| Mash | >= 2.2 | Ondov BD, et al. 2016. Mash: fast genome and metagenome distance estimation using MinHash. Genome Biol 17, 132. doi: doi: 10.1186/s13059-016-0997-x. |
1、安装GTDB-tk工具
使用conda方式安装
##建议大家带上版本号,因为这个数据库一直在更新,方便分辨是哪个版本
conda create -n gtdbtk-2.1.1 -c conda-forge -c bioconda gtdbtk=2.1.1#mamba的安装方式建议大家搜索一下吧,反正就是另外一个命令,安装方式还挺快,不过得先安装mamba
# using mamba (alternative)
mamba create -n gtdbtk-2.1.1 -c conda-forge -c bioconda gtdbtk=2.1.1###自动下载数据库
download-db.sh##默认会下载到安装环境相对路径下:/{conda}/envs/gtdbtk/share/gtdbtk-1.0.2/db/
##这个是自动下载的路径,建议修改,我这里配置的时候会下载出错!
wget -c https://data.ace.uq.edu.au/public/gtdb/data/releases/latest/gtdbtk_r89_data.tar.gz##下面这几个路径是对的,下载的时候记得看清版本
#这两个路径是默认的最新版本
https://data.gtdb.ecogenomic.org/releases/latest/auxillary_files/gtdbtk_data.tar.gz
https://data.ace.uq.edu.au/public/gtdb/data/releases/latest/auxillary_files/gtdbtk_data.tar.gz #这里是直接下载指定版本
https://data.gtdb.ecogenomic.org/releases/release214/214.0/auxillary_files/gtdbtk_r214_data.tar.gz
https://data.gtdb.ecogenomic.org/releases/release207/207.0/auxillary_files/gtdbtk_r207_v2_data.tar.gz
https://data.gtdb.ecogenomic.org/releases/release202/202.0/auxillary_files/gtdbtk_r202_data.tar.gz
https://data.gtdb.ecogenomic.org/releases/release95/95.0/auxillary_files/gtdbtk_r95_data.tar.gz###如果安装环境目录空间有限,建议使用自定义目录统一管理:
#先激活环境
# Activate the GTDB-Tk conda environment
conda activate gtdbtk-2.1.1#再设置GTDBTK数据库的路径,大家只需要将对应版本的数据库下载到自定义路径下并解压就好了。
# Set the environment variable to the directory containing the GTDB-Tk reference data
conda env config vars set GTDBTK_DATA_PATH="/path/to/unarchived/gtdbtk/data";
数据下载秘籍
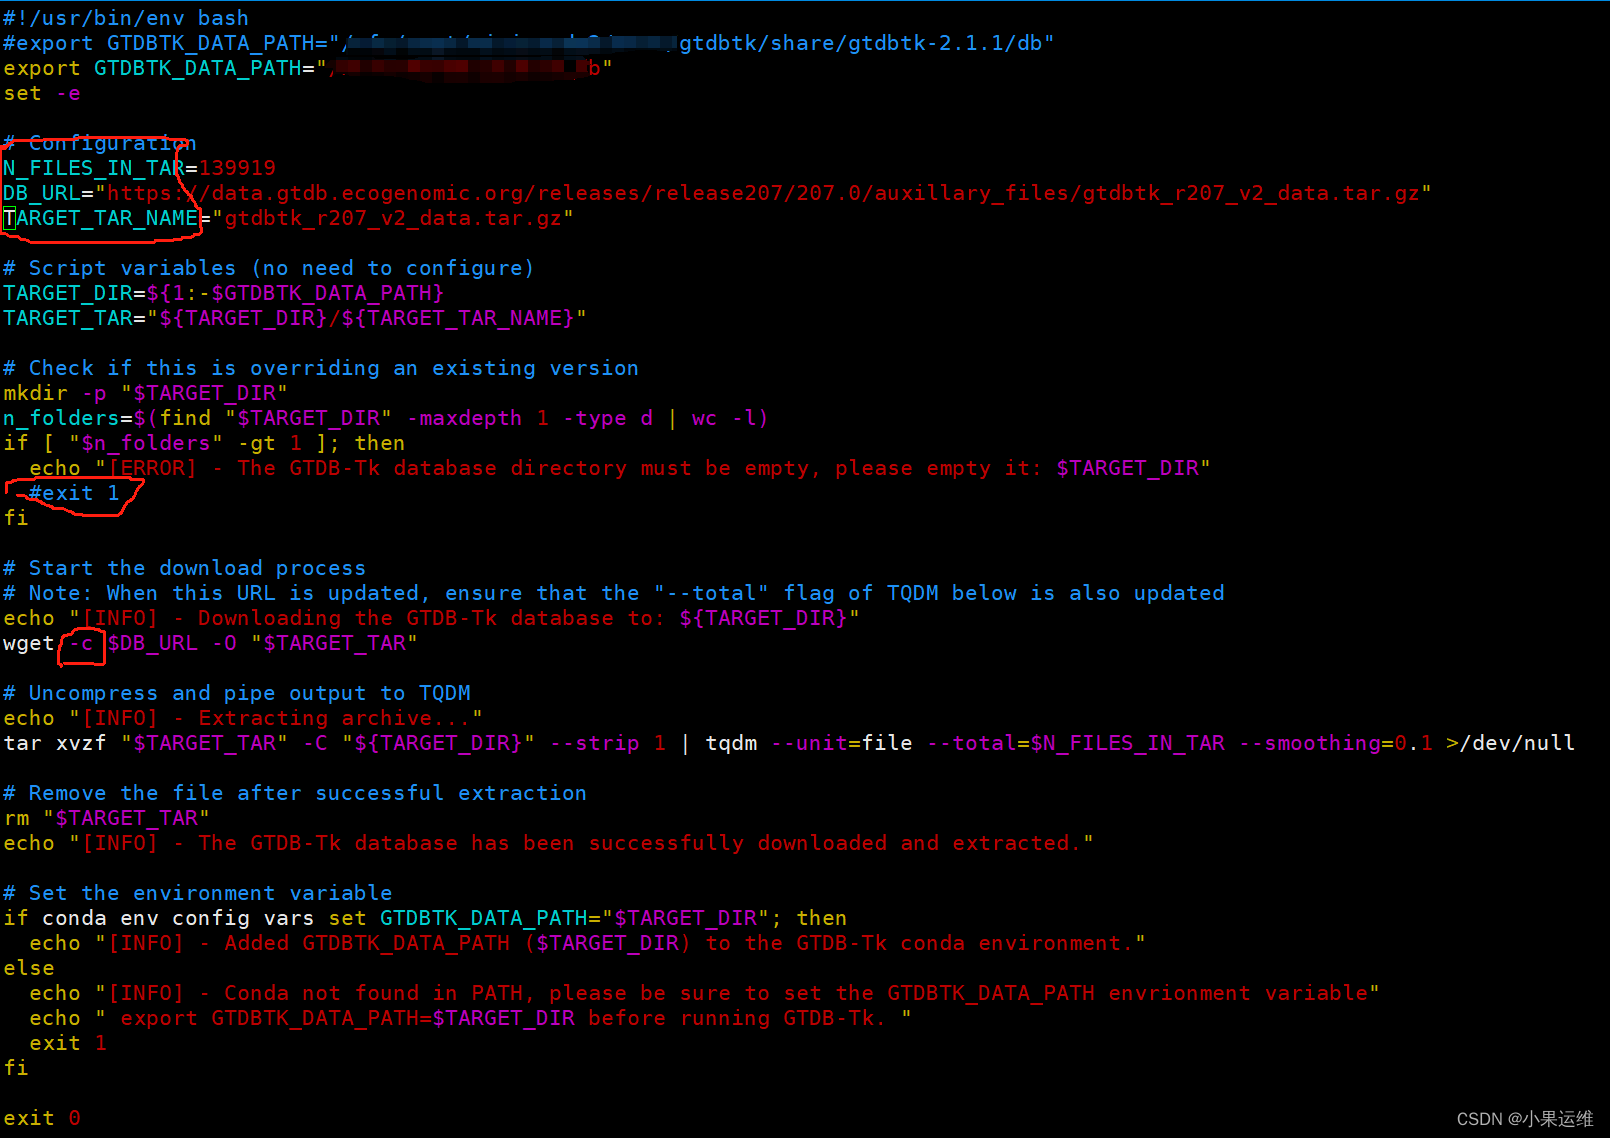
修改/anaconda3/envs/gtdbtk/bin/download-db.sh中的第一行GTDBTK_DATA_PATH到指定目录,修改下面的第6-8行N_FILES_IN_TAR,DB_URL,TARGET_TAR_NAME到指定版本的参数,不知道参数的就不要修改了。还有个判断目录为空的地方建议注释掉,手动删除目标文件夹的除了下载数据库压缩文件以外的所有目录和文件,当然也可以全部删除后重新开始下载

下载文件比较大,建议wget后面加上-c参数以断点续传,防止以外中断重头开始下载:
pip安装方式本质上与conda没啥区别,不过还是建议大家上conda,多个环境单独配置比较好一点
docker方式需要大家简单了解一下docker的用法了,有docker经验的应该会喜欢这个,所有输入输出文件需要进行目录挂载。
官方文档参考:Installing GTDB-Tk — GTDB-Tk 2.3.2 documentation (ecogenomics.github.io)
安装完成后可以使用下面命令检查安装是否正确
#激活环境
conda activate GTDB-TK2.1.1#执行检查命令
gtdbtk check_install
2、命令介绍
Create a multiple sequence alignment based on the AR53/BAC120 marker set.
gtdbtk align --identify_dir identify_output/ --out_dir align_output --cpus 3Determine taxonomic classification of genomes.
#这个就是分类了,就是物种注释
gtdbtk classify --align_dir align_3lines/ --batchfile 3lines_batchfile.tsv --out_dir 3classify_ani --mash_db mash_db_dir/ --cpus 20
The classify workflow consists of four steps: ani_screen, identify, align, and classify.
gtdbtk classify_wf --genome_dir genomes/ --out_dir classify_wf_out --cpus 3The convert_to_itol command will remove internal labels from Newick tree, making it suitable for visualization in iTOL
gtdbtk convert_to_itol --input some_tree.tree --output itol.treeThis workflow consists of five steps: identify, align, infer, root, and decorate.
gtdbtk de_novo_wf --genome_dir genomes/ --outgroup_taxon p__Undinarchaeota --archaea --out_dir de_novo_wf --cpus 3gtdbtk de_novo_wf --genome_dir genomes/ --outgroup_taxon p__Chloroflexota --bacteria  --taxa_filter p__Firmicutes --out_dir de_novo_output#Skip GTDB reference genomes ( requires --custom_taxonomy_file for outgrouping)
gtdbtk de_novo_wf --genome_dir genomes/ --outgroup_taxon p__Customphylum --bacteria --custom_taxonomy_file custom_taxonomy.tsv --out_dir de_novo_output#Use a subset of GTDB reference genomes (p__Firmicutes) and outgroup on a custom Phylum (p__Customphylum)
gtdbtk de_novo_wf --genome_dir genomes/ --taxa_filter p__Firmicutes --outgroup_taxon p__Customphylum --bacteria --custom_taxonomy_file custom_taxonomy.tsv --out_dir de_novo_output
Decorate a tree with the GTDB-Tk taxonomy.
gtdbtk decorate --input_tree input.tree --output_tree output.treeThe export_msa will export the untrimmed archaeal or bacterial MSA used in the reference data.
gtdbtk export_msa --domain arc --output /tmp/msa.faaIdentify marker genes in genome(s). The following heuristic is used to establish the translation table used by Prodigal: use table 11 unless the coding density using table 4 is 5% higher than when using table 11 and the coding density under table 4 is >70%. Distinguishing between tables 4 and 25 is challenging so GTDB-Tk does not attempt to distinguish between these two tables. If you know the correct translation table for your genomes this can be provided to GTDB-Tk in the –batchfile.
gtdbtk identify --genome_dir genomes/ --out_dir identify_output --cpus 3Infer tree from multiple sequence alignment.
gtdbtk infer --msa_file msa.faa --out_dir infer_outRoot a tree using an outgroup.
gtdbtk root --input_tree input.tree --outgroup_taxon p__Nanoarchaeota --output_tree output.treeThe trim_msa command will trim a MSA given a user-specified mask file, or the archaeal/bacterial mask present in the reference data.
gtdbtk trim_msa --untrimmed_msa msa.faa --output msa_trim.faa --mask_file mask.txt###输入输出文件格式:
#### msa.faa
>genome_a
AKLAK#### mask.txt
01011#### msa_trim.faa
>genome_a
KAK
3、GTDBTK工具输出文件内容格式介绍
大家随时可参考这里查看输入输出文件格式,每类文件都有一个示例
Files — GTDB-Tk 2.3.2 documentation (ecogenomics.github.io)![]() https://ecogenomics.github.io/GTDBTk/files/index.html
https://ecogenomics.github.io/GTDBTk/files/index.html
The following files are output by GTDB-Tk throughout various stages of the pipeline:
- ani_closest.tsv
- ani_summary.tsv
- classification_pplacer.tsv
- classify.tree
- fasttree.log
- filtered.tsv
- gtdbtk.log
- gtdbtk.warnings.log
- gtdbtk_ref_sketch.msh
- marker_info.tsv
- markers_summary.tsv
- mash_distances.msh
- msa.fasta
- pfam.tsv
- pfam_tophit.tsv
- pplacer.<domain>.json
- pplacer.<domain>.out
- prodigal_translation_table.tsv
- protein.faa
- protein.fna
- protein.gff
- red_dictionary.tsv
- summary.tsv
- test_execution.log
- tigrfam.out
- tigrfam.tsv
- tigrfam_tophit.tsv
- translation_table_summary.tsv
- tree.log
- unrooted.tree
- user_msa.fasta
- user_query_sketch.msh
- tree.mapping.tsv
- gtdbtk.json
- failed.genomes.tsv
4、分析流程示例
下面的示例是使用classify_wf进行物种分类,基于jupyter notebook的示例,需要安装配置jupyter,当然大家可以使用命令执行也是一样效果。
This jupyter notebook demonstrates how to run the classify_wf command on a set of test genomes.
For a full list of commands see: * gtdbtk -h, or * GTDB-Tk commands
Step 1: 数据获取Obtaining data
This example will use the following two genomes that we will refer to as: * Genome A: GCF_003947435.1 [GTDB / NCBI] * Genome B: GCA_002011125.1 [GTDB / NCBI]
[5]:
# Create the directory.
!mkdir -p /tmp/gtdbtk && cd /tmp/gtdbtk# Obtain the genomes.
!mkdir -p /tmp/gtdbtk/genomes
!wget -q https://ftp.ncbi.nlm.nih.gov/genomes/all/GCF/003/947/435/GCF_003947435.1_ASM394743v1/GCF_003947435.1_ASM394743v1_genomic.fna.gz -O /tmp/gtdbtk/genomes/genome_a.fna.gz
!wget -q https://ftp.ncbi.nlm.nih.gov/genomes/all/GCA/002/011/125/GCA_002011125.1_ASM201112v1/GCA_002011125.1_ASM201112v1_genomic.fna.gz -O /tmp/gtdbtk/genomes/genome_b.fna.gz
Step 2: 基因识别Gene calling (identify)
Note that the workflow can be run as a single command classify_wf, however, each step will be run individually in this notebook. It can sometimes be useful to run the steps individually when processing large pipelines.
[ ]:
!ls -l /tmp/gtdbtk/genomes
[2]:
!gtdbtk identify --genome_dir /tmp/gtdbtk/genomes --out_dir /tmp/gtdbtk/identify --extension gz --cpus 2
[2022-04-11 11:48:59] INFO: GTDB-Tk v2.0.0
[2022-04-11 11:48:59] INFO: gtdbtk identify --genome_dir /tmp/gtdbtk/genomes --out_dir /tmp/gtdbtk/identify --extension gz --cpus 2
[2022-04-11 11:48:59] INFO: Using GTDB-Tk reference data version r207: /srv/db/gtdbtk/official/release207
[2022-04-11 11:48:59] INFO: Identifying markers in 2 genomes with 2 threads.
[2022-04-11 11:48:59] TASK: Running Prodigal V2.6.3 to identify genes.
[2022-04-11 11:49:10] INFO: Completed 2 genomes in 10.94 seconds (5.47 seconds/genome).
[2022-04-11 11:49:10] TASK: Identifying TIGRFAM protein families.
[2022-04-11 11:49:16] INFO: Completed 2 genomes in 5.78 seconds (2.89 seconds/genome).
[2022-04-11 11:49:16] TASK: Identifying Pfam protein families.
[2022-04-11 11:49:16] INFO: Completed 2 genomes in 0.42 seconds (4.81 genomes/second).
[2022-04-11 11:49:16] INFO: Annotations done using HMMER 3.1b2 (February 2015).
[2022-04-11 11:49:16] TASK: Summarising identified marker genes.
[2022-04-11 11:49:16] INFO: Completed 2 genomes in 0.05 seconds (40.91 genomes/second).
[2022-04-11 11:49:16] INFO: Done.
Results
The called genes and marker information can be found under each genomes respeective intermediate files directory, as shown below.
[4]:
!ls /tmp/gtdbtk/identify/identify/intermediate_results/marker_genes/genome_a.fna/
genome_a.fna_pfam_tophit.tsv         genome_a.fna_protein.gff.sha256
genome_a.fna_pfam_tophit.tsv.sha256  genome_a.fna_tigrfam.out
genome_a.fna_pfam.tsv                genome_a.fna_tigrfam.out.sha256
genome_a.fna_pfam.tsv.sha256         genome_a.fna_tigrfam_tophit.tsv
genome_a.fna_protein.faa             genome_a.fna_tigrfam_tophit.tsv.sha256
genome_a.fna_protein.faa.sha256      genome_a.fna_tigrfam.tsv
genome_a.fna_protein.fna             genome_a.fna_tigrfam.tsv.sha256
genome_a.fna_protein.fna.sha256      prodigal_translation_table.tsv
genome_a.fna_protein.gff             prodigal_translation_table.tsv.sha256
However, it is sometimes more useful to just read the summary files which detail markers identified from either the archaeal 53, or bacterial 120 marker set.
[5]:
!cat /tmp/gtdbtk/identify/identify/gtdbtk.ar53.markers_summary.tsv
name    number_unique_genes     number_multiple_genes   number_multiple_unique_genes    number_missing_genes    list_unique_genes       list_multiple_genes     list_multiple_unique_genes      list_missing_genes
genome_a.fna    44      0       0       9       PF00410.20,PF00466.21,PF00687.22,PF00827.18,PF00900.21,PF01000.27,PF01015.19,PF01090.20,PF01200.19,PF01280.21,PF04919.13,PF07541.13,TIGR00037,TIGR00111,TIGR00134,TIGR00279,TIGR00291,TIGR00323,TIGR00335,TIGR00405,TIGR00448,TIGR00483,TIGR00491,TIGR00967,TIGR00982,TIGR01008,TIGR01012,TIGR01018,TIGR01020,TIGR01028,TIGR01046,TIGR01052,TIGR01213,TIGR01952,TIGR02236,TIGR02390,TIGR03626,TIGR03627,TIGR03628,TIGR03671,TIGR03672,TIGR03674,TIGR03676,TIGR03680                     TIGR00064,TIGR00373,TIGR00522,TIGR01171,TIGR02338,TIGR02389,TIGR03629,TIGR03670,TIGR03673
genome_b.fna    50      0       0       3       PF00410.20,PF00466.21,PF00687.22,PF00827.18,PF00900.21,PF01000.27,PF01015.19,PF01090.20,PF01200.19,PF01280.21,PF04919.13,PF07541.13,TIGR00037,TIGR00064,TIGR00111,TIGR00134,TIGR00279,TIGR00291,TIGR00323,TIGR00335,TIGR00373,TIGR00405,TIGR00448,TIGR00483,TIGR00491,TIGR00522,TIGR00967,TIGR00982,TIGR01008,TIGR01012,TIGR01018,TIGR01020,TIGR01028,TIGR01046,TIGR01052,TIGR01952,TIGR02236,TIGR02338,TIGR02389,TIGR02390,TIGR03626,TIGR03628,TIGR03629,TIGR03670,TIGR03671,TIGR03672,TIGR03673,TIGR03674,TIGR03676,TIGR03680                 TIGR01171,TIGR01213,TIGR03627
Step 3: 基因比对Aligning genomes (align)
The align step will align all identified markers, determine the most likely domain and output a concatenated MSA.
[7]:
!gtdbtk align --identify_dir /tmp/gtdbtk/identify --out_dir /tmp/gtdbtk/align --cpus 2
[2022-04-11 11:59:14] INFO: GTDB-Tk v2.0.0
[2022-04-11 11:59:14] INFO: gtdbtk align --identify_dir /tmp/gtdbtk/identify --out_dir /tmp/gtdbtk/align --cpus 2
[2022-04-11 11:59:14] INFO: Using GTDB-Tk reference data version r207: /srv/db/gtdbtk/official/release207
[2022-04-11 11:59:15] INFO: Aligning markers in 2 genomes with 2 CPUs.
[2022-04-11 11:59:16] INFO: Processing 2 genomes identified as archaeal.
[2022-04-11 11:59:16] INFO: Read concatenated alignment for 3,412 GTDB genomes.
[2022-04-11 11:59:16] TASK: Generating concatenated alignment for each marker.
[2022-04-11 11:59:16] INFO: Completed 2 genomes in 0.01 seconds (139.73 genomes/second).
[2022-04-11 11:59:16] TASK: Aligning 52 identified markers using hmmalign 3.1b2 (February 2015).
[2022-04-11 11:59:17] INFO: Completed 52 markers in 0.86 seconds (60.66 markers/second).
[2022-04-11 11:59:17] TASK: Masking columns of archaeal multiple sequence alignment using canonical mask.
[2022-04-11 11:59:21] INFO: Completed 3,414 sequences in 4.19 seconds (815.22 sequences/second).
[2022-04-11 11:59:21] INFO: Masked archaeal alignment from 13,540 to 10,153 AAs.
[2022-04-11 11:59:21] INFO: 0 archaeal user genomes have amino acids in <10.0% of columns in filtered MSA.
[2022-04-11 11:59:21] INFO: Creating concatenated alignment for 3,414 archaeal GTDB and user genomes.
[2022-04-11 11:59:23] INFO: Creating concatenated alignment for 2 archaeal user genomes.
[2022-04-11 11:59:23] INFO: Done.
Results
It is important to pay attention to the output, if a genome had a low number of markers identified it will be excluded from the analysis at this step. A warning will appear if that is the case.
Depending on the domain, a prefixed file of either ar53 or bac120 will appear containing the MSA of the user genomes and the GTDB genomes, or just the user genomes (gtdbtk.ar53.msa.fasta.gz and gtdbtk.ar53.user_msa.fasta.gz respectively.)
[8]:
!ls /tmp/gtdbtk/align/align/
gtdbtk.ar53.filtered.tsv  gtdbtk.ar53.user_msa.fasta.gz
gtdbtk.ar53.msa.fasta.gz  intermediate_results
Step 4: 基因组分类Classifying genomes (classify)
The classify step will place the genomes into a reference tree, then determine their most likely classification.
[9]:
!gtdbtk classify --genome_dir /tmp/gtdbtk/genomes --align_dir /tmp/gtdbtk/align --out_dir /tmp/gtdbtk/classify -x gz --cpus 2
[2022-04-11 12:02:06] INFO: GTDB-Tk v2.0.0
[2022-04-11 12:02:06] INFO: gtdbtk classify --genome_dir /tmp/gtdbtk/genomes --align_dir /tmp/gtdbtk/align --out_dir /tmp/gtdbtk/classify -x gz --cpus 2
[2022-04-11 12:02:06] INFO: Using GTDB-Tk reference data version r207: /srv/db/gtdbtk/official/release207
[2022-04-11 12:02:07] TASK: Placing 2 archaeal genomes into reference tree with pplacer using 2 CPUs (be patient).
[2022-04-11 12:02:07] INFO: pplacer version: v1.1.alpha19-0-g807f6f3[2022-04-11 12:07:06] INFO: Calculating RED values based on reference tree.
[2022-04-11 12:07:06] TASK: Traversing tree to determine classification method.
[2022-04-11 12:07:06] INFO: Completed 2 genomes in 0.00 seconds (18,558.87 genomes/second).
[2022-04-11 12:07:06] TASK: Calculating average nucleotide identity using FastANI (v1.32).
[2022-04-11 12:07:08] INFO: Completed 4 comparisons in 1.61 seconds (2.49 comparisons/second).
[2022-04-11 12:07:08] INFO: 2 genome(s) have been classified using FastANI and pplacer.
[2022-04-11 12:07:08] INFO: Note that Tk classification mode is insufficient for publication of new taxonomic designations. New designations should be based on one or more de novo trees, an example of which can be produced by Tk in de novo mode.
[2022-04-11 12:07:08] INFO: Done.
Results
The two main files output are the summary files (gtdbtk.ar53.summary.tsv, and gtdbtk.bac120.summary.tsv respectively). Classification of the genomes are present in the summary file.
[10]:
!ls /tmp/gtdbtk/classify
classify gtdbtk.ar53.summary.tsv gtdbtk.log gtdbtk.warnings.log
这篇关于GTDB-Tk v2: memory friendly classification with the Genome Taxonomy Database, 物种注释和进化树构建工具使用及介绍的文章就介绍到这儿,希望我们推荐的文章对编程师们有所帮助!


