本文主要是介绍实验室小车跑开源LIO_SAM激光SLAM算法流程(IMU,雷达等串口配置),希望对大家解决编程问题提供一定的参考价值,需要的开发者们随着小编来一起学习吧!
目录
1. IMU设置
2.雷达设置
3.修改配置
4.启动4个launch文件
imu节点
LIDAR节点
LIDAR数据转换节点
LIO_SAM节点
5.最终建图效果
6.推测漂移的原因
7.相关报错
一.imu_tk标定时出现的错误(一大堆错误,类似语法问题)
1. IMU设置
开源标定包标定imu,标定结果修改配置文件
ros读imu数据_好人cc的博客-CSDN博客_ros如何读取imu数据
2.雷达设置
rs雷达串口绑定,开启节点后收发数据正常即可
rs-lidar-16电脑运行过程_好人cc的博客-CSDN博客
3.修改配置
雷达转换,相关配置文件修改
lio_sam:# TopicspointCloudTopic: "velodyne_points"               # Point cloud dataimuTopic: "imu/data_open"                         # IMU dataodomTopic: "odometry/imu"                   # IMU pre-preintegration odometry, same frequency as IMU
# gpsTopic: "odometry/gpsz"                   # GPS odometry topic from navsat, see module_navsat.launch file# gpsTopic: "imu/nav"                #   imu/nav# FrameslidarFrame: "base_link"baselinkFrame: "base_link"odometryFrame: "odom"mapFrame: "map"# GPS SettingsuseImuHeadingInitialization: false          # if using GPS data, set to "true"useGpsElevation: false                      # if GPS elevation is bad, set to "false"gpsCovThreshold: 2.0                        # m^2, threshold for using GPS dataposeCovThreshold: 25.0                      # m^2, threshold for using GPS data# Export settingssavePCD: false                              # https://github.com/TixiaoShan/LIO-SAM/issues/3savePCDDirectory: "/home/zhaopujun/catkin_ws"        # in your home folder, starts and ends with "/". Warning: the code deletes "LOAM" folder then recreates it. See "mapOptimization" for implementation# Sensor Settingssensor: velodyne                            # lidar sensor type, 'velodyne' or 'ouster' or 'livox'N_SCAN: 16                                  # number of lidar channel (i.e., Velodyne/Ouster: 16, 32, 64, 128, Livox Horizon: 6)Horizon_SCAN: 1800                          # lidar horizontal resolution (Velodyne:1800, Ouster:512,1024,2048, Livox Horizon: 4000)downsampleRate: 1                           # default: 1. Downsample your data if too many points. i.e., 16 = 64 / 4, 16 = 16 / 1lidarMinRange: 1.0                          # default: 1.0, minimum lidar range to be usedlidarMaxRange: 1000.0                       # default: 1000.0, maximum lidar range to be used# IMU Settings#imuAccNoise: 1.0151327754116719e-02
# imuGyrNoise: 4.9553027388650394e-03
#imuAccBiasN: 7.4655794718659740e-04
#imuGyrBiasN: 6.3727249626266877e-05
#imuGravity: 9.8035
# imuRPYWeight: 0.01imuAccNoise: 7.5236637366758383e-03imuGyrNoise: 1.4514722960755217e-04imuAccBiasN: 1.9784527286040426e-04imuGyrBiasN: 8.7450530768693497e-07imuGravity: 9.8035imuRPYWeight: 0.01# Extrinsics: T_lb (lidar -> IMU) #############imu-----IMUextrinsicTrans: [0.0, 0.0, 0.0]  #[-0.025, -0.07, -0.245]extrinsicRot: [0.974229, 0.225117,-0.0141541,     ###################################重新弄-0.225, 0.974313, 0.00939782,0.0159061, -0.00597096, 0.999856]
###################################    lidar imu联合标定后的结果
###################################    [0.329847, 0.186982, -0.925332,    ###################################   -0.242434, -0.930538, -0.274452,###################################   -0.912374, 0.314859, -0.261604]extrinsicRPY: [0.974229, 0.225117,-0.0141541,     ###################################重新弄-0.225, 0.974313, 0.00939782,0.0159061, -0.00597096, 0.999856]
#  extrinsicRot: [1, 0, 0,
#                 0, 1, 0,
#                 0, 0, 1]
#  extrinsicRPY: [1, 0, 0,
#                 0, 1, 0,
#                 0, 0, 1]# LOAM feature thresholdedgeThreshold: 1.0surfThreshold: 0.1edgeFeatureMinValidNum: 10surfFeatureMinValidNum: 100# voxel filter papramsodometrySurfLeafSize: 0.2                     # default: 0.4 - outdoor, 0.2 - indoormappingCornerLeafSize: 0.1                    # default: 0.2 - outdoor, 0.1 - indoormappingSurfLeafSize: 0.2                      # default: 0.4 - outdoor, 0.2 - indoor# robot motion constraint (in case you are using a 2D robot)z_tollerance: 1000                            # metersrotation_tollerance: 1000                     # radians# CPU ParamsnumberOfCores: 4                              # number of cores for mapping optimizationmappingProcessInterval: 0.15                  # seconds, regulate mapping frequency# Surrounding mapsurroundingkeyframeAddingDistThreshold: 1.0   # meters, regulate keyframe adding thresholdsurroundingkeyframeAddingAngleThreshold: 0.2  # radians, regulate keyframe adding thresholdsurroundingKeyframeDensity: 2.0               # meters, downsample surrounding keyframe poses   surroundingKeyframeSearchRadius: 50.0         # meters, within n meters scan-to-map optimization (when loop closure disabled)# Loop closureloopClosureEnableFlag: trueloopClosureFrequency: 1.0                     # Hz, regulate loop closure constraint add frequencysurroundingKeyframeSize: 50                   # submap size (when loop closure enabled)historyKeyframeSearchRadius: 15.0             # meters, key frame that is within n meters from current pose will be considerd for loop closurehistoryKeyframeSearchTimeDiff: 30.0           # seconds, key frame that is n seconds older will be considered for loop closurehistoryKeyframeSearchNum: 25                  # number of hostory key frames will be fused into a submap for loop closurehistoryKeyframeFitnessScore: 0.3              # icp threshold, the smaller the better alignment# VisualizationglobalMapVisualizationSearchRadius: 1000.0    # meters, global map visualization radiusglobalMapVisualizationPoseDensity: 10.0       # meters, global map visualization keyframe densityglobalMapVisualizationLeafSize: 1.0           # meters, global map visualization cloud density# Navsat (convert GPS coordinates to Cartesian)
navsat:frequency: 50wait_for_datum: falsedelay: 0.0magnetic_declination_radians: 0yaw_offset: 0zero_altitude: truebroadcast_utm_transform: falsebroadcast_utm_transform_as_parent_frame: falsepublish_filtered_gps: false# EKF for Navsat
ekf_gps:publish_tf: falsemap_frame: mapodom_frame: odombase_link_frame: base_linkworld_frame: odomfrequency: 50two_d_mode: falsesensor_timeout: 0.01# -------------------------------------# External IMU:# -------------------------------------imu0: imu_correct# make sure the input is aligned with ROS REP105. "imu_correct" is manually transformed by myself. EKF can also transform the data using tf between your imu and base_linkimu0_config: [false, false, false,true,  true,  true,false, false, false,false, false, true,true,  true,  true]imu0_differential: falseimu0_queue_size: 50 imu0_remove_gravitational_acceleration: true# -------------------------------------# Odometry (From Navsat):# -------------------------------------odom0: odometry/gpsodom0_config: [true,  true,  true,false, false, false,false, false, false,false, false, false,false, false, false]odom0_differential: falseodom0_queue_size: 10#                            x     y     z     r     p     y   x_dot  y_dot  z_dot  r_dot p_dot y_dot x_ddot y_ddot z_ddotprocess_noise_covariance: [  1.0,  0,    0,    0,    0,    0,    0,     0,     0,     0,    0,    0,    0,    0,      0,0,    1.0,  0,    0,    0,    0,    0,     0,     0,     0,    0,    0,    0,    0,      0,0,    0,    10.0, 0,    0,    0,    0,     0,     0,     0,    0,    0,    0,    0,      0,0,    0,    0,    0.03, 0,    0,    0,     0,     0,     0,    0,    0,    0,    0,      0,0,    0,    0,    0,    0.03, 0,    0,     0,     0,     0,    0,    0,    0,    0,      0,0,    0,    0,    0,    0,    0.1,  0,     0,     0,     0,    0,    0,    0,    0,      0,0,    0,    0,    0,    0,    0,    0.25,  0,     0,     0,    0,    0,    0,    0,      0,0,    0,    0,    0,    0,    0,    0,     0.25,  0,     0,    0,    0,    0,    0,      0,0,    0,    0,    0,    0,    0,    0,     0,     0.04,  0,    0,    0,    0,    0,      0,0,    0,    0,    0,    0,    0,    0,     0,     0,     0.01, 0,    0,    0,    0,      0,0,    0,    0,    0,    0,    0,    0,     0,     0,     0,    0.01, 0,    0,    0,      0,0,    0,    0,    0,    0,    0,    0,     0,     0,     0,    0,    0.5,  0,    0,      0,0,    0,    0,    0,    0,    0,    0,     0,     0,     0,    0,    0,    0.01, 0,      0,0,    0,    0,    0,    0,    0,    0,     0,     0,     0,    0,    0,    0,    0.01,   0,0,    0,    0,    0,    0,    0,    0,     0,     0,     0,    0,    0,    0,    0,      0.015]
用rs_lidar雷达跑lio_sam_好人cc的博客-CSDN博客
4.启动4个launch文件
imu节点
roslaunch openzen_sensor openzen_lpms_ig1.launch
LIDAR节点
roslaunch rslidar_sdk start.launch
LIDAR数据转换节点
roslaunch rs_to_velodyne rs2v.launch
LIO_SAM节点
roslaunch lio_sam run.launch
5.最终建图效果
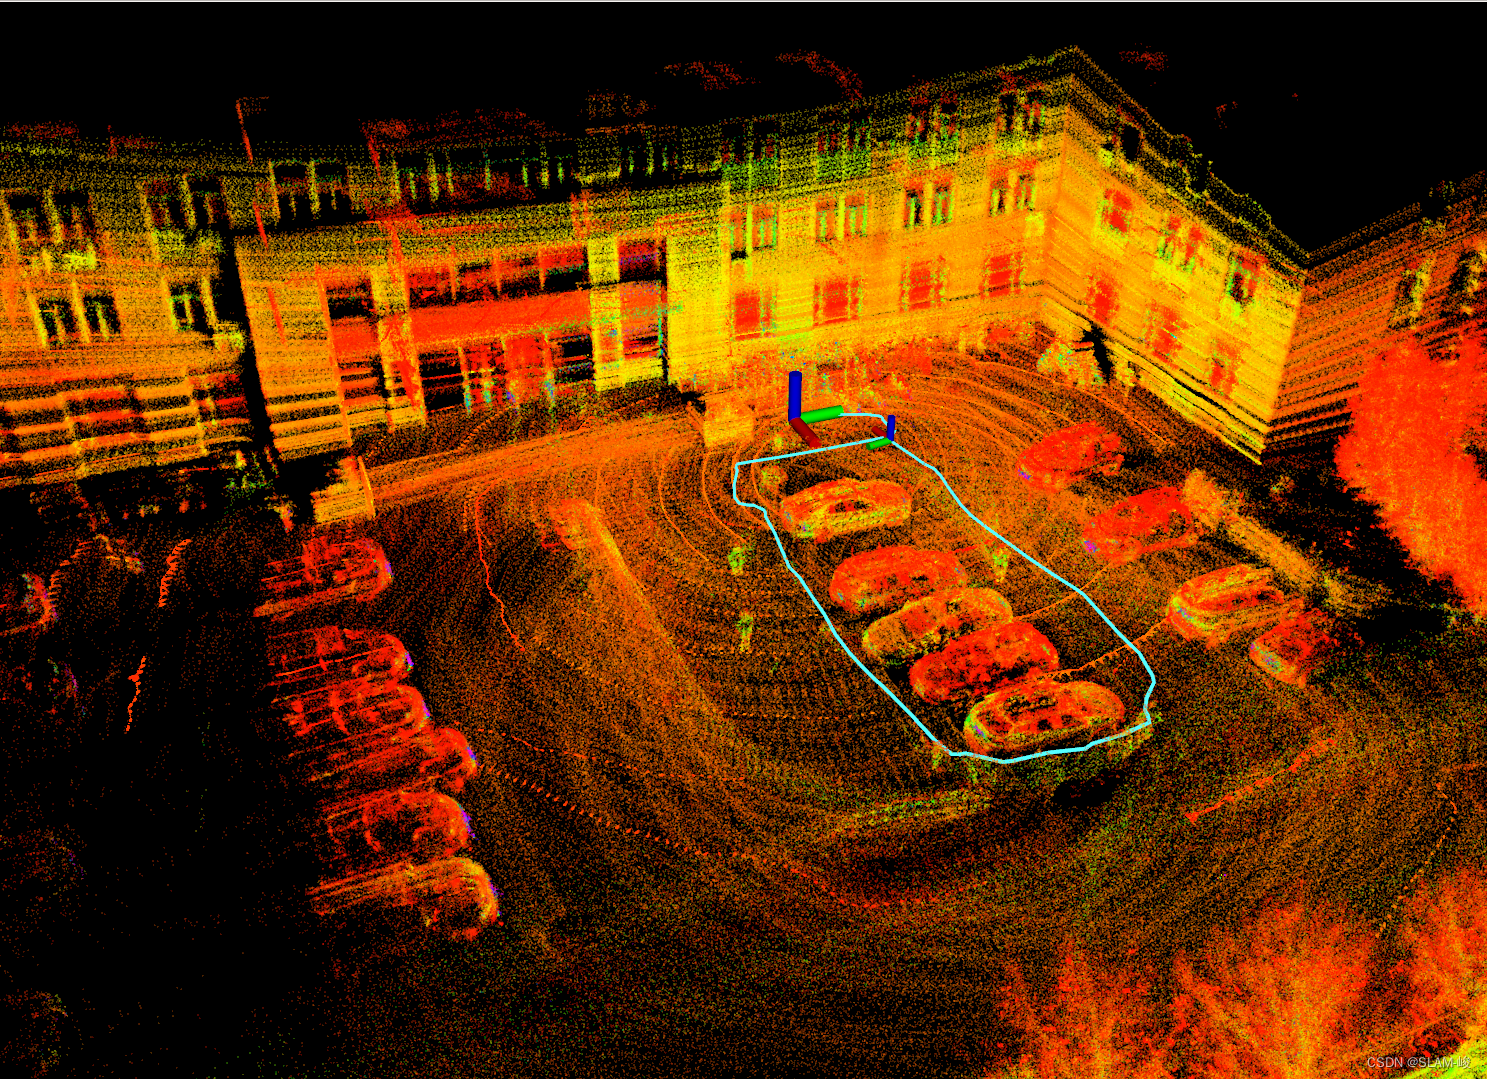
最终建图还是会产生漂移
6.推测漂移的原因:
1.imu标定误差较大
2.GPS未使用,无法校正累计漂移
3.特征点较少的场景会出现退化导致漂移
相关报错:
一.imu_tk标定时出现的错误(一大堆错误,类似语法问题)
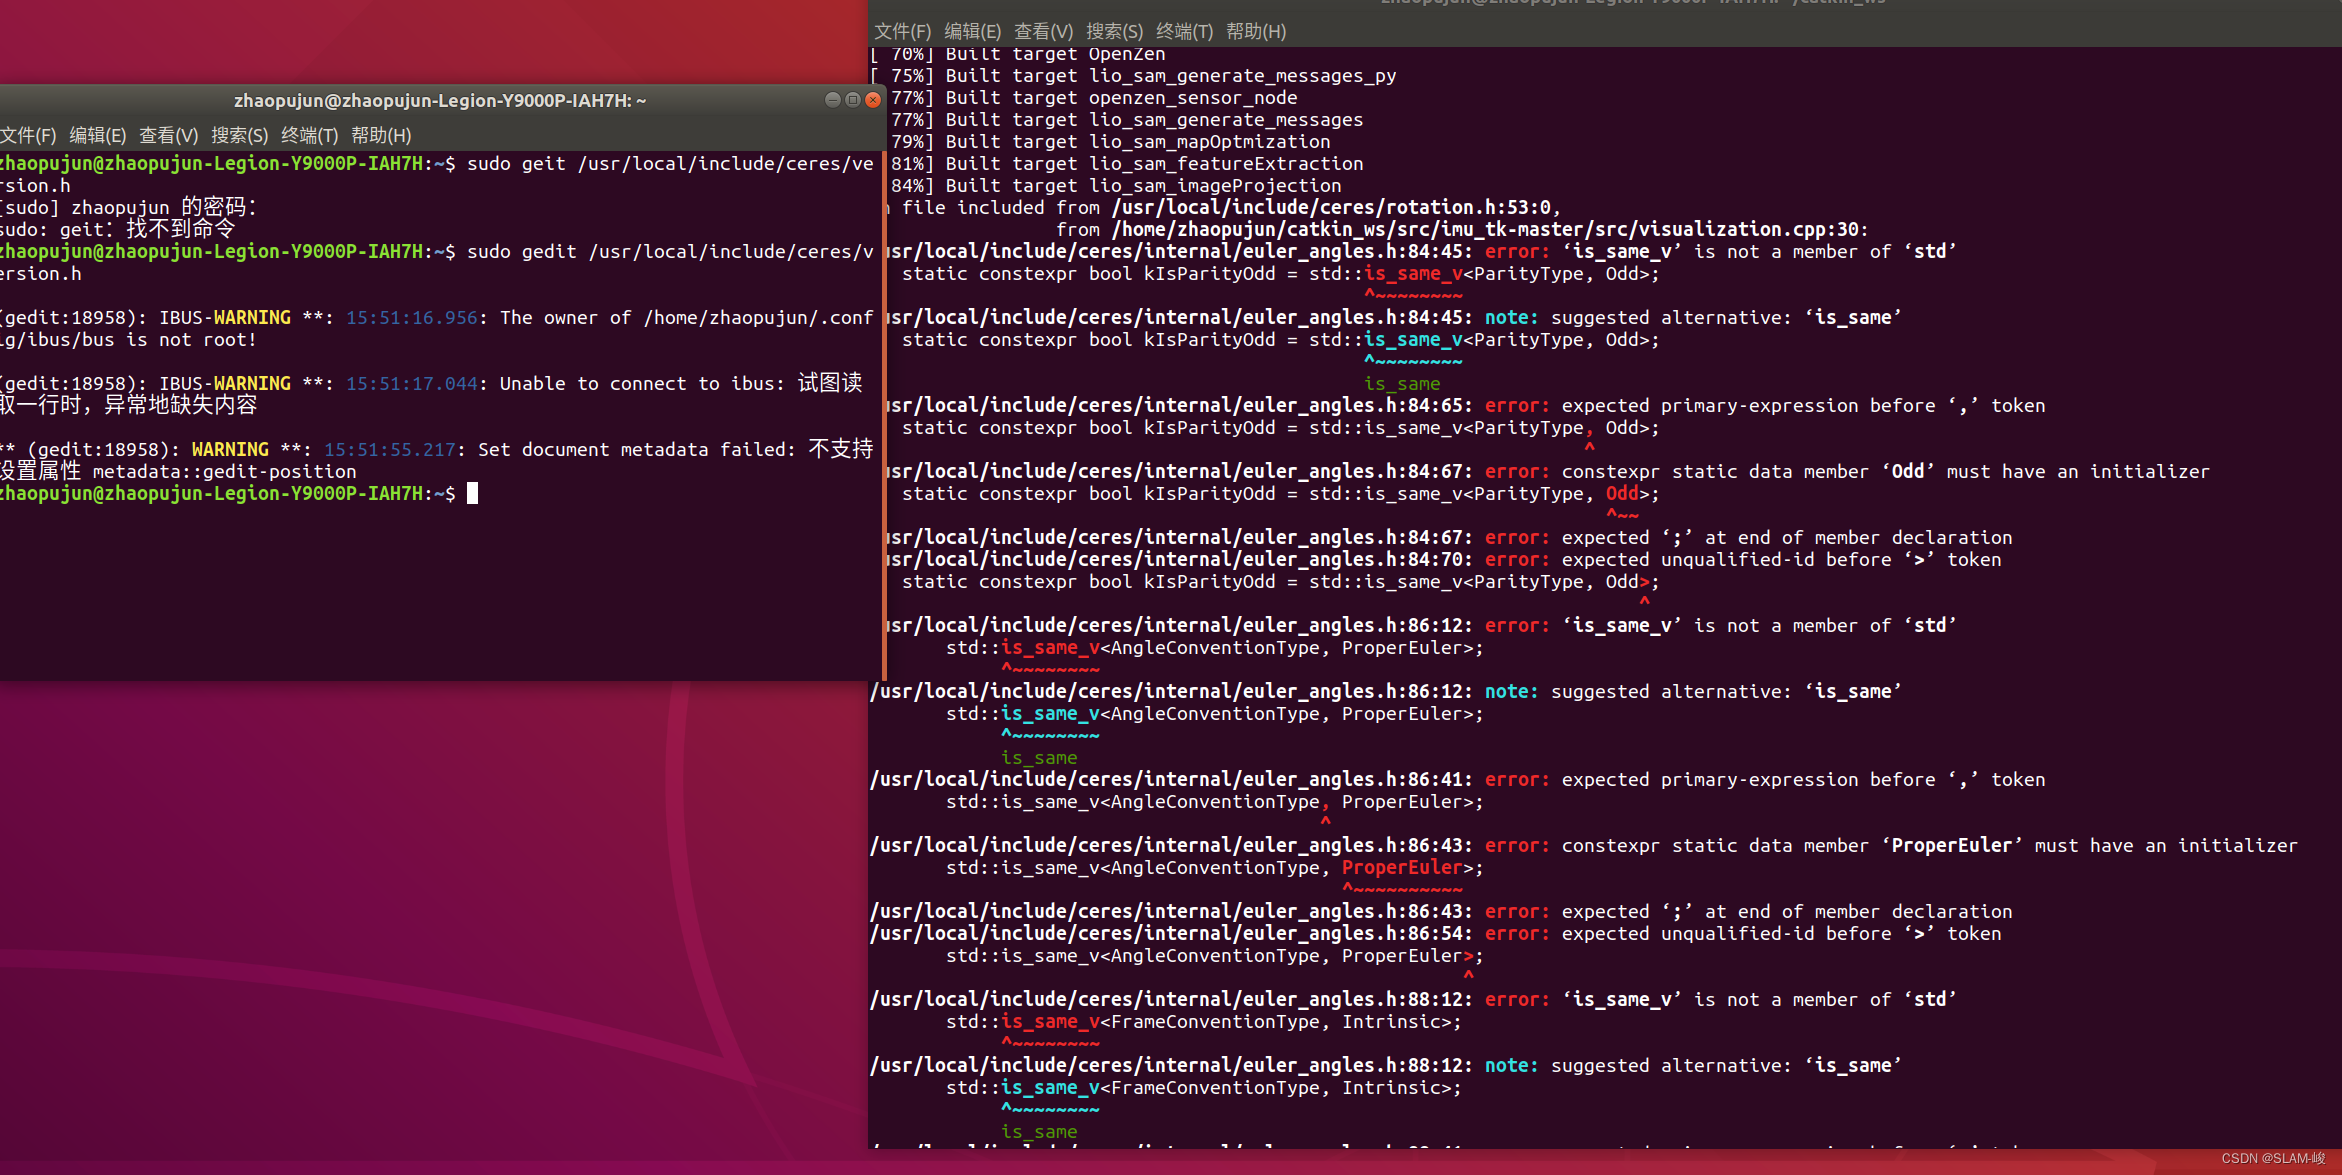
原因:ceres_slover的版本过高
解决:
1 删除ceres库,头文件和lib中
sudo rm -rf /usr/local/include/ceres
sudo rm -rf /usr/local/lib/libceres.a
2 安装较低版本库1.14.0
参考:反复踩坑的ceres安装-----ubuntu18.04_小猫咪朴素的生存智慧的博客-CSDN博客_ceres ubuntu
Ubuntu18.04安装Ceres,图文详解_振华OPPO的博客-CSDN博客_ceres安装
3 安装后还有其他问题 /usr/bin/ld: 找不到 -l.......
参考:
ubuntu Make时,“/usr/bin/ld: 找不到 -lXXX”问题的解决方法_highoooo的博客-CSDN博客_/usr/bin/ld
这篇关于实验室小车跑开源LIO_SAM激光SLAM算法流程(IMU,雷达等串口配置)的文章就介绍到这儿,希望我们推荐的文章对编程师们有所帮助!


