本文主要是介绍Ubuntu20.04配置Kinect 2.0驱动安装和ROS环境下配置以及录制bag包和制作ORB-SLAM数据集,希望对大家解决编程问题提供一定的参考价值,需要的开发者们随着小编来一起学习吧!
1. 安装libfreenect2
1.1 下载官方文件
git clone https://github.com/OpenKinect/libfreenect2.git
cd libfreenect2
1.2 安装build工具
sudo apt-get install build-essential cmake pkg-config
1.3 安装libusb
sudo apt-get install libusb-1.0-0-dev
1.4 安装urboJPEG
sudo apt-get install libturbojpeg0-dev
1.5 安装OpenGL
sudo apt-get install libglfw3-dev
1.6 安装OpenCL
sudo apt-get install beignet-dev
1.7 安装OpenNI
sudo apt-get install libopenni2-dev
1.8 进入libfreenect2 文件夹,编译安装
cd libfreenect2
mkdir build && cd build
cmake .. -DENABLE_CXX11=ON -DCMAKE_INSTALL_PREFIX=$HOME/freenect2
make
make install
注:在对libfreenect2进行make时报错:
fatal error: helper_math.h: No such file or directory
错误原因:
11.6版本之前的CUDA安装时会附带安装CUDA Samples,helper_math.h文件在/xxxx/NVIDIA_CUDA-10.1_Samples/common/inc/helper_math.h位置;11.6版本之后不再附带Samples,从而找不到该文件。
解决方法:
手动下载Samples
1.1. 从github下载Samples库,选择与那cuda同版本的sample库
https://github.com/NVIDIA/cuda-samples
1.2. 在cmake之前添加相应路径到CPATH
cd <sample_dir>
make
1.3 将help_math.h复制到那报错的路径下
cp /home/kunyuwan/cuda-samples/Common/helper_math.h [Where the error occurs]
1.9 设定udev rules
sudo cp /home/kunyuwan/libfreenect2/platform/linux/udev/90-kinect2.rules /etc/udev/rules.d/
1.10 测试
./bin/Protonect
不出意外,看到以下界面
2. 配置ROS环境
2.1 下载iai_kinect2包并安装
cd ~/catkin_ws/src/
git clone https://github.com/code-iai/iai_kinect2.git
cd iai_kinect2
rosdep install -r --from-paths .
cd ~/catkin_ws
catkin_make -DCMAKE_BUILD_TYPE="Release"
2.2 相机上电,测试
打开一个新的终端测试话题订阅
cd ~/catkin_ws
source devel/setup.bash
roslaunch kinect2_bridge kinect2_bridge.launch
打开一个新的终端查看实时画面。
rqt
输入rostopic list可以查看订阅的对应话题
此时再打开一个新的终端,运行以下命令:
cd ~/catkin_ws
source devel/setup.bash
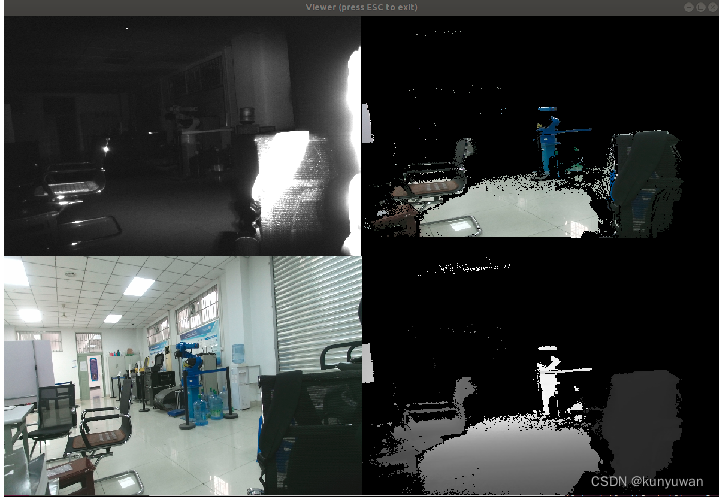
rosrun kinect2_viewer kinect2_viewer kinect2 sd cloud
显示点云相机窗口,则代表启动成功!!!
3 录制bag包和制作ORB-SLAM2数据集
3.1 启动roscore,并启动相机
打开两个终端,分别执行以下命令
roscore
cd ~/catkin_ws
source devel/setup.bash
roslaunch kinect2_bridge kinect2_bridge.launch
3.2 录制
在打开一个终端
rosbag record -o xxx.bag /kinect2/qhd/image_color_rect /kinect2/qhd/image_depth_rect
3.3 提取录制的rosbag包内的rgb和depth
注意修改路径和订阅的话题!!!
# coding:utf-8
#!/usr/bin/python# Extract images from a bag file.#PKG = 'beginner_tutorials'
import roslib;   #roslib.load_manifest(PKG)
import rosbag
import rospy
import cv2
from sensor_msgs.msg import Image
from cv_bridge import CvBridge
from cv_bridge import CvBridgeError# Reading bag filename from command line or roslaunch parameter.
#import os
#import sysrgb_path = '/home/kunyuwan/test_kinectv2_3/rgb/'    # 已经建立好的存储rgb彩色图文件的目录(最好改成绝对路径)
depth_path= '/home/kunyuwan/test_kinectv2_3/depth/' # 已经建立好的存储深度图文件的目录(最好改成绝对路径)class ImageCreator():def __init__(self):self.bridge = CvBridge()with rosbag.Bag('/home/kunyuwan/test_kinectv2_3/4_2024-04-03-21-40-12.bag', 'r') as bag:  #要读取的bag文件(最好改成绝对路径);for topic,msg,t in bag.read_messages(): if topic == "/kinect2/qhd/image_color_rect": #图像的topic 注意不要错了;try:cv_image = self.bridge.imgmsg_to_cv2(msg,"bgr8")except CvBridgeError as e:print(e)timestr = "%.6f" %  msg.header.stamp.to_sec()#%.6f表示小数点后带有6位,可根据精确度需要修改;image_name = timestr+ ".png" #图像命名:时间戳.pngcv2.imwrite(rgb_path + image_name, cv_image)  #保存;elif topic == "/kinect2/qhd/image_depth_rect": #图像的topic;try:cv_image = self.bridge.imgmsg_to_cv2(msg,"16UC1")except CvBridgeError as e:print(e)timestr = "%.6f" %  msg.header.stamp.to_sec()#%.6f表示小数点后带有6位,可根据精确度需要修改;image_name = timestr+ ".png" #图像命名:时间戳.pngcv2.imwrite(depth_path + image_name, cv_image)  #保存;if __name__ == '__main__':#rospy.init_node(PKG)try:image_creator = ImageCreator()except rospy.ROSInterruptException:pass
3.4. 生成rgb.txt和depth.txt
#include <iostream>
#include <fmt/os.h>
#include <fmt/core.h>
#include <fmt/format.h>
#include <string>
#include <vector>
#include <algorithm>
extern "C"
{
#include <sys/types.h>
#include <sys/dir.h>
#include <dirent.h>
}
using namespace std;void getNamesToText(const char *filepath,const char *filetype)
{DIR *streamp = nullptr;dirent *dep = nullptr;string filename(filepath);auto out = fmt::output_file("./"+string(filetype));vector<string> names;streamp = opendir(filepath);errno = 0;while ((dep = readdir(streamp)) != NULL){if ((dep->d_name == ".") || (dep->d_name == "..")){continue;}names.push_back(dep->d_name);}if (errno != 0){fmt::print("error");}closedir(streamp);for (vector<string>::iterator ite = names.begin(); ite != names.end();){if ((*ite == ".") || (*ite == "..")){ite = names.erase(ite); }else{++ite;}}sort(names.begin(), names.end());for (auto &item : names){auto pos = item.find_last_of('.');string filenum;for (int i = 0; i < pos; i++){filenum += item[i];}if(strcmp(filetype,"rgb.txt")==0){out.print("{} rgb/{}\n",filenum,item);}else if(strcmp(filetype,"depth.txt")==0){out.print("{} depth/{}\n",filenum,item);}}fmt::print("{} finished\n",filetype);
}int main(int argc, char *argv[])
{if(argc<3){fmt::print("Usage: [executable] [rgb/depth path] [type]");return 0;}const char *filepath =argv[1];const char *filetype =argv[2];getNamesToText(filepath,filetype);return 0;
}
注意安装fmt
git clone  https://github.com/fmtlib/fmt.git
cd fmt
mkdir build
cd build
cmake ..
make
sudo make install
运行命令
g++ 文件名.cpp -lfmt
./a.out rgb rgb.txt # 文件夹路径和生成文件路径
./a.out depth depth.txt # 文件夹路径和生成文件路径
3.5 associate.py将rgb.txt和depth.txt进行匹配
#!/usr/bin/python
# Software License Agreement (BSD License)
#
# Copyright (c) 2013, Juergen Sturm, TUM
# All rights reserved.
#
# Redistribution and use in source and binary forms, with or without
# modification, are permitted provided that the following conditions
# are met:
#
#  * Redistributions of source code must retain the above copyright
#    notice, this list of conditions and the following disclaimer.
#  * Redistributions in binary form must reproduce the above
#    copyright notice, this list of conditions and the following
#    disclaimer in the documentation and/or other materials provided
#    with the distribution.
#  * Neither the name of TUM nor the names of its
#    contributors may be used to endorse or promote products derived
#    from this software without specific prior written permission.
#
# THIS SOFTWARE IS PROVIDED BY THE COPYRIGHT HOLDERS AND CONTRIBUTORS
# "AS IS" AND ANY EXPRESS OR IMPLIED WARRANTIES, INCLUDING, BUT NOT
# LIMITED TO, THE IMPLIED WARRANTIES OF MERCHANTABILITY AND FITNESS
# FOR A PARTICULAR PURPOSE ARE DISCLAIMED. IN NO EVENT SHALL THE
# COPYRIGHT OWNER OR CONTRIBUTORS BE LIABLE FOR ANY DIRECT, INDIRECT,
# INCIDENTAL, SPECIAL, EXEMPLARY, OR CONSEQUENTIAL DAMAGES (INCLUDING,
# BUT NOT LIMITED TO, PROCUREMENT OF SUBSTITUTE GOODS OR SERVICES;
# LOSS OF USE, DATA, OR PROFITS; OR BUSINESS INTERRUPTION) HOWEVER
# CAUSED AND ON ANY THEORY OF LIABILITY, WHETHER IN CONTRACT, STRICT
# LIABILITY, OR TORT (INCLUDING NEGLIGENCE OR OTHERWISE) ARISING IN
# ANY WAY OUT OF THE USE OF THIS SOFTWARE, EVEN IF ADVISED OF THE
# POSSIBILITY OF SUCH DAMAGE.
#
# Requirements:
# sudo apt-get install python-argparse"""
The Kinect provides the color and depth images in an un-synchronized way. This means that the set of time stamps from the color images do not intersect with those of the depth images. Therefore, we need some way of associating color images to depth images.For this purpose, you can use the ''associate.py'' script. It reads the time stamps from the rgb.txt file and the depth.txt file, and joins them by finding the best matches.
"""import argparse
import sys
import os
import numpydef read_file_list(filename):"""Reads a trajectory from a text file. File format:The file format is "stamp d1 d2 d3 ...", where stamp denotes the time stamp (to be matched)and "d1 d2 d3.." is arbitary data (e.g., a 3D position and 3D orientation) associated to this timestamp. Input:filename -- File nameOutput:dict -- dictionary of (stamp,data) tuples"""file = open(filename)data = file.read()lines = data.replace(","," ").replace("\t"," ").split("\n") list = [[v.strip() for v in line.split(" ") if v.strip()!=""] for line in lines if len(line)>0 and line[0]!="#"]list = [(float(l[0]),l[1:]) for l in list if len(l)>1]return dict(list)def associate(first_list, second_list,offset,max_difference):"""Associate two dictionaries of (stamp,data). As the time stamps never match exactly, we aim to find the closest match for every input tuple.Input:first_list -- first dictionary of (stamp,data) tuplessecond_list -- second dictionary of (stamp,data) tuplesoffset -- time offset between both dictionaries (e.g., to model the delay between the sensors)max_difference -- search radius for candidate generationOutput:matches -- list of matched tuples ((stamp1,data1),(stamp2,data2))"""first_keys = list(first_list)second_keys = list(second_list)potential_matches = [(abs(a - (b + offset)), a, b) for a in first_keys for b in second_keys if abs(a - (b + offset)) < max_difference]potential_matches.sort()matches = []for diff, a, b in potential_matches:if a in first_keys and b in second_keys:first_keys.remove(a)second_keys.remove(b)matches.append((a, b))matches.sort()return matchesif __name__ == '__main__':# parse command lineparser = argparse.ArgumentParser(description='''This script takes two data files with timestamps and associates them   ''')parser.add_argument('first_file', help='first text file (format: timestamp data)')parser.add_argument('second_file', help='second text file (format: timestamp data)')parser.add_argument('--first_only', help='only output associated lines from first file', action='store_true')parser.add_argument('--offset', help='time offset added to the timestamps of the second file (default: 0.0)',default=0.0)parser.add_argument('--max_difference', help='maximally allowed time difference for matching entries (default: 0.02)',default=0.02)args = parser.parse_args()first_list = read_file_list(args.first_file)second_list = read_file_list(args.second_file)matches = associate(first_list, second_list,float(args.offset),float(args.max_difference))    if args.first_only:for a,b in matches:print("%f %s"%(a," ".join(first_list[a])))else:for a,b in matches:print("%f %s %f %s"%(a," ".join(first_list[a]),b-float(args.offset)," ".join(second_list[b])))
运行指令
chmod 777 associate.py
./associate.py rgb.txt depth.txt > associate.txt
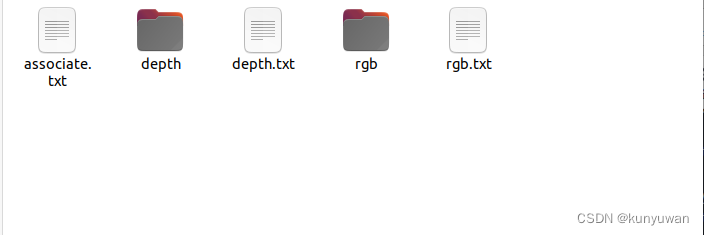
最终得到的文件夹内部的结构如图即可:
这篇关于Ubuntu20.04配置Kinect 2.0驱动安装和ROS环境下配置以及录制bag包和制作ORB-SLAM数据集的文章就介绍到这儿,希望我们推荐的文章对编程师们有所帮助!


