本文主要是介绍深度学习故障诊断实战 | 数据预处理之基于滑动窗的数据样本增强,希望对大家解决编程问题提供一定的参考价值,需要的开发者们随着小编来一起学习吧!
前言
本期给大家分享介绍如何基于滑动窗方法进行数据样本增强
背景
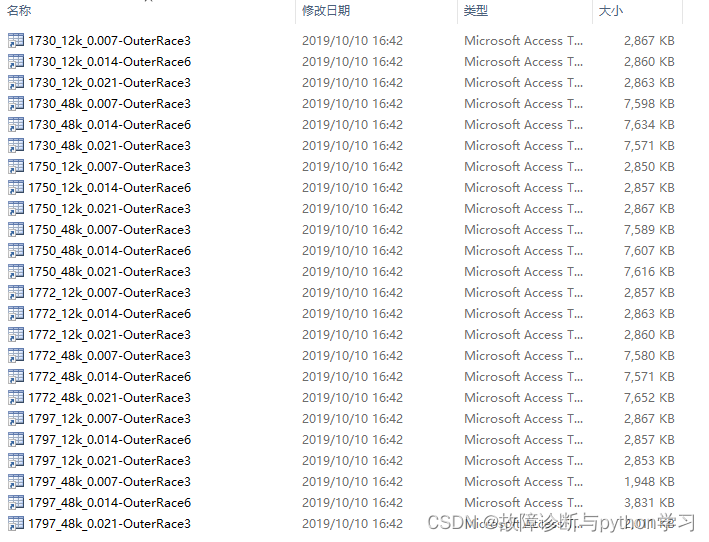
深度学习模型训练需要大量的样本。在故障诊断领域,每个类别大都会达到300个样本。但是在实际公开数据集中,以CWRU数据集为例,每个类别只有24组数据,这明显是不够的。
下图以外圈为例,只有24组数据:

因此需要想办法扩充样本。目前大多数是通过滑动窗方法来扩充样本。例如1组10s长的数据,我每隔0.1s划分1个数据,就可以得到100个子样本。
滑动窗方法介绍

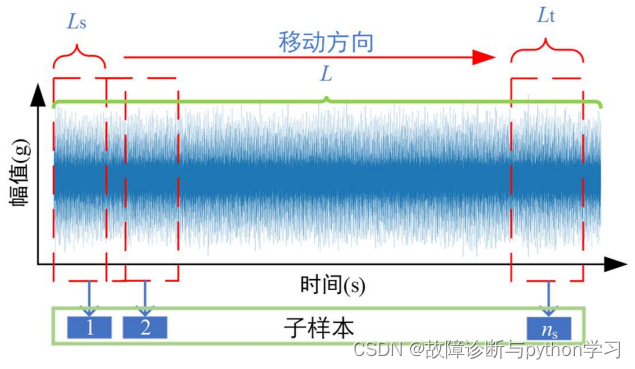
为增加样本数量,采用了基于滑动窗方法的数据增强方法。数据增强示意图如上图所示,假设一个一维原始时域信号的总样本点数为 L L L,用长度为 L t L_t Lt 的窗口框住的样本为第 1 个子样本,每生成一个子样本后,窗口向前移动 L s L_s Ls 个样本点数长度并框住第 2 个子样本,依次进行生成 n s n_s ns 个子样本。 L s L_s Ls 其计算公式如下:
L s = ⌊ L − L t n s ⌋ L_{\mathrm{s}}=\left\lfloor\frac{L-L_{\mathrm{t}}}{n_{\mathrm{s}}}\right\rfloor Ls=⌊nsL−Lt⌋
式中 ⌊ ⌋ \left\lfloor\right\rfloor ⌊⌋是向上取整符号。
窗口长度 L t L_t Lt 选择原则:至少包含1个旋转周期长度,4-5个周期为佳。
代码示例
这里以CWRU"1750_12k_0.021-OuterRace3.mat"数据为例。建议使用jupyter notebook
##========导入包========##
import os
import numpy as np
import pandas as pd
import matplotlib.pyplot as plt
from matplotlib import rcParamsconfig = {"font.family": 'serif', # 衬线字体"font.size": 14, # 相当于小四大小"font.serif": ['SimSun'], # 宋体"mathtext.fontset": 'stix', # matplotlib渲染数学字体时使用的字体,和Times New Roman差别不大'axes.unicode_minus': False # 处理负号,即-号
}
rcParams.update(config)
##========读取数据========##
def data_read(file_path):""":fun: 读取cwru mat格式数据:param file_path: .mat文件路径  eg: r'D:.../01_示例数据/1750_12k_0.021-OuterRace3.mat':return accl_data: 读取到的加速度数据"""import scipy.io as sciodata = scio.loadmat(file_path)  # 加载mat数据data_key_list = list(data.keys())  # mat文件为字典类型,将key变为list类型accl_key = data_key_list[3]  # mat文件为字典类型,其加速度列在key_list的第4个accl_data = data[accl_key].flatten()  # 获取加速度信号,并展成1维数据accl_data = (accl_data-np.mean(accl_data))/np.std(accl_data) #Z-score标准化数据集return accl_data
##========绘制时域信号图========##
def plt_time_domain(arr, fs=12000, ylabel='Amp(mg)', title='原始数据时域图', img_save_path=None, vline=None, hline=None, xlim=None):""":fun: 绘制时域图模板:param arr: 输入一维数组数据:param fs: 采样频率:param ylabel: y轴标签:param title: 图标题:return: None"""import matplotlib.pyplot as pltplt.rcParams['font.sans-serif'] = ['SimHei']  # 显示中文plt.rcParams['axes.unicode_minus'] = False  # 显示负号font = {'family': 'Times New Roman', 'size': '20', 'color': '0.5', 'weight': 'bold'}plt.figure(figsize=(12,4))length = len(arr)t = np.linspace(0, length/fs, length)plt.plot(t, arr, c='g')plt.xlabel('t(s)')plt.ylabel(ylabel)plt.title(title)if vline:plt.vlines(x=vline, ymin=np.min(arr), ymax=np.max(arr), linestyle='--', colors='r')if hline:plt.hlines(y=hline, xmin=np.min(t), xmax=np.max(t), linestyle=':', colors='y')if xlim: # 图片横坐标是否设置xlimplt.xlim(0, xlim)  #===保存图片====#if img_save_path:plt.savefig(img_save_path, dpi=500, bbox_inches = 'tight')plt.show()
##========绘制时域信号图========##
file_path = r'D:/22-学习记录/01_自己学习积累/02_基于滑动窗方法划分数据集/01_示例数据/1750_12k_0.021-OuterRace3.mat'   # cwru数据.mat文件路径
fs = 12000    # 采样率12000Hz
fr = 1750     # 转速1750rpm
num_per_ratation = 60/1750 * fs
accl_data = data_read(file_path)   # 读取加速度数据
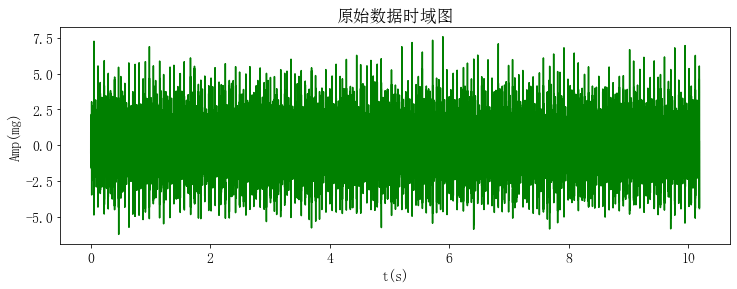
plt_time_domain(accl_data)         # 绘制时域图
print('数据点个数为:', len(accl_data))
print('每转1圈包含点数:', num_per_ratation)
输出结果:

数据点个数为: 122281
每转1圈包含点数: 411.42857142857144
##========通过滑动窗口方法增强样本========##
def data_spilt(data, num_2_generate=20, each_subdata_length=1024):""":Desription:  将数据分割成n个小块。输入数据data采样点数是400000,分成100个子样本数据,每个子样本数据就是4000个数据点:param data:  要输入的数据:param num_2_generate:  要生成的子样本数量:param each_subdata_length: 每个子样本长度:return spilt_datalist: 分割好的数据,类型为2维list"""data = list(data)total_length = len(data)start_num = 0   # 子样本起始值end_num = each_subdata_length  # 子样本终止值step_length = int((total_length - each_subdata_length) / (num_2_generate - 1))  # step_length: 向前移动长度i = 1spilt_datalist = []while i <= num_2_generate:each_data = data[start_num: end_num]each_data = (each_data-np.mean(each_data))/(np.std(each_data)) # 做Z-score归一化spilt_datalist.append(each_data)start_num = 0 + i * step_length;end_num = each_subdata_length + i * step_lengthi = i + 1spilt_data_arr = np.array(spilt_datalist)return spilt_data_arr
spilt_data_arr = data_spilt(data=accl_data, each_subdata_length=1024, num_2_generate=50)
print(spilt_data_arr)
print('划分数据样本的维度为:',spilt_data_arr.shape)
# 输出结果
[[-0.53912541  0.1241063   0.62763801 ... -0.31089743  0.15986003-0.70478437][-0.76625967 -0.90941739 -0.45229575 ... -0.89897241 -0.27165898-0.02220819][-0.95815651 -0.92246646 -1.75344986 ...  1.59903578  0.906053920.08934654]...[-0.99252616 -0.44633003  0.72570346 ... -0.7488478   2.352999450.07193225][ 0.89678044  0.56380553  1.10132216 ... -1.45485483 -0.63490413-0.65809345][-0.40335141 -0.75221082 -0.90351645 ... -3.03949526  0.597549655.42676878]]
划分数据样本的维度为: (50, 1024)
大功告成,1个数据经过滑动窗方法划分得到了50个样本(每个子样本长度1024),那24个数据增大到1200个样本了。
这篇关于深度学习故障诊断实战 | 数据预处理之基于滑动窗的数据样本增强的文章就介绍到这儿,希望我们推荐的文章对编程师们有所帮助!


