本文主要是介绍【深度学习实践】面部表情识别,深度学习分类模型,mmpretrain用于分类的实用教程,多任务网络头,希望对大家解决编程问题提供一定的参考价值,需要的开发者们随着小编来一起学习吧!
文章目录
- 数据集
- 数据集的进一步处理
- 转换training.csv
- 转换validation.csv
- 剔除无法使用的图片数据
- 选择mmpretrain框架来训练
- 配置四个文件
- 改写base model
- 改写base datasets
- schedules
- default_runtime
- 总配置
- 开始训练
- 训练分析
- 考虑在网络上增加facial_landmarks回归head
- 考虑是否可以两阶段
- 是否可以在特征后加一层512
- 多任务学习
- 多头网络
- 联合损失函数,带权重的多任务损失
- DDP 单机多卡训练
- 余弦退火的学习率变动策略
- 指标评测
- 过采样(重采样)
- 如何改进53的准确率
数据集
AffectNet数据集
AffectNet – Mohammad H. Mahoor, PhD
超过42万张图,AffectNet数据集的标注类型包括表情类型和幅度,其中表情类型包括中⽴、⾼兴、悲伤、惊讶、害怕、厌恶、愤怒和轻蔑8种基本表情,以及⽆表情、不确定和⽆⼈脸。
数据下载:
链接:https://pan.baidu.com/s/1R2ZdWPlHDDd4Z8tE7N5vtg
提取码:1234
11个类别,标记是0到10。

Neutral
Happy
Sad
Surprise
Fear
Disgust
Anger
Contempt
None
Uncertain
NonFace
使用下面的代码可以将拿出10张图片放单独文件夹看一下这个数据集:
# 读取validation.csv为表,然后读取expression列,这一列的数字就是图片类别
# subDirectory_filePath列是图片路径
import pandas as pd
import ossrc = r"validation.csv"
df = pd.read_csv(src)
class_list = df["expression"].unique()
fth = r"/ssd/xiedong/src_data/Manually_Annotated_Images/"dst = r"/ssd/xiedong/src_data/val_examples/"
os.makedirs(dst, exist_ok=True)# 每个类别复制10张图到dst的子目录,子目录名字是类别数字要创建
for c in class_list:sub_df = df[df["expression"] == c]sub_df = sub_df.sample(n=10)for i, row in sub_df.iterrows():src_file = os.path.join(fth, row["subDirectory_filePath"])dst_file = os.path.join(dst, str(c))os.makedirs(dst_file, exist_ok=True)os.system("cp {} {}".format(src_file, dst_file))print("cp {} {}".format(src_file, dst_file))
执行后会看到11个类别:
├── val_examples
│   ├── 0
│   ├── 1
│   ├── 10
│   ├── 2
│   ├── 3
│   ├── 4
│   ├── 5
│   ├── 6
│   ├── 7
│   ├── 8
│   └── 9
数据集的进一步处理
为了让mmpretrain方便训练,需要组成mmpretrain可以识别的数据集样式。
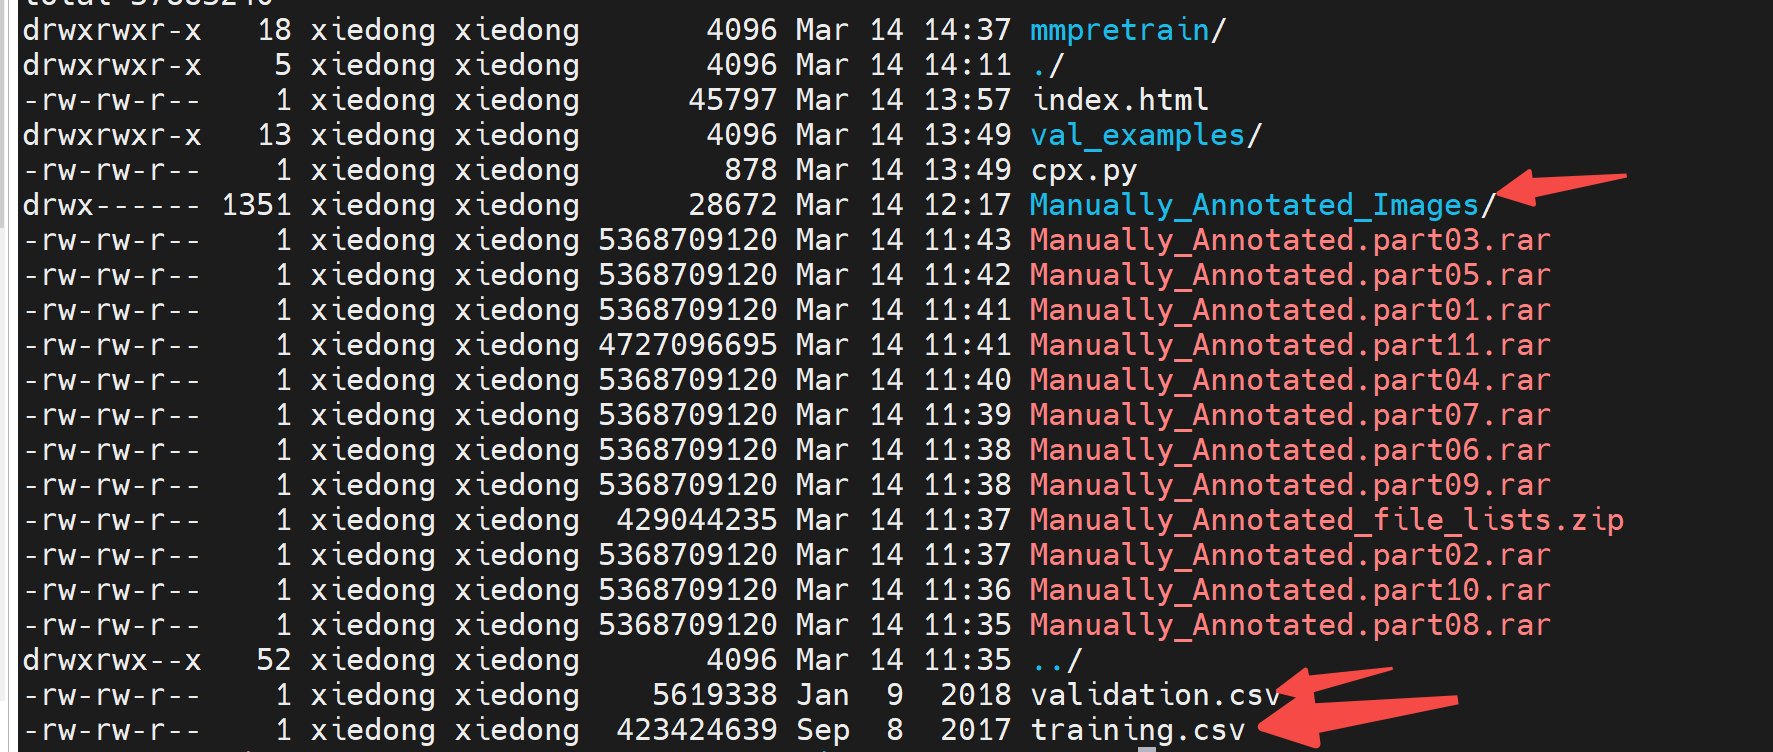
当前的数据集如下图,Manually_Annotated_Images/是多个子文件夹,子文件夹下是具体图片。
training.csv的前几行是这样的:

具体拿前2行看:
subDirectory_filePath,face_x,face_y,face_width,face_height,facial_landmarks,expression,valence,arousal
689/737db2483489148d783ef278f43f486c0a97e140fc4b6b61b84363ca.jpg,134,134,899,899,181.64;530.91;188.32;627.82;195.1;723.37;205.24;819.26;235.82;911.05;295.18;982.18;376.29;1042.33;471.12;1086.0;580.62;1095.39;686.25;1084.29;767.62;1040.37;835.76;980.69;881.37;900.39;898.21;810.86;903.09;718.35;909.41;632.04;912.71;557.24;272.31;455.02;324.2;399.25;397.75;381.28;475.46;391.38;548.4;415.29;666.88;423.52;732.98;404.65;799.61;401.4;857.29;423.11;888.86;473.73;607.14;483.05;608.91;537.83;609.27;593.64;611.04;654.61;515.31;694.98;556.72;713.3;599.07;730.13;638.32;719.39;673.94;709.59;368.89;495.52;407.82;474.54;450.23;475.29;487.48;500.47;448.86;503.7;406.67;503.2;696.84;509.42;739.53;489.14;780.68;494.3;812.04;518.24;780.27;524.1;739.38;520.31;432.72;828.9;495.08;802.44;553.6;792.73;594.12;805.31;632.55;800.26;685.77;814.54;726.14;843.06;682.25;865.78;628.51;873.12;588.43;874.66;549.8;870.79;489.27;854.55;453.19;831.06;551.34;821.61;592.47;828.18;631.76;827.79;706.12;842.32;629.81;841.72;590.19;844.72;550.35;838.36,1,0.785714,-0.0555556
csv文件类似excel表,第一列是subDirectory_filePath表示了图片路径,expression这一列就是表情的类别,其他列暂时无用。
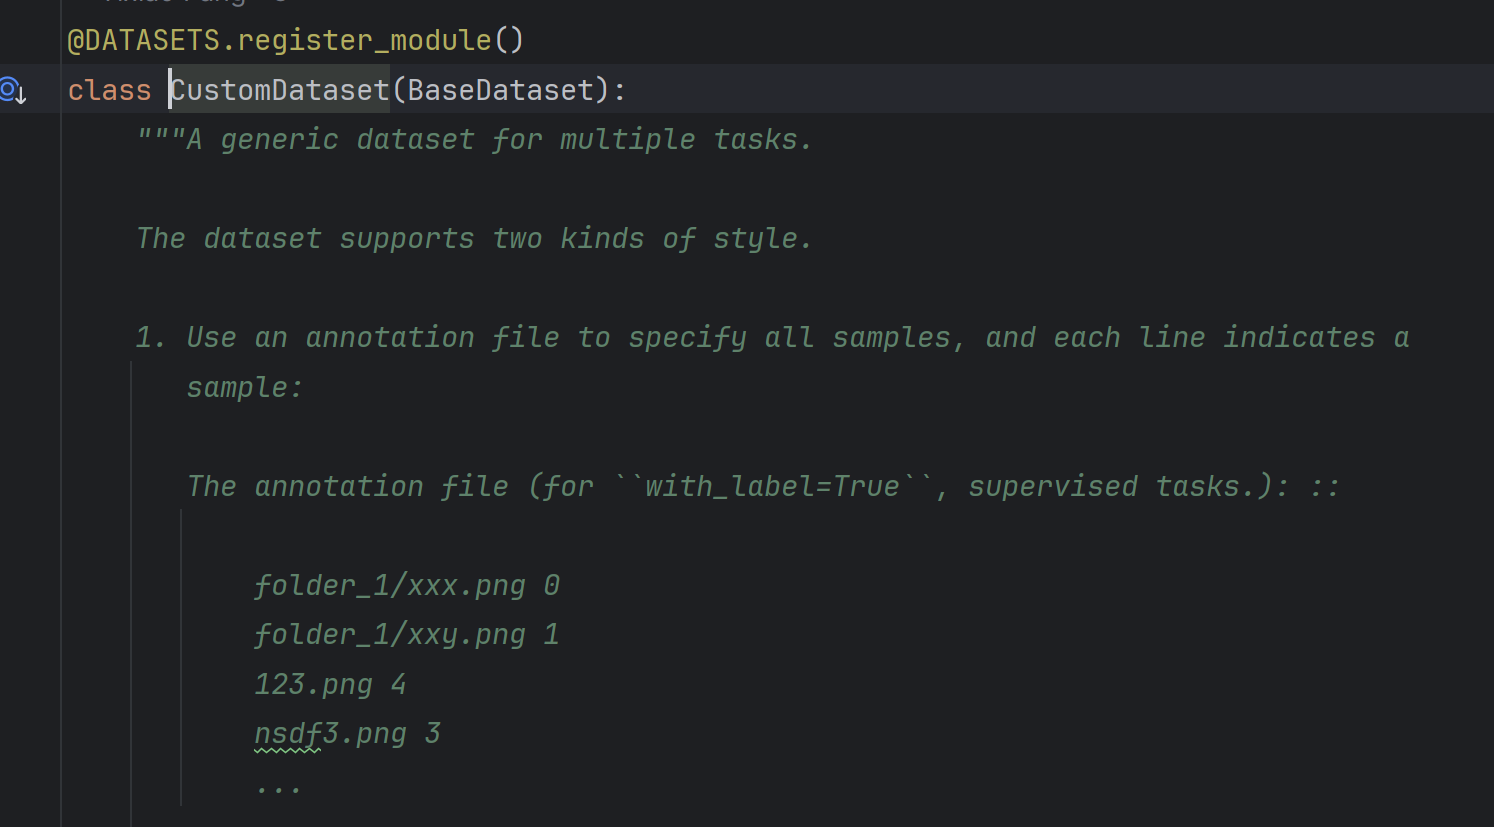
按照下图中的要求格式,需要给一个annotation file来指定类别。
转换training.csv
转换training.csv成转换training.txt,每一行就是:“图片名 所属类别”
执行这个代码:
import pandas as pdsrc = r"training.csv"
dst = r"training.txt"
df = pd.read_csv(src)
# 第一行是列名,需要取subDirectory_filePath列和expression列,然后写入txt,每行都是一个样本,格式是subDirectory_filePath expression
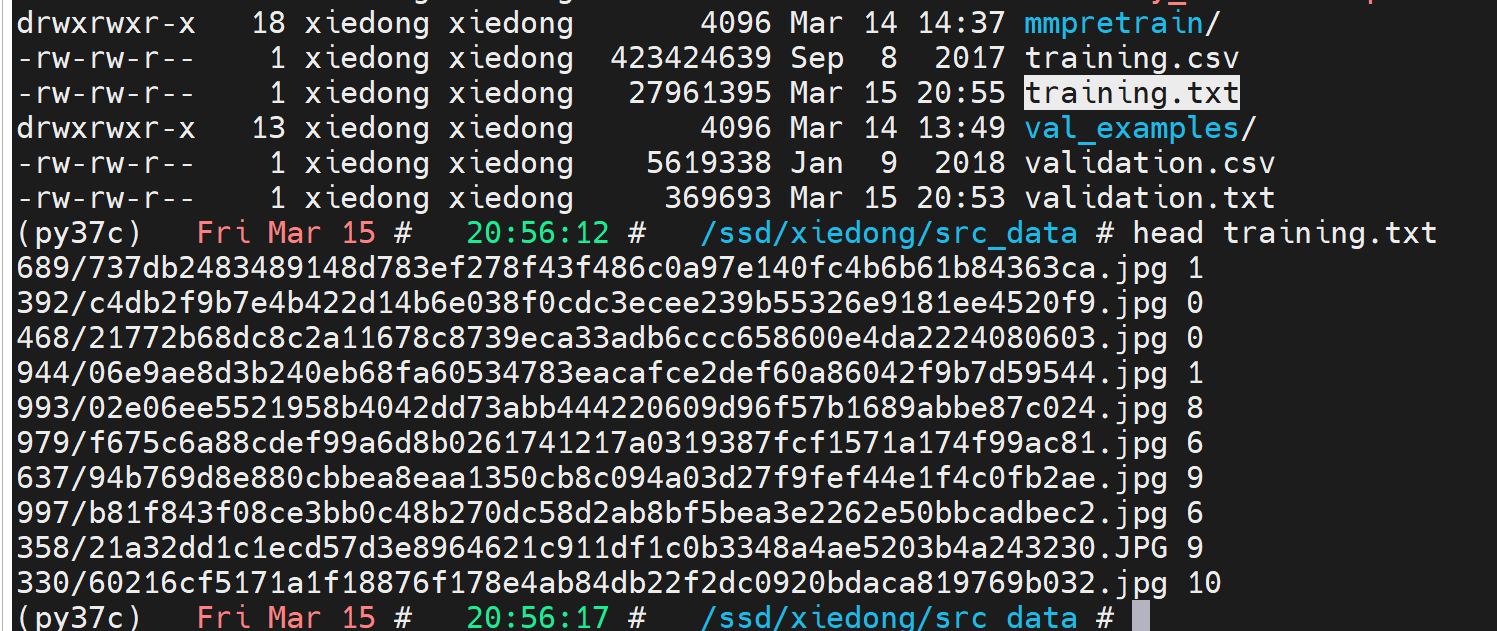
with open(dst, "w") as f:f.write("\n".join(df["subDirectory_filePath"] + " " + df["expression"].astype(str)))转换成功后:
转换validation.csv
转换validation.csv成转换validation.txt,每一行就是:“图片名 所属类别”
执行这个代码:
import pandas as pdsrc = r"validation.csv"
dst = r"validation.txt"
df = pd.read_csv(src)
# 第一行是列名,需要取subDirectory_filePath列和expression列,然后写入txt,每行都是一个样本,格式是subDirectory_filePath expression
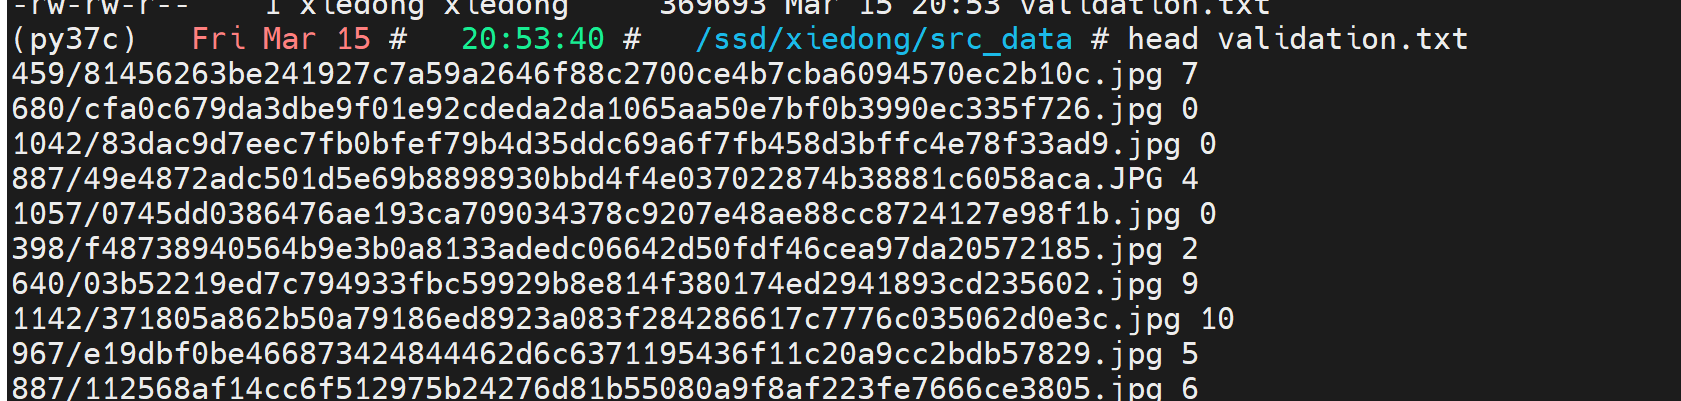
with open(dst, "w") as f:f.write("\n".join(df["subDirectory_filePath"] + " " + df["expression"].astype(str)))转换成功后:
剔除无法使用的图片数据
有的图片无法正常读取,依靠下面的程序可以过滤validation.txt中不正常的行,同理可以过滤training.txt.
import cv2
import os
import multiprocessingdef process_image(line):root_path = r"/ssd/xiedong/src_data/Manually_Annotated_Images/"image_path, label = line.strip().split()image_path = os.path.join(root_path, image_path)try:img = cv2.imread(image_path)except:img = Noneif img is None:print(f"Deleting line: {line.strip()}")return Noneelse:return linedef main():root_path = r"/ssd/xiedong/src_data/Manually_Annotated_Images/"training_file = "validation.txt"training_filex = "validation.txt"# 读取training.txt的每一行with open(training_file, 'r') as file:lines = file.read().splitlines()print(f"Total {len(lines)} lines to process")# lines = lines[:100]# 多进程处理图片with multiprocessing.Pool() as pool:results = pool.map(process_image, lines)# 保存处理后的内容回到training.txtlines_new = [line for line in results if line is not None]with open(training_filex, 'w') as f:f.write("\n".join(lines_new))print(f"Done. {len(lines_new)} lines saved to {training_filex}")if __name__ == "__main__":main()
选择mmpretrain框架来训练
安装环境:
conda create -n open-mmlab python=3.8 pytorch==1.10.1 torchvision==0.11.2 cudatoolkit=11.3 -c pytorch -y
conda activate open-mmlab
pip3 install openmim
git clone https://github.com/open-mmlab/mmpretrain.git
cd mmpretrain
mim install -e .
配置四个文件
教程:https://mmpretrain.readthedocs.io/en/latest/user_guides/config.html
改写base model
文件相对路径是这里:

改为这样,表示11个类别:
# model settings
model = dict(type='ImageClassifier',backbone=dict(type='EfficientNet', arch='b0'),neck=dict(type='GlobalAveragePooling'),head=dict(type='LinearClsHead',num_classes=11,in_channels=1280,loss=dict(type='CrossEntropyLoss', loss_weight=1.0),# topk=(1, 5),  不要测试这个指标))
改写base datasets
下面这个路径下需要定义出数据集给入训练时候得pipeline:

新建文件:facebiaoqing_bs_224.py
# preprocessing configuration
data_preprocessor = dict(# Input image data channels in 'RGB' ordermean=[127.5, 127.5, 127.5],std=[127.5, 127.5, 127.5],to_rgb=True, # Whether to flip the channel from BGR to RGB or RGB to BGR
)train_pipeline = [dict(type='LoadImageFromFile'),dict(type='Resize', scale=224), # RandomResizedCrop RandomCrop CenterCropdict(type='RandomFlip', prob=0.5, direction='horizontal'),dict(type='PackInputs'), # prepare images and labels
]test_pipeline = [dict(type='LoadImageFromFile'),dict(type='Resize', scale=224), # RandomResizedCrop RandomCrop CenterCropdict(type='PackInputs'), # prepare images and labels
]dataset_type = 'Biaoqing'
metainfo = dict(classes=["Neutral","Happy","Sad","Surprise","Fear","Disgust","Anger","Contempt","Nonex","Uncertain","NonFace",])
data = dict(samples_per_gpu=64,workers_per_gpu=8,train=dict(type=dataset_type,data_root='/ssd/xiedong/src_data/Manually_Annotated_Images',data_prefix="",ann_file="/ssd/xiedong/src_data/training.txt",metainfo=metainfo,pipeline=train_pipeline),val=dict(type=dataset_type,data_root='/ssd/xiedong/src_data/Manually_Annotated_Images',data_prefix="",ann_file="/ssd/xiedong/src_data/validation.txt",metainfo=metainfo,pipeline=test_pipeline),test=dict(type=dataset_type,data_root='/ssd/xiedong/src_data/Manually_Annotated_Images',data_prefix="",ann_file="/ssd/xiedong/src_data/validation.txt",metainfo=metainfo,pipeline=test_pipeline))# evaluation = dict(interval=10, metric='accuracy')
# Construct training set dataloader
train_dataloader = dict(batch_size=64, # batchsize per GPUnum_workers=8, # Number of workers to fetch data per GPUdataset=data['train'], # Training datasetsampler=dict(type='DefaultSampler', shuffle=True), # default samplerpersistent_workers=True, # Whether to keep the process, can shorten the preparation time of each epoch
)
test_dataloader = dict(batch_size=64, # batchsize per GPUnum_workers=8, # Number of workers to fetch data per GPUdataset=data['val'], # Testing datasetsampler=dict(type='DefaultSampler', shuffle=False), # default samplerpersistent_workers=True, # Whether to keep the process, can shorten the preparation time of each epoch
)
val_dataloader = test_dataloaderval_evaluator = dict(type='Accuracy', topk=(1, 5))
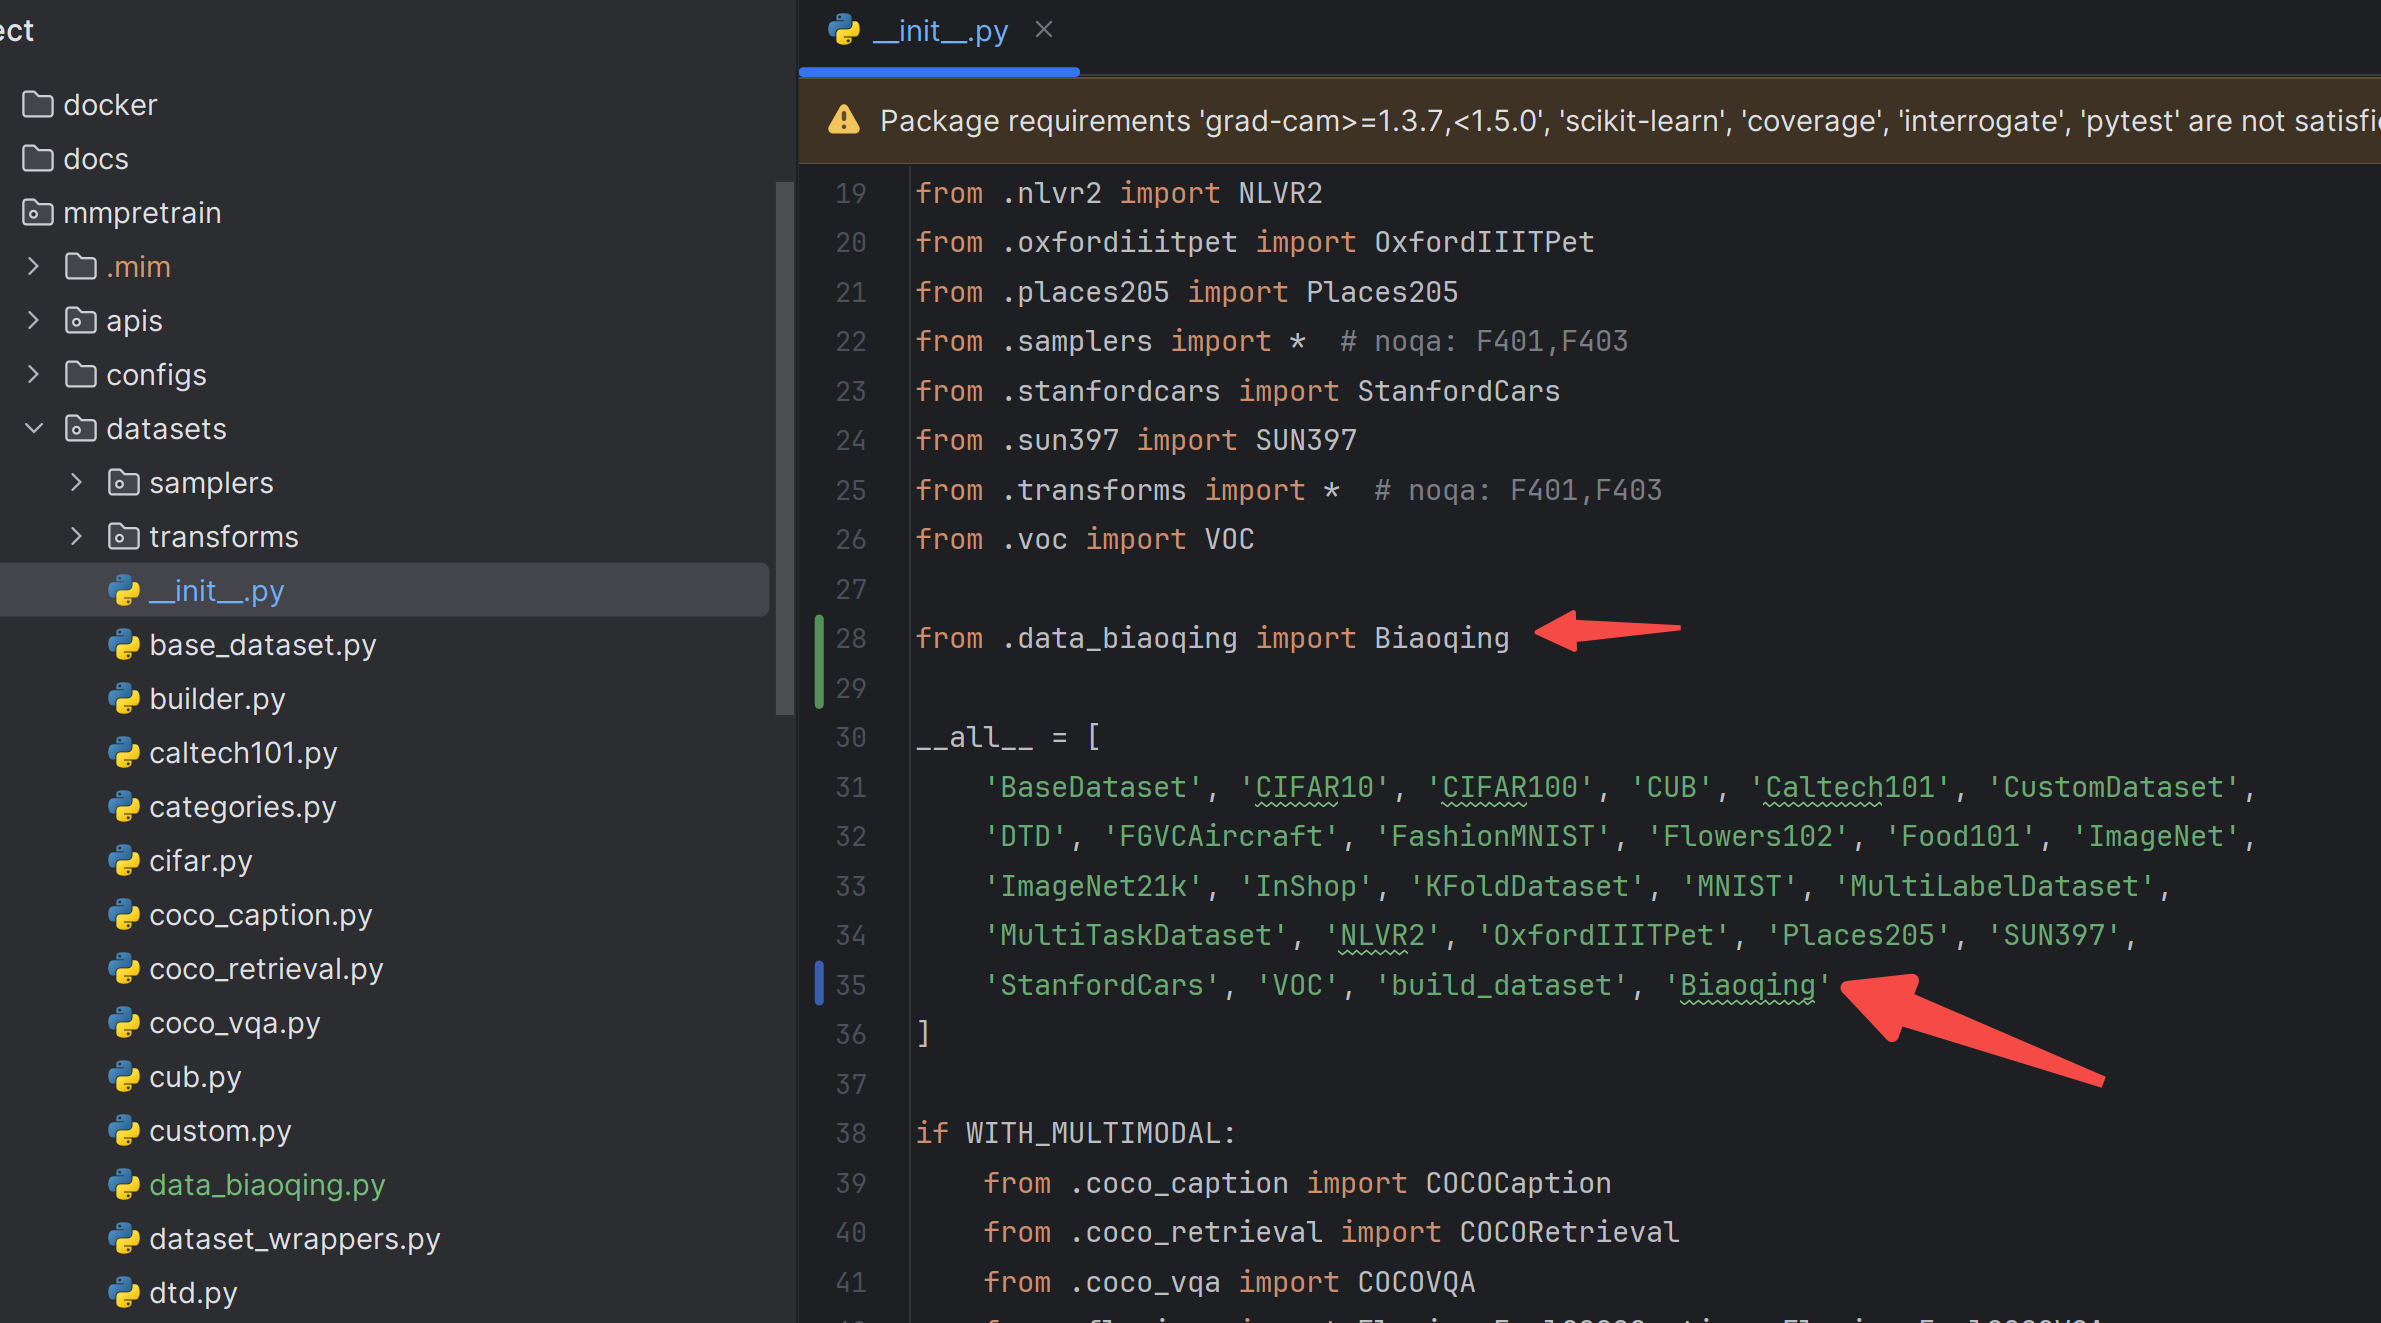
test_evaluator = dict(type='Accuracy', topk=(1, 5))新建数据处理方式data_biaoqing.py:

# Copyright (c) OpenMMLab. All rights reserved.
from typing import List, Optional, Unionfrom mmengine import fileio
from mmengine.logging import MMLoggerfrom mmpretrain.registry import DATASETS
from .categories import IMAGENET_CATEGORIES
from .custom import CustomDataset@DATASETS.register_module()
class Biaoqing(CustomDataset):"""Args:data_root (str): The root directory for ``data_prefix`` and``ann_file``. Defaults to ''.split (str): The dataset split, supports "train", "val" and "test".Default to ''.data_prefix (str | dict): Prefix for training data. Defaults to ''.ann_file (str): Annotation file path. Defaults to ''.metainfo (dict, optional): Meta information for dataset, such as classinformation. Defaults to None.**kwargs: Other keyword arguments in :class:`CustomDataset` and:class:`BaseDataset`.""" # noqa: E501IMG_EXTENSIONS = ('.jpg', '.jpeg', '.png', '.ppm', '.bmp', '.pgm', '.tif')def __init__(self,data_root: str = '',split: str = '',data_prefix: Union[str, dict] = '',ann_file: str = '',metainfo: Optional[dict] = None,**kwargs):kwargs = {'extensions': self.IMG_EXTENSIONS, **kwargs}super().__init__(data_root=data_root,data_prefix=data_prefix,ann_file=ann_file,metainfo=metainfo,**kwargs)def extra_repr(self) -> List[str]:"""The extra repr information of the dataset."""body = [f'Root of dataset: \t{self.data_root}',]return body在__init__.py 中注册上类。
schedules

imagenet_bs2048_coslr.py
# optimizer
optim_wrapper = dict(optimizer=dict(type='SGD', lr=0.8, momentum=0.9, weight_decay=0.0001, nesterov=True))# learning policy
param_scheduler = [# warm up learning rate schedulerdict(type='LinearLR',start_factor=0.25,by_epoch=True,begin=0,# about 2500 iterations for ImageNet-1kend=5,# update by iterconvert_to_iter_based=True),# main learning rate schedulerdict(type='CosineAnnealingLR',T_max=95,by_epoch=True,begin=5,end=100,)
]# train, val, test setting
train_cfg = dict(by_epoch=True, max_epochs=100, val_interval=1)
val_cfg = dict()
test_cfg = dict()# NOTE: `auto_scale_lr` is for automatically scaling LR,
# based on the actual training batch size.
# auto_scale_lr = dict(base_batch_size=2048)
default_runtime

# defaults to use registries in mmpretrain
default_scope = 'mmpretrain'# configure default hooks
default_hooks = dict(# record the time of every iteration.timer=dict(type='IterTimerHook'),# print log every 100 iterations.logger=dict(type='LoggerHook', interval=100),# enable the parameter scheduler.param_scheduler=dict(type='ParamSchedulerHook'),# save checkpoint per epoch.checkpoint=dict(type='CheckpointHook', interval=1),# set sampler seed in distributed evrionment.sampler_seed=dict(type='DistSamplerSeedHook'),# validation results visualization, set True to enable it.visualization=dict(type='VisualizationHook', enable=False),
)# configure environment
env_cfg = dict(# whether to enable cudnn benchmarkcudnn_benchmark=False,# set multi process parametersmp_cfg=dict(mp_start_method='fork', opencv_num_threads=0),# set distributed parametersdist_cfg=dict(backend='nccl'),
)# set visualizer
vis_backends = [dict(type='LocalVisBackend')]
visualizer = dict(type='UniversalVisualizer', vis_backends=vis_backends)# set log level
log_level = 'INFO'# load from which checkpoint
load_from = None# whether to resume training from the loaded checkpoint
resume = False# Defaults to use random seed and disable `deterministic`
randomness = dict(seed=None, deterministic=False)
总配置
efficientnet-b0_8xb32-01norm_in1k

_base_ = ['../_base_/models/efficientnet_b0.py','../_base_/datasets/facebiaoqing_bs_224.py','../_base_/schedules/imagenet_bs2048_coslr.py','../_base_/default_runtime.py',
]
开始训练
官方教程:https://mmpretrain.readthedocs.io/en/latest/user_guides/train.html
单卡训练:
python tools/train.py configs/efficientnet/efficientnet-b0_8xb32-01norm_in1k.py
多卡训练:
CUDA_VISIBLE_DEVICES=0,1 PORT=29500 ./tools/dist_train.sh configs/efficientnet/efficientnet-b0_8xb32-01norm_in1k.py 2训练分析
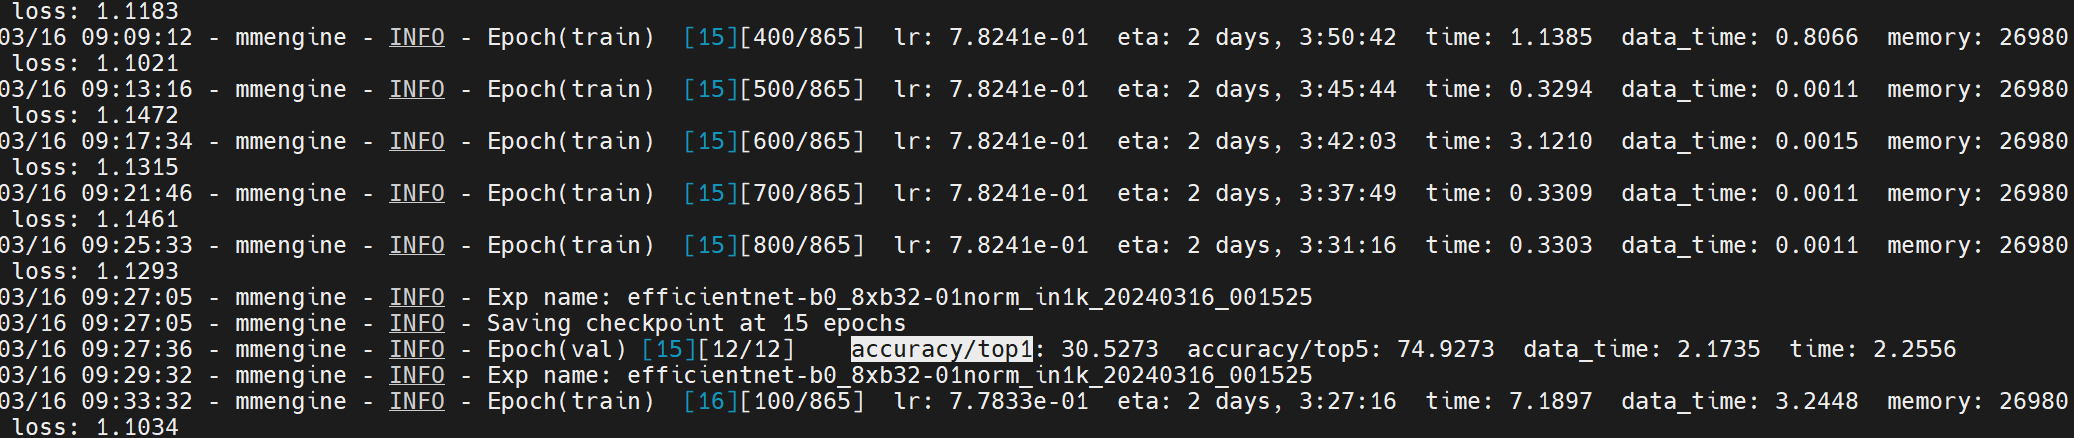
准确率在12轮训练后还是有点低,损失没有很大的下降趋势,考虑到现在才是第12轮,再等一等看损失是否能降低。
同时,考虑为什么是这样的结果。把表情识别当成图片分类来处理是没问题的,但这个任务估计没有很大的指导性,训练难度太大。
考虑在网络上增加facial_landmarks回归head
做表情识别任务,识别图片中人脸是什么表情,当成一个分类任务来做是可以的。
但如果使用人脸的facial_landmarks来在分类头上增加一个回归头,可以起到辅助的作用。请问这是什么原因?
在做表情识别任务时,将其视为一个分类任务是非常常见的做法,因为表情识别的本质是将图像中的人脸表情分为几个预定义的类别,如快乐、悲伤、惊讶等。使用人脸的facial_landmarks来在分类头上增加一个回归头可以起到辅助的作用,原因有以下几点:
更丰富的特征信息:Facial landmarks提供了关于面部结构的详细信息,这些信息可以帮助网络更好地理解面部表情的微妙变化。例如,微笑可能会导致嘴角的特定上扬,眉毛的位置和形状变化可以表示惊讶等。
多任务学习:通过在模型中同时进行分类和回归任务,可以实现多任务学习。这种方法通常能够提高模型的泛化能力,因为模型不仅要学会识别整体的表情类别,还要能够准确地预测面部的关键点位置。这种学习任务的多样性可以增强模型对面部表情细节的捕捉能力。
正则化效应:在模型中加入额外的任务(如回归facial landmarks)可以起到一定的正则化作用,帮助避免过拟合,尤其是在数据量有限的情况下。
考虑是否可以两阶段
可以先回归出facial_landmarks,然后在facial_landmarks后面再增加分类头吗?
是否可以先回归出facial_landmarks,然后在facial_landmarks后面再增加分类头,这是一个可行的方法。这种方法通常被称为两阶段方法,首先利用一部分网络结构预测面部关键点,然后将预测出的关键点信息(可能经过一定的处理)作为额外的特征输入到后续的分类网络中。这种方法的好处是可以明确地利用facial_landmarks信息来辅助表情分类,但可能会增加模型的复杂性和计算量。
是否可以在特征后加一层512
不行,准确率还是低,要考虑别的方法。
2024-03-18 10:57:30.037685 Epoch [97/100], Validation Loss: 0.004361435066569935, Classification Loss: 0.0, Regression Loss: 0.0, Top-1 Acc: 0.45454545454545453, Recall: 0.4500706195750172, Class Accs: [0.4186991869918699, 0.7028571428571428, 0.5009310986964618, 0.48333333333333334, 0.5888223552894212, 0.5167037861915368, 0.4474708171206226, 0.5065913370998116, 0.07482993197278912, 0.20077220077220076, 0.509765625], Class Recalls: [0.31402439024390244, 0.5970873786407767, 0.4446280991735537, 0.41207815275310833, 0.5587121212121212, 0.4377358490566038, 0.45544554455445546, 0.4125766871165644, 0.2129032258064516, 0.3501683501683502, 0.6675191815856778]
多任务学习
这个就不使用mmpretrain了,自己写一个网络来做这个任务。
多头网络
调整EfficientNet模型以同时进行分类和回归:
# 调整EfficientNet模型以同时进行分类和回归
class MyEfficientNet(nn.Module):def __init__(self, num_classes=11, num_landmarks=68 * 2):super(MyEfficientNet, self).__init__()self.efficientnet = models.efficientnet_b0(pretrained=True)# 获取特征层的特征数量num_features = self.efficientnet.classifier[1].in_features# 新的分类器和回归器self.classifier = nn.Linear(num_features, num_classes)self.regressor = nn.Linear(num_features, num_landmarks)# 删除原始模型的分类层self.efficientnet.classifier = nn.Identity()def forward(self, x):# 通过修改后的EfficientNet获取特征features = self.efficientnet(x)# 使用新的分类器和回归器return self.classifier(features), self.regressor(features)
联合损失函数,带权重的多任务损失
class CombinedLoss(nn.Module):def __init__(self):super(CombinedLoss, self).__init__()self.classification_loss = nn.CrossEntropyLoss()self.regression_loss = nn.MSELoss()def forward(self, classification_output, regression_output, classification_targets, regression_targets):classification_loss = self.classification_loss(classification_output, classification_targets)# 计算回归损失时仅考虑有landmarks的样本valid_indices = regression_targets.ne(-1).any(dim=1) # 假设没有标记的landmarks为-1regression_loss = self.regression_loss(regression_output[valid_indices],regression_targets[valid_indices]) if valid_indices.any() else 0# 带权重的多任务损失loss = 1.0 * classification_loss + 0.5 * regression_lossreturn loss, classification_loss, regression_lossDDP 单机多卡训练
开启训练:
CUDA_VISIBLE_DEVICES=2,0 python -m torch.distributed.launch --node_rank=0 --master_addr="127.0.0.1" --master_port=29550 --nnodes=1 --nproc_per_node=2 train.py
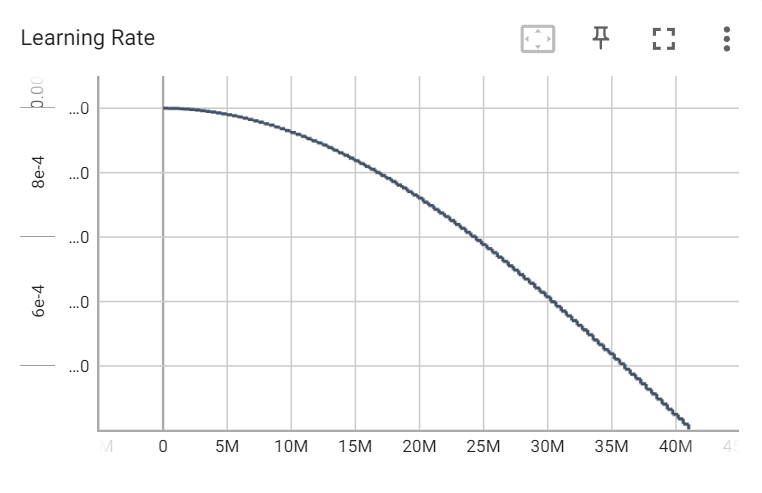
余弦退火的学习率变动策略
指标评测
Validation loss: 0.0111
Validation classification loss: 0.0111
Validation regression loss: 0.0001
Validation mean regression loss: 0.0000
Validation top-1 accuracy: 0.3607
Validation recall: 0.3607
Validation class accuracies: [0.736, 0.918, 0.44, 0.33, 0.258, 0.046, 0.484, 0.0, 0.058, 0.038, 0.66]
Validation class recalls: [0.215962441314554, 0.34075723830734966, 0.45081967213114754, 0.45081967213114754, 0.6972972972972973, 0.8518518518518519, 0.3884430176565008, nan, 0.2396694214876033, 0.5588235294117647, 0.5454545454545454]
Validation total samples: 5500
Validation class accuracies mean: 0.3607272727272727
Validation class recalls mean: nan
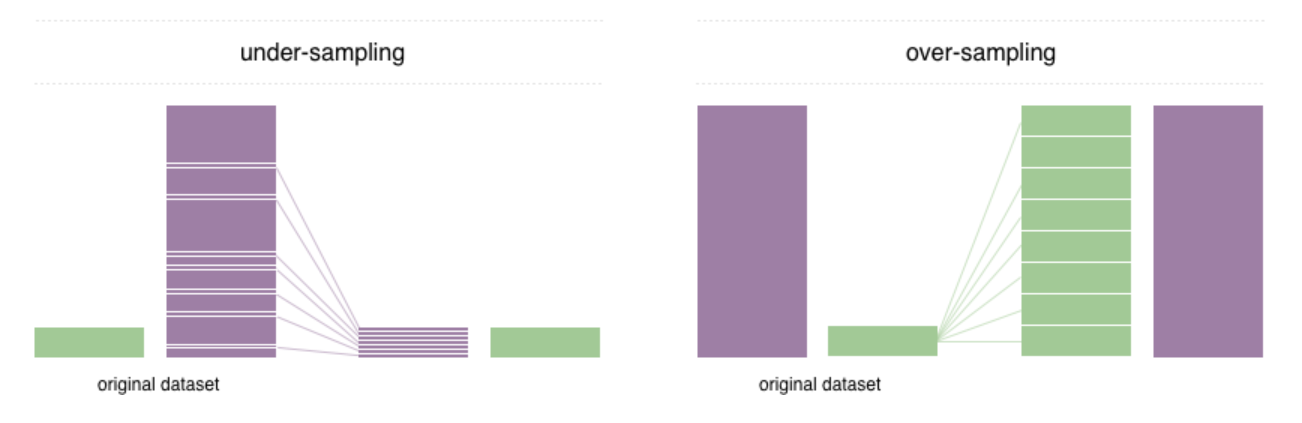
由上面的指标可以看出,倒数第四个类别居然一个没预测正确。轻蔑这个表情只有4k多张,可能是类别不均衡导致的,需要采用一些策略。
过采样(重采样)
https://github.com/ufoym/imbalanced-dataset-sampler
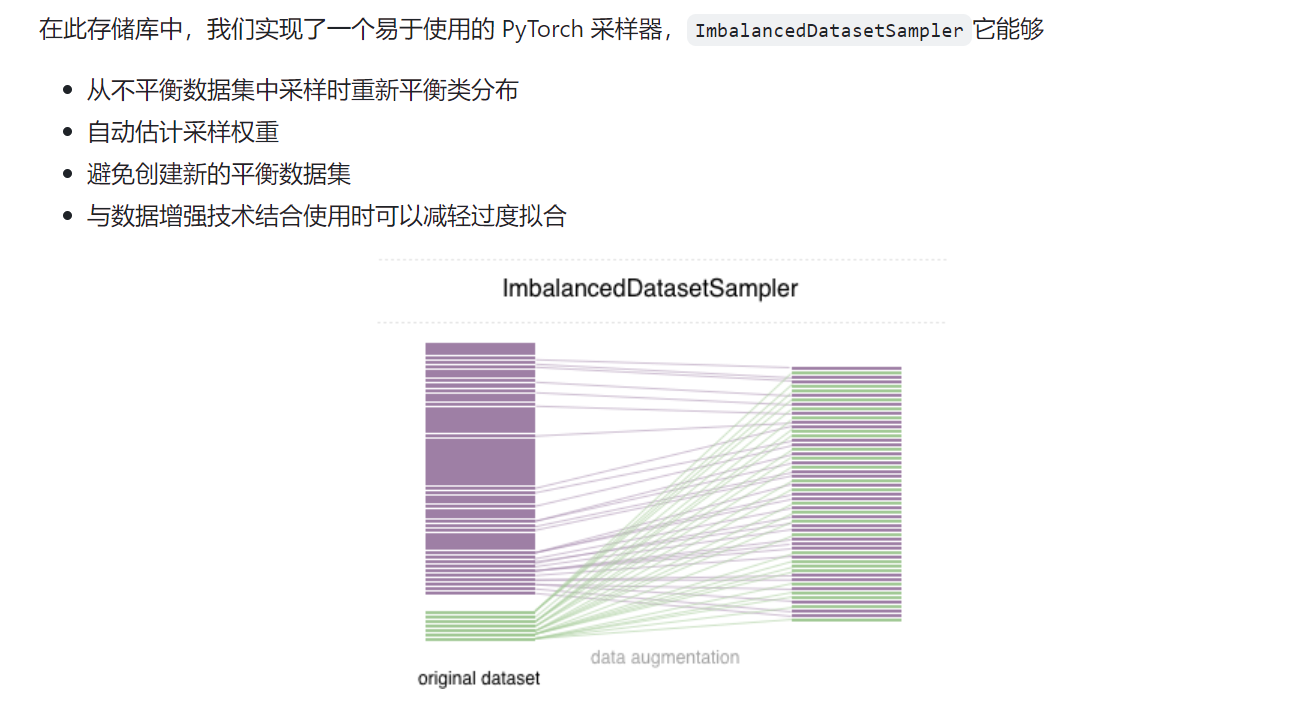
再次训练:
# 训练数据集annofile = r"/ssd/xiedong/src_data/training.csv"train_dataset = AffectNetDataset(prefix, annofile)train_sampler = ImbalancedDatasetSampler(train_dataset)train_loader = DataLoader(dataset=train_dataset, batch_size=batch_size, sampler=train_sampler, num_workers=16)训练结束后:
- 2024-03-17 16:59:40.335762 Epoch [50/50], Validation Loss: 0.0042626089182767005, Classification Loss: 0.004238856727426702, Regression Loss: 8.637177180652777e-09, Top-1 Acc
- 0.4632727272727273, Recall: 0.4648315447804144, Class Accs: [0.44421487603305787, 0.7257731958762886, 0.49056603773584906, 0.505091649694501, 0.5852156057494866, 0.47556390
97744361, 0.5076335877862596, 0.5797665369649806, 0.0688976377952756, 0.15841584158415842, 0.5720081135902637], Class Recalls: [0.32526475037821484, 0.5808580858085809, 0.463
3663366336634, 0.42980935875216636, 0.6063829787234043, 0.46083788706739526, 0.4463087248322148, 0.436950146627566, 0.20348837209302326, 0.28368794326241137, 0.705]
八个类别的平均准确率是 0.5392281749518575
官网的weighted-loss模型的指标是58,

而多任务的b2网络是63。
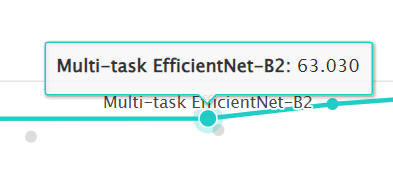
所以现在我们的多任务b0得到53%,还是不错的。
网址:https://paperswithcode.com/sota/facial-expression-recognition-on-affectnet
这里有b2网路做的表情识别:
https://github.com/av-savchenko/face-emotion-recognition
如何改进53的准确率
其实53这个数值已经是够用了,AffectNet 数据集本身就难,实际使用表情稍微做大一点,都能准确识别,但为了进一步,就再思考改进方式:
1、肯定还是选b0,这个网络足够小,才能没显卡也能尽量快
2、损失函数权重,将回归部分的权重设置为更小的0.2,学习率设置得低一些,在之前的数据基础上训练
3、增加一些别的数据集进去,加更多的数据
这篇关于【深度学习实践】面部表情识别,深度学习分类模型,mmpretrain用于分类的实用教程,多任务网络头的文章就介绍到这儿,希望我们推荐的文章对编程师们有所帮助!


