本文主要是介绍Cg Programming/Unity/Soft Shadows of Spheres球体的软阴影,希望对大家解决编程问题提供一定的参考价值,需要的开发者们随着小编来一起学习吧!
本教程介绍了球体的软阴影。
这是有关光照一系列教程中的一章,它已经超出了Phone反射模型的范围,而Phone反射模型是一个局部照明模型并且没有把阴影考虑进来。目前的技术可以在任何网格上渲染单个球体的软阴影,并且跟Orion Sky Lawlor提出的技术多少有点关系(查看下面“扩展阅读”的部分)。着色器可以扩展到以渲染性能为代价来渲染少量球体的阴影;但是,它并不能轻易地被应用到任何种类的阴影投射器上。潜在的应用就是电脑球类游戏(在里面球通常是唯一需要软阴影的物体并且也是向其它所有物体投射动态阴影的唯一物体),具有球形主角的电脑游戏(比如“疯狂弹珠”),只包含球体的可视化(行星可视化,小原子核,原子或分子的球状模型等等。),或者填充着球体并受益于软阴影的测试场景。
软阴影

方向光源和点光源会产生硬阴影,而任何面光源会产生软阴影。这对所有真实光源来说也是这样的,特别是太阳和任何灯泡或者台灯。在阴影投射器后面的一些点上,光源的任何部分都是可见的,并且阴影是完全黑暗的:这叫做本影。从其他点来看,光源或多或少是可见的,因此阴影更少或更完整:这叫做半影。光源的整个区域有可见的点:这些点在阴影外面的。

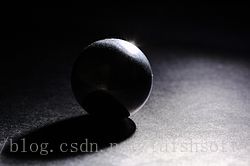
在大多数情况下,阴影的柔和度主要取决于阴影投射器跟阴影接收器之前的距离;距离越远,阴影越柔和。这是一个众所周知的艺术效果;参见上面卡拉瓦乔的那幅画。
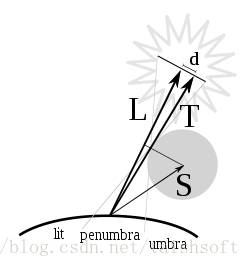
参见上图,我们将要近似地计算表面上某点的阴影,当在S处(跟表面点相关)半径为的球体不包括L处(相对于表面点)半径
的球形光源。
我们考虑球体上的通过表面点的切线方向T。此外,这条切线在跨越L和S的面之间选择,即平行上图所示的观察平面。最重要的观察在于光源中心点和这条切线之间的最短距离d跟表面点阴影的量有直接关系,因为它决定了从表面点可以看到的光源面积有多大。更精确地说,我们需要一个有符号的距离(如果切线与L在球体的同一边就是正的,否则就是负的)来决定表面点是否在本影()、半影(
)或阴影的外面(
)。
对于d的计算,我们要考虑L和S以及T和S之间的角度。这两个角度之间的差值就是L和T之间的角度,它跟d是相关的:
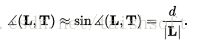
这样,我们得到:

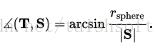
我们可以使用下式来计算T和S之间的角度:
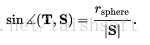
于是:
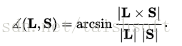
对于L和S之间的角度,我们可以使用叉乘的特性:

因此:
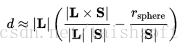
综合一下,我们得到:

目前为止我们所做的跟近似没多大关系;更重要的是它并没有产生渲染。如果性能是个问题,我们可以更近一步,使用arcsin(x) ≈ x;也就是我们可以使用:
这就避免了所有三角函数;但是,这会产生渲染工件(特别是如果镜面高光在面向光源的半影中)。无论这些渲染工件是否值得在性能上有所收获,都必须为每一个案例做出决定。
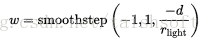
下面我们会看看如何基于d来计算阴影的层次。当d从增加到
,w应该从0增加到1。换句话说,在
的值为-1和1之间时,我们想要一个从0到1的平滑值。达到这个目的最有效的办法很有可能就是内置Cg函数提供的艾米插值
smoothstep(a,b,x) = t*t*(3-2*t),里面t=clamp((x-a)/(b-a),0,1):
虽然这并不是w和d之间基于物理关系的一个特别好的近似,它仍然可以得到基本正确的值。
此外,如果光线方向L跟在S相反方向的话w应该等于0;即它们的点乘是负数。这种情况是有点棘手的,因为它会导致L和S垂直的平面上明显的不连续性。为了减弱这种不连续性,我们可以再次使用smoothstep来计算一个改进的值w’:

另外,如果光源比遮挡球更接近表面点的话我们必须设置w’为0。这同样也有点棘手,因为球形光源会跟阴影相交 - 投射球体。一种避免太明显工件的解决方案(但示能解决完全交叉问题)是:

在方向光源的情况下,我们只需要设置w” = w’。然后(1 - w”)这项,它指定了无阴影照明的等级,应该用光源乘以任何照明。(于是,环境光源就不应该乘以这个系数。)如果多个阴影投射器的阴影被计算,所有阴影投射器的(1-w”)这项都必须跟每个光源结合起来。通常的方法是乘法,尽管这可能不准确(特别是如果本影是重叠的)。
实现
这个实现会计算lightDirection和sphereDirection向量的长度,然后会用归一化的向量来处理。这样,这些向量的长度必须只被计算一次,并且我们甚至要避免除法因为我们使用了归一化向量。这里是片元着色器最重要的一部分:
// computation of level of shadowing w float3 sphereDirection = _SpherePosition.xyz - input.posWorld.xyz;float sphereDistance = length(sphereDirection);sphereDirection = sphereDirection / sphereDistance;float d = lightDistance * (asin(min(1.0, length(cross(lightDirection, sphereDirection)))) - asin(min(1.0, _SphereRadius / sphereDistance)));float w = smoothstep(-1.0, 1.0, -d / _LightSourceRadius);w = w * smoothstep(0.0, 0.2, dot(lightDirection, sphereDirection));if (0.0 != _WorldSpaceLightPos0.w) // point light source?{w = w * smoothstep(0.0, _SphereRadius, lightDistance - sphereDistance);}asin(min(1.0, ...))的使用是为了保证asin的变量在允许的范围内。
完整的着色器代码
完整的源代码为阴影投射体和光源半径定义了属性。所有的值都应该在世界坐标系中。对于额外的光源,光源半径应该用弧度(1 rad = 180° / π)来指定。设置阴影投射体位置和半径的最好办法是一段简短的脚本,它被附着到使用着色器的所有阴影接收物体上,举例来说:
@script ExecuteInEditMode()var occluder : GameObject;function Update () {if (null != occluder) {GetComponent(Renderer).sharedMaterial.SetVector("_SpherePosition", occluder.transform.position);GetComponent(Renderer).sharedMaterial.SetFloat("_SphereRadius", occluder.transform.localScale.x / 2.0);}
}这个脚本有一个公共变量occluder,它应该被设置到阴影投射器上去。然后它设置了下面着色器中的属性_SpherePostion和_SphereRadius(它应该跟脚本一样被挂载到相同的阴影接收物体上)。
Shader "Cg shadow of sphere" {Properties {_Color ("Diffuse Material Color", Color) = (1,1,1,1) _SpecColor ("Specular Material Color", Color) = (1,1,1,1) _Shininess ("Shininess", Float) = 10_SpherePosition ("Sphere Position", Vector) = (0,0,0,1)_SphereRadius ("Sphere Radius", Float) = 1_LightSourceRadius ("Light Source Radius", Float) = 0.005}SubShader {Pass {      Tags { "LightMode" = "ForwardBase" } // pass for ambient light and first light sourceCGPROGRAM#pragma vertex vert  #pragma fragment frag #pragma target 3.0#include "UnityCG.cginc"uniform float4 _LightColor0; // color of light source (from "Lighting.cginc")// User-specified propertiesuniform float4 _Color; uniform float4 _SpecColor; uniform float _Shininess;uniform float4 _SpherePosition; // center of shadow-casting sphere in world coordinatesuniform float _SphereRadius; // radius of shadow-casting sphereuniform float _LightSourceRadius; // in radians for directional light sourcesstruct vertexInput {float4 vertex : POSITION;float3 normal : NORMAL;};struct vertexOutput {float4 pos : SV_POSITION;float4 posWorld : TEXCOORD0;float3 normalDir : TEXCOORD1;};vertexOutput vert(vertexInput input) {vertexOutput output;float4x4 modelMatrix = _Object2World;float4x4 modelMatrixInverse = _World2Object;output.posWorld = mul(modelMatrix, input.vertex);output.normalDir = normalize(mul(float4(input.normal, 0.0), modelMatrixInverse).xyz);output.pos = mul(UNITY_MATRIX_MVP, input.vertex);return output;}float4 frag(vertexOutput input) : COLOR{float3 normalDirection = normalize(input.normalDir);float3 viewDirection = normalize(_WorldSpaceCameraPos - input.posWorld.xyz);float3 lightDirection;float lightDistance;float attenuation;if (0.0 == _WorldSpaceLightPos0.w) // directional light?{attenuation = 1.0; // no attenuationlightDirection = normalize(_WorldSpaceLightPos0.xyz);lightDistance = 1.0;} else // point or spot light{lightDirection = _WorldSpaceLightPos0.xyz - input.posWorld.xyz;lightDistance = length(lightDirection);attenuation = 1.0 / lightDistance; // linear attenuationlightDirection = lightDirection / lightDistance;}// computation of level of shadowing w  float3 sphereDirection = _SpherePosition.xyz - input.posWorld.xyz;float sphereDistance = length(sphereDirection);sphereDirection = sphereDirection / sphereDistance;float d = lightDistance * (asin(min(1.0, length(cross(lightDirection, sphereDirection)))) - asin(min(1.0, _SphereRadius / sphereDistance)));float w = smoothstep(-1.0, 1.0, -d / _LightSourceRadius);w = w * smoothstep(0.0, 0.2, dot(lightDirection, sphereDirection));if (0.0 != _WorldSpaceLightPos0.w) // point light source?{w = w * smoothstep(0.0, _SphereRadius, lightDistance - sphereDistance);}float3 ambientLighting = UNITY_LIGHTMODEL_AMBIENT.rgb * _Color.rgb;float3 diffuseReflection = attenuation * _LightColor0.rgb * _Color.rgb* max(0.0, dot(normalDirection, lightDirection));float3 specularReflection;if (dot(normalDirection, lightDirection) < 0.0) // light source on the wrong side?{specularReflection = float3(0.0, 0.0, 0.0); // no specular reflection}else // light source on the right side{specularReflection = attenuation * _LightColor0.rgb * _SpecColor.rgb * pow(max(0.0, dot(reflect(-lightDirection, normalDirection), viewDirection)), _Shininess);}return float4(ambientLighting + (1.0 - w) * (diffuseReflection + specularReflection), 1.0);}ENDCG}Pass {      Tags { "LightMode" = "ForwardAdd" } // pass for additional light sourcesBlend One One // additive blending CGPROGRAM#pragma vertex vert  #pragma fragment frag #pragma target 3.0#include "UnityCG.cginc"uniform float4 _LightColor0; // color of light source (from "Lighting.cginc")// User-specified propertiesuniform float4 _Color; uniform float4 _SpecColor; uniform float _Shininess;uniform float4 _SpherePosition; // center of shadow-casting sphere in world coordinatesuniform float _SphereRadius; // radius of shadow-casting sphereuniform float _LightSourceRadius; // in radians for directional light sourcesstruct vertexInput {float4 vertex : POSITION;float3 normal : NORMAL;};struct vertexOutput {float4 pos : SV_POSITION;float4 posWorld : TEXCOORD0;float3 normalDir : TEXCOORD1;};vertexOutput vert(vertexInput input) {vertexOutput output;float4x4 modelMatrix = _Object2World;float4x4 modelMatrixInverse = _World2Object;output.posWorld = mul(modelMatrix, input.vertex);output.normalDir = normalize(mul(float4(input.normal, 0.0), modelMatrixInverse).xyz);output.pos = mul(UNITY_MATRIX_MVP, input.vertex);return output;}float4 frag(vertexOutput input) : COLOR{float3 normalDirection = normalize(input.normalDir);float3 viewDirection = normalize(_WorldSpaceCameraPos - input.posWorld.xyz);float3 lightDirection;float lightDistance;float attenuation;if (0.0 == _WorldSpaceLightPos0.w) // directional light?{attenuation = 1.0; // no attenuationlightDirection = normalize(_WorldSpaceLightPos0.xyz);lightDistance = 1.0;} else // point or spot light{lightDirection =_WorldSpaceLightPos0.xyz - input.posWorld.xyz;lightDistance = length(lightDirection);attenuation = 1.0 / lightDistance; // linear attenuationlightDirection = lightDirection / lightDistance;}// computation of level of shadowing w  float3 sphereDirection = _SpherePosition.xyz - input.posWorld.xyz;float sphereDistance = length(sphereDirection);sphereDirection = sphereDirection / sphereDistance;float d = lightDistance * (asin(min(1.0, length(cross(lightDirection, sphereDirection)))) - asin(min(1.0, _SphereRadius / sphereDistance)));float w = smoothstep(-1.0, 1.0, -d / _LightSourceRadius);w = w * smoothstep(0.0, 0.2, dot(lightDirection, sphereDirection));if (0.0 != _WorldSpaceLightPos0.w) // point light source?{w = w * smoothstep(0.0, _SphereRadius, lightDistance - sphereDistance);}float3 diffuseReflection = attenuation * _LightColor0.rgb * _Color.rgb* max(0.0, dot(normalDirection, lightDirection));float3 specularReflection;if (dot(normalDirection, lightDirection) < 0.0) // light source on the wrong side?{specularReflection = float3(0.0, 0.0, 0.0); // no specular reflection}else // light source on the right side{specularReflection = attenuation * _LightColor0.rgb * _SpecColor.rgb * pow(max(0.0, dot(reflect(-lightDirection, normalDirection), viewDirection)), _Shininess);}return float4((1.0 - w) * (diffuseReflection + specularReflection), 1.0);}ENDCG}} Fallback "Specular"
}
总结
恭喜!我希望你已经成功地渲染了一些漂亮的软阴影。我们看到了:
- 什么是软阴影、什么是半影以及什么是本影。
- 如何计算球体的软阴影。
- 如何实现这个计算,包括在其它
GameObject上用JavaScript的脚本设置一些属性。
这篇关于Cg Programming/Unity/Soft Shadows of Spheres球体的软阴影的文章就介绍到这儿,希望我们推荐的文章对编程师们有所帮助!