本文主要是介绍UnityStandardAsset工程、源码分析_5_赛车游戏[AI控制]_AI机制,希望对大家解决编程问题提供一定的参考价值,需要的开发者们随着小编来一起学习吧!
上一章地址: UnityStandardAsset工程、源码分析_4_赛车游戏[玩家控制]_摄像机控制
前几章我们已经将赛车游戏的绝大多数机制分析过了,而Unity还提供了不同的操控模式——AI控制。正如其名,是由AI来代替玩家进行控制,车辆自动绕场地行驶。AI控制的场景大体与玩家控制的场景相似,所以重复的部分不再赘述,我们着重分析AI相关的机制。
AI控制

AI控制场景的车附着的脚本,与玩家控制的车辆有所不同。第一章的截图中,车辆上附着了CarUserControl脚本,用于读入玩家输入并传给CarController,但这里的车辆上没有挂载CarUserControl,取而代之的是CarAIControl和WaypointProgressTracker。同时,在场景中也存在着如下对象:
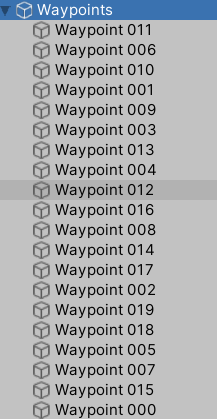
Waypoints上挂载了WaypointCircuit:

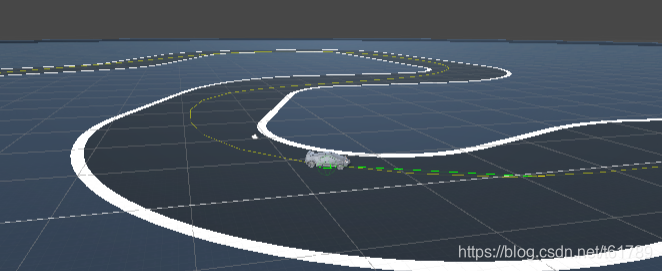
此外,在第一章中,我们也观察到有一个名为WaypointTargetObject的物体,当时只是简略的提了一下这是用于AI相关的物体。而在这章中,它却扮演了一个非常重要的角色。
接下来我们根据上述提到的各个脚本、物体,来完整地分析AI驾驶的实现原理。我们先从CarAIControl入手:
namespace UnityStandardAssets.Vehicles.Car
{[RequireComponent(typeof (CarController))]public class CarAIControl : MonoBehaviour{// 三种行为模式public enum BrakeCondition{// 一直加速,不减速NeverBrake,                 // the car simply accelerates at full throttle all the time.// 根据路径点之间的角度减速TargetDirectionDifference,  // the car will brake according to the upcoming change in direction of the target. Useful for route-based AI, slowing for corners.// 在即将到达路近点的时候减速TargetDistance,             // the car will brake as it approaches its target, regardless of the target's direction. Useful if you want the car to// head for a stationary target and come to rest when it arrives there.}// 这个脚本为车辆的控制提供了输入,就像玩家的输入一样// 就这样,这是真的在“驾驶”车辆,没有使用什么特殊的物理或者动画效果// This script provides input to the car controller in the same way that the user control script does.// As such, it is really 'driving' the car, with no special physics or animation tricks to make the car behave properly.// “闲逛”是用来让车辆变得更加像人类在操作,而不是机器在操作// 他能在驶向目标的时候轻微地改变速度和方向// "wandering" is used to give the cars a more human, less robotic feel. They can waver slightly// in speed and direction while driving towards their target.[SerializeField] [Range(0, 1)] private float m_CautiousSpeedFactor = 0.05f;               // percentage of max speed to use when being maximally cautious[SerializeField] [Range(0, 180)] private float m_CautiousMaxAngle = 50f;                  // angle of approaching corner to treat as warranting maximum caution[SerializeField] private float m_CautiousMaxDistance = 100f;                              // distance at which distance-based cautiousness begins[SerializeField] private float m_CautiousAngularVelocityFactor = 30f;                     // how cautious the AI should be when considering its own current angular velocity (i.e. easing off acceleration if spinning!)[SerializeField] private float m_SteerSensitivity = 0.05f;                                // how sensitively the AI uses steering input to turn to the desired direction[SerializeField] private float m_AccelSensitivity = 0.04f;                                // How sensitively the AI uses the accelerator to reach the current desired speed[SerializeField] private float m_BrakeSensitivity = 1f;                                   // How sensitively the AI uses the brake to reach the current desired speed[SerializeField] private float m_LateralWanderDistance = 3f;                              // how far the car will wander laterally towards its target[SerializeField] private float m_LateralWanderSpeed = 0.1f;                               // how fast the lateral wandering will fluctuate[SerializeField] [Range(0, 1)] private float m_AccelWanderAmount = 0.1f;                  // how much the cars acceleration will wander[SerializeField] private float m_AccelWanderSpeed = 0.1f;                                 // how fast the cars acceleration wandering will fluctuate[SerializeField] private BrakeCondition m_BrakeCondition = BrakeCondition.TargetDistance; // what should the AI consider when accelerating/braking?[SerializeField] private bool m_Driving;                                                  // whether the AI is currently actively driving or stopped.[SerializeField] private Transform m_Target;                                              // 'target' the target object to aim for.[SerializeField] private bool m_StopWhenTargetReached;                                    // should we stop driving when we reach the target?[SerializeField] private float m_ReachTargetThreshold = 2;                                // proximity to target to consider we 'reached' it, and stop driving.private float m_RandomPerlin;             // A random value for the car to base its wander on (so that AI cars don't all wander in the same pattern)private CarController m_CarController;    // Reference to actual car controller we are controllingprivate float m_AvoidOtherCarTime;        // time until which to avoid the car we recently collided withprivate float m_AvoidOtherCarSlowdown;    // how much to slow down due to colliding with another car, whilst avoidingprivate float m_AvoidPathOffset;          // direction (-1 or 1) in which to offset path to avoid other car, whilst avoidingprivate Rigidbody m_Rigidbody;private void Awake(){// 获得车辆的核心逻辑控件// get the car controller referencem_CarController = GetComponent<CarController>();// 车辆闲逛的随机种子// give the random perlin a random valuem_RandomPerlin = Random.value*100;m_Rigidbody = GetComponent<Rigidbody>();}private void FixedUpdate(){if (m_Target == null || !m_Driving){// 没有在驾驶或者没有目标时不应该移动,使用手刹来停下车辆// Car should not be moving,// use handbrake to stopm_CarController.Move(0, 0, -1f, 1f);}else{// 正朝向,如果速度大于最大速度的10%,则为速度方向,否则为模型方向Vector3 fwd = transform.forward;if (m_Rigidbody.velocity.magnitude > m_CarController.MaxSpeed*0.1f){fwd = m_Rigidbody.velocity;}float desiredSpeed = m_CarController.MaxSpeed;// 现在是时候决定我们是否该减速了// now it's time to decide if we should be slowing down...switch (m_BrakeCondition){// 根据路径点角度限制速度case BrakeCondition.TargetDirectionDifference:{// the car will brake according to the upcoming change in direction of the target. Useful for route-based AI, slowing for corners.// 先计算我们当前朝向与路径点的朝向之间的角度// check out the angle of our target compared to the current direction of the carfloat approachingCornerAngle = Vector3.Angle(m_Target.forward, fwd);// 也考虑一下我们当前正在转向的角速度// also consider the current amount we're turning, multiplied up and then compared in the same way as an upcoming corner anglefloat spinningAngle = m_Rigidbody.angularVelocity.magnitude*m_CautiousAngularVelocityFactor;// 角度越大越需要谨慎// if it's different to our current angle, we need to be cautious (i.e. slow down) a certain amountfloat cautiousnessRequired = Mathf.InverseLerp(0, m_CautiousMaxAngle,Mathf.Max(spinningAngle,approachingCornerAngle));// 获得需要的速度,cautiousnessRequired越大desiredSpeed越小desiredSpeed = Mathf.Lerp(m_CarController.MaxSpeed, m_CarController.MaxSpeed*m_CautiousSpeedFactor,cautiousnessRequired);break;}// 根据路近点的距离限制速度case BrakeCondition.TargetDistance:{// the car will brake as it approaches its target, regardless of the target's direction. Useful if you want the car to// head for a stationary target and come to rest when it arrives there.// 计算到达目标与自身之间的距离向量// check out the distance to targetVector3 delta = m_Target.position - transform.position;// 根据最大谨慎距离和当前距离计算距离谨慎因子float distanceCautiousFactor = Mathf.InverseLerp(m_CautiousMaxDistance, 0, delta.magnitude);// 也考虑一下我们当前正在转向的角速度// also consider the current amount we're turning, multiplied up and then compared in the same way as an upcoming corner anglefloat spinningAngle = m_Rigidbody.angularVelocity.magnitude*m_CautiousAngularVelocityFactor;// 角度越大越需要谨慎// if it's different to our current angle, we need to be cautious (i.e. slow down) a certain amountfloat cautiousnessRequired = Mathf.Max(Mathf.InverseLerp(0, m_CautiousMaxAngle, spinningAngle), distanceCautiousFactor);// 获得需要的速度,谨慎程度越大desiredSpeed越小desiredSpeed = Mathf.Lerp(m_CarController.MaxSpeed, m_CarController.MaxSpeed*m_CautiousSpeedFactor,cautiousnessRequired);break;}// 无限加速模式不需要谨慎,desiredSpeed取m_CarController.MaxSpeed,也就是不作减小case BrakeCondition.NeverBrake:break;}// 撞到其他车辆时的逃避行动// Evasive action due to collision with other cars:// 目标偏移坐标始于真正的目标坐标// our target position starts off as the 'real' target positionVector3 offsetTargetPos = m_Target.position;// 如果我们正在为了避免和其他车卡在一起而采取回避行动// if are we currently taking evasive action to prevent being stuck against another car:if (Time.time < m_AvoidOtherCarTime){// 如果有必要的话就减速(发生碰撞的时候我们在其他车后面)// slow down if necessary (if we were behind the other car when collision occured)desiredSpeed *= m_AvoidOtherCarSlowdown;// 转向其他方向// and veer towards the side of our path-to-target that is away from the other caroffsetTargetPos += m_Target.right*m_AvoidPathOffset;}else{// 无需采取回避行动,我们就可以沿着路径随机闲逛,避免AI驾驶车辆的时候看起来太死板// no need for evasive action, we can just wander across the path-to-target in a random way,// which can help prevent AI from seeming too uniform and robotic in their drivingoffsetTargetPos += m_Target.right*(Mathf.PerlinNoise(Time.time*m_LateralWanderSpeed, m_RandomPerlin)*2 - 1)*m_LateralWanderDistance;}// 使用不同的灵敏度,取决于是在加速还是减速// use different sensitivity depending on whether accelerating or braking:float accelBrakeSensitivity = (desiredSpeed < m_CarController.CurrentSpeed)? m_BrakeSensitivity: m_AccelSensitivity;// 根据灵敏度决定真正的 加速/减速 输入,clamp到[-1,1]// decide the actual amount of accel/brake input to achieve desired speed.float accel = Mathf.Clamp((desiredSpeed - m_CarController.CurrentSpeed)*accelBrakeSensitivity, -1, 1);// 利用柏林噪声来使加速度变得随机,以此来让AI的操作更像人类,不过我没太看懂为什么要这么算// add acceleration 'wander', which also prevents AI from seeming too uniform and robotic in their driving// i.e. increasing the accel wander amount can introduce jostling and bumps between AI cars in a raceaccel *= (1 - m_AccelWanderAmount) +(Mathf.PerlinNoise(Time.time*m_AccelWanderSpeed, m_RandomPerlin)*m_AccelWanderAmount);// 将之前计算过的偏移的目标坐标转换为本地坐标// calculate the local-relative position of the target, to steer towardsVector3 localTarget = transform.InverseTransformPoint(offsetTargetPos);// 计算绕y轴的本地目标角度// work out the local angle towards the targetfloat targetAngle = Mathf.Atan2(localTarget.x, localTarget.z)*Mathf.Rad2Deg;// 获得为了转向目标所需要的角度// get the amount of steering needed to aim the car towards the targetfloat steer = Mathf.Clamp(targetAngle*m_SteerSensitivity, -1, 1)*Mathf.Sign(m_CarController.CurrentSpeed);// 使用这些数据调用Move方法// feed input to the car controller.m_CarController.Move(steer, accel, accel, 0f);// 如果过于接近目标,停止驾驶// if appropriate, stop driving when we're close enough to the target.if (m_StopWhenTargetReached && localTarget.magnitude < m_ReachTargetThreshold){m_Driving = false;}}}private void OnCollisionStay(Collision col){// 检测与其他车辆的碰撞,并为此采取回避行动// detect collision against other cars, so that we can take evasive actionif (col.rigidbody != null){var otherAI = col.rigidbody.GetComponent<CarAIControl>();// 与之发生碰撞的物体上需要同样挂载有CarAIControl,否则不采取行动if (otherAI != null){// 我们会在1秒内采取回避行动// we'll take evasive action for 1 secondm_AvoidOtherCarTime = Time.time + 1;// 那么谁在前面?// but who's in front?...if (Vector3.Angle(transform.forward, otherAI.transform.position - transform.position) < 90){// 对方在前面,我们就需要减速// the other ai is in front, so it is only good manners that we ought to brake...m_AvoidOtherCarSlowdown = 0.5f;}else{// 我们在前面,无需减速// we're in front! ain't slowing down for anybody...m_AvoidOtherCarSlowdown = 1;}// 两辆车都需要采取回避行动,驶向偏离目标的方向,远离对方// both cars should take evasive action by driving along an offset from the path centre,// away from the other carvar otherCarLocalDelta = transform.InverseTransformPoint(otherAI.transform.position);float otherCarAngle = Mathf.Atan2(otherCarLocalDelta.x, otherCarLocalDelta.z);m_AvoidPathOffset = m_LateralWanderDistance*-Mathf.Sign(otherCarAngle);}}}public void SetTarget(Transform target){m_Target = target;m_Driving = true;}}
}
Unity自身写的注释也很详细,比之其他脚本而言完全不同,可能不是由同一个开发者制作的。
可见,这个脚本的主要功能,就是根据自身的状态(速度,角速度,驾驶模式),以及很重要的m_Target物体等数据调用Move方法,来实现车辆状态的更新。关于算法的实现,Unity和我的注释已经写的很清楚了,那么现在最主要的问题是,那个m_Target是什么?从上面的算法可以看出,我们的车辆是一直在“追赶”这个m_Target的,它不可能一直处于静止,否则车辆也不会启动了,那么它是怎样移动的?这个问题的答案潜藏在WaypointProgressTracker中:
namespace UnityStandardAssets.Utility
{public class WaypointProgressTracker : MonoBehaviour{// 这个脚本适用于任何的想要跟随一系列路径点的物体// This script can be used with any object that is supposed to follow a// route marked out by waypoints.// 这个脚本管理向前看的数量?(就是管理路径点吧)// This script manages the amount to look ahead along the route,// and keeps track of progress and laps.[SerializeField] private WaypointCircuit circuit; // A reference to the waypoint-based route we should follow[SerializeField] private float lookAheadForTargetOffset = 5;// The offset ahead along the route that the we will aim for[SerializeField] private float lookAheadForTargetFactor = .1f;// A multiplier adding distance ahead along the route to aim for, based on current speed[SerializeField] private float lookAheadForSpeedOffset = 10;// The offset ahead only the route for speed adjustments (applied as the rotation of the waypoint target transform)[SerializeField] private float lookAheadForSpeedFactor = .2f;// A multiplier adding distance ahead along the route for speed adjustments[SerializeField] private ProgressStyle progressStyle = ProgressStyle.SmoothAlongRoute;// whether to update the position smoothly along the route (good for curved paths) or just when we reach each waypoint.[SerializeField] private float pointToPointThreshold = 4;// proximity to waypoint which must be reached to switch target to next waypoint : only used in PointToPoint mode.public enum ProgressStyle{SmoothAlongRoute,PointToPoint,}// these are public, readable by other objects - i.e. for an AI to know where to head!public WaypointCircuit.RoutePoint targetPoint { get; private set; }public WaypointCircuit.RoutePoint speedPoint { get; private set; }public WaypointCircuit.RoutePoint progressPoint { get; private set; }public Transform target;private float progressDistance; // The progress round the route, used in smooth mode.private int progressNum; // the current waypoint number, used in point-to-point mode.private Vector3 lastPosition; // Used to calculate current speed (since we may not have a rigidbody component)private float speed; // current speed of this object (calculated from delta since last frame)// setup script propertiesprivate void Start(){// 我们使用一个物体来表示应当瞄准的点,并且这个点考虑了即将到来的速度变化// 这允许这个组件跟AI交流,不要求进一步的依赖// we use a transform to represent the point to aim for, and the point which// is considered for upcoming changes-of-speed. This allows this component// to communicate this information to the AI without requiring further dependencies.// 你可以手动创造一个物体并把它付给这个组件和AI,如此这个组件就可以更新它,AI也可以从他身上读取数据// You can manually create a transform and assign it to this component *and* the AI,// then this component will update it, and the AI can read it.if (target == null){target = new GameObject(name + " Waypoint Target").transform;}Reset();}// 把对象重置为合适的值// reset the object to sensible valuespublic void Reset(){progressDistance = 0;progressNum = 0;if (progressStyle == ProgressStyle.PointToPoint){target.position = circuit.Waypoints[progressNum].position;target.rotation = circuit.Waypoints[progressNum].rotation;}}private void Update(){if (progressStyle == ProgressStyle.SmoothAlongRoute){// 平滑路径点模式// 确定我们应当瞄准的位置// 这与当前的进度位置不同,这是两个路近的中间量// 我们使用插值来简单地平滑速度// determine the position we should currently be aiming for// (this is different to the current progress position, it is a a certain amount ahead along the route)// we use lerp as a simple way of smoothing out the speed over time.if (Time.deltaTime > 0){speed = Mathf.Lerp(speed, (lastPosition - transform.position).magnitude/Time.deltaTime,Time.deltaTime);}// 根据路程向前偏移一定距离,获取路径点target.position =circuit.GetRoutePoint(progressDistance + lookAheadForTargetOffset + lookAheadForTargetFactor*speed).position;// 路径点方向调整。这里重复计算了,为什么不缓存?target.rotation =Quaternion.LookRotation(circuit.GetRoutePoint(progressDistance + lookAheadForSpeedOffset + lookAheadForSpeedFactor*speed).direction);// 获取未偏移的路径点// get our current progress along the routeprogressPoint = circuit.GetRoutePoint(progressDistance);// 车辆的移动超过路径点的话,将路径点前移Vector3 progressDelta = progressPoint.position - transform.position;if (Vector3.Dot(progressDelta, progressPoint.direction) < 0){progressDistance += progressDelta.magnitude*0.5f;}// 记录位置lastPosition = transform.position;}else{// 点对点模式,如果足够近的话就增加路程// point to point mode. Just increase the waypoint if we're close enough:// 距离小于阈值,就将路径点移动到下一个Vector3 targetDelta = target.position - transform.position;if (targetDelta.magnitude < pointToPointThreshold){progressNum = (progressNum + 1)%circuit.Waypoints.Length;}// 设置路径对象的位置和旋转方向target.position = circuit.Waypoints[progressNum].position;target.rotation = circuit.Waypoints[progressNum].rotation;// 同平滑路径点模式一样进行路程计算// get our current progress along the routeprogressPoint = circuit.GetRoutePoint(progressDistance);Vector3 progressDelta = progressPoint.position - transform.position;if (Vector3.Dot(progressDelta, progressPoint.direction) < 0){progressDistance += progressDelta.magnitude;}lastPosition = transform.position;}}private void OnDrawGizmos(){// 画Gizmosif (Application.isPlaying){Gizmos.color = Color.green;Gizmos.DrawLine(transform.position, target.position);   // 车辆与路径对象的连线Gizmos.DrawWireSphere(circuit.GetRoutePosition(progressDistance), 1);   // 在平滑路径点上画球体Gizmos.color = Color.yellow;Gizmos.DrawLine(target.position, target.position + target.forward); // 画出路径对象的朝向}}}
}
可见这个脚本的主要目的就是更新target的状态,这个target就是之前提到的m_Target,也是场景中一直都没有用上的WaypointTargetObject。问题又来了,这个脚本是根据什么来更新target的状态的?是circuit.GetRoutePoint()。那这个东西又是什么?我们来看看circuit的类型,就能得到答案:
namespace UnityStandardAssets.Utility
{public class WaypointCircuit : MonoBehaviour{// 管理路径点的类,主要功能是根据路径值获取在闭合路径上的路径点public WaypointList waypointList = new WaypointList();[SerializeField] private bool smoothRoute = true;private int numPoints;private Vector3[] points;private float[] distances;public float editorVisualisationSubsteps = 100;public float Length { get; private set; }public Transform[] Waypoints{get { return waypointList.items; }}//this being here will save GC allocsprivate int p0n;private int p1n;private int p2n;private int p3n;private float i;private Vector3 P0;private Vector3 P1;private Vector3 P2;private Vector3 P3;// Use this for initializationprivate void Awake(){if (Waypoints.Length > 1){// 缓存路径点和路程CachePositionsAndDistances();}numPoints = Waypoints.Length;}public RoutePoint GetRoutePoint(float dist){// 计算插值后的路径点和他的方向// position and directionVector3 p1 = GetRoutePosition(dist);Vector3 p2 = GetRoutePosition(dist + 0.1f);Vector3 delta = p2 - p1;return new RoutePoint(p1, delta.normalized);}public Vector3 GetRoutePosition(float dist){int point = 0;// 获取一周的长度if (Length == 0){Length = distances[distances.Length - 1];}// 把dist规定在[0,Length]内dist = Mathf.Repeat(dist, Length);// 从起点数起,寻找dist所在的路段while (distances[point] < dist){++point;}// 获得距离dist最近的两个路径点// get nearest two points, ensuring points wrap-around start & end of circuitp1n = ((point - 1) + numPoints)%numPoints;p2n = point;// 获得两点距离间的百分值// found point numbers, now find interpolation value between the two middle pointsi = Mathf.InverseLerp(distances[p1n], distances[p2n], dist);if (smoothRoute){// 使用平滑catmull-rom曲线// smooth catmull-rom calculation between the two relevant points// 再获得最近的两个点,一共四个,用于计算catmull-rom曲线// get indices for the surrounding 2 points, because// four points are required by the catmull-rom functionp0n = ((point - 2) + numPoints)%numPoints;p3n = (point + 1)%numPoints;// 这里没太懂,似乎是只有三个路径点时,计算出的两个新路径点会重合// 2nd point may have been the 'last' point - a dupe of the first,// (to give a value of max track distance instead of zero)// but now it must be wrapped back to zero if that was the case.p2n = p2n%numPoints;P0 = points[p0n];P1 = points[p1n];P2 = points[p2n];P3 = points[p3n];// 计算catmull-rom曲线// 为什么这里的i值时1、2号点的百分值?为什么不是0、3号点的?return CatmullRom(P0, P1, P2, P3, i);}else{// simple linear lerp between the two points:p1n = ((point - 1) + numPoints)%numPoints;p2n = point;return Vector3.Lerp(points[p1n], points[p2n], i);}}private Vector3 CatmullRom(Vector3 p0, Vector3 p1, Vector3 p2, Vector3 p3, float i){// 魔幻代码,计算catmull-rom曲线// (其实google一下就有公式了)// comments are no use here... it's the catmull-rom equation.// Un-magic this, lord vector!return 0.5f *((2*p1) + (-p0 + p2)*i + (2*p0 - 5*p1 + 4*p2 - p3)*i*i +(-p0 + 3*p1 - 3*p2 + p3)*i*i*i);}private void CachePositionsAndDistances(){// 把每个点的坐标和到达某点的总距离转换成数组// 距离数组中的值表示从起点到达第n个路径点走过的路程,最后一个为起点,路程为一周的路程而不是0// transfer the position of each point and distances between points to arrays for// speed of lookup at runtimepoints = new Vector3[Waypoints.Length + 1];distances = new float[Waypoints.Length + 1];float accumulateDistance = 0;for (int i = 0; i < points.Length; ++i){var t1 = Waypoints[(i)%Waypoints.Length];var t2 = Waypoints[(i + 1)%Waypoints.Length];if (t1 != null && t2 != null){Vector3 p1 = t1.position;Vector3 p2 = t2.position;points[i] = Waypoints[i%Waypoints.Length].position;distances[i] = accumulateDistance;accumulateDistance += (p1 - p2).magnitude;}}}private void OnDrawGizmos(){DrawGizmos(false);}private void OnDrawGizmosSelected(){DrawGizmos(true);}private void DrawGizmos(bool selected){waypointList.circuit = this;if (Waypoints.Length > 1){numPoints = Waypoints.Length;CachePositionsAndDistances();Length = distances[distances.Length - 1];Gizmos.color = selected ? Color.yellow : new Color(1, 1, 0, 0.5f);Vector3 prev = Waypoints[0].position;if (smoothRoute){for (float dist = 0; dist < Length; dist += Length/editorVisualisationSubsteps){Vector3 next = GetRoutePosition(dist + 1);Gizmos.DrawLine(prev, next);prev = next;}Gizmos.DrawLine(prev, Waypoints[0].position);}else{for (int n = 0; n < Waypoints.Length; ++n){Vector3 next = Waypoints[(n + 1)%Waypoints.Length].position;Gizmos.DrawLine(prev, next);prev = next;}}}}[Serializable]public class WaypointList{public WaypointCircuit circuit;public Transform[] items = new Transform[0];}// 路径点结构体public struct RoutePoint{public Vector3 position;public Vector3 direction;public RoutePoint(Vector3 position, Vector3 direction){this.position = position;this.direction = direction;}}}
}
这个类所使用的数据来自场景中的Waypoints对象及其子对象,并且这个类就是挂载在Waypoints上的。那么事情就很明了了:
- 在场景中定义一系列空物体,他们有着规律的坐标,能够组成一圈闭合的路径,将其赋值给
WaypointCircuit WaypointCircuit根据这些数据进行缓存,将他们的坐标和路程转换成数组,方便计算WaypointProgressTracker调用WaypointCircuit的GetRoutePoint方法以及它的公开属性计算并更新WaypointTargetObject的坐标CarAIControl使用WaypointTargetObject的坐标和车辆自身数据调用CarController的Move方法更新车辆数据
一条完整的AI逻辑链,从数据到决策再到数据,就分析完成了。算法的实现我同Unity的注释一起清楚地标识在代码中。此外还有一些Editor和Gizmos的代码,由于这些代码我运行的时候还在报数组越界的Error,我也不想分析了,有兴趣的话可以自己去AssetStore下载,或是克隆我包含了注释的Git仓库:https://github.com/t61789/StandardAssetWithAnnotation
赛车游戏场景到这里就告一段落了,下一章分析第三人称场景或者第一人称场景吧,看心情。
这篇关于UnityStandardAsset工程、源码分析_5_赛车游戏[AI控制]_AI机制的文章就介绍到这儿,希望我们推荐的文章对编程师们有所帮助!


