本文主要是介绍UnityStandardAsset工程、源码分析_1_赛车游戏[玩家控制]_输入系统,希望对大家解决编程问题提供一定的参考价值,需要的开发者们随着小编来一起学习吧!
前言
好久没写博客了。最近在做demo,感觉在游戏架构设计方面遇到了瓶颈。在大学这几年里我基本是在全程造轮子,没有去阅读和分析别人写的源码,导致我缺少横向比较,甚至不知道自己的设计是否存在问题。这几天终于能沉下心来读一读别人的代码,查缺补漏,并且吸取一下别人的经验。
不过好的unity开源项目还挺难找的,要么就是像这样设计得过于简陋,要么就是像OpenRA那样有点杂七杂八。最后还是选定了Unity的StandardAsset,简略看了一下,还是有点东西的。
不知道能写到什么程度,反正写一点是一点吧。
用到的素材
赛车[玩家控制]
先来看看这游戏怎么玩。游戏提供了两种操作方式:
- 通过硬件HardwareInput操作,也就是手柄,左摇杆向前加速,向后减速,左右转向。
- 通过手机倾斜转向,虚拟按钮前进后退。

抽丝剥茧的首要任务就是找到线头,那我们就从最核心的车辆系统入手。
这是车辆prefab的内容:

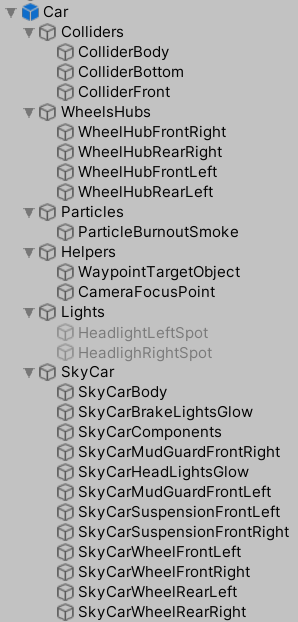
- Colliders是车辆总体的碰撞盒,分为三个部分,顶部,挡风玻璃,底盘,这很好理解。
- WheelsHub是车辆的轮胎碰撞盒,分为四个,对应车辆的四个轮胎,均为WheelCollider。
- Particles是车辆的尾烟,玩一下就可以知道在车辆的行驶过程中尾部会有烟尘飘起,就是这个粒子系统。
- Helpers内WaypointTargetObject用于AI导航,这之后再说,玩家控制用不上。CameraFocusPoint是摄像机的瞄准点。
- Light是车的两个前大灯,为聚光灯模式,设置为Active以后可以亮,否则就不亮。
- SkyCar内是车辆的Mesh,各自独立,用途与其名字对应。
在根节点Car上挂载有车辆的控制逻辑,此外,在四个轮胎上分别有各自的轮胎印控制器,用于模拟轮胎印,所以我们先看最核心的车辆控制逻辑。

CarController就是车辆的核心逻辑;CarUserControl是控制接口,为用户输入与CarController的中间件;CarAudio被CarController调用,控制声音的播放。
我在CarController里找了一下,并没有发现有Update(),那逻辑是怎么运行的呢?答案就是CarUserControl。
private void FixedUpdate(){// pass the input to the car!float h = CrossPlatformInputManager.GetAxis("Horizontal");  //本章重点float v = CrossPlatformInputManager.GetAxis("Vertical");#if !MOBILE_INPUTfloat handbrake = CrossPlatformInputManager.GetAxis("Jump");//m_Car是CarController类型的变量,也就是当前车辆的核心控制脚本//他的Move方法定义为public void Move(float steering, float accel, float footbrake, float handbrake)//作用是通过几个变量的输入改变车辆速度,具体实现我放在下章分析,这章只考虑如何获取输入m_Car.Move(h, v, v, handbrake);
#elsem_Car.Move(h, v, v, 0f);
#endif}
可以看出Unity做了平台适配,让不同的输入方式在不同的平台上得出较为一致的结果,而作为润滑剂的就是CrossPlatformInputManager类,接下来我分析一下他的原理,先放代码。
namespace UnityStandardAssets.CrossPlatformInput
{public static class CrossPlatformInputManager{public enum ActiveInputMethod{Hardware,Touch}private static VirtualInput activeInput;private static VirtualInput s_TouchInput;private static VirtualInput s_HardwareInput;static CrossPlatformInputManager(){s_TouchInput = new MobileInput();s_HardwareInput = new StandaloneInput();//在这里决定使用手机输入还是硬件输入
#if MOBILE_INPUTactiveInput = s_TouchInput;
#elseactiveInput = s_HardwareInput;
#endif}//切换输入模式public static void SwitchActiveInputMethod(ActiveInputMethod activeInputMethod){switch (activeInputMethod){case ActiveInputMethod.Hardware:activeInput = s_HardwareInput;break;case ActiveInputMethod.Touch:activeInput = s_TouchInput;break;}}//接下来的方法均为静态调用public static bool AxisExists(string name){return activeInput.AxisExists(name);}public static bool ButtonExists(string name){return activeInput.ButtonExists(name);}public static void RegisterVirtualAxis(VirtualAxis axis){activeInput.RegisterVirtualAxis(axis);}public static void RegisterVirtualButton(VirtualButton button){activeInput.RegisterVirtualButton(button);}public static void UnRegisterVirtualAxis(string name){if (name == null){throw new ArgumentNullException("name");}activeInput.UnRegisterVirtualAxis(name);}public static void UnRegisterVirtualButton(string name){activeInput.UnRegisterVirtualButton(name);}// returns a reference to a named virtual axis if it exists otherwise nullpublic static VirtualAxis VirtualAxisReference(string name){return activeInput.VirtualAxisReference(name);}// returns the platform appropriate axis for the given namepublic static float GetAxis(string name){return GetAxis(name, false);}public static float GetAxisRaw(string name){return GetAxis(name, true);}// private function handles both types of axis (raw and not raw)private static float GetAxis(string name, bool raw){return activeInput.GetAxis(name, raw);}// -- Button handling --public static bool GetButton(string name){return activeInput.GetButton(name);}public static bool GetButtonDown(string name){return activeInput.GetButtonDown(name);}public static bool GetButtonUp(string name){return activeInput.GetButtonUp(name);}public static void SetButtonDown(string name){activeInput.SetButtonDown(name);}public static void SetButtonUp(string name){activeInput.SetButtonUp(name);}public static void SetAxisPositive(string name){activeInput.SetAxisPositive(name);}public static void SetAxisNegative(string name){activeInput.SetAxisNegative(name);}public static void SetAxisZero(string name){activeInput.SetAxisZero(name);}public static void SetAxis(string name, float value){activeInput.SetAxis(name, value);}public static Vector3 mousePosition{get { return activeInput.MousePosition(); }}public static void SetVirtualMousePositionX(float f){activeInput.SetVirtualMousePositionX(f);}public static void SetVirtualMousePositionY(float f){activeInput.SetVirtualMousePositionY(f);}public static void SetVirtualMousePositionZ(float f){activeInput.SetVirtualMousePositionZ(f);}public class VirtualAxis;//等下分析public class VirtualButton;//等下分析}
}可见这个类的主要职责就是决定应当使用硬件输入还是手机输入,并且维护这个VirtualInput类型的activeInput。
他的设计近似于单例模式和装饰器模式,但不完全符合,他静态储存了activeInput,并提供了一系列静态方法给用户,用于与VirtualInput交互。本身没有储存什么输入相关的数据,只是利用静态方法使得VirtualInput的调用更加方便。
其中有两个内部类VirtualAxis和VirtualButton等下分析,先来看看这个类最主要的维护目标VirtualInput。
namespace UnityStandardAssets.CrossPlatformInput
{// 这是一个抽象类,在CrossPlatformInputManager中可以看到它有两种实现,MobileInput和StandaloneInput// 提供三种输入数据,虚拟光标VirtualMousePosition,轴VirtualAxis,按键VirtualButtonpublic abstract class VirtualInput{// 利用手机的倾斜来模拟光标,与正常的鼠标输入一样为Vector3public Vector3 virtualMousePosition { get; private set; }// 缓冲区,储存了输入的数据,作为输入控制器的类通过id填入数据,需要数据的类通过id获取数据// 输入控制器的作用是将原始数据转化成方便读取的格式,例如TiltInpt类将手机加速度转化为角度,再映射到[-1,1],用于控制转向// 这个是轴数据的缓冲区// Dictionary to store the name relating to the virtual axesprotected Dictionary<string, CrossPlatformInputManager.VirtualAxis> m_VirtualAxes =new Dictionary<string, CrossPlatformInputManager.VirtualAxis>();// 这个是按键数据的缓冲区// list of the axis and button names that have been flagged to always use a virtual axis or buttonprotected Dictionary<string, CrossPlatformInputManager.VirtualButton> m_VirtualButtons =new Dictionary<string, CrossPlatformInputManager.VirtualButton>();protected List<string> m_AlwaysUseVirtual = new List<string>();// 判断是否有名为name的轴输入public bool AxisExists(string name){return m_VirtualAxes.ContainsKey(name);}// 判断是否有名为name的按键输入public bool ButtonExists(string name){return m_VirtualButtons.ContainsKey(name);}// 在使用之前需要注册,这个工作是由输入控制器完成的// 相当于声明变量,在上述缓冲区中开辟一个区域,才能以id进行写入和读出// 注册一个轴输入public void RegisterVirtualAxis(CrossPlatformInputManager.VirtualAxis axis){// id不可重复// check if we already have an axis with that name and log and error if we doif (m_VirtualAxes.ContainsKey(axis.name)){Debug.LogError("There is already a virtual axis named " + axis.name + " registered.");}else{// 注册// add any new axesm_VirtualAxes.Add(axis.name, axis);// 是否匹配InputManager,暂时没有发现有什么用处// if we dont want to match with the input manager setting then revert to always using virtualif (!axis.matchWithInputManager){m_AlwaysUseVirtual.Add(axis.name);}}}// 注册一个按键输入public void RegisterVirtualButton(CrossPlatformInputManager.VirtualButton button){// check if already have a buttin with that name and log an error if we doif (m_VirtualButtons.ContainsKey(button.name)){Debug.LogError("There is already a virtual button named " + button.name + " registered.");}else{// add any new buttonsm_VirtualButtons.Add(button.name, button);// if we dont want to match to the input manager then always use a virtual axisif (!button.matchWithInputManager){m_AlwaysUseVirtual.Add(button.name);}}}// 取消一个轴输入public void UnRegisterVirtualAxis(string name){// if we have an axis with that name then remove it from our dictionary of registered axesif (m_VirtualAxes.ContainsKey(name)){m_VirtualAxes.Remove(name);}}// 取消一个按键输入public void UnRegisterVirtualButton(string name){// if we have a button with this name then remove it from our dictionary of registered buttonsif (m_VirtualButtons.ContainsKey(name)){m_VirtualButtons.Remove(name);}}// 根据id获取输入,如果不存在就返回null// returns a reference to a named virtual axis if it exists otherwise nullpublic CrossPlatformInputManager.VirtualAxis VirtualAxisReference(string name){return m_VirtualAxes.ContainsKey(name) ? m_VirtualAxes[name] : null;}// 设置虚拟光标的x坐标public void SetVirtualMousePositionX(float f){virtualMousePosition = new Vector3(f, virtualMousePosition.y, virtualMousePosition.z);}// 设置虚拟光标的y坐标public void SetVirtualMousePositionY(float f){virtualMousePosition = new Vector3(virtualMousePosition.x, f, virtualMousePosition.z);}// 设置虚拟光标的z坐标public void SetVirtualMousePositionZ(float f){virtualMousePosition = new Vector3(virtualMousePosition.x, virtualMousePosition.y, f);}// 以下方法通过子类来具体实现public abstract float GetAxis(string name, bool raw);public abstract bool GetButton(string name);public abstract bool GetButtonDown(string name);public abstract bool GetButtonUp(string name);public abstract void SetButtonDown(string name);public abstract void SetButtonUp(string name);public abstract void SetAxisPositive(string name);public abstract void SetAxisNegative(string name);public abstract void SetAxisZero(string name);public abstract void SetAxis(string name, float value);public abstract Vector3 MousePosition();}
}
现在分析上述的三种输入模式中的轴VirtualAxis,按键VirtualButton
// virtual axis and button classes - applies to mobile input// Can be mapped to touch joysticks, tilt, gyro, etc, depending on desired implementation.// Could also be implemented by other input devices - kinect, electronic sensors, etc// 大意就是说这个类可以将各种各样的输入映射成可读取的格式// 这其中只有一个float类型的值,代表只能存取轴上的一个分量的数据,例如x轴的值或者y轴的值,而非摇杆向量public class VirtualAxis{public string name { get; private set; } // 输入缓冲区中的idprivate float m_Value; // 值public bool matchWithInputManager { get; private set; } // 暂时不知道有啥用public VirtualAxis(string name): this(name, true){}public VirtualAxis(string name, bool matchToInputSettings){this.name = name;matchWithInputManager = matchToInputSettings;}// 取消注册,调用的是CrossPlatformInputManager的静态方法,自动寻找可用的VirtualInput// removes an axes from the cross platform input systempublic void Remove(){UnRegisterVirtualAxis(name);}// 保存值// a controller gameobject (eg. a virtual thumbstick) should update this classpublic void Update(float value){m_Value = value;}// 读取值public float GetValue{get { return m_Value; }}// 不知道跟上一个方法有什么区别public float GetValueRaw{get { return m_Value; }}}// a controller gameobject (eg. a virtual GUI button) should call the// 'pressed' function of this class. Other objects can then read the// Get/Down/Up state of this button.// 输入控制器应当调用这个对象的Pressed()方法,其他对象就可以获取这个按键的Get\Down\Up状态public class VirtualButton{public string name { get; private set; } // 输入缓冲区中的idpublic bool matchWithInputManager { get; private set; } // 暂时不知道有啥用private int m_LastPressedFrame = -5; // 最后一次按下按钮的帧private int m_ReleasedFrame = -5; // 释放按钮的帧private bool m_Pressed; // 是否已被按下public VirtualButton(string name): this(name, true){}public VirtualButton(string name, bool matchToInputSettings){this.name = name;matchWithInputManager = matchToInputSettings;}// A controller gameobject should call this function when the button is pressed downpublic void Pressed(){if (m_Pressed){return;}m_Pressed = true;m_LastPressedFrame = Time.frameCount;}// A controller gameobject should call this function when the button is releasedpublic void Released(){m_Pressed = false;m_ReleasedFrame = Time.frameCount;}// the controller gameobject should call Remove when the button is destroyed or disabledpublic void Remove(){UnRegisterVirtualButton(name);}// 按键是否已按下// these are the states of the button which can be read via the cross platform input systempublic bool GetButton{get { return m_Pressed; }}// 按键是否正在被按下public bool GetButtonDown{get{return m_LastPressedFrame - Time.frameCount == -1;}}// 按键是否正在被抬起public bool GetButtonUp{get{return (m_ReleasedFrame == Time.frameCount - 1);}}}
这两种数据都是由输入控制器写入数据,其他对象读取,通过VirtualInput管理。
在CrossPlatformInputManager中有这么一段代码:
	s_TouchInput = new MobileInput();s_HardwareInput = new StandaloneInput();
#if MOBILE_INPUTactiveInput = s_TouchInput;
#elseactiveInput = s_HardwareInput;
#endif
s_TouchInput,s_HardwareInput,activeInput均为VirtualInput类型或其子类,前两个实现分别为MobileInput和StandaloneInput,上转型为VirtualInput,根据需要赋值给activeInput
接下来我们看下MobileInput和StandaloneInpt的具体实现:
public class MobileInput : VirtualInput{// 注册按钮private void AddButton(string name){// we have not registered this button yet so add it, happens in the constructorCrossPlatformInputManager.RegisterVirtualButton(new CrossPlatformInputManager.VirtualButton(name));}// 注册轴private void AddAxes(string name){// we have not registered this button yet so add it, happens in the constructorCrossPlatformInputManager.RegisterVirtualAxis(new CrossPlatformInputManager.VirtualAxis(name));}// 获取轴,缓冲区内没有的话就注册一个,下同public override float GetAxis(string name, bool raw){if (!m_VirtualAxes.ContainsKey(name)){AddAxes(name);}return m_VirtualAxes[name].GetValue;}// 按下按钮public override void SetButtonDown(string name){if (!m_VirtualButtons.ContainsKey(name)){AddButton(name);}m_VirtualButtons[name].Pressed();}// 抬起按钮public override void SetButtonUp(string name){if (!m_VirtualButtons.ContainsKey(name)){AddButton(name);}m_VirtualButtons[name].Released();}// 将轴设为正值public override void SetAxisPositive(string name){if (!m_VirtualAxes.ContainsKey(name)){AddAxes(name);}m_VirtualAxes[name].Update(1f);}// 将轴设为负值public override void SetAxisNegative(string name){if (!m_VirtualAxes.ContainsKey(name)){AddAxes(name);}m_VirtualAxes[name].Update(-1f);}// 将轴设为0public override void SetAxisZero(string name){if (!m_VirtualAxes.ContainsKey(name)){AddAxes(name);}m_VirtualAxes[name].Update(0f);}// 设置轴的值public override void SetAxis(string name, float value){if (!m_VirtualAxes.ContainsKey(name)){AddAxes(name);}m_VirtualAxes[name].Update(value);}// 读取按钮正在按下public override bool GetButtonDown(string name){if (m_VirtualButtons.ContainsKey(name)){return m_VirtualButtons[name].GetButtonDown;}AddButton(name);return m_VirtualButtons[name].GetButtonDown;}// 读取按钮正在抬起public override bool GetButtonUp(string name){if (m_VirtualButtons.ContainsKey(name)){return m_VirtualButtons[name].GetButtonUp;}AddButton(name);return m_VirtualButtons[name].GetButtonUp;}// 读取按钮已被按下public override bool GetButton(string name){if (m_VirtualButtons.ContainsKey(name)){return m_VirtualButtons[name].GetButton;}AddButton(name);return m_VirtualButtons[name].GetButton;}// 获取虚拟光标位置public override Vector3 MousePosition(){return virtualMousePosition;}}public class StandaloneInput : VirtualInput{// 获取轴的值public override float GetAxis(string name, bool raw){// 从Input类中直接获取return raw ? Input.GetAxisRaw(name) : Input.GetAxis(name);}// 下同MobileInput,只不过来源为Input类public override bool GetButton(string name){return Input.GetButton(name);}public override bool GetButtonDown(string name){return Input.GetButtonDown(name);}public override bool GetButtonUp(string name){return Input.GetButtonUp(name);}// standaloneInput只能从硬件获取数据,而不能被设置值,所以调用时会抛出异常public override void SetButtonDown(string name){throw new Exception(" This is not possible to be called for standalone input. Please check your platform and code where this is called");}public override void SetButtonUp(string name){throw new Exception(" This is not possible to be called for standalone input. Please check your platform and code where this is called");}public override void SetAxisPositive(string name){throw new Exception(" This is not possible to be called for standalone input. Please check your platform and code where this is called");}public override void SetAxisNegative(string name){throw new Exception(" This is not possible to be called for standalone input. Please check your platform and code where this is called");}public override void SetAxisZero(string name){throw new Exception(" This is not possible to be called for standalone input. Please check your platform and code where this is called");}public override void SetAxis(string name, float value){throw new Exception(" This is not possible to be called for standalone input. Please check your platform and code where this is called");}public override Vector3 MousePosition(){return Input.mousePosition;}}
从上述代码来看StandaloneInput直接从硬件读取数据,不需要也不能被其他诸如输入控制器的类赋值的,也就是说它不需要父类VirtualInput所具有的缓存功能。MobileInput则与StandaloneInput不同,它需要输入控制器来向缓冲区内写入值,才能由其他类读取值。
在这个演示工程中,通过手机倾斜与UI触控的操作模式用到了这个功能。
TiltInput通过手机倾斜控制水平转向的输入控制器,id为Horizontal,这个脚本被附加在CarTiltControls\TiltSteerInput这个空对象上AxisTouchButton分别附加在CarTiltControls\Accelerator和CarTiltControls\Brake这两个按钮UI上,id均为Vertical,但是加速的AxisValue为1,减速的AxisValue为-1
我们先来看TiltInput的代码:
public class TiltInput : MonoBehaviour{// options for the various orientations// 用于计算角度public enum AxisOptions{ForwardAxis,SidewaysAxis,}[Serializable]public class AxisMapping{public enum MappingType{NamedAxis, // 直接控制轴MousePositionX, // 虚拟光标x轴方向MousePositionY, // 虚拟光标y轴方向MousePositionZ // 虚拟光标z轴方向};public MappingType type; // 映射方式public string axisName; // 轴的id}public AxisMapping mapping; // 基础设置public AxisOptions tiltAroundAxis = AxisOptions.ForwardAxis; // 用于计算角度public float fullTiltAngle = 25; // 手机倾斜角度的限制public float centreAngleOffset = 0; // 倾斜的初始角度偏移值private CrossPlatformInputManager.VirtualAxis m_SteerAxis; // 对应的轴private void OnEnable(){// 初始化自己的数据储存单元并且注册,若是虚拟光标控制就无需存储和注册if (mapping.type == AxisMapping.MappingType.NamedAxis){m_SteerAxis = new CrossPlatformInputManager.VirtualAxis(mapping.axisName);CrossPlatformInputManager.RegisterVirtualAxis(m_SteerAxis);}}private void Update(){float angle = 0;if (Input.acceleration != Vector3.zero){switch (tiltAroundAxis){// 将手机加速矢量映射成角度case AxisOptions.ForwardAxis: // 手机左右摆动angle = Mathf.Atan2(Input.acceleration.x, -Input.acceleration.y)*Mathf.Rad2Deg +centreAngleOffset; break;case AxisOptions.SidewaysAxis: // 手机前后摆动angle = Mathf.Atan2(Input.acceleration.z, -Input.acceleration.y)*Mathf.Rad2Deg +centreAngleOffset;break;}}float axisValue = Mathf.InverseLerp(-fullTiltAngle, fullTiltAngle, angle)*2 - 1; // 将角度映射到-1,1之间switch (mapping.type){case AxisMapping.MappingType.NamedAxis:m_SteerAxis.Update(axisValue); // 更新角度break;case AxisMapping.MappingType.MousePositionX: // 更新虚拟光标轴坐标CrossPlatformInputManager.SetVirtualMousePositionX(axisValue*Screen.width);break;case AxisMapping.MappingType.MousePositionY:CrossPlatformInputManager.SetVirtualMousePositionY(axisValue*Screen.width);break;case AxisMapping.MappingType.MousePositionZ:CrossPlatformInputManager.SetVirtualMousePositionZ(axisValue*Screen.width);break;}}private void OnDisable(){m_SteerAxis.Remove();}}
以上代码说明了TiltInput有两种映射模式,一种是将手机摆动的数据映射成角度,再将角度映射到[-1,1]上,需要使用VirtualInput的缓存功能。另一种就是映射成虚拟光标的轴坐标,无需缓存。
再来看AxisTouchButton:
public class AxisTouchButton : MonoBehaviour, IPointerDownHandler, IPointerUpHandler{// 说是被设计成成对使用的按钮,一个固定值-1,一个固定值1,就像前进按钮和后退按钮,感觉没啥必要// designed to work in a pair with another axis touch button// (typically with one having -1 and one having 1 axisValues)public string axisName = "Horizontal"; // The name of the axis // 轴的idpublic float axisValue = 1; // The axis that the value has // 被按下后输出的固定值public float responseSpeed = 3; // The speed at which the axis touch button responds // 朝着固定值移动的速度public float returnToCentreSpeed = 3; // The speed at which the button will return to its centre // 说是返回0的速度,但没有被调用AxisTouchButton m_PairedWith; // Which button this one is paired with // 一对按钮中的另一个CrossPlatformInputManager.VirtualAxis m_Axis; // A reference to the virtual axis as it is in the cross platform input // 储存轴信息的类void OnEnable(){// 未被注册就创建存储类并注册if (!CrossPlatformInputManager.AxisExists(axisName)){// if the axis doesnt exist create a new one in cross platform inputm_Axis = new CrossPlatformInputManager.VirtualAxis(axisName);CrossPlatformInputManager.RegisterVirtualAxis(m_Axis);}else{// 已被注册就直接获取m_Axis = CrossPlatformInputManager.VirtualAxisReference(axisName);}FindPairedButton(); // 找另外一个按钮}void FindPairedButton(){// 寻找轴id相同的另一个按钮// find the other button witch which this button should be paired// (it should have the same axisName)var otherAxisButtons = FindObjectsOfType(typeof(AxisTouchButton)) as AxisTouchButton[];// 获取所有AxisTouchButton对象,遍历查找轴id相同的按钮if (otherAxisButtons != null){for (int i = 0; i < otherAxisButtons.Length; i++){if (otherAxisButtons[i].axisName == axisName && otherAxisButtons[i] != this){m_PairedWith = otherAxisButtons[i];}}}}void OnDisable(){// The object is disabled so remove it from the cross platform input systemm_Axis.Remove();}// 使当前值朝着固定值移动public void OnPointerDown(PointerEventData data){if (m_PairedWith == null){FindPairedButton();}// update the axis and record that the button has been pressed this framem_Axis.Update(Mathf.MoveTowards(m_Axis.GetValue, axisValue, responseSpeed * Time.deltaTime));}// 使当前值朝着0移动public void OnPointerUp(PointerEventData data){m_Axis.Update(Mathf.MoveTowards(m_Axis.GetValue, 0, responseSpeed * Time.deltaTime));}}
这个类通过MoveTowards方法来使加速度平滑变化,而非即刻达到峰值。不过设定成结对使用的模式我不是很理解优势在哪里。
总结
先来总结一下重要的部分:
- 用户对象通过
CrossPlatformInputManager的静态方法来获取输入值。 CrossPlatformInputManager提供硬件输入和虚拟输入之间的切换工作,并且通过静态属性和静态方法使得调用更加方便。VirtualInput作为抽象基类,提供了数据缓冲的功能,并定义了一系列方法用于让功能不同的子类自行重写,也让CrossPlatformInputManager方便的调用。CrossPlatformInputManager.VirtualAxis类作为输入数据缓冲区的存储单元,需要注册才能被用户对象读取,以及被输入控制器写入。- 输入控制器
TiltInput和AxisTouchButton负责读取用户输入并按某种映射模式将数据转化为方便使用的格式,存入缓冲区或是直接被用户对象使用。
总体来说,这个输入系统很好地完成了用户输入与核心逻辑之间的润滑功能,但弯弯绕的注册功能和意义不明的按钮结对使用功能让系统的耦合度增大了不少。
感觉今天写了好多东西啊,下一章分析车辆的核心逻辑吧。
这篇关于UnityStandardAsset工程、源码分析_1_赛车游戏[玩家控制]_输入系统的文章就介绍到这儿,希望我们推荐的文章对编程师们有所帮助!


