本文主要是介绍LLM推理部署(六):TogetherAI推出世界上LLM最快推理引擎,性能超过vLLM和TGI三倍,希望对大家解决编程问题提供一定的参考价值,需要的开发者们随着小编来一起学习吧!
LLM能有多快?答案在于LLM推理的最新突破。
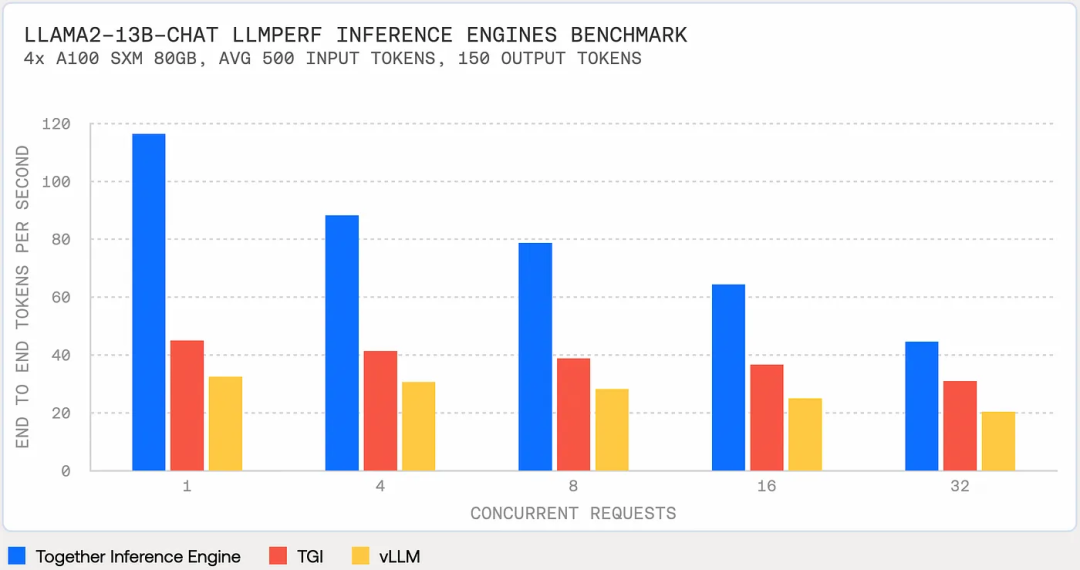
TogetherAI声称,他们在CUDA上构建了世界上最快的LLM推理引擎,该引擎运行在NVIDIA Tensor Core GPU上。Together推理引擎可以支持100多个开源大模型,比如Llama-2,并在Llama-2–70B-Chat上每秒生成117个tokens,在Llama2–13B-Chat中每秒生成171个tokens。
文本将从以下几点进行介绍:
- Together推理引擎技术;
- 使用Python API进行LLM推理;
- 与LangChain的集成;
- 管理聊天历史记录

一、TogetherAI推动LLM推理的极限
TogetherAI新的LLM推理引擎性能超过vLLM和TGI,如下图所示:

定价合理,Llama-2–13b Chat不仅比GPT 3.5 Turbo便宜6倍,而且速度快1.85倍。

TogetherAI推理引擎的方法结合了以下三个关键技术:
FlashAttention-2:可以提高LLM的训练和微调速度4倍以上,并在NVIDIA A100s上实现了72%的模型FLOP利用率。这一点很重要,因为传统的注意力计算受内存带宽限制,通常会进行大量内存交换。Flash Attention重组矩阵运算以减少内存交换,使模型速度翻倍或更多;
Flash-Decoding:加快推理过程中的注意力计算,对超长序列,生成速度可以提高8倍。对输入序列中的多个tokens通过重新组织句子计算可以批处理注意力计算。对短Prompt影响很小,但对于较长的序列(例如,10ktokens),性能可能会翻倍;
Medusa:在LLM的最后隐藏状态之上添加多个头来预测下一个token,然后使用模型来验证这个预测的token,推理速度可以提高2倍。
让我们看看TogetherAI在实践中是如何工作的。
二、TogetherAI如何使用
登录TogetherAI(https://www.together.ai/)并注册即可获得25美元的免费积分。
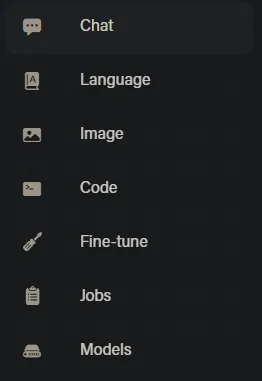
TogetherAI提供了使用LLM的各种功能,可以在左侧导航窗格中看到其中的一些功能。

可以在“设置”中找到您的API密钥和帐单信息。

可以在UI上测试不同的功能,但我们真正想要的是通过API访问。
2.1 设置环境
让我们从设置虚拟环境开始:
mkdir togetherai-serving && cd togetherai-servingpython3 -m venv togetherai-serving-envsource togetherai-serving-env/bin/activatepip3 install ipykernel jupyterpip3 install python-dotenvpip3 install --upgrade togetherpip3 install langchain huggingface_hub# Optionally, fire up VSCode or your favorite IDE and let's get rolling!code .
创建.env文件并添加TogetherAI API密钥:
TOGETHER_API_KEY=<Your API Key>和导入所需的库:
import osimport timeimport jsonimport loggingfrom datetime import datetimeimport togetherfrom langchain.llms.base import LLMfrom langchain import PromptTemplate, LLMChainfrom dotenv import load_dotenv # The dotenv library's load_dotenv function reads a .env file to load environment variables into the process environment. This is a common method to handle configuration settings securely.# Load env variablesload_dotenv()# Set up logginglogging.basicConfig(level=logging.INFO)
2.2 了解TogetherAI Python API
我们现在可以查看一下TogetherAI支持的模型,并选择一个来使用:
model_list = together.Models.list()print(f"There are {len(model_list)} models to choose from!")[model['name'] for model in model_list][:20]
总共支持103个模型,下面查看前20个模型
There are 103 models to choose from!['Austism/chronos-hermes-13b','EleutherAI/llemma_7b','EleutherAI/pythia-12b-v0','EleutherAI/pythia-1b-v0','EleutherAI/pythia-2.8b-v0','EleutherAI/pythia-6.9b','Gryphe/MythoMax-L2-13b','HuggingFaceH4/starchat-alpha','NousResearch/Nous-Hermes-13b','NousResearch/Nous-Hermes-Llama2-13b','NousResearch/Nous-Hermes-Llama2-70b','NousResearch/Nous-Hermes-llama-2-7b','NumbersStation/nsql-llama-2-7B','Open-Orca/Mistral-7B-OpenOrca','OpenAssistant/oasst-sft-4-pythia-12b-epoch-3.5','OpenAssistant/stablelm-7b-sft-v7-epoch-3','Phind/Phind-CodeLlama-34B-Python-v1','Phind/Phind-CodeLlama-34B-v2','SG161222/Realistic_Vision_V3.0_VAE','WizardLM/WizardCoder-15B-V1.0']
让我们使用“togethercomputer/lama-2–7b chat”来生成一个回复:
prompt = "<human>: What do you think about Large Language Models?\n<bot>:"model = "togethercomputer/llama-2-7b-chat"output = together.Complete.create(prompt = prompt,model = model,max_tokens = 256,temperature = 0.8,top_k = 60,top_p = 0.6,repetition_penalty = 1.1,stop = ['<human>', '\n\n'])print(json.dumps(output, indent = 4))
花了2秒才得到完整的答案,以下是输出:
{"id": "8268eed93d23b903-AMS","status": "finished","prompt": ["<human>: What do you think about Large Language Models?\n<bot>:"],"model": "togethercomputer/llama-2-7b-chat","model_owner": "","tags": {},"num_returns": 1,"args": {"model": "togethercomputer/llama-2-7b-chat","prompt": "<human>: What do you think about Large Language Models?\n<bot>:","top_p": 0.6,"top_k": 60,"temperature": 0.8,"max_tokens": 256,"stop": ["<human>","\n\n"],"repetition_penalty": 1.1,"logprobs": null},"subjobs": [],"output": {"result_type": "language-model-inference","choices": [{"text": "Large language models, such as transformer-based models like BERT and RoBERTa, have been instrumental in achieving state-of-the-art results in a wide range of natural language processing (NLP) tasks. These models are trained on large amounts of text data and have the ability to learn complex patterns and relationships in language.\n\n"}]}}
以下是如何获得生成的响应:
print(output['output']['choices'][0]['text'])# Large language models, such as transformer-based models like BERT and# RoBERTa, have been instrumental in achieving state-of-the-art results# in a wide range of natural language processing (NLP) tasks. These models# are trained on large amounts of text data and have the ability to learn# complex patterns and relationships in language.
还可以使用流:
for token in together.Complete.create_streaming(prompt=prompt):print(token, end="", flush=True)
现在,我们来看看LangChain集成。
三、TogetherAI与LangChain的集成
为了在LangChain中使用TogetherAI,我们必须扩展基本LLM抽象类。
这里有一个创建自定义LLM包装器的示例代码(https://python.langchain.com/docs/modules/model_io/llms/custom_llm),但我们将通过类型验证、异常处理和日志记录使其变得更好。
class TogetherLLM(LLM):"""Together LLM integration.Attributes:model (str): Model endpoint to use.together_api_key (str): Together API key.temperature (float): Sampling temperature to use.max_tokens (int): Maximum number of tokens to generate."""model: str = "togethercomputer/llama-2-7b-chat"together_api_key: str = os.environ["TOGETHER_API_KEY"]temperature: float = 0.7max_tokens: int = 512@propertydef _llm_type(self) -> str:"""Return type of LLM."""return "together"def _call(self, prompt: str, **kwargs: Any) -> str:"""Call to Together endpoint."""try:logging.info("Making API call to Together endpoint.")return self._make_api_call(prompt)except Exception as e:logging.error(f"Error in TogetherLLM _call: {e}", exc_info=True)raisedef _make_api_call(self, prompt: str) -> str:"""Make the API call to the Together endpoint."""together.api_key = self.together_api_keyoutput = together.Complete.create(prompt,model=self.model,max_tokens=self.max_tokens,temperature=self.temperature,)logging.info("API call successful.")return output['output']['choices'][0]['text']
langchain.lms.base模块通过提供比直接实现_generate方法用户更友好的界面来简化与LLM的交互。
类langchain.lms.base.LLM是LLM的一个抽象基类,这意味着它为其他类提供了一个模板,但并不意味着它自己被实例化。它旨在通过在内部处理LLM的复杂性,为LLM的工作提供一个更简单的界面,允许用户更容易地与这些模型交互。
__call__方法允许像函数一样调用类,它检查缓存并在给定提示下运行LLM。
我们现在可以创建TogetherLLM的类实例:
llm = TogetherLLM(model = model,max_tokens = 256,temperature = 0.8)
然后创建LLM链:
prompt_template = "You are a friendly bot, answer the following question: {question}"prompt = PromptTemplate(input_variables=["question"], template=prompt_template)chat = LLMChain(llm=llm, prompt=prompt)
让我们开始对话:
chat("Can AI take over developer jobs?")INFO:root:Making API call to Together endpoint.INFO:root:API call successful.{'question': 'Can AI take over developer jobs?','text': '\n\nNo, AI will not take over developer jobs. AI can assistdevelopers in various ways, such as automating repetitive tasks, generatingcode, or analyzing data, but it will not replace human developers.Developers are needed to design, build, and maintain complex software systems,which require creativity, critical thinking, and problem-solving skillsthat AI systems do not possess. Additionally, the field of softwaredevelopment is constantly evolving, and new technologies and techniquesare constantly being developed, which requires developers to stayup-to-date and adapt to new challenges.'}
让我们看看还能做些什么。
四、管理聊天历史记录
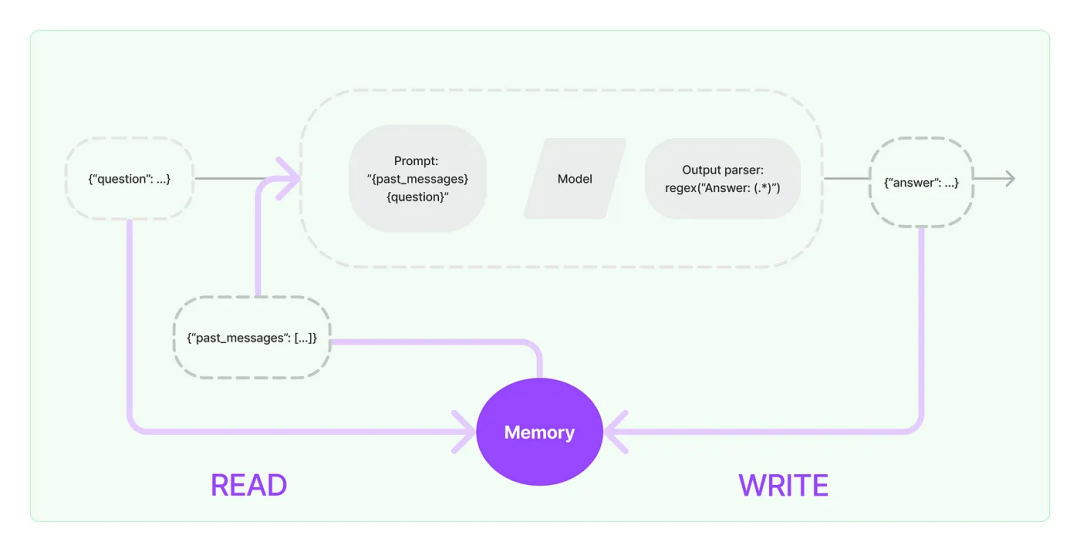
单轮聊天是可以,但这是一个聊天模型,我们来学习一下如何管理聊天历史,以实现更连贯和上下文感知的互动。
以下是LangChain文档中的一个简单图表,显示了流程:

然而,不想使用LangChain的抽象,而是想重新实现LLMChain类,让用户更好地debug代码。
from typing import Listclass LLMChain:def __init__(self, llm, prompt):self.llm = llmself.prompt = promptself.history: List[str] = [] # Initialize an empty list to keep track of the conversation historydef add_to_history(self, user_input: str, bot_response: str):self.history.append(f"<human>: {user_input}")self.history.append(f"<bot>: {bot_response}")def generate_prompt(self, question: str) -> str:history_str = "\n".join(self.history) # Convert the history list into a single stringreturn f"{history_str}\n<human>: {question}\n<bot>:"def ask(self, question: str) -> str:full_prompt = self.generate_prompt(question)response = self.llm._call(full_prompt) # Assuming _call method handles the actual API callself.add_to_history(question, response)return response
在这个实现中,我们每次调用ask方法时,会话历史都会更新为最新的交换。generate_prompt方法构造一个包含此历史记录的新Prompt来维护会话的上下文。
通过以下实例看一些如何使用:
# Usagellm = TogetherLLM(model = model,max_tokens = 256,temperature = 0.8)prompt_template = "You are a friendly bot, answer the following question: {question}"prompt = PromptTemplate(input_variables=["question"], template=prompt_template)chat = LLMChain(llm=llm, prompt=prompt)# Example interactionresponse = chat.ask("What is the weather like today?")print(response) # Bot's response# The next call to chat.ask will include the previous interaction in the promptresponse = chat.ask("How can I enjoy such a weather?")print(response)
你可能已经注意到,随着聊天历史的增长,很难管理模型的上下文窗口,有几种策略可以处理它,后面会继续分享,敬请期待。
参考文献:
[1] https://medium.com/@datadrifters/the-worlds-fastest-llm-inference-engine-3x-faster-than-vllm-and-tgi-a2ed9e33c55f?source=email-c63e4493b83d-1702407845871-digest.reader--a2ed9e33c55f----2-98------------------775b79bd_d6f0_4703_a101_7e17ca89ae00-1
[2] https://www.together.ai/blog/together-inference-engine-v1
这篇关于LLM推理部署(六):TogetherAI推出世界上LLM最快推理引擎,性能超过vLLM和TGI三倍的文章就介绍到这儿,希望我们推荐的文章对编程师们有所帮助!


