本文主要是介绍MR素数测试及 pycryptodome库下 已知MR伪素数以及强伪证 生成指定伪随机数生成器绕过素性检测,希望对大家解决编程问题提供一定的参考价值,需要的开发者们随着小编来一起学习吧!
MR素数测试在密码学库中应用广泛,通常作为BSPW的一部分来进行素数测试,由于在其算法中,有随机数的使用(选择一个随机的base),若一个MR伪素数 n n n,已知其在某一个强伪证 a a a(随机base)下表现出伪素性,那么我们可以逆向其算法过程,构造一个伪随机数生成器,使其通过MR素数测试。这通常是绕过BSPW必不可少的一部分。
文章目录
- 1.MR素数测试
- 2.pycryptodome 下MR素数测试源码分析
- 2.1 相关版本
- 2.2 源码分析
- 3.已知MR伪素数以及强伪证 生成指定伪随机数生成器
- 3.1 base生成机理
- 3.2 转换为伪随机数生成器的输出
- 3.3 生成指定伪随机数生成器
- 3.4 测试
1.MR素数测试
设 n n n是一个素数,且 n > 2 n>2 n>2,则 n − 1 n-1 n−1为偶数, n − 1 n-1 n−1可以表示为 2 s d 2^{s}d 2sd, s s s和 d d d为正整数,且 d d d为奇数。对任意在 ( Z / n Z ) ∗ (Z/nZ)^{*} (Z/nZ)∗范围内的 a a a,必须满足以下两种形式的一种:
a d ≡ 1 ( m o d n ) 1 ◯ a 2 r d ≡ − 1 ( m o d n ) 2 ◯ a^{d} \equiv1\ (mod \ n) \textcircled{1}\\ a^{2^{r}d} \equiv -1\ (mod \ n) \textcircled{2} ad≡1 (mod n)1◯a2rd≡−1 (mod n)2◯
其中 r r r是满足 , 0 ≤ r ≤ s − 1 ,0\leq r \leq s-1 ,0≤r≤s−1的整数。
由费马定理可得,对于一个素数 n n n,有
a n − 1 ≡ 1 ( m o d n ) a^{n-1} \equiv 1\ (mod \ n) an−1≡1 (mod n)
不断对 a n − 1 a^{n-1} an−1取平方根后,总会得到 1 1 1或 − 1 -1 −1。如果得到了 − 1 -1 −1,意味着 2 ◯ \textcircled{2} 2◯成立。如果从未得到-1,那么这个过程已经取遍了所有 2 2 2的幂次,意味着 1 ◯ \textcircled{1} 1◯成立。
Miller–Rabin素数测试基于上述原理的逆否,如果能找到一个 a a a,使得对于任意 0 ≤ r ≤ s − 1 0\leq r \leq s-1 0≤r≤s−1以下两个式子均满足:
a d ≢ 1 ( m o d n ) a 2 r d ≢ − 1 ( m o d n ) a^{d} \not\equiv1\ (mod \ n) \\ a^{2^{r}d} \not\equiv -1\ (mod \ n) ad≡1 (mod n)a2rd≡−1 (mod n)
那么 n n n是一个合数。这样的 a a a称为 n n n是合数的一个凭证(witness)。否则 a a a可能是一个证明 n n n是素数的“强伪证”(strong liar),即当 n n n确实是一个合数,但是对于当前选取的 a a a来说上述两个式子均不满足,这时我们认为 n n n是基于 a a a的大概率素数。
详情参考维基百科:https://zh.wikipedia.org/wiki/%E7%B1%B3%E5%8B%92-%E6%8B%89%E5%AE%BE%E6%A3%80%E9%AA%8C
2.pycryptodome 下MR素数测试源码分析
2.1 相关版本
- python 3.9.0
- pycryptodome 3.18.0
2.2 源码分析
直接取自Crypto.Math.Primality下的miller_rabin_test方法:
def miller_rabin_test(candidate, iterations, randfunc=None):"""Perform a Miller-Rabin primality test on an integer.The test is specified in Section C.3.1 of `FIPS PUB 186-4`__.:Parameters:candidate : integerThe number to test for primality.iterations : integerThe maximum number of iterations to perform beforedeclaring a candidate a probable prime.randfunc : callableAn RNG function where bases are taken from.:Returns:``Primality.COMPOSITE`` or ``Primality.PROBABLY_PRIME``... __: http://nvlpubs.nist.gov/nistpubs/FIPS/NIST.FIPS.186-4.pdf"""if not isinstance(candidate, Integer):candidate = Integer(candidate)if candidate in (1, 2, 3, 5):return PROBABLY_PRIMEif candidate.is_even():return COMPOSITEone = Integer(1)minus_one = Integer(candidate - 1)if randfunc is None:randfunc = Random.new().read# Step 1 and 2m = Integer(minus_one)a = 0while m.is_even():m >>= 1a += 1# Skip step 3# Step 4for i in iter_range(iterations):# Step 4.1-2base = 1while base in (one, minus_one):base = Integer.random_range(min_inclusive=2,max_inclusive=candidate - 2,randfunc=randfunc)assert(2 <= base <= candidate - 2)# Step 4.3-4.4z = pow(base, m, candidate)if z in (one, minus_one):continue# Step 4.5for j in iter_range(1, a):z = pow(z, 2, candidate)if z == minus_one:breakif z == one:return COMPOSITEelse:return COMPOSITE# Step 5return PROBABLY_PRIME
三个参数分别是待测数、迭代次数、伪随机数生成器,同时注释也表明了是遵循nist规范(http://nvlpubs.nist.gov/nistpubs/FIPS/NIST.FIPS.186-4.pdf)的一个实现。
按照第1章的符号规范的话,其中的minus_one是 n − 1 n-1 n−1,m是 d d d,a是 s s s,base是随机选择的 a a a。
整体流程是:
- 1.先将 n − 1 n-1 n−1表示为 2 s d 2^{s}d 2sd。
- 2.在指定迭代次数下,每次随机选取一个 a a a,满足 1 < a < n − 1 1<a<n-1 1<a<n−1,分别测试 1 ◯ \textcircled{1} 1◯和 2 ◯ \textcircled{2} 2◯的逆否。
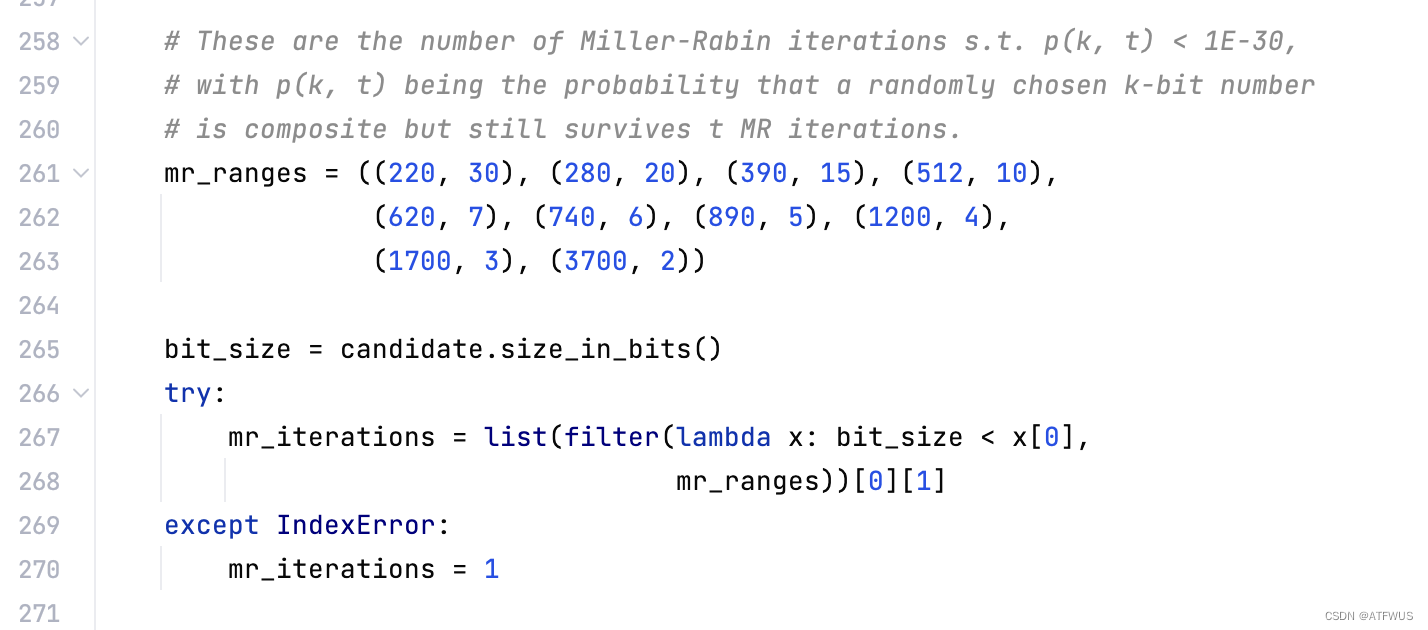
再来看一下默认迭代次数是如何选择的,在test_probable_prime方法中:

选择的依据是保证伪素数的概率是 1 0 − 30 10^{-30} 10−30,按照220比特内,迭代30次,220-280比特内,迭代20次这样的方式预设迭代次数的值。
3.已知MR伪素数以及强伪证 生成指定伪随机数生成器
如何构造一个MR伪素数及强伪证不是本文的重点,可以自行参考相应论文(Fran ̧cois Arnault. Constructing Carmichael numbers which are strong pseudoprimes to several bases. Journal of Symbolic Computation, 20(2):151–161, 1995.)
假设已知一个MR伪素数 n n n,一个强伪证 a a a,若要让第2章中的miller_rabin_test通过测试,我们需要确定其随机数的选择机理,同时将 a a a转换为一系列伪随机生成器的输出,同时逆向该伪随机数生成器,在调用miller_rabin_test的时候指定为该伪随机数生成器,或覆盖系统的os.urandom为该伪随机数生成器。
3.1 base生成机理
base的生成,调用的是Integer.random_range方法:
@classmethoddef random_range(cls, **kwargs):"""Generate a random integer within a given internal.:Keywords:min_inclusive : integerThe lower end of the interval (inclusive).max_inclusive : integerThe higher end of the interval (inclusive).max_exclusive : integerThe higher end of the interval (exclusive).randfunc : callableA function that returns a random byte string. The length of thebyte string is passed as parameter. Optional.If not provided (or ``None``), randomness is read from the system RNG.:Returns:An Integer randomly taken in the given interval."""min_inclusive = kwargs.pop("min_inclusive", None)max_inclusive = kwargs.pop("max_inclusive", None)max_exclusive = kwargs.pop("max_exclusive", None)randfunc = kwargs.pop("randfunc", None)if kwargs:raise ValueError("Unknown keywords: " + str(kwargs.keys))if None not in (max_inclusive, max_exclusive):raise ValueError("max_inclusive and max_exclusive cannot be both"" specified")if max_exclusive is not None:max_inclusive = max_exclusive - 1if None in (min_inclusive, max_inclusive):raise ValueError("Missing keyword to identify the interval")if randfunc is None:randfunc = Random.new().readnorm_maximum = max_inclusive - min_inclusivebits_needed = cls(norm_maximum).size_in_bits()norm_candidate = -1while not 0 <= norm_candidate <= norm_maximum:norm_candidate = cls.random(max_bits=bits_needed,randfunc=randfunc)return norm_candidate + min_inclusive
在该方法中,将其分为了norm_candidate + min_inclusive(最小值保证),随后调用了cls.random获取norm_candidate:
@classmethoddef random(cls, **kwargs):"""Generate a random natural integer of a certain size.:Keywords:exact_bits : positive integerThe length in bits of the resulting random Integer number.The number is guaranteed to fulfil the relation:2^bits > result >= 2^(bits - 1)max_bits : positive integerThe maximum length in bits of the resulting random Integer number.The number is guaranteed to fulfil the relation:2^bits > result >=0randfunc : callableA function that returns a random byte string. The length of thebyte string is passed as parameter. Optional.If not provided (or ``None``), randomness is read from the system RNG.:Return: a Integer object"""exact_bits = kwargs.pop("exact_bits", None)max_bits = kwargs.pop("max_bits", None)randfunc = kwargs.pop("randfunc", None)if randfunc is None:randfunc = Random.new().readif exact_bits is None and max_bits is None:raise ValueError("Either 'exact_bits' or 'max_bits' must be specified")if exact_bits is not None and max_bits is not None:raise ValueError("'exact_bits' and 'max_bits' are mutually exclusive")bits = exact_bits or max_bitsbytes_needed = ((bits - 1) // 8) + 1significant_bits_msb = 8 - (bytes_needed * 8 - bits)msb = bord(randfunc(1)[0])if exact_bits is not None:msb |= 1 << (significant_bits_msb - 1)msb &= (1 << significant_bits_msb) - 1return cls.from_bytes(bchr(msb) + randfunc(bytes_needed - 1))流程如下:
- 1.先产生一个随机字节,用于确定最高位。
- 2.然后产生剩余的字节,一起组合成一个整数。
3.2 转换为伪随机数生成器的输出
我们使用python的random模块,其使用的是MT19937。若要逆向MT19937得到一个完全一致的伪随机数生成器,我们需要明确在整个调用伪随机数生成器期间,生成了哪些32位数。
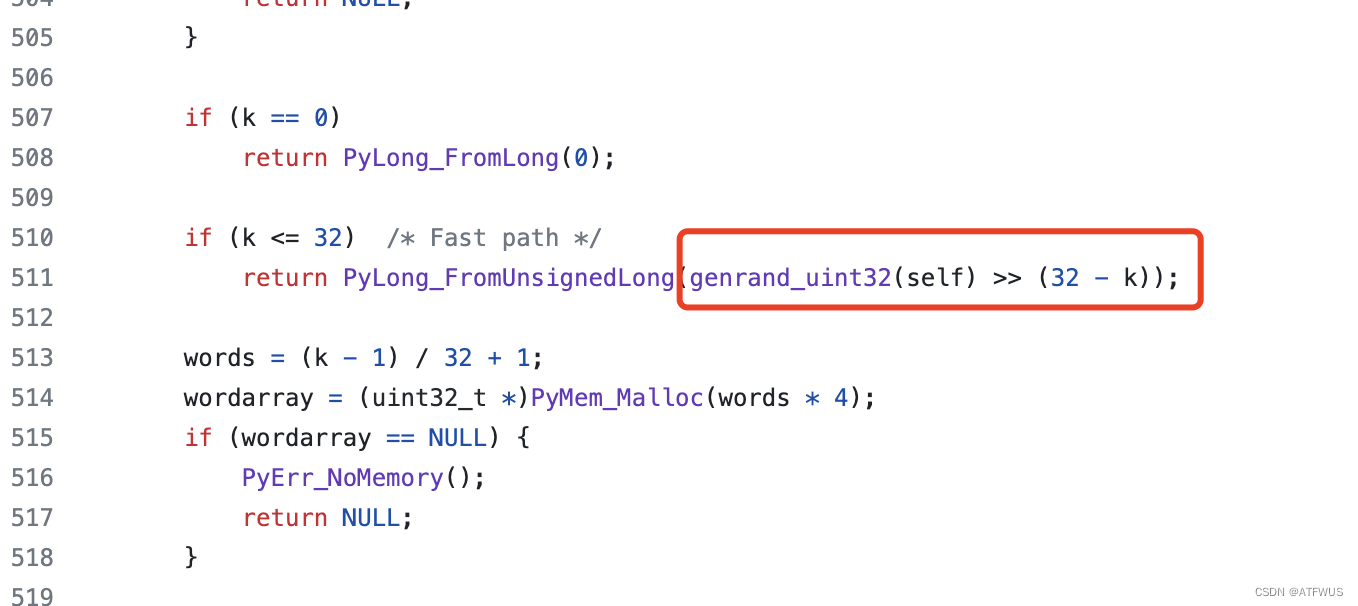
MT19937默认生成的随机数是32字节,若调用random.randbytes(1)生成一个字节,那么从源码可以看出:

是将一个32位的数右移24位。
剩余的字节数,按每4个字节是一个完整的MT19937输出计算,好需要特殊处理末尾的几个字节,可能为0-3个字节。
具体转换过程见代码:
def get_mr_test_rand_list(p, base):def get_iter_count(x):x = Integer(x)mr_ranges = ((220, 30), (280, 20), (390, 15), (512, 10),(620, 7), (740, 6), (890, 5), (1200, 4),(1700, 3), (3700, 2))bit_size = x.size_in_bits()try:mr_iterations = list(filter(lambda x: bit_size < x[0],mr_ranges))[0][1]except IndexError:mr_iterations = 1return mr_iterationsres_rands = []base_bytes = long_to_bytes(base - 2)iter_count = get_iter_count(p)for _ in range(iter_count):# randbytes(1)res_rands += [base_bytes[0] << 24]# randbytes(bytes_needed - 1)base_byte_size = len(base_bytes) - 1base_int_size_r = base_byte_size % 4for i in range(1, base_byte_size - base_int_size_r + 1, 4):res_rands += [base_bytes[i] + base_bytes[i + 1] * 2**8 +base_bytes[i + 2] * 2**16 + base_bytes[i + 3] * 2**24]last_int = 0for i in range(0, base_int_size_r):last_int += base_bytes[base_byte_size - base_int_size_r + 1 + i] * 2**(i*8)res_rands += [last_int << ((4 - base_int_size_r) * 8)]return res_rands
3.3 生成指定伪随机数生成器
参考之前逆向MT19937的文章:
MT19937在连续输出存在截断的情况下利用z3符号执行推导内部状态以及等价种子: 点我前往
只需要将get_mr_test_rand_list函数的输出,传入recover_seed,即可得到一个等价种子,从而得到一个指定的伪随机数生成器。
3.4 测试
给定MR伪素数及强伪证如下:
p1 = 142445387161415482404826365418175962266689133006163
p2 = 5840260873618034778597880982145214452934254453252643
p3 = 14386984103302963722887462907235772188935602433622363
n = p1 * p2 * p3
a = 29
在控制其伪随机数生成器后,成功通过MR素数测试。
import randomfrom Crypto.Math.Primality import *
from Crypto import Random
from Crypto.Math.Numbers import Integer
from Crypto.Util.number import *def mr_test(x, randfunc=None):if randfunc is None:randfunc = Random.new().readx = Integer(x)mr_ranges = ((220, 30), (280, 20), (390, 15), (512, 10),(620, 7), (740, 6), (890, 5), (1200, 4),(1700, 3), (3700, 2))bit_size = x.size_in_bits()try:mr_iterations = list(filter(lambda x: bit_size < x[0],mr_ranges))[0][1]except IndexError:mr_iterations = 1if miller_rabin_test(x, mr_iterations,randfunc=randfunc) == COMPOSITE:return COMPOSITEreturn PROBABLY_PRIME
def get_mr_test_rand_list(p, base):def get_iter_count(x):x = Integer(x)mr_ranges = ((220, 30), (280, 20), (390, 15), (512, 10),(620, 7), (740, 6), (890, 5), (1200, 4),(1700, 3), (3700, 2))bit_size = x.size_in_bits()try:mr_iterations = list(filter(lambda x: bit_size < x[0],mr_ranges))[0][1]except IndexError:mr_iterations = 1return mr_iterationsres_rands = []base_bytes = long_to_bytes(base - 2)iter_count = get_iter_count(p)for _ in range(iter_count):# randbytes(1)res_rands += [base_bytes[0] << 24]# randbytes(bytes_needed - 1)base_byte_size = len(base_bytes) - 1base_int_size_r = base_byte_size % 4for i in range(1, base_byte_size - base_int_size_r + 1, 4):res_rands += [base_bytes[i] + base_bytes[i + 1] * 2**8 +base_bytes[i + 2] * 2**16 + base_bytes[i + 3] * 2**24]last_int = 0for i in range(0, base_int_size_r):last_int += base_bytes[base_byte_size - base_int_size_r + 1 + i] * 2**(i*8)res_rands += [last_int << ((4 - base_int_size_r) * 8)]return res_rands
p1 = 142445387161415482404826365418175962266689133006163
p2 = 5840260873618034778597880982145214452934254453252643
p3 = 14386984103302963722887462907235772188935602433622363
q = p1 * p2 * p3
a = 29res_rands = get_mr_test_rand_list(q, a)#from find_seed_u import find_seed
#seed_int = find_seed(res_rands)
#print(hex(seed_int))
seed_int = 0x200000026f63458da31799827b37b66b56258fad6d9f4abe83b656d75039aa466cebe4069b45a9aa58e93c783fc680f4418983609647fe2054326d4aa9a06188b0f2faf737d0ffc160b133e1e01f264e99d5a1fd7d4023be33f7ed49542176243de356cd0cfb685ba1453824b8dd32467785e2aa2ad361cc6e68483ef79d3975d154fa154fd80cba2b98ddb1db4192aef398aa2ca421148c954b11b9064a3965c16ad46d3fe517cb53fc6f6394778ef1ebb497ad74102f662d48dc193914129deb8d816dbdf2c805e20f411be3d853e069c37534b51662b4e4f7b2307b6b4559b38d2260f244250db221655a89c8133cf4f081d60373d8a0bf322addc33ea21633c989bf45d9303864c65d06408cbdf76040560944091e12f57a22122711f266ab939a29c7eaa3d046f1bd461761b70e5173b7e23f3f8be4f1e78b6867d79af97d8b4f173d7f5ca15e516041b949596f62cca47119a3889be1b75e21078885ed8fb011c4e310d4c90cb916908e9b797a631096de1c8ae1d8e7d8f7d42010c9acfa74585a413fd19112b5c4c0a4fa64b269767c3e1f183d405391ce52eb4cde09c24e75e152f02d46edea20ea6d4c4edb515f41559a88f0a15861725d5c8c93e8f09d2236c97ca1c318fe0142ccba897ddcee14b14eff773a34d8e2adfa61ef4e47203c3ec3ab6a93c704d02d8ce6061b7fc17ea56f05ab7ec08d9ede71299873c3a02f97191f80116ced41e1db53db1e4f9caa5a6a86bb35c69f83af511e65ee4531ea4e3091ddf437441553b567cc2166d99c9b172f9d41372d8e1cfffc28337f1cede9a7f9403989fa7e466050b907bfd4bbe6be77f6e6a795836f06b3d87f057ad49c0e3fb15ee7005782d7fa6ac59879e5b056216dff18f8dfd26a12b60fc6c1a7c389094b638524ea341332b1c04f7283a405518872fd7f7512379b8c06543da5a6bdf77ceabe2b0a1775b3d3ca2a525b3f0ef6566d9ccb531ed8c70ac5dd179c55b337102d5fe22855c9dd0eda78ae89d61ccf7138054eac9bfda4e1b433bd9a9d8b42bc6d80b6b9bafa84301df7c81349ba20b92de6a07d4fe6b147d881049d1786e4e2cfcb4271a9ef776de67a7a3b22c69cde2b4bb7bfff5b74a39e0840f49ffaf71c8ed7be06a2fd6ada15ed583bb11f43833328128aae86c293743cdfcdf5942683ed9a12faf2cf29106d8669fa635d9fc06a1ce26a8ea724ff69f1b8b2bc9966f25a964e5fc93ba15a5875d99b9121a28f3d617c1bacb17347ffa64bf0bbf09b82002fdd56c8d3f46c3ab36bf4e1786acb9a1d8780dd003cf3317deeb1a717bf2f39540d1931003958693ea2b3420eb11a6407969647a0512f710f4cbb6e80f7487a22eff221a8d92cafbc25984e07077320aa0a29a5ed86d976dffffde8f1329395ec395f73b12a53d1dee3325d630806a67a91fd884dd08aa9f4d7b3f9de82357819fd5387e2f3e2247945efb87302f8af8dcb194c26ecc68c2f0cfc85bb567e25357916f471c42aa90570a0a299412ee2e0eeee4a90959388c1aeb7f612ce5724f6a77f4ca4bb654698a7f05523873fe70b9537529147ff18d476f34e87121e22537358500acf037c276b4d39e58e5a1c017c572f1ed4d5d74d2c3ccda2006b55e31246bb4770906e5ab3f3ea3f2187a429c3438fc27ae570bf39fb576ad70448a5519e51bbc81a878429790eb8500ab63cf07b0913dca24d291d7dfa63662e415859eb013103f5d1bd5072940b917792100919a5c0fe9036e9a4f4e84ceeb2d3e3456cada86b7bdb01a624a4ad0200acdb98fac04e6437d1be8b4300021090e27bc5b8a82321d0fcc5993eceac5688ee7bef3b6840624951fbd503e98a113b91e1e330b7abe30b8dd5d78e69dd5a2c5cf94f6d20ce9a63bfd0e0d84359f246f4ae373c7d7c072d64edb02ee6720584a98858b37abeb8e3505dbedb681a20ed7260291520a0e3042aa2b7fcf130831ec37f21710fc2ff2a784ce2f1986610f7db78a1fabb59f1f2ae72e64deacf4c11e37358f7379beaed89121b305e1cf8bf8423d57603269ae10fb1b3c4f67f1c7ef1ce0f010b2e8a74fb1f597a303bfd3762f6658bd602949bd687a237e54fd3ff5639789aa17af0270cb4f2f1132bcab6ed8c917d7a977bb39cf66221b6519c23c148331d0d712acd48e028a066511892c516dcb0ec0ac8db98896b179b2bff0ec92715e8ec5ab5282d7f548ef3f706ae1ac6d354e6b8cf3b30962cd49b998af43fc49e17254b4ae4c0dabda4ee8360215a72486b209d974aa27079d23e31ebf8f0d62f7af43222bf9450f07e1ce8048be131aa55b8752782a563151a4f0c71658dc77cefcf0669a47746fdf46d8e98f5b56e59831dcee875f2038cd7bff3cedb121bca32f55b706e982c47bf010cb336a70e829df61a2e8ffe57b5d652f0495f132377842eb646c814d8bb7ab2da4985d7f5e98d31f882015e271c520b4b2f42c82af9c8cb98149a850540c03ad0a9bb8711e13cc6355df41ef9e9ad44adc5da4c5658e41e9d94e6f40210c04579feb5aaad2a435f184e8a3bcf243e1b97e45f87095c8642f67e63f9d5036f1122849e37e99f7e29958f5cbf47004fa9c3e5a29cc53da9e05116f0016dd8dcffd78bf3e656c092a4c87d4a9f81153dbe35fe33309dde407587bc1fc7e5aeef630c0856bd4566ccedb6b016bbacae97a24c07a3958259b4567a09a03bba4aa49e3de6469c5c31aaa2348fe52a83155d99b00523c530a73140e6cb0c77c9217f437e2e142c04bf443b62b4fda667fe5e7a75ced70db0387a7e95b4fae41c210d656fa25cda5eb2214041a2dca52aa9ed5692f441f6b4490c3f5ac9f88e2c8f78ff5e058dc09d5f21a926680cb196a778fc6be1b6337bdcdcff9be3f2899087ed58a978dbfca49c4425374f6fdd847908a0d29a596995aa334a0d7674aecbeaf410a92a8b6ce62d801caf7796eed699f304e13571dd7e3faf5138bb54c503365672f4bd2e77711681af1efceb5bc81b0dcbd8e05ba60f45a7b1824ec5db1c2e49b82db896a28c24f5cff6f8ce34e5c736ee4f2791494e4e9535517d4e00e844033e101a61bc201831830ab3063799f928a6309fe898f00696ac02dea38c7445b064e4c2a5994ae342d16b6bdd086991293423efe2ca2b5eed550f7fde1187964b904974bd036da4bcc3589e34c638c1e67341b78ea086282f651db24ff95031e97f22f88081d51c58b7d6160bbc49b4d458c2d50639ffef26e35773cc5243c7c48a8827c6bea813385b076048ef50d7a2c1f9ac605c298f93c78075abd920a25e2e54e23815f379ea23da984a90b472bebb908303dfdfd01685477fbee0814e0c8f2fdc50598c58a8e6b3a1c268dd8be35a31b9f2044bb347beb5abf4bc1453684567baf8f2766437a0711777ad04d1db165bdb52815583ab2d64713908094bf1ab993877a7b87ef5758e9bf2b4f17ec9bd0f127508669cc461762543b4f6ae34f9f0bc8988757ceefddb4774e3307e6677665205164522cdece2a79a80random.seed(seed_int)
print(mr_test(q, randfunc=random.randbytes))
ATFWUS 2023-11-20
这篇关于MR素数测试及 pycryptodome库下 已知MR伪素数以及强伪证 生成指定伪随机数生成器绕过素性检测的文章就介绍到这儿,希望我们推荐的文章对编程师们有所帮助!


