本文主要是介绍cocos2d 高德地图_(译)加入敌人和战斗:如果使用cocos2d制作基于tiled地图的游戏:第三部分...,希望对大家解决编程问题提供一定的参考价值,需要的开发者们随着小编来一起学习吧!
免责申明(必读!):本博客提供的所有教程的翻译原稿均来自于互联网,仅供学习交流之用,切勿进行商业传播。同时,转载时不要移除本申明。如产生任何纠纷,均与本博客所有人、发表该翻译稿之人无任何关系。谢谢合作!
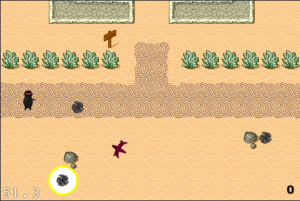
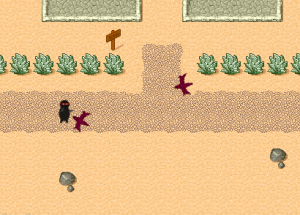
程序截图:
这篇教程是Ray Wenderlich的《如何使用cocos2d制作基于tiled地图的游戏》系列教程的后续。如果你还没有看过前面两部分的教程,可以在我的博客上找到另外两篇我翻译Ray的教程。
在第二部分教程中,Ray教大家如何在地图中制作可碰撞的区域,如何使用tile属性,如何制作可以拾取的物品以及如何动态修改地图、如何使用“Heads up display”来显示分数。
在这个教程中,我们将加入敌人,这样的话,你的忍者就可以向它们扔飞镖啦,同时还增加了胜利和失败的游戏逻辑。但是,首先,你得下载一些相关的
资源文件。
这个zip文件里面包含以下内容:
1.一个敌人精灵
2.一个忍者飞镖,从Ray的《如何使用cocos2d制作一个简单的iphone游戏》中拿过来的。
3.两张按钮的图片,在教程的后面有使用。
在继续学习之前,不要忘了把这些资源加入到你的工程中。
增加敌人
到第二部分教程结束的时候,游戏已经很酷了,但是它还不是一个完整的游戏。你的忍者可以轻而易举地四处游荡,想吃就吃。但是,什么时候玩家会胜利或者失败呢。我们不妨想象一下,有2个敌人在追杀你的忍者,那么这个游戏会显得更加有趣。
敌人出现的位置点
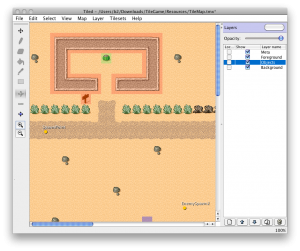
好了,回到Tiled软件(此教程使用java版),然后打开你的Tile地图(TileMap.tmx)。
往对象层中加入一个对象,在player附近就行,但是不要太近,否则敌人一出现玩家就Game over了。这个位置将成为敌人出现的位置点,把它命名为“EnemySpawn1”。
对象组(对象层中的所有对象组成一个对象组)中的对象被存储在一个NSMutableDictionary中,同时使用对象名字作为key。这意味着每一个位置点必须有一个唯一的名字。尽管我们可以遍历所有的key来比较哪个是以“EnemySpawn”开头,但是这样做效率很低下。相反,我们采用的做法是,使用一个属性来表示,每个给定的对象代表一个敌人出现的位置点。
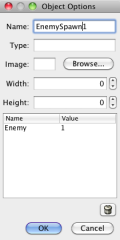
给这个对象一个属性“Enemy”,同时赋一个值1.如果你想在这个教程的基础上扩展,并且增加其它的不同类型的敌人,你可以使用这些敌人的属性值来表示不同类型的敌人。
现在,制作6-10个这种敌人出现位置点对象,相应的它们离player的距离也要有一些不同。为每一个对象定义一个“Enemy”属性,并且赋值为1.保存这张地图并且回到Xcode。
开始创建敌人
好了,现在我们将把敌人实际显示到地图上来。首先在HelloWorldScene.m中添加如下代码:

//
in the HelloWorld class
-
(
void
)addEnemyAtX:(
int
)x y:(
int
)y {
CCSprite
*
enemy
=
[CCSprite spriteWithFile:
@"
enemy1.png
"
];
enemy.position
=
ccp(x, y);
[self addChild:enemy];
}
//
in the init method - after creating the player
//
iterate through objects, finding all enemy spawn points
//
create an enemy for each one
NSMutableDictionary
*
spawnPoint;
for
(spawnPoint
in
[objects objects]) {
if
([[spawnPoint valueForKey:
@"
Enemy
"
] intValue]
==
1
){
x
=
[[spawnPoint valueForKey:
@"
x
"
] intValue];
y
=
[[spawnPoint valueForKey:
@"
y
"
] intValue];
[self addEnemyAtX:x y:y];
}
}
第一个循环遍历对象列表,判断它是否是一个敌人出现的位置点。如果是,则获得它的x和y坐标值,然后调用addEnemyAtX:Y方法把它们加入到合适的地方去。
这个addEnemyAtX:Y方法非常直白,它仅仅是在传入的X,Y坐标值处创建一个敌人精灵。
如果你编译并运行,你会看到这些敌人出现在你之前在Tiled工具中设定的位置处,很酷吧!
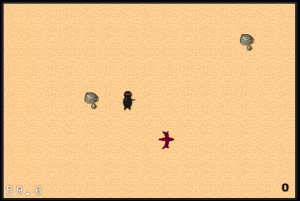
但是,这里有一个问题,这些敌人很傻瓜,它们并不会追杀你的忍者。
使它们移动
因此,现在我们将添加一些代码,使这些敌人会追着我们的player跑。因为,player肯定会移动,我们必须动态地改变敌人的运动方向。为了实现这个目的,我们让敌人每次移动10个像素,然后在下一次移动之前,先调整它们的方向。在HelloWorldScene.m中加入如下代码:
//
callback. starts another iteration of enemy movement.
-
(
void
) enemyMoveFinished:(id)sender {
CCSprite
*
enemy
=
(CCSprite
*
)sender;
[self animateEnemy: enemy];
}
//
a method to move the enemy 10 pixels toward the player
-
(
void
) animateEnemy:(CCSprite
*
)enemy
{
//
speed of the enemy
ccTime actualDuration
=
0.3
;
//
Create the actions
id actionMove
=
[CCMoveBy actionWithDuration:actualDuration
position:ccpMult(ccpNormalize(ccpSub(_player.position,enemy.position)),
10
)];
id actionMoveDone
=
[CCCallFuncN actionWithTarget:self
selector:@selector(enemyMoveFinished:)];
[enemy runAction:
[CCSequence actions:actionMove, actionMoveDone, nil]];
}
//
add this at the end of addEnemyAtX:y:
//
Use our animation method and
//
start the enemy moving toward the player
[self animateEnemy:enemy];
animateEnemy:方法创建两个action。第一个action使之朝敌人移动10个像素,时间为0.3秒。你可以改变这个时间使之移动得更快或者更慢。第二个action将会调用enemyMoveFinished:方法。我们使用CCSequence action来把它们组合起来,这样的话,当敌人停止移动的时候就立马可以执行enemyMoveFinished:方法就可以被调用了。在addEnemyAtX:Y:方法里面,我们调用animateEnemy:方法来使敌人朝着玩家(player)移动。(其实这里是个递归的调用,每次移动10个像素,然后又调用enemyMoveFinished:方法)

很简洁!但是,但是,如果敌人每次移动的时候面部都对着player那样是不是更逼真呢?只需要在animateEnemy:方法中加入下列语句即可:
//
immediately before creating the actions in animateEnemy
//
rotate to face the player
CGPoint diff
=
ccpSub(_player.position,enemy.position);
float
angleRadians
=
atanf((
float
)diff.y
/
(
float
)diff.x);
float
angleDegrees
=
CC_RADIANS_TO_DEGREES(angleRadians);
float
cocosAngle
=
-
1
*
angleDegrees;
if
(diff.x
<
0
) {
cocosAngle
+=
180
;
}
enemy.rotation = cocosAngle
这个代码计算每次玩家相对于敌人的角度,然后旋转敌人来使之面朝玩家。
忍者飞镖
已经很不错了,但是玩家是一个忍者啊!他应该要能够保护他自己!
我们将向游戏中添加模式(modes)。模式并不是实现这个功能的最好方式,但是,它比其他的方法要简单,而且这个方法在模拟器下也能运行(因为并不需要多点触摸)。因为这些优点,所以这个教程里面,我们使用这种方法。首先将会建立UI,这样的话玩家可以方便地在“移动模式”和“掷飞镖”模式之间进行切换。我们将增加一个按钮来使用这个功能的转换。(即从移动模式转到掷飞镖模式)。
现在,我们将增加一些属性,使两个层之间可以更好的通信。在HelloWorldScene.h里面增加如下代码:
//
at the top of the file add a forward declaration for HelloWorld,
//
because our two layers need to reference each other
@class HelloWorld;
//
inside the HelloWorldHud class declaration
HelloWorld
*
_gameLayer;
//
After the class declaration
@property (nonatomic, assign) HelloWorld
*
gameLayer;
//
Inside the HelloWorld class declaration
int
_mode;
//
After the class declaration
@property (nonatomic, assign)
int
mode;
同时修改HelloWorldScene.m文件
//
At the top of the HelloWorldHud implementation
@synthesize gameLayer
=
_gameLayer;
//
At the top of the HelloWorld implementation
@synthesize mode
=
_mode;
//
in HelloWorld's init method
_mode
=
0
;
//
in HelloWorld's scene method
//
after layer.hud = hud
hud.gameLayer
=
layer;
如果想知道在cocos2d里面如何使用按钮,可以参照我翻译的另外一篇教程
《在cocos2d里面如何制作按钮:简单按钮、单选按钮和开关按钮》。
在HelloWorldScene.m中添加下面的代码,这段代码定义了一个按钮。
Add the folowing code, which defines a button, to HelloWorldScene.m:
//
in HelloWorldHud's init method
//
define the button
CCMenuItem
*
on;
CCMenuItem
*
off;
on
=
[[CCMenuItemImage itemFromNormalImage:
@"
projectile-button-on.png
"
selectedImage:
@"
projectile-button-on.png
"
target:nil selector:nil] retain];
off
=
[[CCMenuItemImage itemFromNormalImage:
@"
projectile-button-off.png
"
selectedImage:
@"
projectile-button-off.png
"
target:nil selector:nil] retain];
CCMenuItemToggle
*
toggleItem
=
[CCMenuItemToggle itemWithTarget:self
selector:@selector(projectileButtonTapped:) items:off, on, nil];
CCMenu
*
toggleMenu
=
[CCMenu menuWithItems:toggleItem, nil];
toggleMenu.position
=
ccp(
100
,
32
);
[self addChild:toggleMenu];
//
in HelloWorldHud
//
callback for the button
//
mode 0 = moving mode
//
mode 1 = ninja star throwing mode
-
(
void
)projectileButtonTapped:(id)sender
{
if
(_gameLayer.mode
==
1
) {
_gameLayer.mode
=
0
;
}
else
{
_gameLayer.mode
=
1
;
}
}
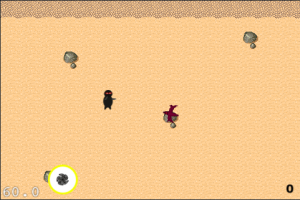
编译并运行。这时会在左下角出现一个按钮,并且你可以打开或者关闭之。但是这并不会对游戏造成任何影响。我们的下一步就是增加飞镖的发射。
发射飞镖
接下来,我们将添加一些代码来检查玩家当前处于哪种模式下面,并且在用户点击屏幕的时候影响不同的事件。如果是移动模式则移动玩家,如果是射击模式,则掷飞镖。在ccTouchEnded:withEvent:方法里面增加下面代码:
if
(_mode
==
0
) {
//
old contents of ccTouchEnded:withEvent:
}
else
{
//
code to throw ninja stars will go here
}
这样可以使得移动模式下,玩家只能移动。下一步就是要添加代码使忍者能够发射飞镖。在else部分增加,在增加之前,先在HelloWorld.m中添加一些清理代码:
-
(
void
) projectileMoveFinished:(id)sender {
CCSprite
*
sprite
=
(CCSprite
*
)sender;
[self removeChild:sprite cleanup:YES];
}
好了,看到上面的else部分的注释了吗:
// code to throw ninja stars will go here
在上面的注释后面添加下面的代码:
//
Find where the touch is
CGPoint touchLocation
=
[touch locationInView: [touch view]];
touchLocation
=
[[CCDirector sharedDirector] convertToGL: touchLocation];
touchLocation
=
[self convertToNodeSpace:touchLocation];
//
Create a projectile and put it at the player's location
CCSprite
*
projectile
=
[CCSprite spriteWithFile:
@"
Projectile.png
"
];
projectile.position
=
_player.position;
[self addChild:projectile];
//
Determine where we wish to shoot the projectile to
int
realX;
//
Are we shooting to the left or right?
CGPoint diff
=
ccpSub(touchLocation, _player.position);
if
(diff.x
>
0
)
{
realX
=
(_tileMap.mapSize.width
*
_tileMap.tileSize.width)
+
(projectile.contentSize.width
/
2
);
}
else
{
realX
=
-
(_tileMap.mapSize.width
*
_tileMap.tileSize.width)
-
(projectile.contentSize.width
/
2
);
}
float
ratio
=
(
float
) diff.y
/
(
float
) diff.x;
int
realY
=
((realX
-
projectile.position.x)
*
ratio)
+
projectile.position.y;
CGPoint realDest
=
ccp(realX, realY);
//
Determine the length of how far we're shooting
int
offRealX
=
realX
-
projectile.position.x;
int
offRealY
=
realY
-
projectile.position.y;
float
length
=
sqrtf((offRealX
*
offRealX)
+
(offRealY
*
offRealY));
float
velocity
=
480
/
1
;
//
480pixels/1sec
float
realMoveDuration
=
length
/
velocity;
//
Move projectile to actual endpoint
id actionMoveDone
=
[CCCallFuncN actionWithTarget:self
selector:@selector(projectileMoveFinished:)];
[projectile runAction:
[CCSequence actionOne:
[CCMoveTo actionWithDuration: realMoveDuration
position: realDest]
two: actionMoveDone]];
这段代码会在用户点击屏幕的方向发射飞镖。对于这段代码的完整的细节,可以查看我翻译的另一个文章
《如何使用cocos2d来做一个简单的iphone游戏教程(第一部分)》。当然,查看原作者的文章后面的注释会更加清楚明白一些。
projectileMoveFinished:方法会在飞镖移动到屏幕之外的时候移除。这个方法非常关键。一旦我们开始做碰撞检测的时候,我们将要循环遍历所有的飞镖。如果我们不移除飞出屏幕范围之外的飞镖的话,这个存储飞镖的列表将会越来越大,而且游戏将会越来越慢。编译并运行工程,现在,你的忍者可以向敌人投掷飞镖了。

碰撞检测
接下来,就是当飞镖击中敌人的时候,要把敌人销毁。在HelloWorldClass类中增加以下变量(在HelloWorldScene.h文件中):
NSMutableArray
*
_enemies;
NSMutableArray
*
_projectiles;
然后初使化_projectiles数组:
//
at the end of the launch projectiles section of ccTouchEnded:withEvent:
[_projectiles addObject:projectile];
//
at the end of projectileMoveFinished:
[_projectiles removeObject:sprite];
然后在addEnemyAtX:y方法的结尾添加如下代码:
[_enemies addObject:enemy];
接着,在HelloWorld类中添加如下代码:
-
(
void
)testCollisions:(ccTime)dt {
NSMutableArray
*
projectilesToDelete
=
[[NSMutableArray alloc] init];
//
iterate through projectiles
for
(CCSprite
*
projectile
in
_projectiles) {
CGRect projectileRect
=
CGRectMake(
projectile.position.x
-
(projectile.contentSize.width
/
2
),
projectile.position.y
-
(projectile.contentSize.height
/
2
),
projectile.contentSize.width,
projectile.contentSize.height);
NSMutableArray
*
targetsToDelete
=
[[NSMutableArray alloc] init];
//
iterate through enemies, see if any intersect with current projectile
for
(CCSprite
*
target
in
_enemies) {
CGRect targetRect
=
CGRectMake(
target.position.x
-
(target.contentSize.width
/
2
),
target.position.y
-
(target.contentSize.height
/
2
),
target.contentSize.width,
target.contentSize.height);
if
(CGRectIntersectsRect(projectileRect, targetRect)) {
[targetsToDelete addObject:target];
}
}
//
delete all hit enemies
for
(CCSprite
*
target
in
targetsToDelete) {
[_enemies removeObject:target];
[self removeChild:target cleanup:YES];
}
if
(targetsToDelete.count
>
0
) {
//
add the projectile to the list of ones to remove
[projectilesToDelete addObject:projectile];
}
[targetsToDelete release];
}
//
remove all the projectiles that hit.
for
(CCSprite
*
projectile
in
projectilesToDelete) {
[_projectiles removeObject:projectile];
[self removeChild:projectile cleanup:YES];
}
[projectilesToDelete release];
}
最后,初始化敌人来飞镖数组,并且调度testCollisions:方法,把这些代码加在HelloWorld类的init方法中。
//
you need to put these initializations before you add the enemies,
//
because addEnemyAtX:y: uses these arrays.
_enemies
=
[[NSMutableArray alloc] init];
_projectiles
=
[[NSMutableArray alloc] init];
[self schedule:@selector(testCollisions:)];
上面的所有的代码,关于具体是如何工作的,可以在我的博客上查找
《如何使用COCOS2D制作一个简单的iphone游戏》教程。当然,原作者的文章注释部分的讨论更加清晰,所以我翻译的教程,也希望大家多讨论啊。代码尽量自己用手敲进去,不要为了省事,alt+c,alt+v,这样不好,真的!
好了,现在可以用飞镖打敌人,而且打中之后它们会消失。现在让我们添加一些逻辑,使得游戏可以胜利或者失败吧!
胜利和失败
The Game Over Scene
好了,让我们创建一个新的场景,来作为我们的“You Win”或者“You Lose”指示器吧。在Xcode中,选择Classes文件夹,然后点击File\New File,再选择Objective-c类,确保NSObject是基类被选中。点击下一步,然后输入文件名GameOverScene,并且确保“Also create GameOverScene.h”复选中。
然后用下面的代码替换掉模板生成代码:
#import
"
cocos2d.h
"
@interface GameOverLayer : CCColorLayer {
CCLabel
*
_label;
}
@property (nonatomic, retain) CCLabel
*
label;
@end
@interface GameOverScene : CCScene {
GameOverLayer
*
_layer;
}
@property (nonatomic, retain) GameOverLayer
*
layer;
@end
相应地修改GameOverScene.m文件:
#import
"
GameOverScene.h
"
#import
"
HelloWorldScene.h
"
@implementation GameOverScene
@synthesize layer
=
_layer;
-
(id)init {
if
((self
=
[super init])) {
self.layer
=
[GameOverLayer node];
[self addChild:_layer];
}
return
self;
}
-
(
void
)dealloc {
[_layer release];
_layer
=
nil;
[super dealloc];
}
@end
@implementation GameOverLayer
@synthesize label
=
_label;
-
(id) init
{
if
( (self
=
[super initWithColor:ccc4(
255
,
255
,
255
,
255
)] )) {
CGSize winSize
=
[[CCDirector sharedDirector] winSize];
self.label
=
[CCLabel labelWithString:
@""
fontName:
@"
Arial
"
fontSize:
32
];
_label.color
=
ccc3(
0
,
0
,
0
);
_label.position
=
ccp(winSize.width
/
2
, winSize.height
/
2
);
[self addChild:_label];
[self runAction:[CCSequence actions:
[CCDelayTime actionWithDuration:
3
],
[CCCallFunc actionWithTarget:self selector:@selector(gameOverDone)],
nil]];
}
return
self;
}
-
(
void
)gameOverDone {
[[CCDirector sharedDirector] replaceScene:[HelloWorld scene]];
}
-
(
void
)dealloc {
[_label release];
_label
=
nil;
[super dealloc];
}
@end
GameOverLayer仅仅只是在屏幕中间旋转一个label,然后调度一个transition隔3秒后回到HelloWorld场景中。
胜利场景
现在,让我们添加一些代码,使得玩家吃完所有的西瓜的时候,游戏会结束。在HelloWorld类的setPlayerPositoin:方法中添加以下代码,(位于HelloWorldScene.m中,就是update代码后面:)
//
put the number of melons on your map in place of the '2'
if
(_numCollected
==
2
) {
[self win];
}
然后,在HelloWorld类中创建win方法:
-
(
void
) win {
GameOverScene
*
gameOverScene
=
[GameOverScene node];
[gameOverScene.layer.label setString:
@"
You Win!
"
];
[[CCDirector sharedDirector] replaceScene:gameOverScene];
}
不要忘了包含头文件:
#import
"
GameOverScene.h
"
编译并运行,当你吃完所有的西瓜后,就会出现如下画面:

失败场景
就这个教程而言,我们的玩家只要有一个敌人碰到他,游戏是结束了。在HelloWorld类的testCollision方法中添加以列循环:
for
(CCSprite
*
target
in
_enemies) {
CGRect targetRect
=
CGRectMake(
target.position.x
-
(target.contentSize.width
/
2
),
target.position.y
-
(target.contentSize.height
/
2
),
target.contentSize.width,
target.contentSize.height );
if
(CGRectContainsPoint(targetRect, _player.position)) {
[self lose];
}
}
这个循环遍历所有的敌人,只要有一个敌人精灵的图片所在的矩形和玩家接触到了,那么游戏就失败了。接下,再创建lose方法:
-
(
void
) lose {
GameOverScene
*
gameOverScene
=
[GameOverScene node];
[gameOverScene.layer.label setString:
@"
You Lose!
"
];
[[CCDirector sharedDirector] replaceScene:gameOverScene];
}
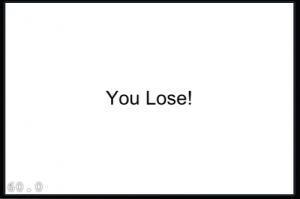
编译并运行,一旦有一个敌人碰到你,你就会看到下面的场景:
完整源代码
这里有这个教程的
完整源代码。谢谢你们有耐心看到这里。
接下来怎么做?
建议:
增加多个关卡
增加不同类型的敌人
在Hud层中显示血条和玩家生命
制作更多的道具,比如加血的,武器等等
一个菜单系统,可以选择关卡,关闭音效,等等
使用更好的用户界面,来使游戏画面更加精美,投掷飞镖更加潇洒。
这篇关于cocos2d 高德地图_(译)加入敌人和战斗:如果使用cocos2d制作基于tiled地图的游戏:第三部分...的文章就介绍到这儿,希望我们推荐的文章对编程师们有所帮助!


