本文主要是介绍三文带你轻松上手鸿蒙的AI语音03-文本合成声音,希望对大家解决编程问题提供一定的参考价值,需要的开发者们随着小编来一起学习吧!
三文带你轻松上手鸿蒙的AI语音03-文本合成声音
前言
接上文 三文带你轻松上手鸿蒙的AI语音02-声音文件转文本
HarmonyOS NEXT 提供的AI 文本合并语音功能,可以将一段不超过10000字符的文本合成为语音并进行播报。
场景举例
- 手机在无网状态下,系统应用无障碍(屏幕朗读)接入文本转语音能力,为视障人士提供播报能力。
- 类似微信读书,可以实现将文章内容通过语音朗读,可以在无法不方便阅读文章时提供帮助,如一边送外卖一边听书。
实现效果

使用流程
- 创建文本合成语音引擎
- 设置监听回调
- 开始合成

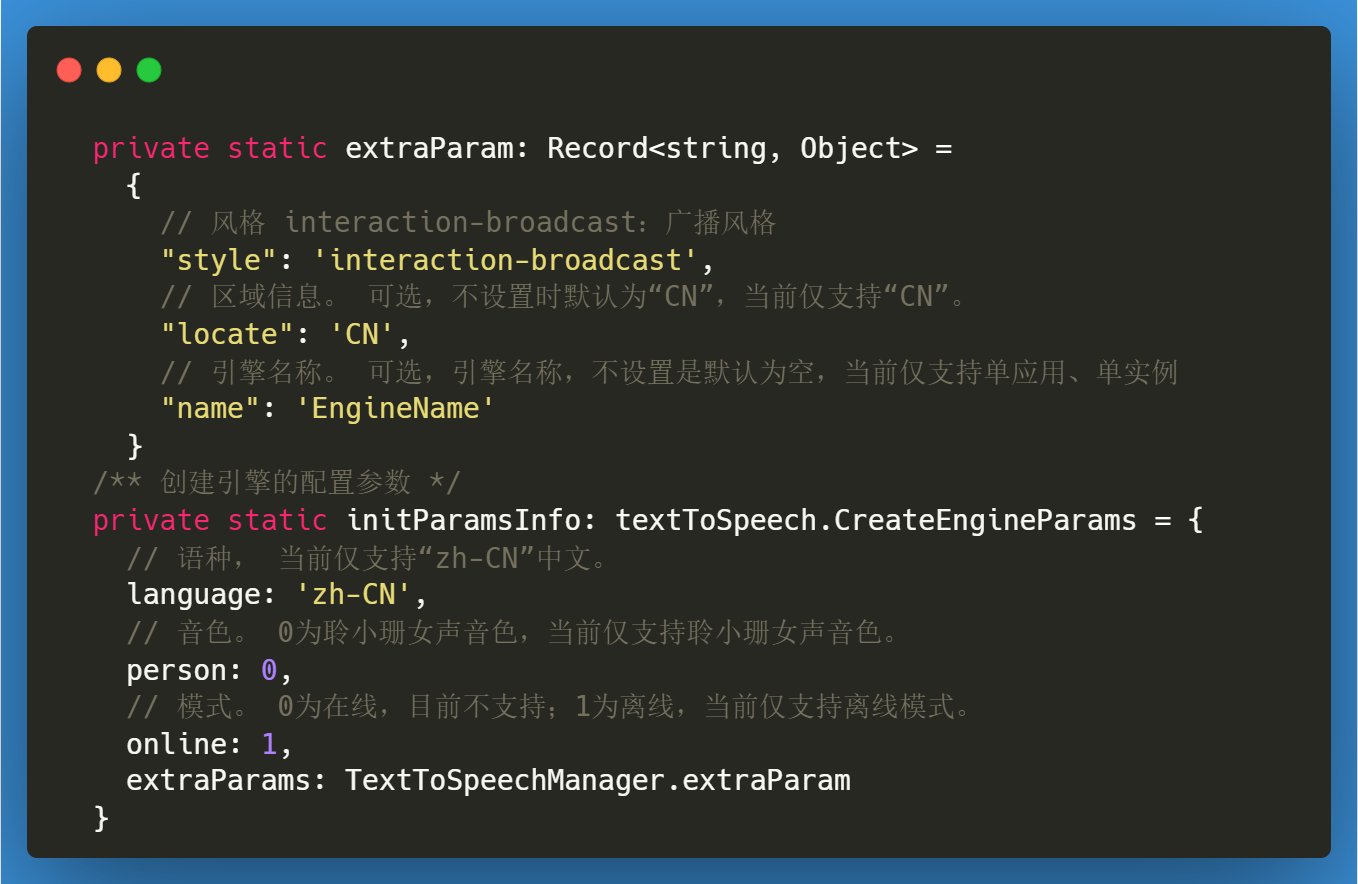
创建文本合成语音引擎
文末会提供封装后的代码
创建文本合成语音引擎需要先引入 textToSpeech,然后调用其 createEngine 方法时,需要准备 初始化引擎的参数

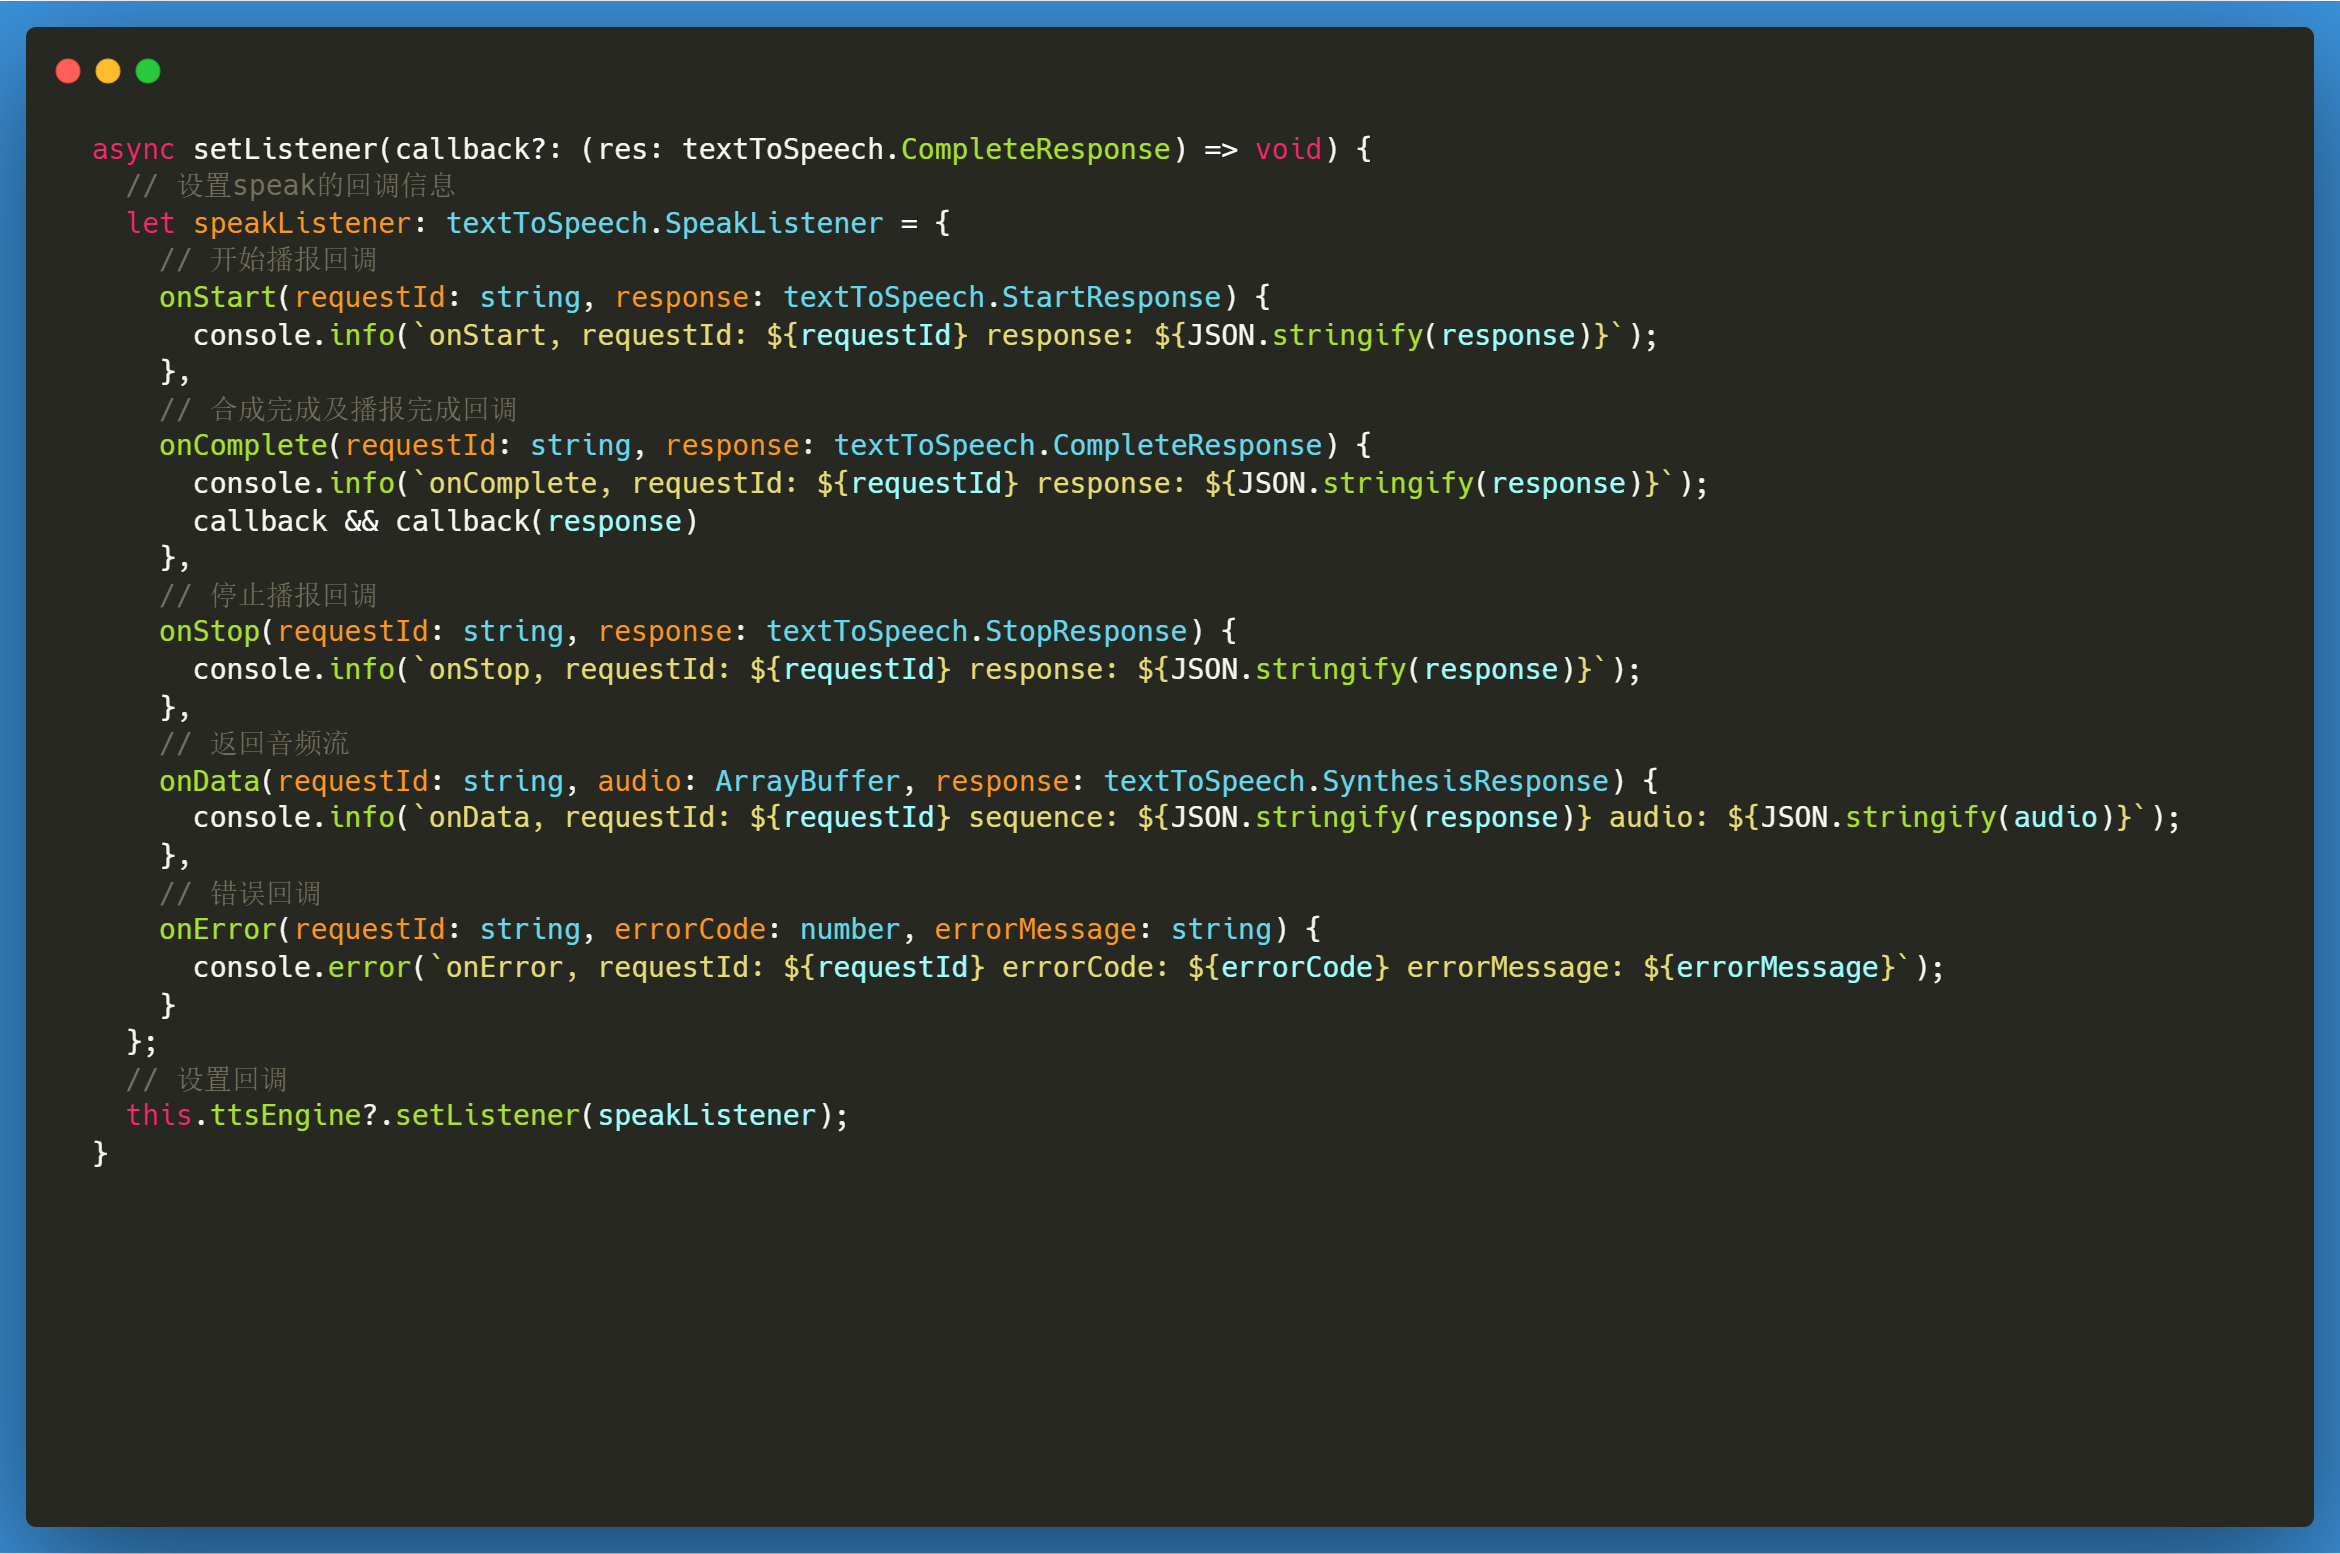
设置监听回调
调用完createEngine 时会返回相应实例,此时可以设置监听回调。
- onStart 播报开始时回调
- onStop 播报结束时回调
- onComplete 合成或播报结束后分别回调此接口,返回请求ID,完成播报相关信息
- onData 合成播报过程中回调此接口,返回请求ID,音频流信息,音频附加信息如格式、时长等。若需要返回音频流信息,请实现此接口。
- onError 合成播报过程中,出现错误时回调,返回请求ID、错误码及错误描述。

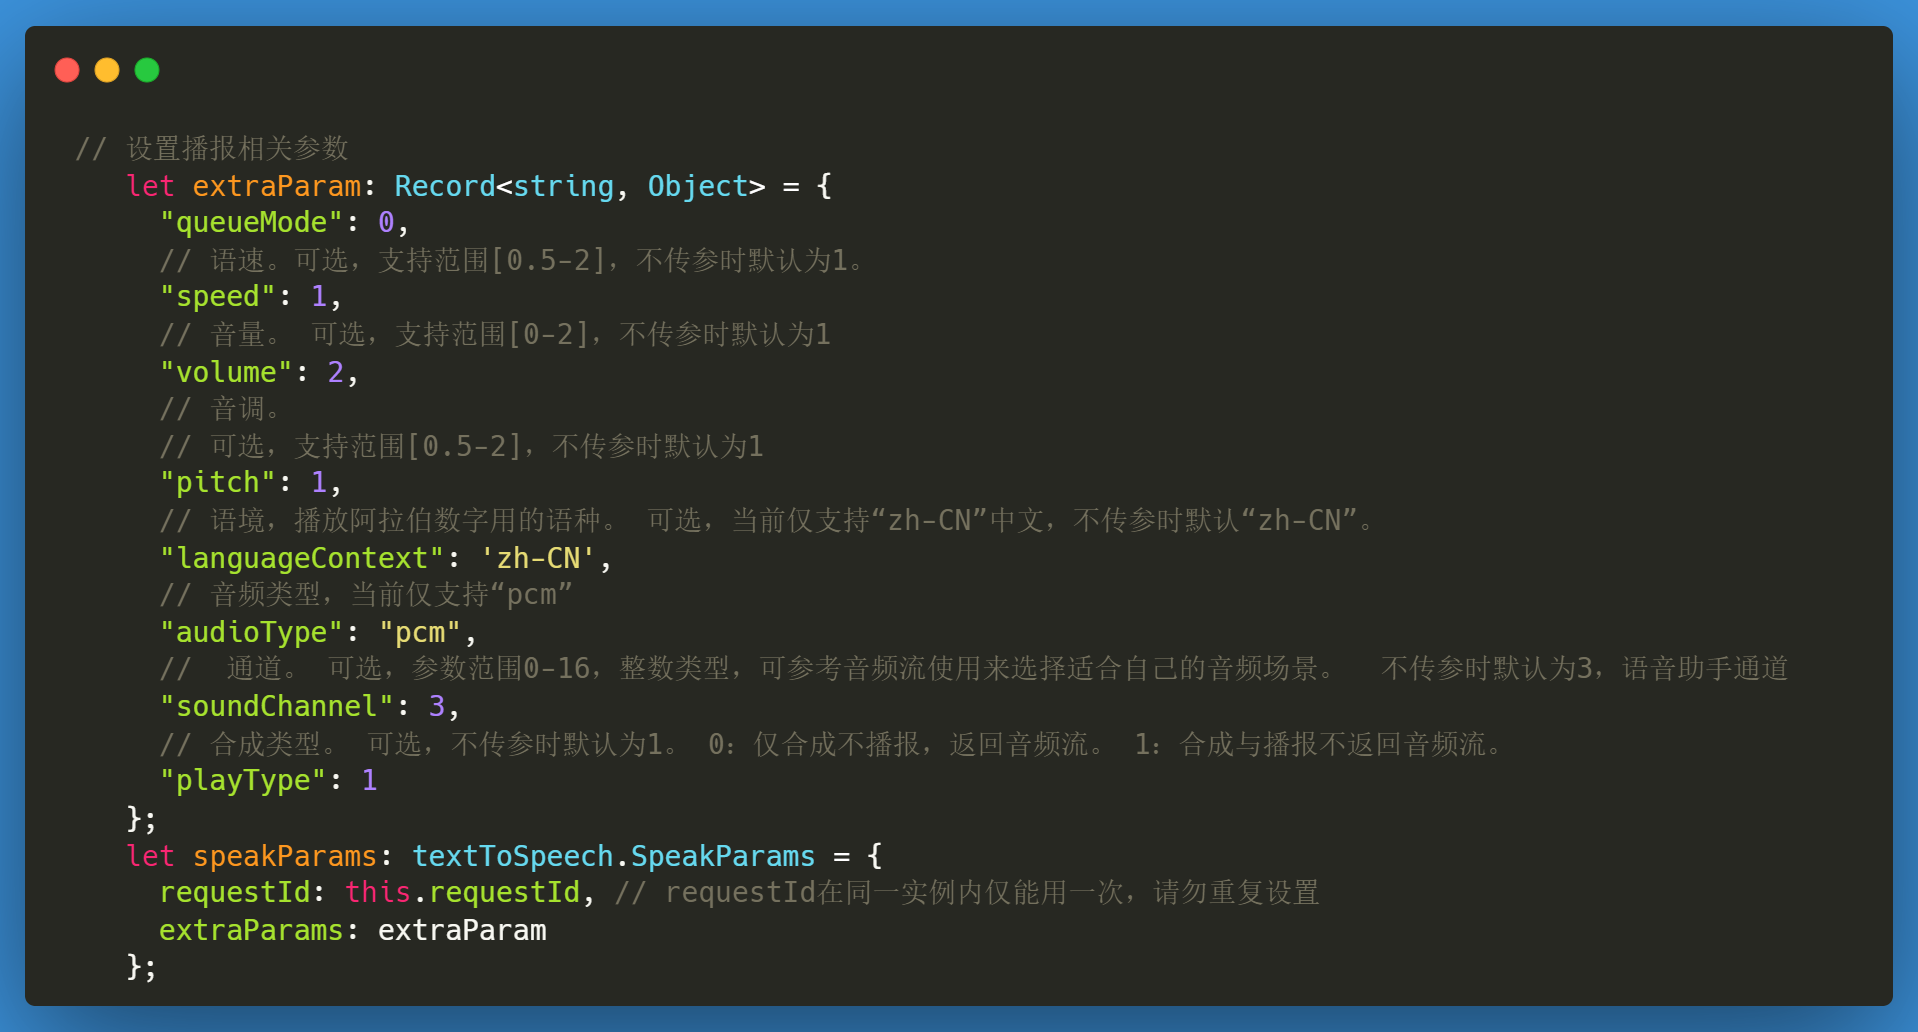
开始合成
完成上面的实例创建和设置监听后,便可以调用 speak方法开始合成了。但是在调用speak时,也需要传递相应的参数。

封装好的代码
import { textToSpeech } from '@kit.CoreSpeechKit';class TextToSpeechManager {/** 语音转文本引擎 */private ttsEngine: textToSpeech.TextToSpeechEngine | null = null/** 创建引擎的配置参数 */private static extraParam: Record<string, Object> ={// 风格 interaction-broadcast:广播风格"style": 'interaction-broadcast',// 区域信息。 可选,不设置时默认为“CN”,当前仅支持“CN”。"locate": 'CN',// 引擎名称。 可选,引擎名称,不设置是默认为空,当前仅支持单应用、单实例"name": 'EngineName'}/** 创建引擎的配置参数 */private static initParamsInfo: textToSpeech.CreateEngineParams = {// 语种, 当前仅支持“zh-CN”中文。language: 'zh-CN',// 音色。 0为聆小珊女声音色,当前仅支持聆小珊女声音色。person: 0,// 模式。 0为在线,目前不支持;1为离线,当前仅支持离线模式。online: 1,extraParams: TextToSpeechManager.extraParam}/** 会话ID,一个实例只能使用一次 */private requestId: stringconstructor() {this.requestId = `tts` + Date.now()}/** 创建引擎 */async createEngine() {return this.ttsEngine = await textToSpeech.createEngine(TextToSpeechManager.initParamsInfo)}/** 设置回调监听 */async setListener(callback?: (res: textToSpeech.CompleteResponse) => void) {// 设置speak的回调信息let speakListener: textToSpeech.SpeakListener = {// 开始播报回调onStart(requestId: string, response: textToSpeech.StartResponse) {console.info(`onStart, requestId: ${requestId} response: ${JSON.stringify(response)}`);},// 合成完成及播报完成回调onComplete(requestId: string, response: textToSpeech.CompleteResponse) {console.info(`onComplete, requestId: ${requestId} response: ${JSON.stringify(response)}`);callback && callback(response)},// 停止播报回调onStop(requestId: string, response: textToSpeech.StopResponse) {console.info(`onStop, requestId: ${requestId} response: ${JSON.stringify(response)}`);},// 返回音频流onData(requestId: string, audio: ArrayBuffer, response: textToSpeech.SynthesisResponse) {console.info(`onData, requestId: ${requestId} sequence: ${JSON.stringify(response)} audio: ${JSON.stringify(audio)}`);},// 错误回调onError(requestId: string, errorCode: number, errorMessage: string) {console.error(`onError, requestId: ${requestId} errorCode: ${errorCode} errorMessage: ${errorMessage}`);}};// 设置回调this.ttsEngine?.setListener(speakListener);}/** 开始转换 */async speak(originalText: string) {// 设置播报相关参数let extraParam: Record<string, Object> = {"queueMode": 0,// 语速。可选,支持范围[0.5-2],不传参时默认为1。"speed": 1,// 音量。 可选,支持范围[0-2],不传参时默认为1"volume": 2,// 音调。// 可选,支持范围[0.5-2],不传参时默认为1"pitch": 1,// 语境,播放阿拉伯数字用的语种。 可选,当前仅支持“zh-CN”中文,不传参时默认“zh-CN”。"languageContext": 'zh-CN',// 音频类型,当前仅支持“pcm”"audioType": "pcm",//  通道。 可选,参数范围0-16,整数类型,可参考音频流使用来选择适合自己的音频场景。  不传参时默认为3,语音助手通道"soundChannel": 3,// 合成类型。 可选,不传参时默认为1。 0:仅合成不播报,返回音频流。 1:合成与播报不返回音频流。"playType": 1};let speakParams: textToSpeech.SpeakParams = {requestId: this.requestId, // requestId在同一实例内仅能用一次,请勿重复设置extraParams: extraParam};// 调用播报方法this.ttsEngine?.speak(originalText, speakParams);}/** 停止转换 */async stop() {this.ttsEngine?.stop()}
}export default TextToSpeechManager
页面中使用
Index.ets

import { PermissionManager } from '../utils/permissionMananger'
import { Permissions } from '@kit.AbilityKit'
import SpeechRecognizerManager from '../utils/SpeechRecognizerManager'
import { AudioCapturerManager } from '../utils/AudioCapturerManager'
import TextToSpeechManager from '../utils/TextToSpeechManager'@Entry
@Component
struct Index {@Statetext: string = ""fileName: string = ""// 1 申请权限fn1 = async () => {// 准备好需要申请的权限 麦克风权限const permissions: Permissions[] = ["ohos.permission.MICROPHONE"]// 检查是否拥有权限const isPermission = await PermissionManager.checkPermission(permissions)if (!isPermission) {//   如果没权限,就主动申请PermissionManager.requestPermission(permissions)}}// 2 实时语音识别fn2 = () => {SpeechRecognizerManager.init(res => {console.log("实时语音识别", JSON.stringify(res))this.text = res.result})}// 3 开始录音fn3 = () => {this.fileName = Date.now().toString()AudioCapturerManager.startRecord(this.fileName)}// 4 接收录音fn4 = () => {AudioCapturerManager.stopRecord()}// 5 声音文件转换文本fn5 = () => {SpeechRecognizerManager.init2(res => {this.text = res.resultconsole.log("声音文件转换文本", JSON.stringify(res))}, this.fileName)}// 6 文本合成声音fn6 = async () => {const tts = new TextToSpeechManager()await tts.createEngine()tts.setListener((res) => {console.log("res", JSON.stringify(res))})tts.speak("我送你离开 千里之外")}build() {Column({ space: 10 }) {Text(this.text)Button("申请权限").onClick(this.fn1)Button("实时语音识别").onClick(this.fn2)Button("开始录音").onClick(this.fn3)Button("结束录音").onClick(this.fn4)Button("声音文件转换文本").onClick(this.fn5)Button("文本合成声音").onClick(this.fn6)}.width("100%").height("100%").justifyContent(FlexAlign.Center)}
}
总结
HarmonyOS NEXT 提供的AI 文本合并语音功能,可以将一段不超过10000字符的文本合成为语音并进行播报
使用的步骤为3步
- 创建文本合成语音引擎
- 设置监听回调
- 开始合成
这篇关于三文带你轻松上手鸿蒙的AI语音03-文本合成声音的文章就介绍到这儿,希望我们推荐的文章对编程师们有所帮助!


