本文主要是介绍OpenGL ES 2.0 正交投影和透视投影,希望对大家解决编程问题提供一定的参考价值,需要的开发者们随着小编来一起学习吧!
本文载自:http://blog.csdn.net/shulianghan/article/details/46680803
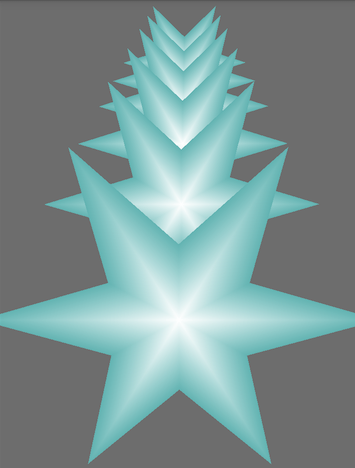
正交投影效果 :

透视投影效果 :
投影简介
- 摄像机位置
摄像机参数 :
摄像机位置 : 摄像机的 三维坐标位置 x, y, z 坐标;
观察方向 : 摄像机镜头的朝向, 是一个三维向量, 指向一个三维坐标方向;
up 方向 : 有了位置 和 朝向, 此时摄像机可以 360 度旋转, 这是我们需要一个 up 方向, 将摄像机固定在一个位置一个方向;
设置摄像机的方法 :
void android.opengl.Matrix.setLookAtM(float[] rm, int rmOffset, float eyeX, float eyeY, float eyeZ, float centerX, float centerY, float centerZ, float upX, float upY, float upZ) float[] rm 参数 : 生成矩阵元素的 float[] 数组;
int rmOffset 参数 : 矩阵元素数组的起始偏移量;
float eyeX, float eyeY, float eyeZ 参数 : 摄像机位置的 x, y, z 三维坐标;
float centerX, float centerY, float centerZ 参数 : 摄像机镜头朝向的点, 该点与摄像机位置连线的方向就是摄像机方向;
float upX, float upY, float upZ 参数 : 摄像机 up 方向, 该点与摄像机连线的方向, 就是摄像机的 up 方向;
正交投影简介
投影简介 :
视景体 : 管线会确定的一个可视空间区域, 由 上平面(up), 下平面(down), 左平面(left), 右平面(right), 远平面(far), 近平面(near) 六个平面组成;
视景体与投影 : 视景体内的物体会投影到近平面, 视景体之外的内容会被裁减掉, 例如眼睛看不到的范围就是处于视景体外即被裁减掉的;
正交投影 : 正交投影属于平行投影, 投影线平行, 视景体是长方形的, 投影的内容不会出现近大远小的效果;
- 投影线 : 物体顶点 与 近平面的对应的物体顶点 投影的连线;
正交投影方法 :
Matrix.orthoM() 方法设置正交投影;
void android.opengl.Matrix.orthoM(float[] m, int mOffset, float left, float right, float bottom, float top, float near, float far)float[] m 参数 : 生成矩阵元素的 float[] 数组;
int mOffset 参数 : 矩阵数组的起始偏移量;
float left, float right, float bottom, float top 参数 : 近平面的 左, 右, 下, 上 的值;
float near 参数 : 近平面 与 视点之间的距离;
float far 参数 : 远平面 与 视点之间的距离;
视口 : 视景体中的物体投影到近平面后, 最终会映射到显示屏的视口中, 视口就相当于眼睛 或者 手机屏幕的一部分;
说明 : 视口并不是占手机全部屏幕, 是显示投影的部分, 也可以是一个 View 组件;
视口设置方法 :
void android.opengl.GLES20.glViewport(int x, int y, int width, int height)
int x, int y 参数 : x, y 是视口在手机屏幕左上角的坐标
int width, int height 参数 : 视口的宽度 与 高度
透视投影简介
透视投影 : 与现实世界观察物体一样, 有 近大远小 的效果, 这种投影更加真实;
投影线介绍 : 透视投影的投影线不平行, 相交于视点
视景体 : 透视投影中视景体是锥台形区域
用处 : 所有的 3D 游戏都采用了透视投影的效果, 我们控制物体向前行走, 远处的物体不断变大就是这种效果
正交透视投影源码详解
源码结构详解
源码组成 :MatrixState : 矩阵相关的辅助类;
ProjectionActivity : 显示具体 OpenGL 图像的 Activity;
ProjectionSurfaceView : 自定义的 GLSurfaceView, 该 View 可以显示 OpenGL 图像内容;
ShaderUtil : 着色器工具类;
SixPointedStar : 具体的图形类, 如何生成该图形;
MatrixState 源码:
    package com.opengl.app;import android.opengl.Matrix;
import android.util.Log;import java.nio.ByteBuffer;
import java.nio.ByteOrder;
import java.nio.FloatBuffer;//存储系统矩阵状态的类
public class MatrixState {private static float[] mProjMatrix = new float[16];//4x4矩阵 投影用private static float[] mVMatrix = new float[16];//摄像机位置朝向9参数矩阵private static float[] mMVPMatrix;//最后起作用的总变换矩阵private static float[] currMatrix;   //当前变换矩阵static float[][] mStack = new float[10][16];   //用于保存变换矩阵的类static int stackTop = -1; //标识栈顶的索引public static float[] lightLocation=new float[]{0,0,0};//定位光光源位置public static FloatBuffer lightPositionFB;public static FloatBuffer cameraFB;/*** 初始化变换矩阵*/public static void setInitStack() {currMatrix = new float[16];Matrix.setRotateM(currMatrix, 0, 0, 1, 0, 0);  //除初始化无变换内容的矩阵}/*** 把变换矩阵保存到栈中*/public static void pushMatrix() {stackTop++;for (int i = 0; i < 16; i++) {mStack[stackTop][i] = currMatrix[i];}}/*** 从栈中读取变换矩阵*/public static void popMatrix() {for (int i = 0; i < 16; i++) {currMatrix[i] = mStack[stackTop][i];}stackTop--;}/*** 平移变换*/public static void translate(float x, float y, float z) {Matrix.translateM(currMatrix, 0, x, y, z);}/*** 旋转变换** @param angle* @param x* @param y*/public static void rotate(float angle, float x, float y, float z) {Matrix.rotateM(currMatrix, 0, angle, x, y, z);}/*** 缩放变换*/public static void scale(float x, float y, float z) {Matrix.scaleM(currMatrix, 0, x, y, z);}//设置摄像机static ByteBuffer llbb= ByteBuffer.allocateDirect(3*4);static float[] cameraLocation=new float[3];//摄像机位置/*** 设置摄像机** @param cx  摄像机位置x* @param cy  摄像机位置y* @param cz  摄像机位置z* @param tx  摄像机目标点x* @param ty  摄像机目标点y* @param tz  摄像机目标点z* @param upx 摄像机UP向量X分量* @param upy 摄像机UP向量Y分量* @param upz 摄像机UP向量Z分量*/public static void setCamera(float cx, float cy, float cz, float tx, float ty, float tz, float upx, float upy, float upz) {Matrix.setLookAtM(mVMatrix, 0, cx, cy, cz, tx, ty, tz, upx, upy, upz);cameraLocation[0]=cx;cameraLocation[1]=cy;cameraLocation[2]=cz;llbb.clear();llbb.order(ByteOrder.nativeOrder());//设置字节顺序cameraFB=llbb.asFloatBuffer();cameraFB.put(cameraLocation);cameraFB.position(0);}/*** 设置正交投影参数** @param left   near面的left* @param right  near面的right* @param bottom near面的bottom* @param top    near面的top* @param near   near面距离* @param far    far面距离*/public static void setProjectOrtho(float left, float right, float bottom, float top, float near, float far) {Matrix.orthoM(mProjMatrix, 0, left, right, bottom, top, near, far);}/*** 设置透视投影参数** @param left   near面的left* @param right  near面的right* @param bottom near面的bottom* @param top    near面的top* @param near   near面距离* @param far    far面距离*/public static void setProjectFrustum(float left, float right, float bottom, float top, float near, float far) {Matrix.frustumM(mProjMatrix, 0, left, right, bottom, top, near, far);}/*** 获取具体物体的总变换矩阵** @param spec 变换矩阵* @return*/public static float[] getFinalMatrix(float[] spec) {mMVPMatrix = new float[16];Matrix.multiplyMM(mMVPMatrix, 0, mVMatrix, 0, spec, 0);Matrix.multiplyMM(mMVPMatrix, 0, mProjMatrix, 0, mMVPMatrix, 0);return mMVPMatrix;}/*** 获取具体物体的变换之后的矩阵** @return*/public static float[] getFinalMatrix() {mMVPMatrix = new float[16];Matrix.multiplyMM(mMVPMatrix, 0, mVMatrix, 0, currMatrix, 0);Matrix.multiplyMM(mMVPMatrix, 0, mProjMatrix, 0, mMVPMatrix, 0);return mMVPMatrix;}//设置灯光位置的方法static ByteBuffer llbbL = ByteBuffer.allocateDirect(3 * 4);public static void setLightLocation(float x,float y,float z){llbbL.clear();lightLocation[0]=x;lightLocation[1]=y;lightLocation[2]=z;llbbL.order(ByteOrder.nativeOrder());//设置字节顺序lightPositionFB=llbbL.asFloatBuffer();lightPositionFB.put(lightLocation);lightPositionFB.position(0);}//获取具体物体的变换矩阵public static float[] getMMatrix(){return currMatrix;}
}
ShaderUtil 源码:
    package com.opengl.app;import java.io.ByteArrayOutputStream;
import java.io.InputStream;import android.content.res.Resources;
import android.opengl.GLES20;
import android.util.Log;//加载顶点Shader与片元Shader的工具类
public class ShaderUtil {//加载制定shader的方法public static int loadShader(int shaderType, //shader的类型  GLES20.GL_VERTEX_SHADER   GLES20.GL_FRAGMENT_SHADERString source   //shader的脚本字符串) {//创建一个新shaderint shader = GLES20.glCreateShader(shaderType);//若创建成功则加载shaderif (shader != 0) {//加载shader的源代码GLES20.glShaderSource(shader, source);//编译shaderGLES20.glCompileShader(shader);//存放编译成功shader数量的数组int[] compiled = new int[1];//获取Shader的编译情况GLES20.glGetShaderiv(shader, GLES20.GL_COMPILE_STATUS, compiled, 0);if (compiled[0] == 0) {//若编译失败则显示错误日志并删除此shaderLog.e("ES20_ERROR", "Could not compile shader " + shaderType + ":");Log.e("ES20_ERROR", GLES20.glGetShaderInfoLog(shader));GLES20.glDeleteShader(shader);shader = 0;}}return shader;}//创建shader程序的方法public static int createProgram(String vertexSource, String fragmentSource) {//加载顶点着色器int vertexShader = loadShader(GLES20.GL_VERTEX_SHADER, vertexSource);if (vertexShader == 0) {return 0;}//加载片元着色器int pixelShader = loadShader(GLES20.GL_FRAGMENT_SHADER, fragmentSource);if (pixelShader == 0) {return 0;}//创建程序int program = GLES20.glCreateProgram();//若程序创建成功则向程序中加入顶点着色器与片元着色器if (program != 0) {//向程序中加入顶点着色器GLES20.glAttachShader(program, vertexShader);checkGlError("glAttachShader");//向程序中加入片元着色器GLES20.glAttachShader(program, pixelShader);checkGlError("glAttachShader");//链接程序GLES20.glLinkProgram(program);//存放链接成功program数量的数组int[] linkStatus = new int[1];//获取program的链接情况GLES20.glGetProgramiv(program, GLES20.GL_LINK_STATUS, linkStatus, 0);//若链接失败则报错并删除程序if (linkStatus[0] != GLES20.GL_TRUE) {Log.e("ES20_ERROR", "Could not link program: ");Log.e("ES20_ERROR", GLES20.glGetProgramInfoLog(program));GLES20.glDeleteProgram(program);program = 0;}}return program;}//检查每一步操作是否有错误的方法public static void checkGlError(String op) {int error;while ((error = GLES20.glGetError()) != GLES20.GL_NO_ERROR) {Log.e("ES20_ERROR", op + ": glError " + error);throw new RuntimeException(op + ": glError " + error);}}//从sh脚本中加载shader内容的方法public static String loadFromAssetsFile(String fname, Resources r) {String result = null;try {InputStream in = r.getAssets().open(fname);int ch = 0;ByteArrayOutputStream baos = new ByteArrayOutputStream();while ((ch = in.read()) != -1) {baos.write(ch);}byte[] buff = baos.toByteArray();baos.close();in.close();result = new String(buff, "UTF-8");result = result.replaceAll("\\r\\n", "\n");} catch (Exception e) {e.printStackTrace();}return result;}
}
ProjectionSurfaceView 源码:
    package com.opengl.app.projection;import android.opengl.GLSurfaceView;
import android.util.AttributeSet;
import android.util.Log;
import android.view.MotionEvent;
import android.opengl.GLES20;import javax.microedition.khronos.egl.EGLConfig;
import javax.microedition.khronos.opengles.GL10;import android.content.Context;import com.opengl.app.Constant;
import com.opengl.app.MatrixState;
import com.opengl.app.view.SixPointedStar;public class ProjectionSurfaceView extends GLSurfaceView {public static final String TAG = "Projection";private final float TOUCH_SCALE_FACTOR = 180.0f / 320;//角度缩放比例private SceneRenderer mRenderer;//场景渲染器private float mPreviousY;//上次的触控位置Y坐标private float mPreviousX;//上次的触控位置X坐标public ProjectionSurfaceView(Context context) {super(context);this.setEGLContextClientVersion(2); //设置使用OPENGL ES2.0mRenderer = new SceneRenderer();    //创建场景渲染器setRenderer(mRenderer);                //设置渲染器setRenderMode(GLSurfaceView.RENDERMODE_CONTINUOUSLY);//设置渲染模式为主动渲染   }public ProjectionSurfaceView(Context context, AttributeSet attrs) {super(context, attrs);this.setEGLContextClientVersion(2); //设置使用OPENGL ES2.0mRenderer = new SceneRenderer();    //创建场景渲染器setRenderer(mRenderer);                //设置渲染器setRenderMode(GLSurfaceView.RENDERMODE_CONTINUOUSLY);//设置渲染模式为主动渲染}//触摸事件回调方法@Overridepublic boolean onTouchEvent(MotionEvent e) {float y = e.getY();float x = e.getX();switch (e.getAction()) {case MotionEvent.ACTION_MOVE:float dy = y - mPreviousY;//计算触控笔Y位移float dx = x - mPreviousX;//计算触控笔X位移for (SixPointedStar h : mRenderer.ha) {h.yAngle += dx * TOUCH_SCALE_FACTOR;//设置六角星数组中的各个六角星绕y轴旋转角度h.xAngle+= dy * TOUCH_SCALE_FACTOR;//设置六角星数组中的各个六角星绕x轴旋转角度}}mPreviousY = y;//记录触控笔位置mPreviousX = x;//记录触控笔位置return true;}public void setOrtho(boolean isOrtho) {if (isOrtho) {MatrixState.setProjectOrtho(-Constant.ratio, Constant.ratio, -1, 1, 1, 10);} else {//设置透视投影MatrixState.setProjectFrustum(-Constant.ratio * 0.4f, Constant.ratio * 0.4f, -1 * 0.4f, 1 * 0.4f, 1, 50);}}private class SceneRenderer implements GLSurfaceView.Renderer {SixPointedStar[] ha = new SixPointedStar[6];//六角星数组public void onDrawFrame(GL10 gl) {//清除深度缓冲与颜色缓冲GLES20.glClear(GLES20.GL_DEPTH_BUFFER_BIT | GLES20.GL_COLOR_BUFFER_BIT);//绘制六角星数组中的各个六角星for (SixPointedStar h : ha) {h.drawSelf();}}public void onSurfaceChanged(GL10 gl, int width, int height) {Log.d(TAG, "onSurfaceChange");//设置视窗大小及位置 GLES20.glViewport(0, 0, width, height);//计算GLSurfaceView的宽高比Constant.ratio = (float) width / height;//设置平行投影MatrixState.setProjectOrtho(-Constant.ratio, Constant.ratio, -1, 1, 1, 10);//调用此方法产生摄像机9参数位置矩阵MatrixState.setCamera(0, 0, 3f,0, 0, 0f,0f, 1.0f, 0.0f);}public void onSurfaceCreated(GL10 gl, EGLConfig config) {//设置屏幕背景色RGBAGLES20.glClearColor(0.5f, 0.5f, 0.5f, 1.0f);//创建六角星数组中的各个对象 for (int i = 0; i < ha.length; i++) {ha[i] = new SixPointedStar(ProjectionSurfaceView.this, 0.2f, 0.5f, -0.3f * i);}//打开深度检测GLES20.glEnable(GLES20.GL_DEPTH_TEST);}}
}
ProjectionActivity 源码:
    package com.opengl.app.projection;import android.content.pm.ActivityInfo;
import android.support.v7.app.AppCompatActivity;
import android.os.Bundle;
import android.util.Log;
import android.view.Menu;
import android.view.MenuItem;
import android.view.View;
import android.view.Window;
import android.view.WindowManager;import com.opengl.app.R;public class ProjectionActivity extends AppCompatActivity {private ProjectionSurfaceView mGLSurfaceView;@Overrideprotected void onCreate(Bundle savedInstanceState){super.onCreate(savedInstanceState);//设置为全屏
//        requestWindowFeature(Window.FEATURE_NO_TITLE);//设置为横屏模式setRequestedOrientation(ActivityInfo.SCREEN_ORIENTATION_PORTRAIT);//初始化GLSurfaceView//切换到主界面setContentView(R.layout.activity_projection);mGLSurfaceView = (ProjectionSurfaceView) findViewById(R.id.projection_sf);mGLSurfaceView.requestFocus();//获取焦点mGLSurfaceView.setFocusableInTouchMode(true);//设置为可触控}@Overrideprotected void onResume() {super.onResume();mGLSurfaceView.onResume();}@Overrideprotected void onPause() {super.onPause();mGLSurfaceView.onPause();}public void ortho(View v){mGLSurfaceView.setOrtho(true);}public void frustum(View v){mGLSurfaceView.setOrtho(false);}}
SixPointedStar 源码:
    package com.opengl.app.view;import java.nio.ByteBuffer;
import java.nio.ByteOrder;
import java.nio.FloatBuffer;
import java.util.ArrayList;
import java.util.List;import android.opengl.GLES20;
import android.opengl.Matrix;import com.opengl.app.Constant;
import com.opengl.app.MatrixState;
import com.opengl.app.ShaderUtil;
import com.opengl.app.projection.ProjectionSurfaceView;//六角星
public class SixPointedStar {int mProgram;//自定义渲染管线着色器程序idint muMVPMatrixHandle;//总变换矩阵引用int maPositionHandle; //顶点位置属性引用int maColorHandle; //顶点颜色属性引用String mVertexShader;    //顶点着色器代码脚本String mFragmentShader;    //片元着色器代码脚本static float[] mMMatrix = new float[16];    //具体物体的3D变换矩阵,包括旋转、平移、缩放FloatBuffer mVertexBuffer;//顶点坐标数据缓冲FloatBuffer mColorBuffer;//顶点着色数据缓冲int vCount = 0;public float yAngle = 0;//绕y轴旋转的角度public float xAngle = 0;//绕z轴旋转的角度public SixPointedStar(ProjectionSurfaceView mv, float r, float R, float z) {//调用初始化顶点数据的initVertexData方法initVertexData(R, r, z);//调用初始化着色器的intShader方法initShader(mv);}//自定义初始化顶点数据的initVertexData方法public void initVertexData(float R, float r, float z) {List<Float> flist = new ArrayList<Float>();float tempAngle = 360 / 6;for (float angle = 0; angle < 360; angle += tempAngle) {//第一个三角形//第一个中心点flist.add(0f);flist.add(0f);flist.add(z);//第二个点flist.add((float) (R * Constant.UNIT_SIZE * Math.cos(Math.toRadians(angle))));flist.add((float) (R * Constant.UNIT_SIZE * Math.sin(Math.toRadians(angle))));flist.add(z);//第三个点flist.add((float) (r * Constant.UNIT_SIZE * Math.cos(Math.toRadians(angle + tempAngle / 2))));flist.add((float) (r * Constant.UNIT_SIZE * Math.sin(Math.toRadians(angle + tempAngle / 2))));flist.add(z);//第二个三角形//第一个中心点flist.add(0f);flist.add(0f);flist.add(z);//第二个点flist.add((float) (r * Constant.UNIT_SIZE * Math.cos(Math.toRadians(angle + tempAngle / 2))));flist.add((float) (r * Constant.UNIT_SIZE * Math.sin(Math.toRadians(angle + tempAngle / 2))));flist.add(z);//第三个点flist.add((float) (R * Constant.UNIT_SIZE * Math.cos(Math.toRadians(angle + tempAngle))));flist.add((float) (R * Constant.UNIT_SIZE * Math.sin(Math.toRadians(angle + tempAngle))));flist.add(z);}vCount = flist.size() / 3;float[] vertexArray = new float[flist.size()];for (int i = 0; i < vCount; i++) {vertexArray[i * 3] = flist.get(i * 3);vertexArray[i * 3 + 1] = flist.get(i * 3 + 1);vertexArray[i * 3 + 2] = flist.get(i * 3 + 2);}ByteBuffer vbb = ByteBuffer.allocateDirect(vertexArray.length * 4);vbb.order(ByteOrder.nativeOrder());    //设置字节顺序为本地操作系统顺序mVertexBuffer = vbb.asFloatBuffer();mVertexBuffer.put(vertexArray);mVertexBuffer.position(0);//顶点着色数据的初始化================begin============================float[] colorArray = new float[vCount * 4];for (int i = 0; i < vCount; i++) {if (i % 3 == 0) {//中心点为白色colorArray[i * 4] = 1;colorArray[i * 4 + 1] = 1;colorArray[i * 4 + 2] = 1;colorArray[i * 4 + 3] = 0;} else {//边上的点为淡蓝色colorArray[i * 4] = 0.45f;colorArray[i * 4 + 1] = 0.75f;colorArray[i * 4 + 2] = 0.75f;colorArray[i * 4 + 3] = 0;}}ByteBuffer cbb = ByteBuffer.allocateDirect(colorArray.length * 4);cbb.order(ByteOrder.nativeOrder());    //设置字节顺序为本地操作系统顺序mColorBuffer = cbb.asFloatBuffer();mColorBuffer.put(colorArray);mColorBuffer.position(0);//特别提示:由于不同平台字节顺序不同数据单元不是字节的一定要经过ByteBuffer//转换,关键是要通过ByteOrder设置nativeOrder(),否则有可能会出问题//顶点着色数据的初始化================end============================}//自定义初始化着色器的intShader方法public void initShader(ProjectionSurfaceView mv) {//加载顶点着色器的脚本内容mVertexShader = ShaderUtil.loadFromAssetsFile("six_point_vertex.sh", mv.getResources());//加载片元着色器的脚本内容mFragmentShader = ShaderUtil.loadFromAssetsFile("six_point_frag.sh", mv.getResources());//基于顶点着色器与片元着色器创建程序mProgram = ShaderUtil.createProgram(mVertexShader, mFragmentShader);//获取程序中顶点位置属性引用idmaPositionHandle = GLES20.glGetAttribLocation(mProgram, "aPosition");//获取程序中顶点颜色属性引用idmaColorHandle = GLES20.glGetAttribLocation(mProgram, "aColor");//获取程序中总变换矩阵引用idmuMVPMatrixHandle = GLES20.glGetUniformLocation(mProgram, "uMVPMatrix");}public void drawSelf() {//制定使用某套shader程序GLES20.glUseProgram(mProgram);//初始化变换矩阵Matrix.setRotateM(mMMatrix, 0, 0, 0, 1, 0);//设置沿Z轴正向位移1Matrix.translateM(mMMatrix, 0, 0, 0, 1);//设置绕y轴旋转Matrix.rotateM(mMMatrix, 0, yAngle, 0, 1, 0);//设置绕z轴旋转Matrix.rotateM(mMMatrix, 0, xAngle, 1, 0, 0);//将最终变换矩阵传入shader程序GLES20.glUniformMatrix4fv(muMVPMatrixHandle, 1, false, MatrixState.getFinalMatrix(mMMatrix), 0);//为画笔指定顶点位置数据GLES20.glVertexAttribPointer(maPositionHandle,3,GLES20.GL_FLOAT,false,3 * 4,mVertexBuffer);//为画笔指定顶点着色数据GLES20.glVertexAttribPointer(-maColorHandle,4,GLES20.GL_FLOAT,false,4 * 4,mColorBuffer);//允许顶点位置数据数组GLES20.glEnableVertexAttribArray(maPositionHandle);GLES20.glEnableVertexAttribArray(maColorHandle);//绘制六角星GLES20.glDrawArrays(GLES20.GL_TRIANGLES, 0, vCount);}
}
这里需要用到2个shell程序,用来加载片元着色器和顶点着色器:
six_point_vertex.sh:
uniform mat4 uMVPMatrix;     //总变换矩阵
attribute vec3 aPosition;     //顶点位置
attribute vec4 aColor;        //顶点颜色
varying  vec4 aaColor;     //用于传递给片元着色器的变量
void main()
{                                   gl_Position = uMVPMatrix * vec4(aPosition,1);   //根据总变换的矩阵计算绘制此顶点的位置aaColor = aColor;                              //将接收的颜色传递给片元着色器
}
six_point_frag.sh
precision mediump float;
varying  vec4 aaColor;  //接收从顶点着色器过来的参数
void main()
{                       gl_FragColor = aaColor;   //给此片源颜色值
}
这篇关于OpenGL ES 2.0 正交投影和透视投影的文章就介绍到这儿,希望我们推荐的文章对编程师们有所帮助!


