本文主要是介绍基于 MediaPipe 的 2D 和 3D 的人体姿态追踪:Rerun 展示,希望对大家解决编程问题提供一定的参考价值,需要的开发者们随着小编来一起学习吧!
点击下方卡片,关注“小白玩转Python”公众号
概述
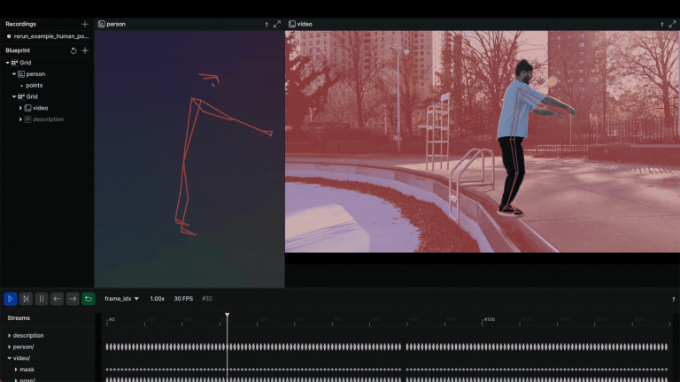
我们探讨一个使用 MediaPipe 在 2D 和 3D 中追踪人体姿态的用例。使这次探索更加有趣的是通过开源可视化工具 Rerun 提供的可视化功能,可以全方位展示人体姿态的动态。在这篇博文中,您将学习如何使用 MediaPipe 追踪 2D 和 3D 的人体姿态,并探索 Rerun 的可视化能力。
人体姿态追踪
人体姿态追踪是计算机视觉中的一项任务,专注于识别关键身体部位位置、分析姿态和分类动作。该技术的核心是一种预训练的机器学习模型,用于评估视觉输入并识别身体在图像坐标和 3D 世界坐标中的关键点。该技术的应用场景包括但不限于人机交互、运动分析、游戏、虚拟现实、增强现实、健康等。
拥有一个完美的模型当然很好,但遗憾的是,目前的模型仍不完美。尽管数据集中可能包含各种体型,但人体在个体之间存在差异。每个人体的独特性尤其是那些手臂和腿部尺寸非标准的人,可能会导致使用这项技术时准确度较低。在考虑将这项技术整合到系统中时,必须认识到存在不准确的可能性。希望科学界的持续努力能够推动更健壮模型的发展。
除了准确度不足,使用这项技术还涉及伦理和法律问题。例如,在公共场所捕捉人体姿态可能会在未征得个人同意的情况下侵犯隐私权。在实际应用这项技术之前,务必考虑任何伦理和法律问题。
前提条件与设置
首先安装所需的库:
# Install the required Python packages
pip install mediapipe
pip install numpy
pip install opencv-python<4.6
pip install requests>=2.31,<3
pip install rerun-sdk# or just use the requirements file
pip install -r examples/python/human_pose_tracking/requirements.txt
使用 MediaPipe 追踪人体姿态
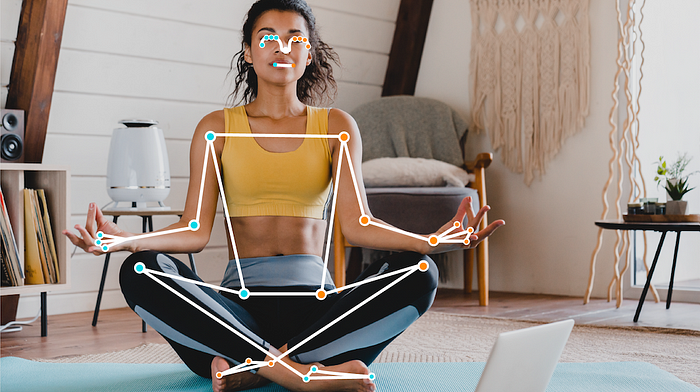
MediaPipe Python 是一个对开发者非常有用的工具,适合集成设备上的计算机视觉和机器学习解决方案。在下面的代码中,利用 MediaPipe 姿态标志检测来检测图像中人体的标志。该模型可以检测到图像坐标和 3D 世界坐标中的人体姿态标志。一旦成功运行机器学习模型,您可以使用图像坐标和 3D 世界坐标来可视化输出结果。
import mediapipe as mp
import numpy as np
from typing import Any
import numpy.typing as npt
import cv2"""Read 2D landmark positions from Mediapipe Pose results.Args:results (Any): Mediapipe Pose results.image_width (int): Width of the input image.image_height (int): Height of the input image.Returns:np.array | None: Array of 2D landmark positions or None if no landmarks are detected.
"""
def read_landmark_positions_2d(results: Any,image_width: int,image_height: int,
) -> npt.NDArray[np.float32] | None:if results.pose_landmarks is None:return Noneelse:# Extract normalized landmark positions and scale them to image dimensionsnormalized_landmarks = [results.pose_landmarks.landmark[lm] for lm in mp.solutions.pose.PoseLandmark]return np.array([(image_width * lm.x, image_height * lm.y) for lm in normalized_landmarks])"""Read 3D landmark positions from Mediapipe Pose results.Args:results (Any): Mediapipe Pose results.Returns:np.array | None: Array of 3D landmark positions or None if no landmarks are detected.
"""
def read_landmark_positions_3d(results: Any,
) -> npt.NDArray[np.float32] | None:if results.pose_landmarks is None:return Noneelse:# Extract 3D landmark positionslandmarks = [results.pose_world_landmarks.landmark[lm] for lm in mp.solutions.pose.PoseLandmark]return np.array([(lm.x, lm.y, lm.z) for lm in landmarks])"""Track and analyze pose from an input image.Args:image_path (str): Path to the input image.
"""
def track_pose(image_path: str) -> None:# Read the image, convert color to RGBimage = cv2.imread(image_path)image = cv2.cvtColor(image, cv2.COLOR_BGR2RGB)# Create a Pose model instancepose_detector = mp.solutions.pose.Pose(static_image_mode=True)# Process the image to obtain pose landmarksresults = pose_detector.process(image)h, w, _ = image.shape# Read 2D and 3D landmark positionslandmark_positions_2d = read_landmark_positions_2d(results, w, h)landmark_positions_3d = read_landmark_positions_3d(results)
使用 Rerun 可视化 MediaPipe 的输出
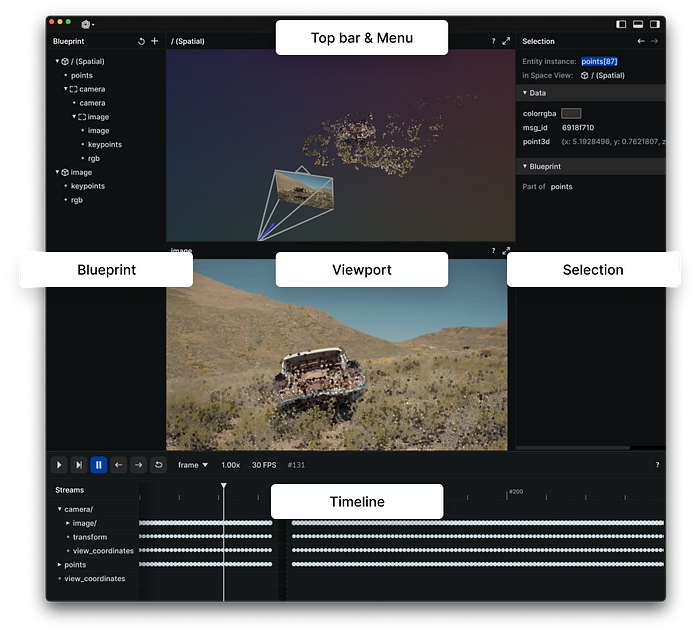
Rerun 是一个多模态数据的可视化工具。通过 Rerun Viewer,您可以构建布局、自定义可视化并与数据交互。本节的其余部分详细说明了如何使用 Rerun SDK 记录和展示数据,以便在 Rerun Viewer 中进行可视化。
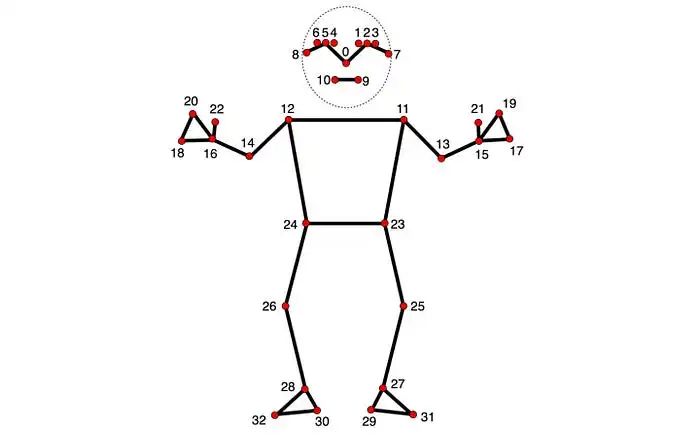
在 2D 和 3D 点中,指定点之间的连接是必不可少的。定义这些连接会自动在它们之间渲染线条。利用 MediaPipe 提供的信息,可以从 POSE_CONNECTIONS 集合中获取姿态点的连接,然后使用Annotation Context(https://www.rerun.io/docs/concepts/annotation-context)将它们设置为关键点连接。
rr.log("/",rr.AnnotationContext(rr.ClassDescription(info=rr.AnnotationInfo(id=0, label="Person"),keypoint_annotations=[rr.AnnotationInfo(id=lm.value, label=lm.name) for lm in mp_pose.PoseLandmark],keypoint_connections=mp_pose.POSE_CONNECTIONS,)),timeless=True,)图像坐标 — 2D 位置
在视频上可视化人体姿态标志是一个不错的选择。为实现这一点,您需要遵循 Rerun 文档中的实体和组件指南。实体路径层次结构页面描述了如何在同一实体上记录多个组件。例如,您可以创建“video”实体,并包含“video/rgb”组件用于视频,以及“video/pose”组件用于人体姿态。如果您打算将其用于视频,则需要时间线的概念。每一帧都可以与相应的数据相关联。这里有一个可以在视频上可视化 2D 点的函数:
def track_pose_2d(video_path: str) -> None:mp_pose = mp.solutions.pose with closing(VideoSource(video_path)) as video_source, mp_pose.Pose() as pose:for idx, bgr_frame in enumerate(video_source.stream_bgr()):if max_frame_count is not None and idx >= max_frame_count:breakrgb = cv2.cvtColor(bgr_frame.data, cv2.COLOR_BGR2RGB)# Associate frame with the datarr.set_time_seconds("time", bgr_frame.time)rr.set_time_sequence("frame_idx", bgr_frame.idx)# Present the videorr.log("video/rgb", rr.Image(rgb).compress(jpeg_quality=75))# Get the prediction resultsresults = pose.process(rgb)h, w, _ = rgb.shape# Log 2d points to 'video' entitylandmark_positions_2d = read_landmark_positions_2d(results, w, h)if landmark_positions_2d is not None:rr.log("video/pose/points",rr.Points2D(landmark_positions_2d, class_ids=0, keypoint_ids=mp_pose.PoseLandmark),)3D 世界坐标 — 3D 点
为什么仅仅停留在 2D 点呢,当您还可以拥有 3D 点?创建一个新的实体,命名为“Person”,并记录 3D 点。完成了!您刚刚创建了一个人体姿态的 3D 表示。下面是如何做到的:
def track_pose_3d(video_path: str, *, segment: bool, max_frame_count: int | None) -> None:mp_pose = mp.solutions.pose rr.log("person", rr.ViewCoordinates.RIGHT_HAND_Y_DOWN, timeless=True)with closing(VideoSource(video_path)) as video_source, mp_pose.Pose() as pose:for idx, bgr_frame in enumerate(video_source.stream_bgr()):if max_frame_count is not None and idx >= max_frame_count:breakrgb = cv2.cvtColor(bgr_frame.data, cv2.COLOR_BGR2RGB)# Associate frame with the datarr.set_time_seconds("time", bgr_frame.time)rr.set_time_sequence("frame_idx", bgr_frame.idx)# Present the videorr.log("video/rgb", rr.Image(rgb).compress(jpeg_quality=75))# Get the prediction resultsresults = pose.process(rgb)h, w, _ = rgb.shape# New entity "Person" for the 3D presentationlandmark_positions_3d = read_landmark_positions_3d(results)if landmark_positions_3d is not None:rr.log("person/pose/points",rr.Points3D(landmark_positions_3d, class_ids=0, keypoint_ids=mp_pose.PoseLandmark),)源代码
本教程重点讲解了人体姿态追踪示例的主要部分。对于喜欢动手实践的人来说,可以在 GitHub 上找到此示例的完整源代码。随意探索、修改并理解实现的内部工作原理。
提示与建议
压缩图像以提高效率 通过压缩记录的图像,可以提升整体处理速度:
rr.log("video", rr.Image(img).compress(jpeg_quality=75)
)
限制内存使用 如果您记录的数据超出 RAM 的容量,旧数据将开始被丢弃。默认限制是系统 RAM 的 75%。如果您想增加这个限制,可以使用命令行参数——memory-limit。有关内存限制的更多信息,请参阅 Rerun 的“如何限制内存使用”页面。
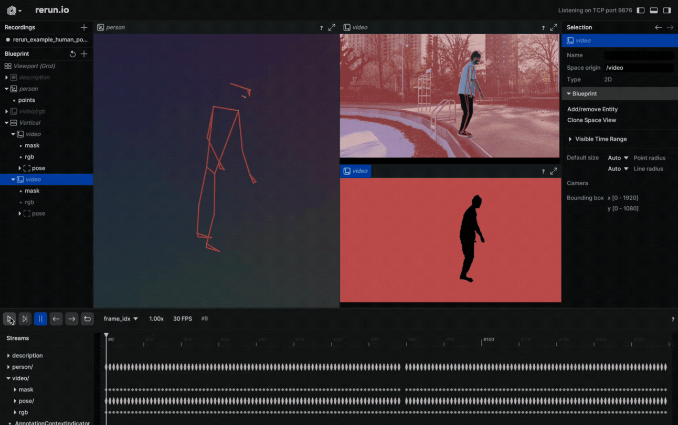
根据需要自定义可视化
· END ·
HAPPY LIFE

本文仅供学习交流使用,如有侵权请联系作者删除
这篇关于基于 MediaPipe 的 2D 和 3D 的人体姿态追踪:Rerun 展示的文章就介绍到这儿,希望我们推荐的文章对编程师们有所帮助!


