本文主要是介绍Unity3d--坦克对战游戏 AI 设计,希望对大家解决编程问题提供一定的参考价值,需要的开发者们随着小编来一起学习吧!
一.作业要求
从商店下载游戏:“Kawaii” Tank 或 其他坦克模型,构建 AI 对战坦克。具体要求
- 使用“感知-思考-行为”模型,建模 AI 坦克
- 场景中要放置一些障碍阻挡对手视线
- 坦克需要放置一个矩阵包围盒触发器,以保证 AI 坦克能使用射线探测对手方位
- AI 坦克必须在有目标条件下使用导航,并能绕过障碍。(失去目标时策略自己思考)
- 实现人机对战
二.具体实现
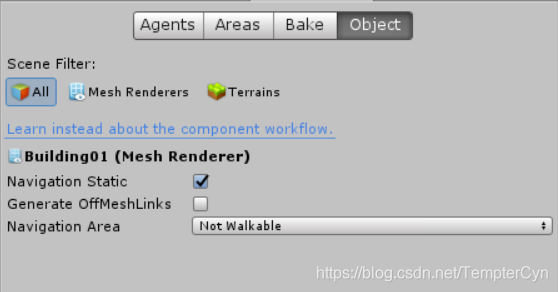
我使用了商店中的资源Tanks! Tutorial,Tanks! Tutorial是一个完整的两个玩家进行对战的坦克游戏。预制、地图很优美、规范。遵循“感知-思考-行为”模型,使其中的AI坦克具有智能跟踪玩家的功能,并能在适当的时候射击玩家。NavMesh是unity提供的导航寻路功能。给对象加上Nav Mesh Agent组件,在Navigation窗口给地图中的各个对象设置walkable或者not walkable等属性,然后bake烘培,就得到描述了游戏对象可行走的表面的数据结构Navigation Mesh,可通过这些三角网格计算其中任意两点之间的最短路径用于游戏对象的导航,作为“感知-思考-行为”模型中的“感知”。
“感知-思考-行为”模型在AITank的具体解释是:
感知周围是否出现玩家,然后进行思考,若没有玩家就进行行动巡逻,若附近有玩家就进行行动追捕。继续进行感知,若玩家到了AITank的射击范围则进行射击行动,若没有进入玩家射击范围则继续进行追捕行动。
首先是地图和玩家坦克的制作:

然后设置游戏对象的Navigation:

接着设置Bake使得AITank可以进行寻路:

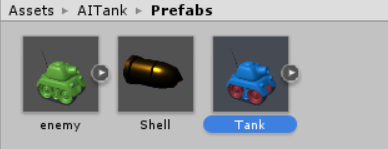
接下来是预制的制作,包括enemy,player和bullet,其中enemy和player中都有NavMeshAgent对象:


接下来是具体代码实现:
首先是AITank,它实现了感知-思考-行为”模型中的“思考”。一开始AI坦克如果在自己附近没有发现玩家,则会进入巡逻状态,如果AI坦克发现了附近的玩家,则会进行追捕。当距离进入了AI坦克的射程范围,则AI坦克会通过每隔一段时间发射一颗子弹:
using System;
using System.Collections;
using System.Collections.Generic;
using UnityEngine;
using UnityEngine.AI;public class AITank : Tank {public delegate void recycle(GameObject tank);public static event recycle recycleEvent;private Vector3 target;private bool gameover;private static Vector3[] points = { new Vector3(37.6f,0,0), new Vector3(40.9f,0,39), new Vector3(13.4f, 0, 39),new Vector3(13.4f, 0, 21), new Vector3(0,0,0), new Vector3(-20,0,0.3f), new Vector3(-20, 0, 32.9f), new Vector3(-37.5f, 0, 40.3f), new Vector3(-37.5f,0,10.4f), new Vector3(-40.9f, 0, -25.7f), new Vector3(-15.2f, 0, -37.6f),new Vector3(18.8f, 0, -37.6f), new Vector3(39.1f, 0, -18.1f)};private int destPoint = 0;private NavMeshAgent agent;private bool isPatrol = false;private void Awake(){destPoint = UnityEngine.Random.Range(0, 13);}// Use this for initializationvoid Start () {setHp(100f);StartCoroutine(shoot());agent = GetComponent<NavMeshAgent>();}private IEnumerator shoot(){while (!gameover){for(float i = 1; i > 0; i -= Time.deltaTime){yield return 0;}if(Vector3.Distance(transform.position, target) < 20){GameObjectFactory mf = Singleton<GameObjectFactory>.Instance;GameObject bullet = mf.getBullet(tankType.Enemy);bullet.transform.position = new Vector3(transform.position.x, 1.5f, transform.position.z) + transform.forward * 1.5f;bullet.transform.forward = transform.forward;Rigidbody rb = bullet.GetComponent<Rigidbody>();rb.AddForce(bullet.transform.forward * 20, ForceMode.Impulse);}}}// Update is called once per framevoid Update () {gameover = GameDirector.getInstance().currentSceneController.isGameOver();if (!gameover){target = GameDirector.getInstance().currentSceneController.getPlayerPos();if (getHp() <= 0 && recycleEvent != null){recycleEvent(this.gameObject);}else{if(Vector3.Distance(transform.position, target) <= 30){isPatrol = false;agent.autoBraking = true;agent.SetDestination(target);}else{patrol();}}}else{NavMeshAgent agent = GetComponent<NavMeshAgent>();agent.velocity = Vector3.zero;agent.ResetPath();}}private void patrol(){if(isPatrol){if(!agent.pathPending && agent.remainingDistance < 0.5f)GotoNextPoint();}else{agent.autoBraking = false;GotoNextPoint();}isPatrol = true;}private void GotoNextPoint(){agent.SetDestination(points[destPoint]);destPoint = (destPoint + 1) % points.Length;}
}
在追捕中会进行一系列输入来调动坦克的行为。这就是感知-思考-行为”模型中的“行动”。
然后就是Bullet子弹类。子弹类的主要问题是碰撞问题,通过OnCollisionEnter函数检查bullet碰撞范围内的对象,如果是玩家则玩家血量减少。并再子弹爆炸后通过工厂类对子弹进行回收:
using System.Collections;
using System.Collections.Generic;
using UnityEngine;public class Bullet : MonoBehaviour {public float explosionRadius = 3f;private tankType type;public void setTankType(tankType type){this.type = type;}private void Update(){if(this.transform.position.y < 0 && this.gameObject.activeSelf){GameObjectFactory mf = Singleton<GameObjectFactory>.Instance;ParticleSystem explosion = mf.getPs();explosion.transform.position = transform.position;explosion.Play();mf.recycleBullet(this.gameObject);}}void OnCollisionEnter(Collision other){GameObjectFactory mf = Singleton<GameObjectFactory>.Instance;ParticleSystem explosion = mf.getPs();explosion.transform.position = transform.position;Collider[] colliders = Physics.OverlapSphere(transform.position, explosionRadius);for(int i = 0; i < colliders.Length; i++)if(colliders[i].tag == "tankPlayer" && this.type == tankType.Enemy || colliders[i].tag == "tankEnemy" && this.type == tankType.Player){float distance = Vector3.Distance(colliders[i].transform.position, transform.position);//被击中坦克与爆炸中心的距离float hurt = 100f / distance;float current = colliders[i].GetComponent<Tank>().getHp();colliders[i].GetComponent<Tank>().setHp(current - hurt);}explosion.Play();if (this.gameObject.activeSelf) mf.recycleBullet(this.gameObject);}
}
导演类与之前的作业一样:
using System.Collections;
using System.Collections.Generic;
using UnityEngine;public class GameDirector : System.Object {private static GameDirector _instance;public SceneController currentSceneController { get; set; }private GameDirector() { }public static GameDirector getInstance(){if(_instance == null){_instance = new GameDirector();}return _instance;}
}
通过工厂类来对AITank,Bullet,爆炸粒子系统等游戏对象进行生产或回收,具体思路与之前的工厂类相同:
using System.Collections;
using System.Collections.Generic;
using UnityEngine;public enum tankType : int { Player, Enemy }public class GameObjectFactory : MonoBehaviour {public GameObject player;public GameObject tank;public GameObject bullet;public ParticleSystem ps;private Dictionary<int, GameObject> usingTanks;private Dictionary<int, GameObject> freeTanks;private Dictionary<int, GameObject> usingBullets;private Dictionary<int, GameObject> freeBullets;private List<ParticleSystem> psContainer;private void Awake(){usingTanks = new Dictionary<int, GameObject>();freeTanks = new Dictionary<int, GameObject>();usingBullets = new Dictionary<int, GameObject>();freeBullets = new Dictionary<int, GameObject>();psContainer = new List<ParticleSystem>();}// Use this for initializationvoid Start () {AITank.recycleEvent += recycleTank;}public GameObject getPlayer(){return player;}public GameObject getTank(){if(freeTanks.Count == 0){GameObject newTank = Instantiate<GameObject>(tank);usingTanks.Add(newTank.GetInstanceID(), newTank);newTank.transform.position = new Vector3(Random.Range(-100, 100), 0, Random.Range(-100, 100));return newTank;}foreach (KeyValuePair<int, GameObject> pair in freeTanks){pair.Value.SetActive(true);freeTanks.Remove(pair.Key);usingTanks.Add(pair.Key, pair.Value);pair.Value.transform.position = new Vector3(Random.Range(-100, 100), 0, Random.Range(-100, 100));return pair.Value;}return null;}public GameObject getBullet(tankType type){if (freeBullets.Count == 0){GameObject newBullet = Instantiate(bullet);newBullet.GetComponent<Bullet>().setTankType(type);usingBullets.Add(newBullet.GetInstanceID(), newBullet);return newBullet;}foreach (KeyValuePair<int, GameObject> pair in freeBullets){pair.Value.SetActive(true);pair.Value.GetComponent<Bullet>().setTankType(type);freeBullets.Remove(pair.Key);usingBullets.Add(pair.Key, pair.Value);return pair.Value;}return null;}public ParticleSystem getPs(){for(int i = 0; i < psContainer.Count; i++){if (!psContainer[i].isPlaying) return psContainer[i];}ParticleSystem newPs = Instantiate<ParticleSystem>(ps);psContainer.Add(newPs);return newPs;}public void recycleTank(GameObject tank){usingTanks.Remove(tank.GetInstanceID());freeTanks.Add(tank.GetInstanceID(), tank);tank.GetComponent<Rigidbody>().velocity = new Vector3(0, 0, 0);tank.SetActive(false);}public void recycleBullet(GameObject bullet){usingBullets.Remove(bullet.GetInstanceID());freeBullets.Add(bullet.GetInstanceID(), bullet);bullet.GetComponent<Rigidbody>().velocity = new Vector3(0, 0, 0);bullet.SetActive(false);}
}
接口类与之前的作业实现相同:
using System.Collections;
using System.Collections.Generic;
using UnityEngine;public interface IUserAction
{void moveForward();void moveBackWard();void turn(float offsetX);void shoot();bool isGameOver();
}
在GUI类当中实现了读取玩家的键盘操作并调用相关的函数对玩家Tank进行控制,移动或发射子弹,其中WASD进行移动,空格键发射子弹:
using System.Collections;
using System.Collections.Generic;
using UnityEngine;public class IUserGUI : MonoBehaviour {IUserAction action;// Use this for initializationvoid Start () {action = GameDirector.getInstance().currentSceneController as IUserAction;}// Update is called once per framevoid Update () {if (!action.isGameOver()){if (Input.GetKey(KeyCode.W)){action.moveForward();}if (Input.GetKey(KeyCode.S)){action.moveBackWard();}if (Input.GetKeyDown(KeyCode.Space)){action.shoot();}float offsetX = Input.GetAxis("Horizontal");action.turn(offsetX);}}
}
然后实现了一个简单的对摄像机进行控制的MainCameraControl类,实现了移动跟随效果以及通过游戏场景中所有坦克的距离大小来设置摄像机的范围:
using System.Collections;
using System.Collections.Generic;
using UnityEngine;public class MainCameraControl : MonoBehaviour {public float m_DampTime = 0.2f; public float m_ScreenEdgeBuffer = 4f;public float m_MinSize = 6.5f; [HideInInspector] public List<Transform> m_Targets;private Camera m_Camera;                        private float m_ZoomSpeed;                      private Vector3 m_MoveVelocity;                 private Vector3 m_DesiredPosition;             private void Awake(){m_Camera = Camera.main;}public void setTarget(Transform transform){m_Targets.Add(transform);}private void FixedUpdate(){Move();Zoom();}private void Move(){FindAveragePosition();transform.position = Vector3.SmoothDamp(transform.position, m_DesiredPosition, ref m_MoveVelocity, m_DampTime);}private void FindAveragePosition(){Vector3 averagePos = new Vector3();int numTargets = 0;for (int i = 0; i < m_Targets.Count; i++){if (!m_Targets[i].gameObject.activeSelf)continue;averagePos += m_Targets[i].position;numTargets++;}if (numTargets > 0)averagePos /= numTargets;averagePos.y = transform.position.y;m_DesiredPosition = averagePos;}private void Zoom(){float requiredSize = FindRequiredSize();m_Camera.orthographicSize = Mathf.SmoothDamp(m_Camera.orthographicSize, requiredSize, ref m_ZoomSpeed, m_DampTime);}private float FindRequiredSize(){Vector3 desiredLocalPos = transform.InverseTransformPoint(m_DesiredPosition);float size = 0f;for (int i = 0; i < m_Targets.Count; i++){if (!m_Targets[i].gameObject.activeSelf)continue;Vector3 targetLocalPos = transform.InverseTransformPoint(m_Targets[i].position);Vector3 desiredPosToTarget = targetLocalPos - desiredLocalPos;size = Mathf.Max(size, Mathf.Abs(desiredPosToTarget.y));size = Mathf.Max(size, Mathf.Abs(desiredPosToTarget.x) / m_Camera.aspect);}size += m_ScreenEdgeBuffer;size = Mathf.Max(size, m_MinSize);return size;}public void SetStartPositionAndSize(){FindAveragePosition();transform.position = m_DesiredPosition;m_Camera.orthographicSize = FindRequiredSize();}
}
单例类与之前作业的实现相同:
using System.Collections;
using System.Collections.Generic;
using UnityEngine;public class Singleton<T> : MonoBehaviour where T : MonoBehaviour
{protected static T instance;public static T Instance{get{if (instance == null){instance = (T)FindObjectOfType(typeof(T));if (instance == null){Debug.LogError("An instance of " + typeof(T) + " is needed in the scene, but there is none.");}}return instance;}}
}
最后是场景控制类,主要是调用工厂类初始化Tank,AITank,Bullet,粒子系统等游戏对象,以及实现接口中的函数:
using System.Collections;
using System.Collections.Generic;
using UnityEngine;public class SceneController : MonoBehaviour, IUserAction {public GameObject player;private bool gameOver = false;private int enemyCount = 6;private GameObjectFactory mf;private MainCameraControl cameraControl;private void Awake(){GameDirector director = GameDirector.getInstance();director.currentSceneController = this;mf = Singleton<GameObjectFactory>.Instance;player = mf.getPlayer();cameraControl = GetComponent<MainCameraControl>();cameraControl.setTarget(player.transform);}// Use this for initializationvoid Start () {for(int i = 0; i < enemyCount; i++){GameObject gb = mf.getTank();cameraControl.setTarget(gb.transform);}Player.destroyEvent += setGameOver;cameraControl.SetStartPositionAndSize();}void Update () {Camera.main.transform.position = new Vector3(player.transform.position.x, 15, player.transform.position.z);}public Vector3 getPlayerPos(){return player.transform.position;}public bool isGameOver(){return gameOver;}public void setGameOver(){gameOver = true;}public void moveForward(){player.GetComponent<Rigidbody>().velocity = player.transform.forward * 20;}public void moveBackWard(){player.GetComponent<Rigidbody>().velocity = player.transform.forward * -20;}public void turn(float offsetX){float y = player.transform.localEulerAngles.y + offsetX * 5;float x = player.transform.localEulerAngles.x;player.transform.localEulerAngles = new Vector3(x, y, 0);}public void shoot(){GameObject bullet = mf.getBullet(tankType.Player);bullet.transform.position = new Vector3(player.transform.position.x, 1.5f, player.transform.position.z) + player.transform.forward * 1.5f;bullet.transform.forward = player.transform.forward;Rigidbody rb = bullet.GetComponent<Rigidbody>();rb.AddForce(bullet.transform.forward * 20, ForceMode.Impulse);}
}
这样就实现了坦克对战游戏 AI 设计。
三.实验总结及思考
这次作业中实现了坦克对战游戏 AI 的设计,在实现的过程中,场景预制等都根据资源Tanks! Tutorial预先可以获得,地图只需要在资源中自己拼接就能简获得,自己需要编写的就是一些具体的实现。
Github地址:AITankBattle
视频演示:AI坦克对战
最后感谢师兄的博客!
这篇关于Unity3d--坦克对战游戏 AI 设计的文章就介绍到这儿,希望我们推荐的文章对编程师们有所帮助!


