本文主要是介绍旭日x3派目标跟随小车,希望对大家解决编程问题提供一定的参考价值,需要的开发者们随着小编来一起学习吧!
目标跟随小车(yolov5、安全帽识别)
- 前言
- 最终结果
- 接线
- 实现
前言
上板运行的后处理使用cython封装了,由于每个版本的yolo输出的形状不一样,这里只能用yolov5-6.2这个版本。
①训练自己的模型并部署于旭日x3派参考:
https://blog.csdn.net/m0_71523511/article/details/136546588/部署官方权重文件
https://blog.csdn.net/m0_71523511/article/details/136823320/部署自己训练的安全帽识别权重文件
②通过40pin引脚驱动减速电机参考:
https://blog.csdn.net/m0_71523511/article/details/136722608/视觉循迹小车
最终结果
跟随戴着安全帽的人前进,当距离过近时会停车(没有使用深度相机,无法直接获取距离信息,简单根据检测框与图像的比值来确定是否停车),检测不到安全帽时也会停车。根据目标(在这里是目标框中心的 x 坐标)与设定值(320)之间的偏差计算(PID)得到相应占空比驱动差速车轮。
接线
这里使用物理引脚编号:

旭日x3派连接TB6612驱动电机:
11、13引脚接AIN1、AIN2;15、16引脚接BIN1、BIN2;32引脚接PWMA;33引脚接PWMB引脚。TB6612的VCC接3.3v,VM和STBY接5V,有条件的VM可以接7-12V;AO1、AO2接左电机的正负极;BO1、BO2接右电机的正负极。
如果想把小车弄好的,需要能输出3A电流供电,可以使用18650电池,输出最好在7V-12V,3A。这里参考:
https://developer.horizon.cc/forumDetail/146176819622746404
实现
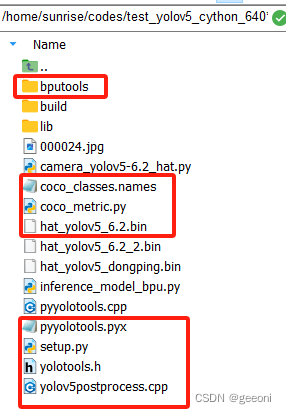
经过前面的步骤得到bin文件之后,需要将如下文件放入板端(在前言的参考博客中有下载链接)
新建一个视频推理py文件:
import numpy as np
import cv2
import os
from hobot_dnn import pyeasy_dnn as dnn
from bputools.format_convert import imequalresize, bgr2nv12_opencv
import Hobot.GPIO as GPIOimport lib.pyyolotools as yolotoolsclass CTRL():def __init__(self, in1, in2, in3, in4, pa, pb):GPIO.setmode(GPIO.BOARD)GPIO.setwarnings(False)GPIO.setup(in1, GPIO.OUT)GPIO.setup(in2, GPIO.OUT)GPIO.setup(in3, GPIO.OUT)GPIO.setup(in4, GPIO.OUT)self.in1 = in1self.in2 = in2self.in3 = in3self.in4 = in4self.PWMA = GPIO.PWM(pa, 48000)self.PWMB = GPIO.PWM(pb, 48000)def drive(self, FL, FR):if FL >= 0:GPIO.output(self.in3, GPIO.HIGH)GPIO.output(self.in4, GPIO.LOW)elif FL < 0:GPIO.output(self.in4, GPIO.HIGH)GPIO.output(self.in3, GPIO.LOW)if FR >= 0:GPIO.output(self.in1, GPIO.HIGH)GPIO.output(self.in2, GPIO.LOW)elif FR < 0:GPIO.output(self.in2, GPIO.HIGH)GPIO.output(self.in1, GPIO.LOW)self.PWMA.ChangeDutyCycle(abs(FR))self.PWMB.ChangeDutyCycle(abs(FL))self.PWMA.start(abs(FR))self.PWMB.start(abs(FL))def stop(self):GPIO.output(self.in1, GPIO.LOW)GPIO.output(self.in2, GPIO.LOW)GPIO.output(self.in3, GPIO.LOW)GPIO.output(self.in4, GPIO.LOW)self.PWMA.ChangeDutyCycle(0)self.PWMB.ChangeDutyCycle(0)self.PWMA.start(0)self.PWMB.start(0)def clean(self):self.PWMB.stop()self.PWMA.stop()GPIO.cleanup()class PIDController():def __init__(self,KP,KI,KD,setpoint):self.KP = KPself.KI = KIself.KD = KDself.setpoint = setpointself.prev_error = 0self.integral = 0def update(self,current_value):error = self.setpoint - current_valueself.integral += errorderivative = error - self.prev_erroroutput = self.KP * error + self.KI *self.integral + self.KD * derivativeself.prev_error = errorreturn outputdef get_hw(pro):if pro.layout == "NCHW":return pro.shape[2], pro.shape[3]else:return pro.shape[1], pro.shape[2]def format_yolov5(frame):row, col, _ = frame.shape_max = max(col, row)result = np.zeros((_max, _max, 3), np.uint8)result[0:row, 0:col] = framereturn result# 加载模型和设置参数
model_path = 'hat_yolov5_6.2_2.bin'
classes_name_path = 'coco_classes.names'
models = dnn.load(model_path)
model_h, model_w = get_hw(models[0].inputs[0].properties)
print("Model Height:", model_h, "Model Width:", model_w)thre_confidence = 0.4
thre_score = 0.25
thre_nms = 0.45
colors = [(255, 255, 0), (0, 255, 0), (0, 255, 255), (255, 0, 0)]# 打开摄像头
cap = cv2.VideoCapture(8) # 使用第一个摄像头(如果有多个摄像头,可能需要更改参数)
Ctrl = CTRL(11, 13, 16, 15, 32, 33) # 设置管脚
pidController = PIDController(KP=0.12,KI=0.001,KD=0.12,setpoint=320)
Ctrl.drive(25, 25) # 小车的始发运动# 主循环:读取帧,进行目标检测,显示结果
while True:ret, frame = cap.read() # 读取一帧图像if not ret:print("Error: Couldn't capture frame")breakinputImage = format_yolov5(frame)img = imequalresize(inputImage, (model_w, model_h))nv12 = bgr2nv12_opencv(img)t1 = cv2.getTickCount()outputs = models[0].forward(nv12)t2 = cv2.getTickCount()outputs = outputs[0].buffer#print('Inference time: {0} ms'.format((t2 - t1) * 1000 / cv2.getTickFrequency()))image_width, image_height, _ = inputImage.shapefx, fy = image_width / model_w, image_height / model_ht1 = cv2.getTickCount()class_ids, confidences, boxes = yolotools.pypostprocess_yolov5(outputs[0][:, :, 0], fx, fy,thre_confidence, thre_score, thre_nms)t2 = cv2.getTickCount()#print('Post-processing time: {0} ms'.format((t2 - t1) * 1000 / cv2.getTickFrequency()))with open(classes_name_path, "r") as f:class_list = [cname.strip() for cname in f.readlines()]for (classid, confidence, box) in zip(class_ids, confidences, boxes):color = colors[int(classid) % len(colors)]cv2.rectangle(frame, box, color, 2)cv2.rectangle(frame, (box[0], box[1] - 20), (box[0] + box[2], box[1]), color, -1)#cv2.putText(frame, str(classid), (box[0], box[1] - 10), cv2.FONT_HERSHEY_SIMPLEX, .5, (0, 0, 0))cv2.putText(frame, class_list[classid], (box[0], box[1] - 10), cv2.FONT_HERSHEY_SIMPLEX, .5, (0,0,0))cv2.imshow('frame', frame) # 显示帧##########################################################################################################################car_logicalnum_detection = len(boxes)if num_detection == 0:print("no_object_stop")Ctrl.stop()else:if classid == 0:x1,y1 = box[0],box[1]x2,y2 = box[0] + box[2],box[1] + box[3]kuang_area = (x2-x1) * (y2-y1)input_area = 409600bizhi = kuang_area / input_areaif bizhi > 0.1:print("too_close_stop")Ctrl.stop()else:x3 = (x2+x1)/2print("weizhi",x3)#direct_control#if x3 < 300:#print("left")#Ctrl.drive(20,-20)#elif x3 > 280 and x3 < 320:#print("zhixian")#Ctrl.drive(25,25)#else:#print("right")#Ctrl.drive(-20,20)#pid_controlpid_output = pidController.update(x3)if pid_output > 11:pid_output = 11if pid_output < -11:pid_output = -11Ctrl.drive(25+pid_output, 25-pid_output)else:Ctrl.stop()print("hat_stop")#########################################################################################################################if cv2.waitKey(1) & 0xFF == ord('q'): # 按下 'q' 键退出循环Ctrl.stop()break# 释放资源并关闭窗口
cap.release()
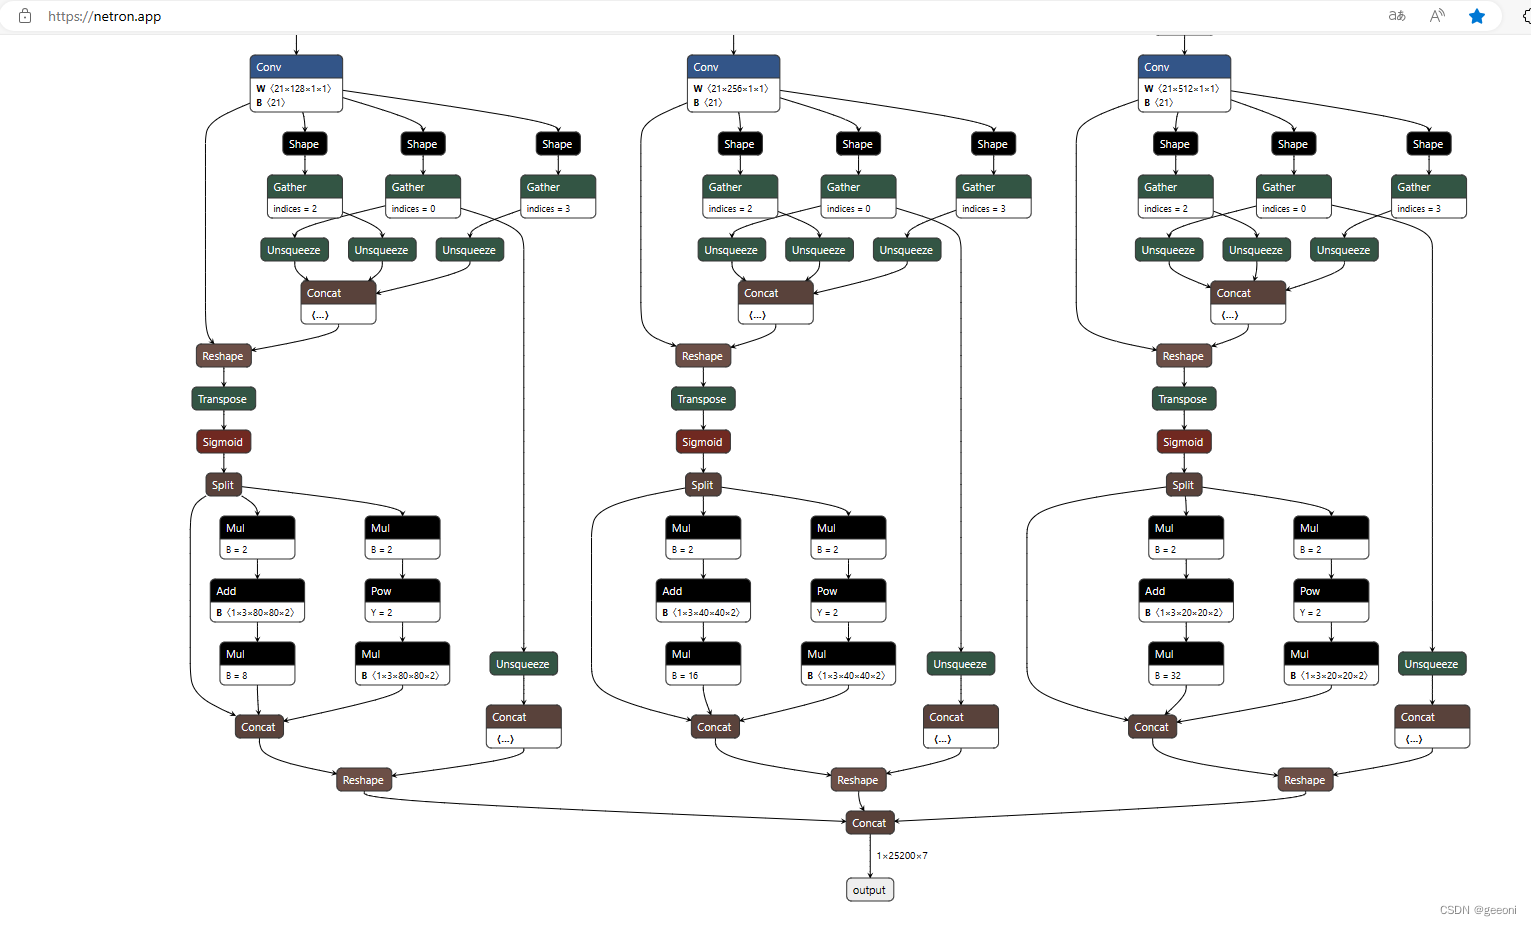
cv2.destroyAllWindows()如果模型输出是 1×25200×7 ,代码直接复制就能用。
查看模型结构图网址:https://netron.app/ ,直接打开onnx文件拉到最后就可以看到模型输出:
这篇关于旭日x3派目标跟随小车的文章就介绍到这儿,希望我们推荐的文章对编程师们有所帮助!


![[数据集][目标检测]血细胞检测数据集VOC+YOLO格式2757张4类别](https://i-blog.csdnimg.cn/direct/22c867ab717d44c78b985ed667169b42.png)


![[数据集][目标检测]智慧农业草莓叶子病虫害检测数据集VOC+YOLO格式4040张9类别](https://i-blog.csdnimg.cn/direct/4a9ca83db964467783f221a1fd15ab5b.png)
