本文主要是介绍Faster RCNN源码解读3.2-_region_proposal()筛选anchors-_anchor_target_layer()(核心和关键2),希望对大家解决编程问题提供一定的参考价值,需要的开发者们随着小编来一起学习吧!
Faster RCNN复现
Faster RCNN源码解读1-整体流程和各个子流程梳理
Faster RCNN源码解读2-_anchor_component()为图像建立anchors(核心和关键1)
Faster RCNN源码解读3.1-_region_proposal() 筛选anchors-_proposal_layer()(核心和关键2)
Faster RCNN源码解读3.2-_region_proposal()筛选anchors-_anchor_target_layer()(核心和关键2)
Faster RCNN源码解读3.3-_region_proposal() 筛选anchors-_proposal_target_layer()(核心和关键2)
Faster RCNN源码解读4-其他收尾工作:ROI_pooling、分类、回归等
Faster RCNN源码解读5-损失函数
理论介绍:有关Faster RCNN理论介绍的文章,可以自行搜索,这里就不多说理论部分了。
复现过程:代码配置过程没有记录,具体怎么把源码跑起来需要自己搜索一下。
faster rcnn源码确实挺复杂的,虽然一步步解析了,但是觉得还是没有领会其中的精髓,只能算是略知皮毛。在这里将代码解析的过程给大家分享一下,希望对大家有帮助。先是解析了代码的整体结构,然后对各个子结构进行了分析。代码中的注释,有的是原来就有的注释,有的是参考网上别人的,有的是自己理解的,里面或多或少会有些错误,如果发现,欢迎指正!
本文解析的源码地址:https://github.com/lijianaiml/tf-faster-rcnn-windows
RPN处的处理流程:

_region_proposal()函数依赖关系:

接上一篇,继续解析下面这个模块
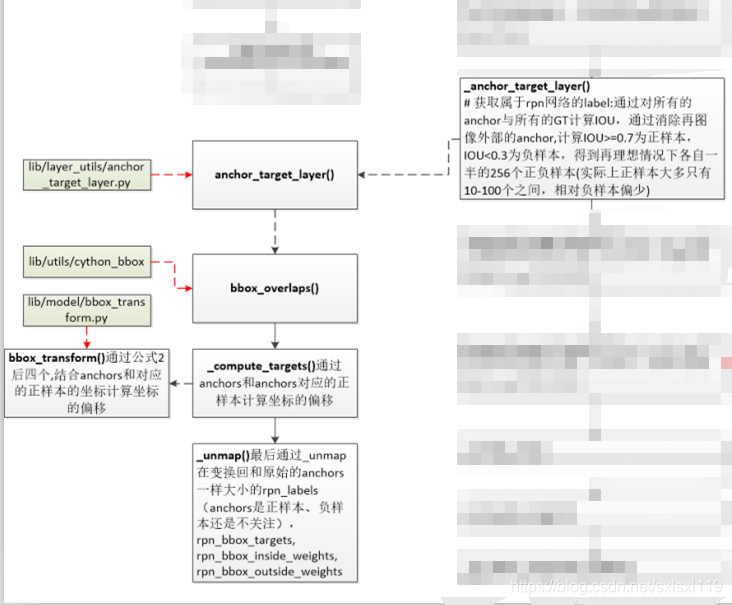
2,_anchor_target_layer()
函数目标: 获取属于rpn网络的label:通过对所有的anchor与所有的GT计算IOU,通过消除在图像外部的anchor,
计算IOU>=0.7为正样本,IOU<0.3为负样本,得到在理想情况下各自一半的256个正负样本(实际上正样
本大多只有10-100个之间,相对负样本偏少)。
此函数没有对数据进行直接操作,而是调用了anchor_target_layer(),并接收其返回值。
'''#函数目标: 获取属于rpn网络的label:通过对所有的anchor与所有的GT计算IOU,通过消除在图像外部的anchor,计算IOU>=0.7为正样本,IOU<0.3为负样本,得到在理想情况下各自一半的256个正负样本(实际上正样本大多只有10-100个之间,相对负样本偏少)'''def _anchor_target_layer(self, rpn_cls_score, name):# rpn_cls_score:每个位置的9个anchors分类特征[1,?,?,9*2]with tf.variable_scope(name) as scope:#rpn_labes:特征图中每个位置对应的时正样本,负样本还是不关注(去除了边界在图像外面的anchors)#rpn_bbox_targets:特征图中每个位置和对应的正样本的坐标偏移(很多为0)#rpn_bbox_inside_weights:正样本的权重为1(去除负样本和不关注的样本,均为0)#rpn_bbox_outside_weights:正样本和负样本(不包括不关注的样本)归一化的权重rpn_labels, rpn_bbox_targets, rpn_bbox_inside_weights, rpn_bbox_outside_weights = tf.py_func(anchor_target_layer, # anchor_target_layer()在 lib/layer_utils/anchor_target_layer.py中定义[rpn_cls_score, self._gt_boxes, self._im_info, self._feat_stride, self._anchors, self._num_anchors],[tf.float32, tf.float32, tf.float32, tf.float32],name="anchor_target")rpn_labels.set_shape([1, 1, None, None])rpn_bbox_targets.set_shape([1, None, None, self._num_anchors * 4])rpn_bbox_inside_weights.set_shape([1, None, None, self._num_anchors * 4])rpn_bbox_outside_weights.set_shape([1, None, None, self._num_anchors * 4])rpn_labels = tf.to_int32(rpn_labels, name="to_int32")self._anchor_targets['rpn_labels'] = rpn_labels #rpn_labes:特征图中每个位置对应的时正样本,负样本还是不关注(去除了边界在图像外面的anchors)self._anchor_targets['rpn_bbox_targets'] = rpn_bbox_targets #rpn_bbox_targets:特征图中每个位置和对应的正样本的坐标偏移(很多为0)self._anchor_targets['rpn_bbox_inside_weights'] = rpn_bbox_inside_weights #rpn_bbox_inside_weights:正样本的权重为1(去除负样本和不关注的样本,均为0)self._anchor_targets['rpn_bbox_outside_weights'] = rpn_bbox_outside_weights #rpn_bbox_outside_weights:正样本和负样本(不包括不关注的样本)归一化的权重self._score_summaries.update(self._anchor_targets)return rpn_labels2.1,anchor_target_layer()
'''
#rpn_cls_score:[1,?,?,9*2]
#gt_boxes:[?,5]
#im_info:[3]
#_feat_stride:16
#all_anchors:[?,4]
#num_anchors:9
函数目标:从w*h*9个anchor中选择256个训练RPN网络
'''
def anchor_target_layer(rpn_cls_score, gt_boxes, im_info, _feat_stride, all_anchors, num_anchors):"""Same as the anchor target layer in original Faster RCNN """#*************1,筛选图片内的anchors**********************************************************A = num_anchors                       #9total_anchors = all_anchors.shape[0]  #所有anchors的个数,9*特征图宽*特征图高 个K = total_anchors / num_anchors       #anchors总数除以9,K等于特征图宽*特征图高_allowed_border = 0  #允许边框超出边界范围height, width = rpn_cls_score.shape[1:3] #rpn网络得到的特征图的高宽#保证所有的anchors都在图上,即去除超出边界的anchors,执行完下段代码,len(all_anchors)=17100,   len(inds_inside)=5944inds_inside = np.where(  #所有anchors边界可能超出图像,取在图像内部的anchors索引(all_anchors[:, 0] >= -_allowed_border) &(all_anchors[:, 1] >= -_allowed_border) &(all_anchors[:, 2] < im_info[1] + _allowed_border) &  # width(all_anchors[:, 3] < im_info[0] + _allowed_border)  # height)[0]anchors = all_anchors[inds_inside, :] #得到在图像内部anchors的坐标#-------------得到在图像内部anchors的坐标------------------------------------------# *************1,筛选图片内的anchors**********************************************************# *************2,重叠率的计算*****************************************************************#(1)计算所有的没超过图像边界的anchor与gt_boxes之间的重合度IOU(交并比),并返回交并比IOU# 假设该图片的gt数量为3,则计算每一个anchor与gt的重叠率,得到overlaps,overlaps = (5944, 3)overlaps = bbox_overlaps( # bbox_overlaps()在lib/utils/cython_bbox中定义,第三方库np.ascontiguousarray(anchors, dtype=np.float),np.ascontiguousarray(gt_boxes, dtype=np.float))   #shape(5944,n),n=len(gt)#(2)计算每一个anchor与哪个gt有最大重叠,即argmax_overlaps# 如上所述,需计算每一个anchor与gt的重叠率,如果有多个gt,则需要找出当前anchor与哪一个gt有最大重叠。#argmax_overlaps的值为gt的序号:如0、1...len(gt)-1argmax_overlaps = overlaps.argmax(axis=1) #返回沿轴axis最大值的索引,#shape(5944,1)#(3)根据每个anchor与第*个gt有最大重叠,根据最大重叠的gt索引,取出重叠率# 假设有3个gt,4个anchors,取法类似overlaps[0,1],overlaps[1,1],overlaps[2,2],overlaps[3,0],结果形如max_overlaps=[0.02,0,0.71,0.3]max_overlaps = overlaps[np.arange(len(inds_inside)), argmax_overlaps] #得到上述的重叠率max_overlaps#(4)返回 与每一个gt重叠率最高的 anchor的序号 gt_argmax_overlaps# 假设gt数量是3,假设与序号为0的gt重叠率最高的是第221个anchor,与序号为1的gt重叠率最高的是第1221个anchor# 与序号为2的gt重叠率最高的是第3221个anchor,那么gt_argmax_overlaps=[221,1221,3221]gt_argmax_overlaps = overlaps.argmax(axis=0) #序号#(5)得到上述的重叠率gt_max_overlaps。# 与上面对应,假设gt数量是3,上面得到的是gt_argmax_overlaps=[221,1221,3221]# 这里应该是 gt_max_overlaps=[0.71,0.66,0.89],数值是我随机设的,理解意思就行gt_max_overlaps = overlaps[gt_argmax_overlaps,np.arange(overlaps.shape[1])] #值# 6)因为(4)只选出了与每一个gt重叠率最高的其中一个anchor,还存在其他anchor也有相同的重叠率,# 返回这些anchor的序号,gt_argmax_overlaps。gt_argmax_overlaps = np.where(overlaps == gt_max_overlaps)[0]# *************2,重叠率的计算*****************************************************************# *************3,labels的计算*****************************************************************#label初始化,所有的label都置为-1# label: 1 正样本, 0 负样本, -1 不关注labels = np.empty((len(inds_inside),), dtype=np.float32) #np.empty()返回一个随机元素的矩阵,大小按照参数定义。labels.fill(-1)  #全部填充为-1#(1)首先将与每一个gt重叠率最高的anchor设置为fg(这些anchor的序号为gt_argmax_overlaps ),labels = 1labels[gt_argmax_overlaps] = 1#(2)将重叠率(max_overlaps)大于0.7的anchor设置为fg即前景,labels = 1labels[max_overlaps >= cfg.TRAIN.RPN_POSITIVE_OVERLAP] = 1#(3)将重叠率(max_overlaps)小于0.3的anchor设置为bg即北京,labels = 0if not cfg.TRAIN.RPN_CLOBBER_POSITIVES:# assign bg labels first so that positive labels can clobber them# first set the negatives# 将anchors对应的正样本的重叠区域中小于阈值的置0labels[max_overlaps < cfg.TRAIN.RPN_NEGATIVE_OVERLAP] = 0if cfg.TRAIN.RPN_CLOBBER_POSITIVES:# assign bg labels last so that negative labels can clobber positiveslabels[max_overlaps < cfg.TRAIN.RPN_NEGATIVE_OVERLAP] = 0#(4)如果有过多的正样本,则只随机选择num_fg=0.5*256=128个正样本num_fg = int(cfg.TRAIN.RPN_FG_FRACTION * cfg.TRAIN.RPN_BATCHSIZE)fg_inds = np.where(labels == 1)[0]if len(fg_inds) > num_fg: #正样本个数大于128个disable_inds = npr.choice(fg_inds, size=(len(fg_inds) - num_fg), replace=False)labels[disable_inds] = -1 #将多余的正样本设置为不关注#(5)如果有过多的负样本,则只随机选择 num_bg 个负样本=256-正样本个数num_bg = cfg.TRAIN.RPN_BATCHSIZE - np.sum(labels == 1)bg_inds = np.where(labels == 0)[0]if len(bg_inds) > num_bg: #负样本个数大于256-正样本个数disable_inds = npr.choice(bg_inds, size=(len(bg_inds) - num_bg), replace=False)labels[disable_inds] = -1 #将多余的负样本设置为不关注# *************3,labels的计算*****************************************************************# *************4,计算偏移参数*****************************************************************#(1)计算每一个anchor与其重叠率最大的gt之间的偏移参数(dx,dy,dw,dh),# 记为bbox_targets。bbox_targets = (5944, 4)bbox_targets = np.zeros((len(inds_inside), 4), dtype=np.float32)bbox_targets = _compute_targets(anchors, gt_boxes[argmax_overlaps, :])#(2)对于每一个acnhor生成bbox_inside_weights,# bbox_inside_weights = (5944,4)但是对于fg,为1;bg为0;忽略为0bbox_inside_weights = np.zeros((len(inds_inside), 4), dtype=np.float32)bbox_inside_weights[labels == 1, :] = np.array(cfg.TRAIN.RPN_BBOX_INSIDE_WEIGHTS)#(3)对于每一个acnhor生成bbox_outside_weights,# bbox_outside_weights = (5944,4),fg和bg的值都为1/256,忽略为0bbox_outside_weights = np.zeros((len(inds_inside), 4), dtype=np.float32)if cfg.TRAIN.RPN_POSITIVE_WEIGHT < 0:# uniform weighting of examples (given non-uniform sampling)num_examples = np.sum(labels >= 0) #正样本和负样本的总数(去除不关注的样本)positive_weights = np.ones((1, 4)) * 1.0 / num_examples #归一化的权重negative_weights = np.ones((1, 4)) * 1.0 / num_examples #归一化的权重else:assert ((cfg.TRAIN.RPN_POSITIVE_WEIGHT > 0) &(cfg.TRAIN.RPN_POSITIVE_WEIGHT < 1))positive_weights = (cfg.TRAIN.RPN_POSITIVE_WEIGHT /np.sum(labels == 1))negative_weights = ((1.0 - cfg.TRAIN.RPN_POSITIVE_WEIGHT) /np.sum(labels == 0))# 对前景和背景控制权重,positive_weights,negative_weights有互补的意味# 在_smooth_l1_loss里面使用bbox_outside_weights[labels == 1, :] = positive_weights #归一化的权重bbox_outside_weights[labels == 0, :] = negative_weights #归一化的权重# *************4,计算偏移参数*****************************************************************# *************5,映射到全部anchors************************************************************# 通过_unmap()函数实现将之前在所有图像上产生的anchors都赋上label、bbox_targets、# bbox_inside_weights、bbox_outside_weights属性# 因为上面的labels、bbox_targets、bbox_inside_weights,bbox_outside_weights行数都是5944,# 也就是都是在落在图片内的anchor的基础上编号的,需要将其回复到原始的17100下的编号,# 此步骤需要用到inds_inside。#(1)恢复labels,那些落在图像外的anchor的label为-1labels = _unmap(labels, total_anchors, inds_inside, fill=-1)#(2)恢复bbox_targets,那些落在图像外的anchor的位置为0bbox_targets = _unmap(bbox_targets, total_anchors, inds_inside, fill=0)#(3)恢复bbox_inside_weights,那些落在图像外的anchor的位置为0bbox_inside_weights = _unmap(bbox_inside_weights, total_anchors, inds_inside, fill=0)#(4)恢复bbox_outside_weights,那些落在图像外的anchor的位置为0bbox_outside_weights = _unmap(bbox_outside_weights, total_anchors, inds_inside, fill=0)# *************5,映射到全部anchors************************************************************# *************6,变换成需要的形式*************************************************************#变换成需要的形式#(1)label(17100, )->reshape(1, 38, 50, 9)->transpose(1, 9, 38, 50)# ->reshape(1, 1, 342, 50),将其赋予给rpn_labelslabels = labels.reshape((1, height, width, A)).transpose(0, 3, 1, 2)labels = labels.reshape((1, 1, A * height, width))rpn_labels = labels #特征图中每个位置对应的正样本、负样本还是不关注(去除了边界在图像外面的anchors)#(2)bbox_targets(17100,4)reshape(1,38,50,36),将其赋予给rpn_bbox_targetsbbox_targets = bbox_targets.reshape((1, height, width, A * 4))rpn_bbox_targets = bbox_targets #归一化的权重#(3)bbox_inside_weights(17100,4)reshape(1,38,50,36),将其赋予给rpn_bbox_inside_weightsbbox_inside_weights = bbox_inside_weights.reshape((1, height, width, A * 4))rpn_bbox_inside_weights = bbox_inside_weights#(4)bbox_outside_weights(17100, 4)reshape(1, 38, 50, 36), 将其赋予给rpn_bbox_outside_weightsbbox_outside_weights = bbox_outside_weights.reshape((1, height, width, A * 4))rpn_bbox_outside_weights = bbox_outside_weights# *************6,变换成需要的形式*************************************************************return rpn_labels, rpn_bbox_targets, rpn_bbox_inside_weights, rpn_bbox_outside_weights
2.1.1,bbox_overlaps()
使用bbox_overlaps (ex, gt),计算所有的没超过图像边界的anchor与gt_boxes之间的重合度IOU(交并比),并返回交并比IOU。bbox_overlaps()在lib/utils/cython_bbox中定义,第三方库
import numpy as np
cimport numpy as npDTYPE = np.float
ctypedef np.float_t DTYPE_tdef bbox_overlaps(np.ndarray[DTYPE_t, ndim=2] boxes,np.ndarray[DTYPE_t, ndim=2] query_boxes):"""Parameters----------boxes (anchors): (N, 4) ndarray of floatquery_boxes (gt_boxes): (K, 4) ndarray of floatReturns-------overlaps: (N, K) ndarray of overlap between boxes and query_boxes"""cdef unsigned int N = boxes.shape[0]cdef unsigned int K = query_boxes.shape[0]cdef np.ndarray[DTYPE_t, ndim=2] overlaps = np.zeros((N, K), dtype=DTYPE)cdef DTYPE_t iw, ih, box_areacdef DTYPE_t uacdef unsigned int k, nfor k in range(K):box_area = ((query_boxes[k, 2] - query_boxes[k, 0] + 1) *(query_boxes[k, 3] - query_boxes[k, 1] + 1)) # gt_boxes的面积for n in range(N):iw = (min(boxes[n, 2], query_boxes[k, 2]) -max(boxes[n, 0], query_boxes[k, 0]) + 1) #anchors与gt_boxes的重叠宽度:最小的x2-最大的x1if iw > 0:ih = (min(boxes[n, 3], query_boxes[k, 3]) -max(boxes[n, 1], query_boxes[k, 1]) + 1) #anchors与gt_boxes的重叠高度:最小的y2-最大的y1if ih > 0:ua = float((boxes[n, 2] - boxes[n, 0] + 1) *(boxes[n, 3] - boxes[n, 1] + 1) +box_area - iw * ih) #anchors面积+gt_boxes的面积-anchors与gt_boxes重叠的面积overlaps[n, k] = iw * ih / ua #第n个anchors与第K个gt_boxes的IOU重合度公式return overlaps
2.1.2,_compute_targets()
通过anchors和anchors对应的正样本计算坐标的偏移 。此函数没有进行数据操作,主要通过调用bbox_transform(ex_rois, gt_rois)完成相关数据操作,并接收返回值。
'''
通过_compute_targets计算anchors和最大重叠位置的
gt_boxes的变换后的坐标bbox_targets(见自己写的那张纸上的公式(6-9))。
'''
def _compute_targets(ex_rois, gt_rois):"""Compute bounding-box regression targets for an image."""# assert检查条件,不符合就终止程序assert ex_rois.shape[0] == gt_rois.shape[0]assert ex_rois.shape[1] == 4assert gt_rois.shape[1] == 5# 通过自己写的那张纸上的公式(6-9),结合anchors和对应的正样本的坐标计算坐标的偏移# bbox_transform()在lib/model/bbox_transform.py中定义return bbox_transform(ex_rois, gt_rois[:, :4]).astype(np.float32, copy=False)
2.1.3,bbox_transform()
通过自己写的那张纸上的公式(6-9)计算tx,ty,tw,th
#通过自己写的那张纸上的公式(6-9)计算tx,ty,tw,th
def bbox_transform(ex_rois, gt_rois):ex_widths = ex_rois[:, 2] - ex_rois[:, 0] + 1.0   #anchor的宽ex_heights = ex_rois[:, 3] - ex_rois[:, 1] + 1.0  #anchor的高ex_ctr_x = ex_rois[:, 0] + 0.5 * ex_widths        #anchor的中心xex_ctr_y = ex_rois[:, 1] + 0.5 * ex_heights       #anchor的中心ygt_widths = gt_rois[:, 2] - gt_rois[:, 0] + 1.0   #真实正样本wgt_heights = gt_rois[:, 3] - gt_rois[:, 1] + 1.0  #真实正样本hgt_ctr_x = gt_rois[:, 0] + 0.5 * gt_widths        #真实正样本中心xgt_ctr_y = gt_rois[:, 1] + 0.5 * gt_heights       #真实正样本中心y#通过自己写的那张纸上的公式(6-9)计算tx,ty,tw,thtargets_dx = (gt_ctr_x - ex_ctr_x) / ex_widths    #通过自己写的那张纸上的公式(6)得到dxtargets_dy = (gt_ctr_y - ex_ctr_y) / ex_heights   #通过自己写的那张纸上的公式(6)得到dytargets_dw = np.log(gt_widths / ex_widths)        #通过自己写的那张纸上的公式(6)得到dwtargets_dh = np.log(gt_heights / ex_heights)      #通过自己写的那张纸上的公式(6)得到dh#np.vstack: 按垂直方向(行顺序)堆叠数组构成一个新的数组,可参考:https://www.jianshu.com/p/2469e0e2a1cftargets = np.vstack((targets_dx, targets_dy, targetss_dw, targets_dh)).transpose()return targets
2.1.4,_unmap()
最后通过_unmap在变换回和原始的anchors一样大小的rpn_labels(anchors是正样本、 负样本还是不关注),rpn_bbox_targets, rpn_bbox_inside_weights, rpn_bbox_outside_weights。 '''
'''
通过_unmap()函数实现将之前在所有图像上产生的anchors都赋上label、bbox_targets、
bbox_inside_weights、bbox_outside_weights属性
'''
def _unmap(data, count, inds, fill=0):""" Unmap a subset of item (data) back to the original set of items (ofsize count) """if len(data.shape) == 1:ret = np.empty((count,), dtype=np.float32) #得到1维矩阵ret.fill(fill) #默认填充fill的值ret[inds] = data  #有效位置填充具体数据else:ret = np.empty((count,) + data.shape[1:], dtype=np.float32) #得到对应维数的矩阵ret.fill(fill)  #默认填充fill的值ret[inds, :] = data #有效位置填充具体数据return ret
下面重新开一篇文章解析下面这个模块


这篇关于Faster RCNN源码解读3.2-_region_proposal()筛选anchors-_anchor_target_layer()(核心和关键2)的文章就介绍到这儿,希望我们推荐的文章对编程师们有所帮助!


