本文主要是介绍FPFH特征描述符、对应关系可视化以及ICP配准,希望对大家解决编程问题提供一定的参考价值,需要的开发者们随着小编来一起学习吧!
一、FPFH特征描述符可视化
C++
#include <pcl/point_types.h>
#include <pcl/point_cloud.h>
#include <pcl/search/kdtree.h>
#include <pcl/io/pcd_io.h>
#include <pcl/features/normal_3d_omp.h>//使用OMP需要添加的头文件
#include <boost/thread/thread.hpp>
#include <pcl/features/3dsc.h>
#include <pcl/visualization/pcl_plotter.h>// 直方图的可视化
#include <pcl/visualization/histogram_visualizer.h>
#include <pcl/kdtree/kdtree_flann.h>
#include <pcl/features/fpfh_omp.h>
using namespace std;
int main()
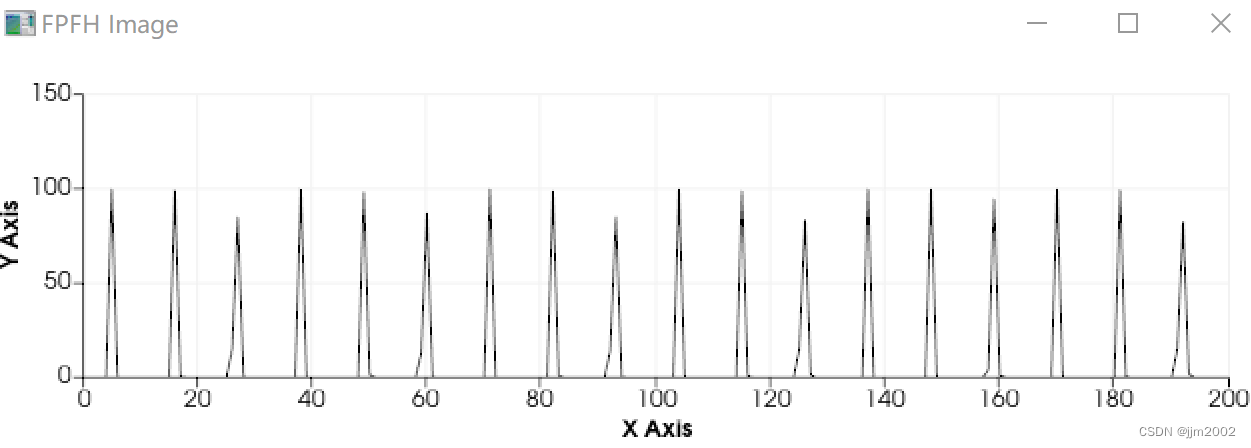
{//------------------加载点云数据-----------------pcl::PointCloud<pcl::PointXYZ>::Ptr cloud(new pcl::PointCloud<pcl::PointXYZ>);if (pcl::io::loadPCDFile<pcl::PointXYZ>("pcd/pig_view1.pcd", *cloud) == -1)//需使用绝对路径{PCL_ERROR("Could not read file\n");}//--------------------计算法线------------------pcl::NormalEstimationOMP<pcl::PointXYZ, pcl::Normal> n;//OMP加速pcl::PointCloud<pcl::Normal>::Ptr normals(new pcl::PointCloud<pcl::Normal>);//建立kdtree来进行近邻点集搜索pcl::search::KdTree<pcl::PointXYZ>::Ptr tree(new pcl::search::KdTree<pcl::PointXYZ>);n.setNumberOfThreads(8);//设置openMP的线程数n.setInputCloud(cloud);n.setSearchMethod(tree);n.setKSearch(20);n.compute(*normals);//开始进行法向计算// ------------------FPFH图像计算------------------pcl::FPFHEstimationOMP<pcl::PointXYZ, pcl::Normal, pcl::FPFHSignature33> f;pcl::PointCloud<pcl::FPFHSignature33>::Ptr fpfh_images(new pcl::PointCloud<pcl::FPFHSignature33>());f.setNumberOfThreads(12);f.setInputCloud(cloud);f.setInputNormals(normals);f.setSearchMethod(tree);f.setKSearch(30);f.compute(*fpfh_images);cout << "FPFH图像计算计算完成" << endl;// 显示和检索第一点的自旋图像描述符向量。pcl::FPFHSignature33 first_descriptor = fpfh_images->points[0];cout << first_descriptor << endl;pcl::visualization::PCLPlotter plotter;plotter.addFeatureHistogram(*fpfh_images, 200); //设置的横坐标长度,该值越大,则显示的越细致plotter.setWindowName("FPFH Image");plotter.plot();return 0;
}关键代码解析:
pcl::FPFHEstimationOMP<pcl::PointXYZ, pcl::Normal, pcl::FPFHSignature33> f;pcl::PointCloud<pcl::FPFHSignature33>::Ptr fpfh_images(new pcl::PointCloud<pcl::FPFHSignature33>());f.setNumberOfThreads(12);f.setInputCloud(cloud);f.setInputNormals(normals);f.setSearchMethod(tree);f.setKSearch(30);f.compute(*fpfh_images);cout << "FPFH图像计算计算完成" << endl;// 显示和检索第一点的自旋图像描述符向量。pcl::FPFHSignature33 first_descriptor = fpfh_images->points[0];cout << first_descriptor << endl;pcl::visualization::PCLPlotter plotter;plotter.addFeatureHistogram(*fpfh_images, 200); //设置的横坐标长度,该值越大,则显示的越细致plotter.setWindowName("FPFH Image");plotter.plot();
-
pcl::FPFHEstimationOMP<pcl::PointXYZ, pcl::Normal, pcl::FPFHSignature33> f;- 这一行定义了一个FPFH特征估计器对象
f,使用了OMP(Open Multi-Processing)进行多线程计算。指定了输入点云类型为pcl::PointXYZ,输入法向量类型为pcl::Normal,以及输出特征类型为pcl::FPFHSignature33。
- 这一行定义了一个FPFH特征估计器对象
-
pcl::PointCloud<pcl::FPFHSignature33>::Ptr fpfh_images(new pcl::PointCloud<pcl::FPFHSignature33>());- 创建一个指向
pcl::PointCloud<pcl::FPFHSignature33>类型的智能指针fpfh_images,用于存储计算得到的FPFH特征。
- 创建一个指向
-
f.setNumberOfThreads(12);- 设置用于计算FPFH特征的线程数。这里设置为12,以充分利用多核处理器的性能。线程数的选择应该考虑到计算机的硬件配置,过多的线程可能导致性能下降。
-
f.setInputCloud(cloud);- 将点云数据设置为FPFH估计器的输入。
cloud是一个指向pcl::PointCloud<pcl::PointXYZ>类型的指针,表示原始点云数据。
- 将点云数据设置为FPFH估计器的输入。
-
f.setInputNormals(normals);- 将法向量数据设置为FPFH估计器的输入。
normals是一个指向pcl::PointCloud<pcl::Normal>类型的指针,表示点云中每个点的法向量数据。
- 将法向量数据设置为FPFH估计器的输入。
-
f.setSearchMethod(tree);- 设置搜索方法。
tree是一个用于加速邻域搜索的数据结构,例如kd-tree或octree。这个参数可以根据点云的大小和分布来调整,以获得更好的性能。
- 设置搜索方法。
-
f.setKSearch(30);- 设置用于计算FPFH特征的近邻点数目。这个参数影响着计算的邻域大小,值越大则考虑的邻域越大,特征描述更全局。
-
f.compute(*fpfh_images);- 运行FPFH特征的计算过程。该方法会根据输入的点云和法向量数据以及设置的搜索参数来计算每个点的FPFH特征,并将结果存储在
fpfh_images中。
- 运行FPFH特征的计算过程。该方法会根据输入的点云和法向量数据以及设置的搜索参数来计算每个点的FPFH特征,并将结果存储在
-
cout << "FPFH图像计算计算完成" << endl;- 打印消息,指示FPFH特征计算完成。
-
pcl::FPFHSignature33 first_descriptor = fpfh_images->points[0];- 提取第一个点的FPFH特征描述符。这里假设点云中至少有一个点。
-
cout << first_descriptor << endl;- 打印第一个点的FPFH特征描述符。
-
pcl::visualization::PCLPlotter plotter;- 创建一个PCL绘图器对象,用于可视化FPFH特征。
-
plotter.addFeatureHistogram(*fpfh_images, 200);- 向绘图器中添加FPFH特征的直方图。第二个参数指定了横坐标的长度,该值越大,显示的越细致。
-
plotter.setWindowName("FPFH Image");- 设置绘图窗口的名称。
-
plotter.plot();- 显示绘图器中的图像。
总的来说,这段代码的作用是计算并可视化点云的FPFH特征。参数的设置会直接影响特征的计算和可视化效果,因此需要根据具体的数据和需求进行调整。
结果:
二、FPFH对应关系可视化
C++
#include <pcl/point_types.h>
#include <pcl/point_cloud.h>
#include <pcl/io/pcd_io.h>
#include <pcl/features/normal_3d_omp.h>
#include <pcl/features/fpfh_omp.h>
#include <pcl/registration/correspondence_estimation.h>
#include <boost/thread/thread.hpp>
#include <pcl/visualization/pcl_visualizer.h>
#include <pcl/registration/transformation_estimation_svd.h> typedef pcl::PointCloud<pcl::PointXYZ> pointcloud;
typedef pcl::PointCloud<pcl::Normal> pointnormal;
typedef pcl::PointCloud<pcl::FPFHSignature33> fpfhFeature;fpfhFeature::Ptr compute_fpfh_feature(pointcloud::Ptr input_cloud, pcl::search::KdTree<pcl::PointXYZ>::Ptr tree)
{pointnormal::Ptr normals(new pointnormal);pcl::NormalEstimationOMP<pcl::PointXYZ, pcl::Normal> n;n.setInputCloud(input_cloud);n.setNumberOfThreads(12);n.setSearchMethod(tree);n.setKSearch(20);n.compute(*normals);fpfhFeature::Ptr fpfh(new fpfhFeature);pcl::FPFHEstimationOMP<pcl::PointXYZ, pcl::Normal, pcl::FPFHSignature33> f;f.setNumberOfThreads(12);f.setInputCloud(input_cloud);f.setInputNormals(normals);f.setSearchMethod(tree);f.setKSearch(30);f.compute(*fpfh);return fpfh;
}int main(int argc, char** argv)
{pointcloud::Ptr source_cloud(new pointcloud);pointcloud::Ptr target_cloud(new pointcloud);pcl::io::loadPCDFile<pcl::PointXYZ>("pcd/pig_view1.pcd", *source_cloud);pcl::io::loadPCDFile<pcl::PointXYZ>("pcd/pig_view2.pcd", *target_cloud);pcl::search::KdTree<pcl::PointXYZ>::Ptr tree(new pcl::search::KdTree<pcl::PointXYZ>());fpfhFeature::Ptr source_fpfh = compute_fpfh_feature(source_cloud, tree);fpfhFeature::Ptr target_fpfh = compute_fpfh_feature(target_cloud, tree);pcl::registration::CorrespondenceEstimation<pcl::FPFHSignature33, pcl::FPFHSignature33> crude_cor_est;boost::shared_ptr<pcl::Correspondences> cru_correspondences(new pcl::Correspondences);crude_cor_est.setInputSource(source_fpfh);crude_cor_est.setInputTarget(target_fpfh);crude_cor_est.determineCorrespondences(*cru_correspondences, 0.4);Eigen::Matrix4f Transform = Eigen::Matrix4f::Identity();pcl::registration::TransformationEstimationSVD<pcl::PointXYZ, pcl::PointXYZ, float>::Ptr trans(new pcl::registration::TransformationEstimationSVD<pcl::PointXYZ, pcl::PointXYZ, float>);trans->estimateRigidTransformation(*source_cloud, *target_cloud, *cru_correspondences, Transform);cout << "变换矩阵为:\n" << Transform << endl;boost::shared_ptr<pcl::visualization::PCLVisualizer>viewer(new pcl::visualization::PCLVisualizer("v"));viewer->setBackgroundColor(0, 0, 0);// 对目标点云着色可视化 (red).pcl::visualization::PointCloudColorHandlerCustom<pcl::PointXYZ>target_color(target_cloud, 255, 0, 0);viewer->addPointCloud<pcl::PointXYZ>(target_cloud, target_color, "target cloud");viewer->setPointCloudRenderingProperties(pcl::visualization::PCL_VISUALIZER_POINT_SIZE, 2, "target cloud");// 对源点云着色可视化 (green).pcl::visualization::PointCloudColorHandlerCustom<pcl::PointXYZ>input_color(source_cloud, 0, 255, 0);viewer->addPointCloud<pcl::PointXYZ>(source_cloud, input_color, "input cloud");viewer->setPointCloudRenderingProperties(pcl::visualization::PCL_VISUALIZER_POINT_SIZE, 2, "input cloud");//对应关系可视化viewer->addCorrespondences<pcl::PointXYZ>(source_cloud, target_cloud, *cru_correspondences, "correspondence");//viewer->initCameraParameters();while (!viewer->wasStopped()){viewer->spinOnce(100);boost::this_thread::sleep(boost::posix_time::microseconds(100000));}return 0;
}
关键代码解析:
pcl::registration::CorrespondenceEstimation<pcl::FPFHSignature33, pcl::FPFHSignature33> crude_cor_est;boost::shared_ptr<pcl::Correspondences> cru_correspondences(new pcl::Correspondences);crude_cor_est.setInputSource(source_fpfh);crude_cor_est.setInputTarget(target_fpfh);crude_cor_est.determineCorrespondences(*cru_correspondences, 0.4);Eigen::Matrix4f Transform = Eigen::Matrix4f::Identity();pcl::registration::TransformationEstimationSVD<pcl::PointXYZ, pcl::PointXYZ, float>::Ptr trans(new pcl::registration::TransformationEstimationSVD<pcl::PointXYZ, pcl::PointXYZ, float>);trans->estimateRigidTransformation(*source_cloud, *target_cloud, *cru_correspondences, Transform);-
pcl::registration::CorrespondenceEstimation<pcl::FPFHSignature33, pcl::FPFHSignature33> crude_cor_est;- 创建了一个用于估计FPFH特征之间对应关系的对象
crude_cor_est。这个对象的类型是pcl::registration::CorrespondenceEstimation,它用于估计两个点云之间的对应关系。
- 创建了一个用于估计FPFH特征之间对应关系的对象
-
boost::shared_ptr<pcl::Correspondences> cru_correspondences(new pcl::Correspondences);- 创建了一个指向
pcl::Correspondences类型的智能指针cru_correspondences,用于存储对应关系。
- 创建了一个指向
-
crude_cor_est.setInputSource(source_fpfh);- 设置源点云的FPFH特征作为对应关系估计的输入。
source_fpfh是指向源点云的FPFH特征的指针。
- 设置源点云的FPFH特征作为对应关系估计的输入。
-
crude_cor_est.setInputTarget(target_fpfh);- 设置目标点云的FPFH特征作为对应关系估计的目标。
target_fpfh是指向目标点云的FPFH特征的指针。
- 设置目标点云的FPFH特征作为对应关系估计的目标。
-
crude_cor_est.determineCorrespondences(*cru_correspondences, 0.4);- 使用设定的FPFH特征对两个点云之间的对应关系进行估计。第二个参数
0.4是一个阈值,用于控制匹配的严格度。更高的值会导致更宽松的匹配。
- 使用设定的FPFH特征对两个点云之间的对应关系进行估计。第二个参数
-
Eigen::Matrix4f Transform = Eigen::Matrix4f::Identity();- 创建一个4x4的单位矩阵,用于存储刚性变换。
-
pcl::registration::TransformationEstimationSVD<pcl::PointXYZ, pcl::PointXYZ, float>::Ptr trans(new pcl::registration::TransformationEstimationSVD<pcl::PointXYZ, pcl::PointXYZ, float>);- 创建了一个用于估计刚性变换的对象
trans。这里使用了SVD(奇异值分解)方法进行刚性变换的估计。
- 创建了一个用于估计刚性变换的对象
-
trans->estimateRigidTransformation(*source_cloud, *target_cloud, *cru_correspondences, Transform);- 使用对应关系和源点云以及目标点云之间的FPFH特征,估计两个点云之间的刚性变换。这个变换会被存储在
Transform中。
- 使用对应关系和源点云以及目标点云之间的FPFH特征,估计两个点云之间的刚性变换。这个变换会被存储在
参数的设置会影响配准的结果。例如,对应关系估计的阈值会影响匹配的严格度,而刚性变换的估计方法则会影响配准的准确度和鲁棒性。需要根据具体的应用场景和数据特点来选择合适的参数值
结果:

三、3DSC结合ICP配准
C++
#include <pcl/io/pcd_io.h>
#include <pcl/point_types.h>
#include <pcl/features/normal_3d_omp.h>
#include <pcl/features/spin_image.h>
#include <pcl/registration/icp.h>
#include <pcl/visualization/pcl_visualizer.h>
#include <boost/thread/thread.hpp>
#include <pcl/keypoints/iss_3d.h>
#include <pcl/registration/ia_ransac.h>
#include <pcl/visualization/pcl_plotter.h>
#include <pcl/features/fpfh_omp.h>
typedef pcl::PointXYZ PointT;
typedef pcl::PointCloud<PointT> PointCloud;
typedef pcl::FPFHSignature33 FPFHT;
typedef pcl::PointCloud<FPFHT> PointCloudfpfh;
typedef pcl::search::KdTree<PointT> Tree;// 关键点提取
void extract_keypoint(PointCloud::Ptr& cloud, PointCloud::Ptr& keypoint, Tree::Ptr& tree)
{pcl::ISSKeypoint3D<PointT, PointT> iss;iss.setInputCloud(cloud);iss.setSearchMethod(tree);iss.setNumberOfThreads(8); //初始化调度器并设置要使用的线程数iss.setSalientRadius(5); // 设置用于计算协方差矩阵的球邻域半径iss.setNonMaxRadius(5); // 设置非极大值抑制应用算法的半径iss.setThreshold21(0.95); // 设定第二个和第一个特征值之比的上限iss.setThreshold32(0.95); // 设定第三个和第二个特征值之比的上限iss.setMinNeighbors(6); // 在应用非极大值抑制算法时,设置必须找到的最小邻居数iss.compute(*keypoint);
}
// 法线计算和 计算特征点的Spinimage描述子
void computeKeyPointsFPFH(PointCloud::Ptr& cloud_in, PointCloud::Ptr& key_cloud, PointCloudfpfh::Ptr& dsc, Tree::Ptr& tree)
{pcl::NormalEstimationOMP<PointT, pcl::Normal> n;//OMP加速pcl::PointCloud<pcl::Normal>::Ptr normals(new pcl::PointCloud<pcl::Normal>);n.setNumberOfThreads(6);//设置openMP的线程数n.setInputCloud(key_cloud);n.setSearchSurface(cloud_in);n.setSearchMethod(tree);//n.setKSearch(10);n.setRadiusSearch(0.3);n.compute(*normals);pcl::FPFHEstimationOMP<pcl::PointXYZ, pcl::Normal, pcl::FPFHSignature33> f;f.setNumberOfThreads(12);f.setInputCloud(key_cloud);f.setInputNormals(normals);f.setSearchMethod(tree);f.setKSearch(30);f.compute(*dsc);}// 点云可视化
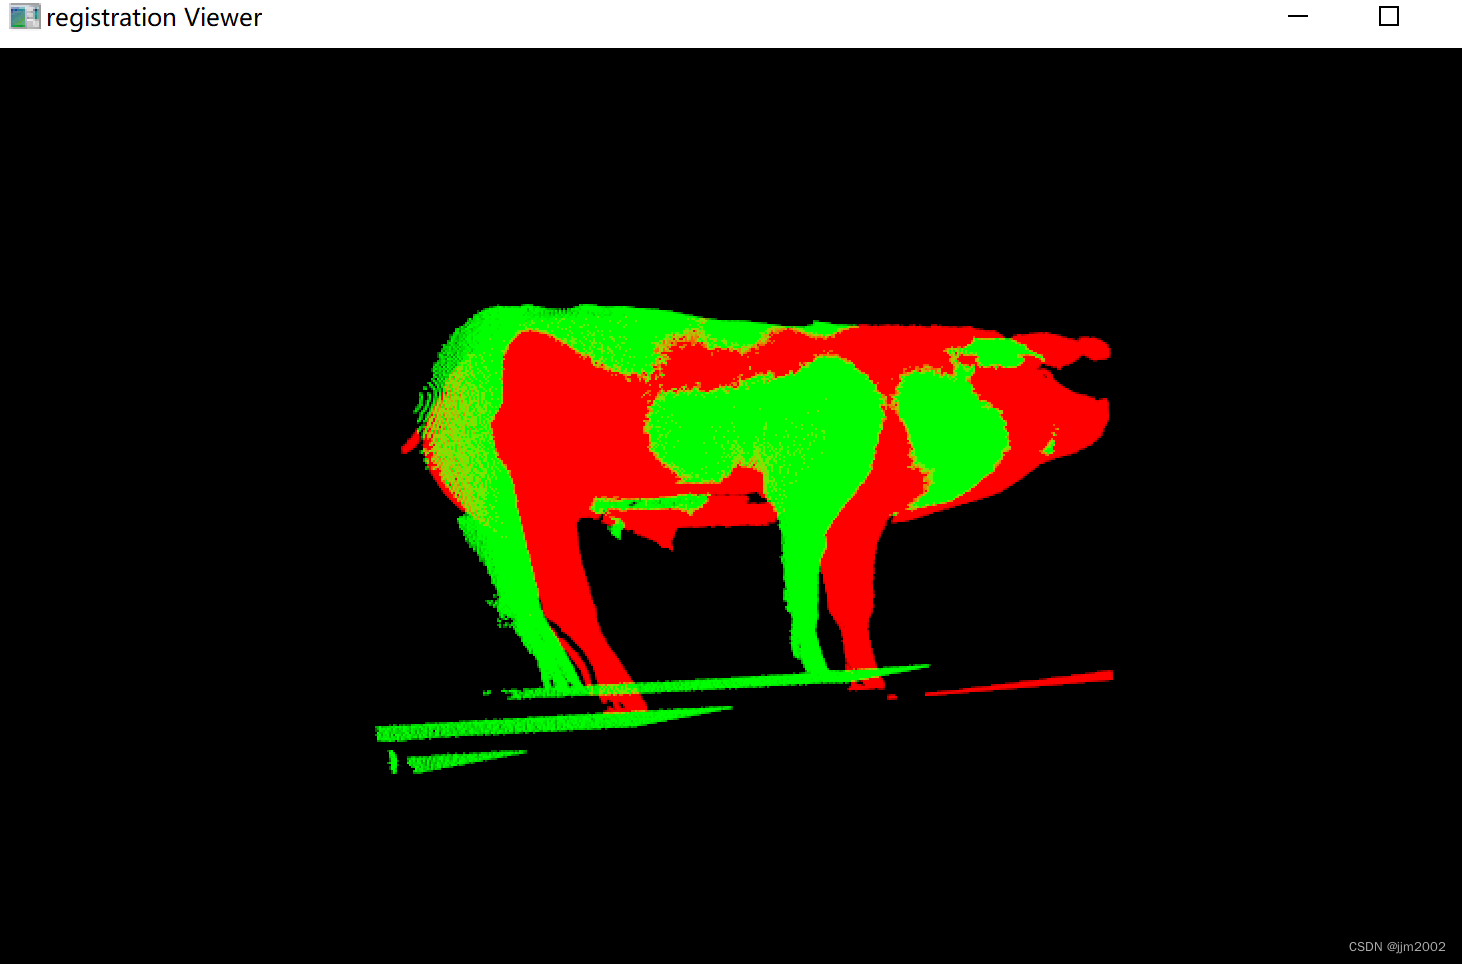
void visualize_pcd(PointCloud::Ptr icp_result, PointCloud::Ptr cloud_target)
{//创建初始化目标pcl::visualization::PCLVisualizer viewer("registration Viewer");pcl::visualization::PointCloudColorHandlerCustom<PointT> final_h(icp_result, 0, 255, 0);pcl::visualization::PointCloudColorHandlerCustom<PointT> tgt_h(cloud_target, 255, 0, 0);viewer.setBackgroundColor(0, 0, 0);viewer.addPointCloud(cloud_target, tgt_h, "tgt cloud");viewer.addPointCloud(icp_result, final_h, "final cloud");while (!viewer.wasStopped()){viewer.spinOnce(100);boost::this_thread::sleep(boost::posix_time::microseconds(100000));}
}int main()
{// 加载源点云和目标点云PointCloud::Ptr cloud(new PointCloud);PointCloud::Ptr cloud_target(new PointCloud);if (pcl::io::loadPCDFile<pcl::PointXYZ>("pcd/pig_view1.pcd", *cloud) == -1){PCL_ERROR("加载点云失败\n");}if (pcl::io::loadPCDFile<pcl::PointXYZ>("pcd/pig_view2.pcd", *cloud_target) == -1){PCL_ERROR("加载点云失败\n");}visualize_pcd(cloud, cloud_target);//关键点pcl::PointCloud<PointT>::Ptr keypoints1(new pcl::PointCloud<pcl::PointXYZ>);pcl::PointCloud<PointT>::Ptr keypoints2(new pcl::PointCloud<pcl::PointXYZ>);Tree::Ptr tree(new Tree);extract_keypoint(cloud, keypoints1, tree);extract_keypoint(cloud_target, keypoints2, tree);cout << "iss完成!" << endl;cout << "cloud的关键点的个数:" << keypoints1->size() << endl;cout << "cloud_target的关键点的个数:" << keypoints2->size() << endl;// 使用SpinImage描述符计算特征PointCloudfpfh::Ptr source_features(new PointCloudfpfh);PointCloudfpfh::Ptr target_features(new PointCloudfpfh);computeKeyPointsFPFH(cloud, keypoints1, source_features, tree);computeKeyPointsFPFH(cloud_target, keypoints2, target_features, tree);cout << "FPFH完成!" << endl;//SAC配准pcl::SampleConsensusInitialAlignment<PointT, PointT, FPFHT> scia;scia.setInputSource(keypoints1);scia.setInputTarget(keypoints2);scia.setSourceFeatures(source_features);scia.setTargetFeatures(target_features);scia.setMinSampleDistance(7); // 设置样本之间的最小距离scia.setNumberOfSamples(100); // 设置每次迭代计算中使用的样本数量(可省),可节省时间scia.setCorrespondenceRandomness(6);// 在选择随机特征对应时,设置要使用的邻居的数量;PointCloud::Ptr sac_result(new PointCloud);scia.align(*sac_result);Eigen::Matrix4f sac_trans;sac_trans = scia.getFinalTransformation();cout << "SAC配准完成!" << endl;//icp配准PointCloud::Ptr icp_result(new PointCloud);pcl::IterativeClosestPoint<PointT, PointT> icp;icp.setInputSource(keypoints1);icp.setInputTarget(keypoints2);icp.setMaxCorrespondenceDistance(20);icp.setMaximumIterations(35); // 最大迭代次数icp.setTransformationEpsilon(1e-10); // 两次变化矩阵之间的差值icp.setEuclideanFitnessEpsilon(0.01);// 均方误差icp.align(*icp_result, sac_trans);cout << "ICP配准完成!" << endl;// 输出配准结果std::cout << "ICP converged: " << icp.hasConverged() << std::endl;std::cout << "Transformation matrix:\n" << icp.getFinalTransformation() << std::endl;Eigen::Matrix4f icp_trans;icp_trans = icp.getFinalTransformation();cout << icp_trans << endl;使用创建的变换对未过滤的输入点云进行变换pcl::transformPointCloud(*cloud, *icp_result, icp_trans);visualize_pcd(icp_result, cloud_target);return 0;
}
关键代码解析:
我之前在iss关键点检测以及SAC-IA粗配准-CSDN博客
和Spin Image自旋图像描述符可视化以及ICP配准-CSDN博客以及本章第一部分已经解释了大部分函数,这里就不赘述了
结果:
这篇关于FPFH特征描述符、对应关系可视化以及ICP配准的文章就介绍到这儿,希望我们推荐的文章对编程师们有所帮助!


