本文主要是介绍骑砍战团MOD开发(29)-module_scenes.py游戏场景,希望对大家解决编程问题提供一定的参考价值,需要的开发者们随着小编来一起学习吧!
骑砍1战团mod开发-场景制作方法_哔哩哔哩_bilibili![]() https://www.bilibili.com/video/BV1Cw411N7G4/
https://www.bilibili.com/video/BV1Cw411N7G4/
一.骑砍游戏场景
骑砍战团中进入城堡,乡村,战斗地图都被定义为场景,由module_scenes.py进行管理。
scene(游戏场景) = 天空盒(Skyboxes.py) + 地形(terrain code) + 场景物(scene_obj)
#  Each scene record contains the following fields:
#  1) Scene id {string}: used for referencing scenes in other files. The prefix scn_ is automatically added before each scene-id.
#  2) Scene flags {int}. See header_scenes.py for a list of available flags
#  3) Mesh name {string}: This is used for indoor scenes only. Use the keyword "none" for outdoor scenes.
#  4) Body name {string}: This is used for indoor scenes only. Use the keyword "none" for outdoor scenes.
#  5) Min-pos {(float,float)}: minimum (x,y) coordinate. Player can't move beyond this limit.
#  6) Max-pos {(float,float)}: maximum (x,y) coordinate. Player can't move beyond this limit.
#  7) Water-level {float}.
#  8) Terrain code {string}: You can obtain the terrain code by copying it from the terrain generator screen
#  9) List of other scenes accessible from this scene {list of strings}.
#     (deprecated. This will probably be removed in future versions of the module system)
#     (In the new system passages are used to travel between scenes and
#     the passage's variation-no is used to select the game menu item that the passage leads to.)
# 10) List of chest-troops used in this scene {list of strings}. You can access chests by placing them in edit mode.
#     The chest's variation-no is used with this list for selecting which troop's inventory it will access.
通过scene_flags标识为室内场景/室外场景,出生点随机生成等
#flags
##室内室外场景,进入城堡为室内场景,野外战斗为室外场景
sf_indoors           = 0x00000001   #The scene shouldn't have a skybox and lighting by sun.##是否加载天空盒
sf_force_skybox      = 0x00000002   #Force adding a skybox even if indoors flag is set.
sf_generate          = 0x00000100   #Generate terrain by terran-generator
sf_randomize         = 0x00000200   #Randomize terrain generator key##是否随机出生点
sf_auto_entry_points = 0x00000400   #Automatically create entry points
sf_no_horses         = 0x00000800   #Horses are not avaible
sf_muddy_water       = 0x00001000   #Changes the shader of the river mesh
二.场景天空盒
CommonRes\skyboxes.brf 存放天空盒模型,骑砍天空盒是一个球体,材质支持RGB,HDR等天空盒纹理。
Skyboxes.py 存放天空盒配置,高光和反射程度,实现夜晚,白天等不同时间的天空盒效果.也提供API实现天空盒的设置.
# Scene parameters handlingscene_set_day_time                           = 1266  # (scene_set_day_time, <value>),# Defines the time for the scene to force the engine to select a different skybox than the one dictated by current game time. Must be called within ti_before_mission_start trigger in module_mission_templates.py. Value should be in range 0..23.
set_rain                                     = 1797  # (set_rain, <rain-type>, <strength>),# Sets a new weather for the mission. Rain_type values: 0 = clear, 1 = rain, 2 = snow. Strength is typically used in range 0..100 but is actually unlimited. Affects number of particles and fog density.
set_fog_distance                             = 1798  # (set_fog_distance, <distance_in_meters>, [fog_color]),# Sets the density (and optionally color) of the fog for the mission.set_skybox                                   = 2389  # (set_skybox, <non_hdr_skybox_index>, <hdr_skybox_index>),# Version 1.153+. Forces the scene to be rendered with specified skybox. Index of -1 will disable.
set_startup_sun_light                        = 2390  # (set_startup_sun_light, <r>, <g>, <b>),# Version 1.153+. Defines the sunlight color for the scene.
set_startup_ambient_light                    = 2391  # (set_startup_ambient_light, <r>, <g>, <b>),# Version 1.153+. Defines the ambient light level and colour for the scene. Expects Fixed Point values between 0 and 1.
set_startup_ground_ambient_light             = 2392  # (set_startup_ground_ambient_light, <r>, <g>, <b>),# Version 1.153+. Defines the ambient light color for the ground.
get_startup_sun_light                        = 2394  # (get_startup_sun_light, <position_no>),# Version 1.165+. Returns startup sunlight color in (x, y, z) coordinates of position register.
get_startup_ambient_light                    = 2395  # (get_startup_ambient_light, <position_no>),# Version 1.165+. Returns startup ambient light color in (x, y, z) coordinates of position register.
get_startup_ground_ambient_light             = 2396  # (get_startup_ground_ambient_light, <position_no>),# Version 1.165+. Returns startup ambient ground lighting color in (x, y, z) coordinates of position register.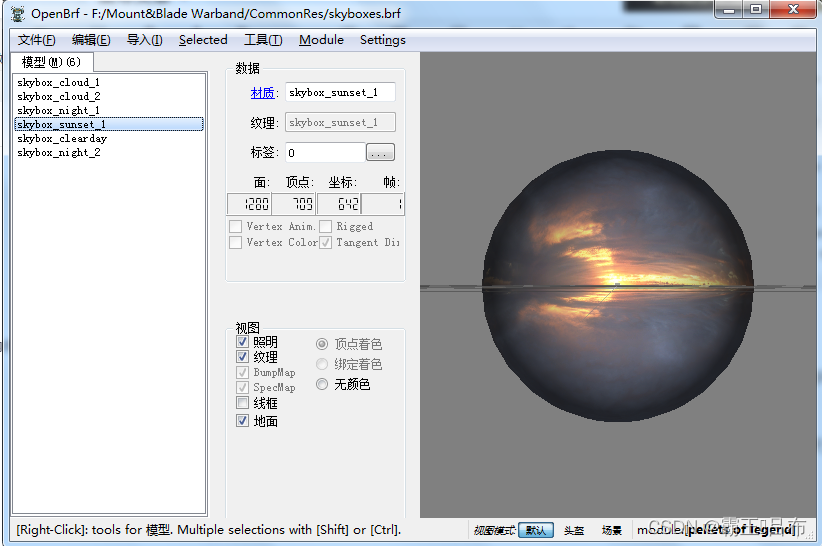
三.场景地形
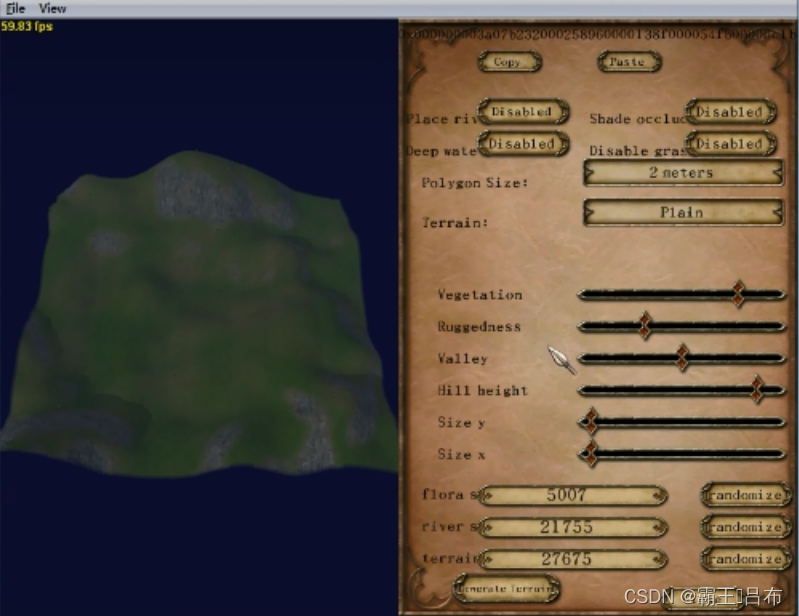
骑砍引擎中地形不采用静态模型进行实现,为了管理不同的情况下的地形,通过地形代码terrain code进行控制,地形代码包含地形长宽,地形植被茂密程度,高低起伏比例等特征,在大地图左下角的地形tab页进行编辑生成.
四.场景物
骑砍引擎将定义的场景名添加scn前缀实现场景物的管理.场景物不仅包含静态的模型如门,城墙等,还包含地形增量,出生点,通道,AI网格等信息.
场景物(scene_obj) = 静态模型房子/门(scene_prop) + 出生点(entry_point) + AI网格(控制AI自动游荡) + 通道(Passage).
例如城堡town1的对应的scene_obj为scn_town1.sco,存放在SceneObj\scn_town1.sco中
sco文件暂无编辑工具进行编辑,需调整骑砍战团为编辑作弊模式,进入场景后Ctrl + E进行编辑.
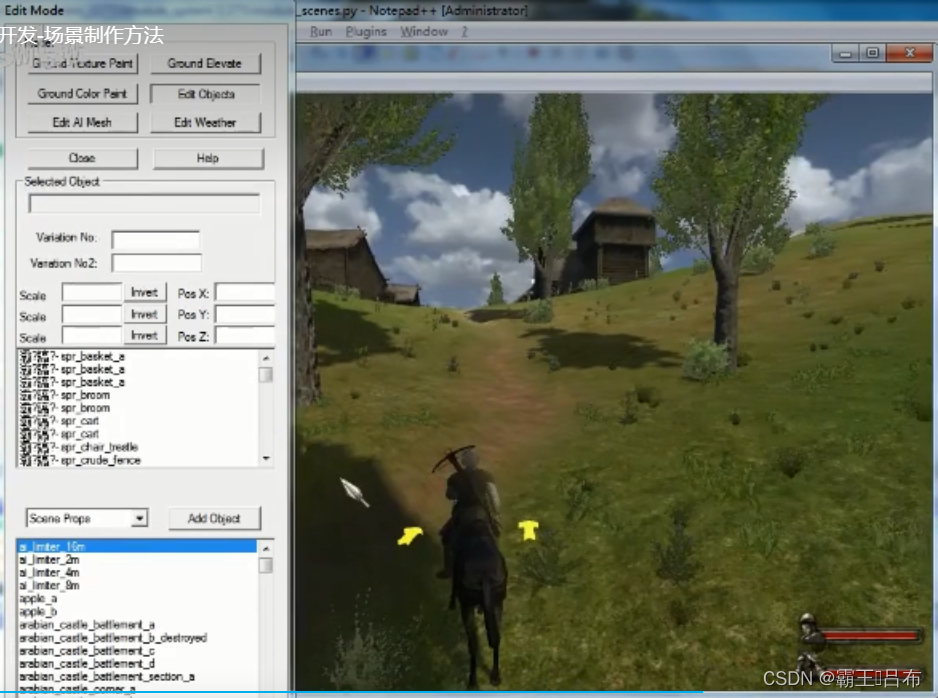
骑砍引擎场景编辑操作指导如下,例如:C/E/WASD 上下左右前后移动摄像机
Left Mouse Button: While pressed, mouse movements rotate
the camera.
H: Hides/unhides the highlights and user interface objects
(Good for taking a screenshot).
CTRL + Any movement key: Speeds up the camera
movements, slows down the object movements.Edit Objects Mode
----------------------
Right Mouse Button: Selects objects.
CTRL + Right Mouse Button: Selects multiple objects.
Double Click on Scene Objects list: Selects the clicked
object and moves the camera towards it.
A,S,D,W: Moves the camera.
C,E: Increases/decreases the height of the camera.
G: While pressed, mouse movements move the selected
object(s) parallel to the ground.
T: While pressed, mouse movements increase/decrease the
height of the selected object(s).
X,Y,Z: While pressed, mouse movements rotate the selected
object(s) with respect to the object's X, Y and Z axis.
U: While pressed, mouse movements rotate the selected
object(s) with respect to the "Up" axis of the world.
R: Resets the selected object's rotation.
B: Scale selected object.
B + X: Scale selected object along X axis.
B + Y: Scale selected object along Y axis.
B + Z: Scale selected object along Z axis.
Alt + B: Resets the selected object's scale.
Delete: Deletes selected object(s).
Space: Enables add object mode.Add Object Mode
-------------------
Right Mouse Button: Adds current object to scene.
Space: Disables add object mode.
T, U, X, Y, Z, R and B can also be used in this mode.Ground Elevate and Ground Paint Mode
-----------------------------------------------
Right Mouse Button: Elevates the ground up or down in
"Ground Elevate" mode and paints the ground in "Ground
Paint" mode.
Midle Mouse Button: Clears the elevation in "Ground Elevate"
mode and clears the paints in "Ground Paint" mode.Edit AI Mesh Mode
---------------------
Right Mouse Button: Selects AI mesh objects.
CTRL + Right Mouse Button: Selects multiple AI mesh objects.
1: Activates Vertex Editing Mode
2: Activates Edge Editing Mode
3: Activates Face Editing Mode
G, T, X, Y, Z, B and Delete can also be used in this mode.Additional Help
------------------
- You can save your changes only when you leave the edit
mode.- You can not undo your works, you can only discard changes
while leaving the edit mode. So you should save your work
occasionally by leaving the edit mode and re-entering it.- Scene files are located under [Current Module]\SceneObj
foler. When you save your changes, the related scene file
under this folder will be updated.- Create AI Mesh button works only on outdoor scenes
这篇关于骑砍战团MOD开发(29)-module_scenes.py游戏场景的文章就介绍到这儿,希望我们推荐的文章对编程师们有所帮助!


