本文主要是介绍轻量封装WebGPU渲染系统示例<38>- 动态构建WGSL材质Shader(源码),希望对大家解决编程问题提供一定的参考价值,需要的开发者们随着小编来一起学习吧!
实现原理: 基于宏定义和WGSL文件系统实现
当前示例源码github地址:
https://github.com/vilyLei/voxwebgpu/blob/feature/rendering/src/voxgpu/sample/DynamicShaderBuilding.ts
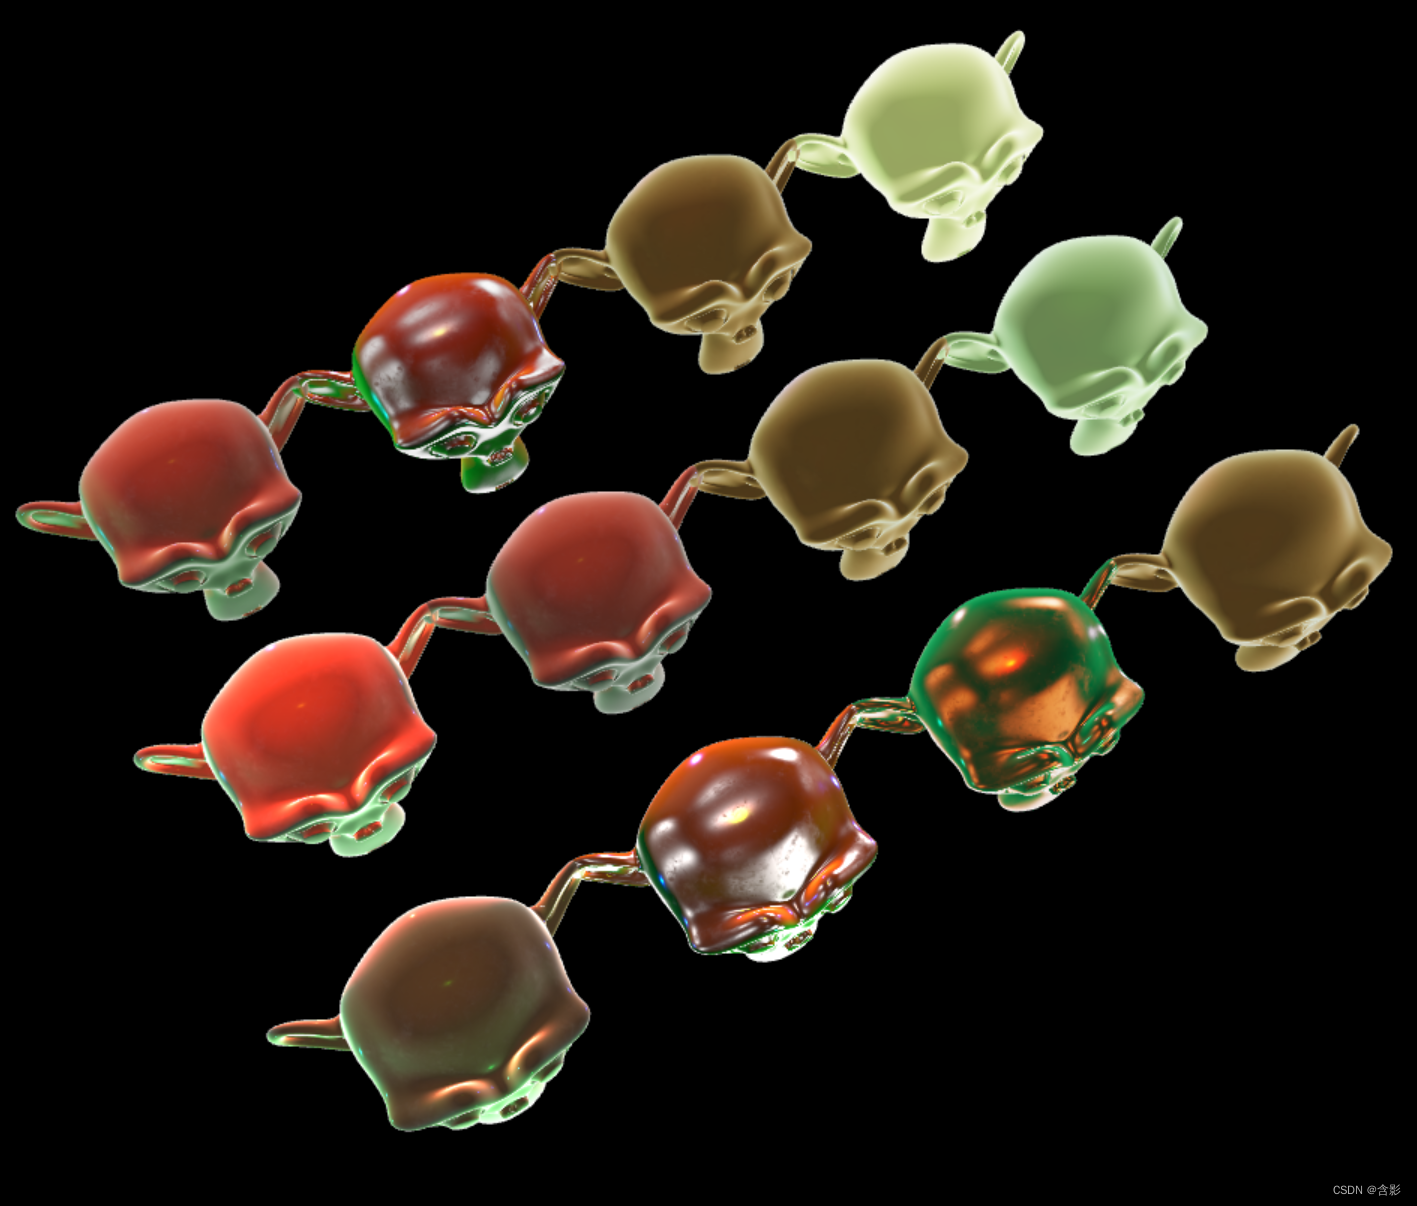
当前示例运行效果:

此示例基于此渲染系统实现,当前示例TypeScript源码如下:
export class DynamicShaderBuilding {private mRscene = new RendererScene();initialize(): void {this.mRscene.initialize({ canvasWith: 1024, canvasHeight: 1024, rpassparam: { multisampleEnabled: true } });this.initScene();this.initEvent();}private hdrEnvtex = new SpecularEnvBrnTexture();private createTextures(ns: string): WGTextureDataDescriptor[] {const albedoTex = { albedo: { url: `static/assets/pbr/${ns}/albedo.jpg` } };const normalTex = { normal: { url: `static/assets/pbr/${ns}/normal.jpg` } };const aoTex = { ao: { url: `static/assets/pbr/${ns}/ao.jpg` } };const roughnessTex = { roughness: { url: `static/assets/pbr/${ns}/roughness.jpg` } };const metallicTex = { metallic: { url: `static/assets/pbr/${ns}/metallic.jpg` } };let textures = [this.hdrEnvtex,albedoTex,normalTex,aoTex,roughnessTex,metallicTex] as WGTextureDataDescriptor[];return textures;}private initScene(): void {this.initEntities();}private initEntities(): void {let callback = (): void => {let pos = new Vector3(0, 0, 0);let basePos = new Vector3(-300, 0, -400);let dis = 250;let textures = this.createTextures("plastic");let material = this.createModelEntity(monkeySrc, pos.clone().add(new Vector3(0, 0, 0)).addBy(basePos), textures.slice(0, 0));this.applyMaterialPPt(material);material = this.createModelEntity(monkeySrc, pos.clone().add(new Vector3(dis, 0, 0)).addBy(basePos), textures.slice(0, 1));this.applyMaterialPPt(material);material = this.createModelEntity(monkeySrc, pos.clone().add(new Vector3(dis * 2, 0, 0)).addBy(basePos), textures.slice(0, 2));this.applyMaterialPPt(material);material = this.createModelEntity(monkeySrc, pos.clone().add(new Vector3(0, 0, dis)).addBy(basePos), textures.slice(0, 3));this.applyMaterialPPt(material);material = this.createModelEntity(monkeySrc, pos.clone().add(new Vector3(dis, 0, dis)).addBy(basePos), textures.slice(0, 4));this.applyMaterialPPt(material);material = this.createModelEntity(monkeySrc, pos.clone().add(new Vector3(dis * 2, 0, dis)).addBy(basePos), textures.slice(0, 5));this.applyMaterialPPt(material);material = this.createModelEntity(monkeySrc, pos.clone().add(new Vector3(0, 0, dis * 2)).addBy(basePos), textures.slice(0, 6));this.applyMaterialPPt(material);material = this.createModelEntity(monkeySrc, pos.clone().add(new Vector3(dis, 0, dis * 2)).addBy(basePos), textures);material.property.glossiness = false;this.applyMaterialPPt(material);material = this.createModelEntity(monkeySrc, pos.clone().add(new Vector3(dis * 2, 0, dis * 2)).addBy(basePos), textures);material.property.toneMapping = false;this.applyMaterialPPt(material);material = this.createModelEntity(monkeySrc, pos.clone().add(new Vector3(0, 0, dis * 3)).addBy(basePos), textures.slice(0, 6));material.property.metallicCorrection = false;material.property.glossiness = false;this.applyMaterialPPt(material);material = this.createModelEntity(monkeySrc, pos.clone().add(new Vector3(dis, 0, dis * 3)).addBy(basePos), textures.slice(0, 6));material.property.glossiness = false;material.property.toneMapping = false;this.applyMaterialPPt(material);material = this.createModelEntity(monkeySrc, pos.clone().add(new Vector3(dis * 2, 0, dis * 3)).addBy(basePos), textures.slice(0, 6));material.property.glossiness = false;material.property.toneMapping = false;material.property.metallicCorrection = false;this.applyMaterialPPt(material);};let monkeySrc = new ModelEntity({callback,modelUrl: "static/assets/draco/monkey.drc"});}private applyMaterialPPt(material: BasePBRMaterial): void {let property = material.property;property.ambient.value = [0.0, 0.2, 0.2];property.albedo.value = [0.7, 0.7, 0.3];property.arms.roughness = 0.8;property.armsBase.value = [0, 0, 0];property.uvParam.value = [2, 2];property.param.scatterIntensity = 32;}private mLightParams: LightShaderDataParam[] = [];private createModelEntity(srcEntity: ModelEntity, position: Vector3DataType, textures: WGTextureDataDescriptor[]): BasePBRMaterial {let rc = this.mRscene;let lightParam = this.createLightData(position);let material = new BasePBRMaterial();material.setLightParam(lightParam);material.addTextures(textures);let monkey = new ModelEntity({materials: [material],geometry: srcEntity.geometry,transform: { position, scale: [100, 100, 100], rotation: [0, 90, 0] }});rc.addEntity(monkey);return material;}private createLightData(position: Vector3DataType): LightShaderDataParam {let pos = new Vector3().setVector4(position);let pv0 = pos.clone().addBy(new Vector3(0, 200, 0));let pv1 = pos.clone().addBy(new Vector3(200, 0, 0));let pv2 = pos.clone().addBy(new Vector3(0, 0, 200));let pv3 = pos.clone().addBy(new Vector3(-200, 0, 0));let pv4 = pos.clone().addBy(new Vector3(0, 0, -200));let posList = [pv0, pv1, pv2, pv3, pv4];let c0 = new Color4(0.1 + Math.random() * 13, 0.1 + Math.random() * 13, 0.0, 0.00002);let c1 = new Color4(0.0, 0.1 + Math.random() * 13, 1.0, 0.00002);let c2 = new Color4(0.0, 0.1 + Math.random() * 13, 0.1 + Math.random() * 13, 0.00002);let c3 = new Color4(0.1 + Math.random() * 13, 1.0, 0.1 + Math.random() * 13, 0.00002);let c4 = new Color4(0.5, 1.0, 0.1 + Math.random() * 13, 0.00002);let colorList = [c0, c1, c2, c3, c4];let pointLightsTotal = posList.length;let j = 0;let lightsData = new Float32Array(4 * pointLightsTotal);let lightColorsData = new Float32Array(4 * pointLightsTotal);for (let i = 0; i < lightsData.length;) {const pv = posList[j];pv.w = 0.00002;pv.toArray4(lightsData, i);const c = colorList[j];c.toArray4(lightColorsData, i);j++;i += 4;}let param = { lights: lightsData, colors: lightColorsData, pointLightsTotal };this.mLightParams.push(param);return param;}private initEvent(): void {const rc = this.mRscene;rc.addEventListener(MouseEvent.MOUSE_DOWN, this.mouseDown);new MouseInteraction().initialize(rc, 0, false).setAutoRunning(true);}private mouseDown = (evt: MouseEvent): void => { };run(): void {this.mRscene.run();}
}
这篇关于轻量封装WebGPU渲染系统示例<38>- 动态构建WGSL材质Shader(源码)的文章就介绍到这儿,希望我们推荐的文章对编程师们有所帮助!


