本文主要是介绍二百零五、Flume——数据流监控工具Ganglia单机版安装以及使用Ganglia监控Flume任务的数据流(附流程截图),希望对大家解决编程问题提供一定的参考价值,需要的开发者们随着小编来一起学习吧!
一、目的
Flume采集Kafka的数据流需要实时监控,这时就需要用到监控工具Ganglia
二、Ganglia简介
(一)第一部分:gmond
(二)第二部分:gmetad
(三)第三部分:gweb
三、Ganglia单机版安装步骤
(一)下载epel-release和ganglia
yum -y install epel-release
yum -y install ganglia-gmetad
yum -y install ganglia-web
yum -y install ganglia-gmond
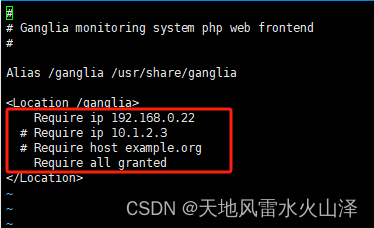
(二)修改配置文件ganglia.conf
[root@hurys22 ~]# vi /etc/httpd/conf.d/ganglia.conf
<Location /ganglia>
Require ip 192.168.0.22
# Require ip 10.1.2.3
# Require host example.org
Require all granted
</Location>

(三)修改配置文件gmetad.conf
[root@hurys22 ~]# vi /etc/ganglia/gmetad.conf
44 data_source "my cluster" hurys22

(四)修改配置文件gmond.conf
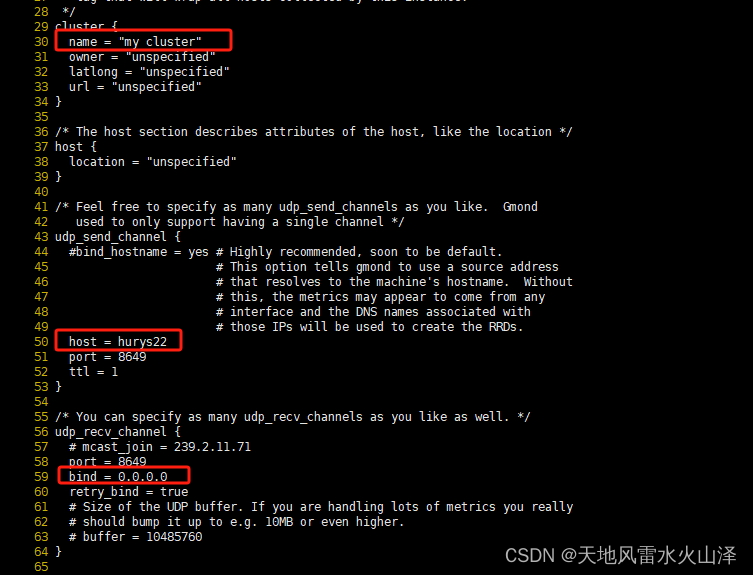
[root@hurys22 ~]# vi /etc/ganglia/gmond.conf
30 name = "my cluster"
31 owner = "unspecified"
32 latlong = "unspecified"
33 url = "unspecified"
50 host = hurys22
51 port = 8649
52 ttl = 1
57 # mcast_join = 239.2.11.71
58 port = 8649
# 接收来自任意连接的数据
59 bind = 0.0.0.0
60 retry_bind = true

(五)修改配置文件config
[root@hurys22 ~]# vi /etc/selinux/config
SELINUX=disabled


(六)文件赋权
[root@hurys22 ~]# chmod -R 777 /var/lib/ganglia
(七)重启
[root@hurys22 ~]# reboot
(八)启动 ganglia
[root@hurys22 ~]# sudo systemctl start gmond
[root@hurys22 ~]# sudo systemctl start httpd
[root@hurys22 ~]# sudo systemctl start gmetad
(九)打开网页浏览 ganglia 页面
http://hurys22/ganglia

(十)使用Ganglia监控Flume
1、修改Flume配置文件flume-env.sh
[root@hurys22 ~]# cd /usr/local/hurys/dc_env/flume/flume190/conf/
[root@hurys22 conf]# vi flume-env.sh
export JAVA_OPTS="-Dflume.monitoring.type=ganglia -Dflume.monitoring.hosts=192.168.0.22:8649 -Xms8000m -Xmx8000m -Dcom.sun.management.jmxremote"

2、创建Flume任务文件 flume-netcat-logger.conf
[root@hurys22 conf]# vi flume-netcat-logger.conf
# Name the components on this agent
a1.sources = r1
a1.sinks = k1
a1.channels = c1
# Describe/configure the source
a1.sources.r1.type = netcat
a1.sources.r1.bind = localhost
a1.sources.r1.port = 44444
# Describe the sink
a1.sinks.k1.type = logger
# Use a channel which buffers events in memory
a1.channels.c1.type = memory
a1.channels.c1.capacity = 1000
a1.channels.c1.transactionCapacity = 100
# Bind the source and sink to the channel
a1.sources.r1.channels = c1
a1.sinks.k1.channel = c1

3、运行Flume任务
[root@hurys22 flume190]# bin/flume-ng agent -c conf/ -n a1 -f conf/flume-netcat-logger.conf -Dflume.root.logger=INFO,console -Dflume.monitoring.type=ganglia -Dflume.monitoring.hosts=192.168.0.22:8649
或者
bin/flume-ng agent \
-c conf/ \
-n a1 \
-f conf/flume-netcat-logger.conf \
-Dflume.root.logger=INFO,console \
-Dflume.monitoring.type=ganglia \
-Dflume.monitoring.hosts=192.168.0.22:8649

4、使用44444端口发送数据

5、Flume运行界面显示任务运行

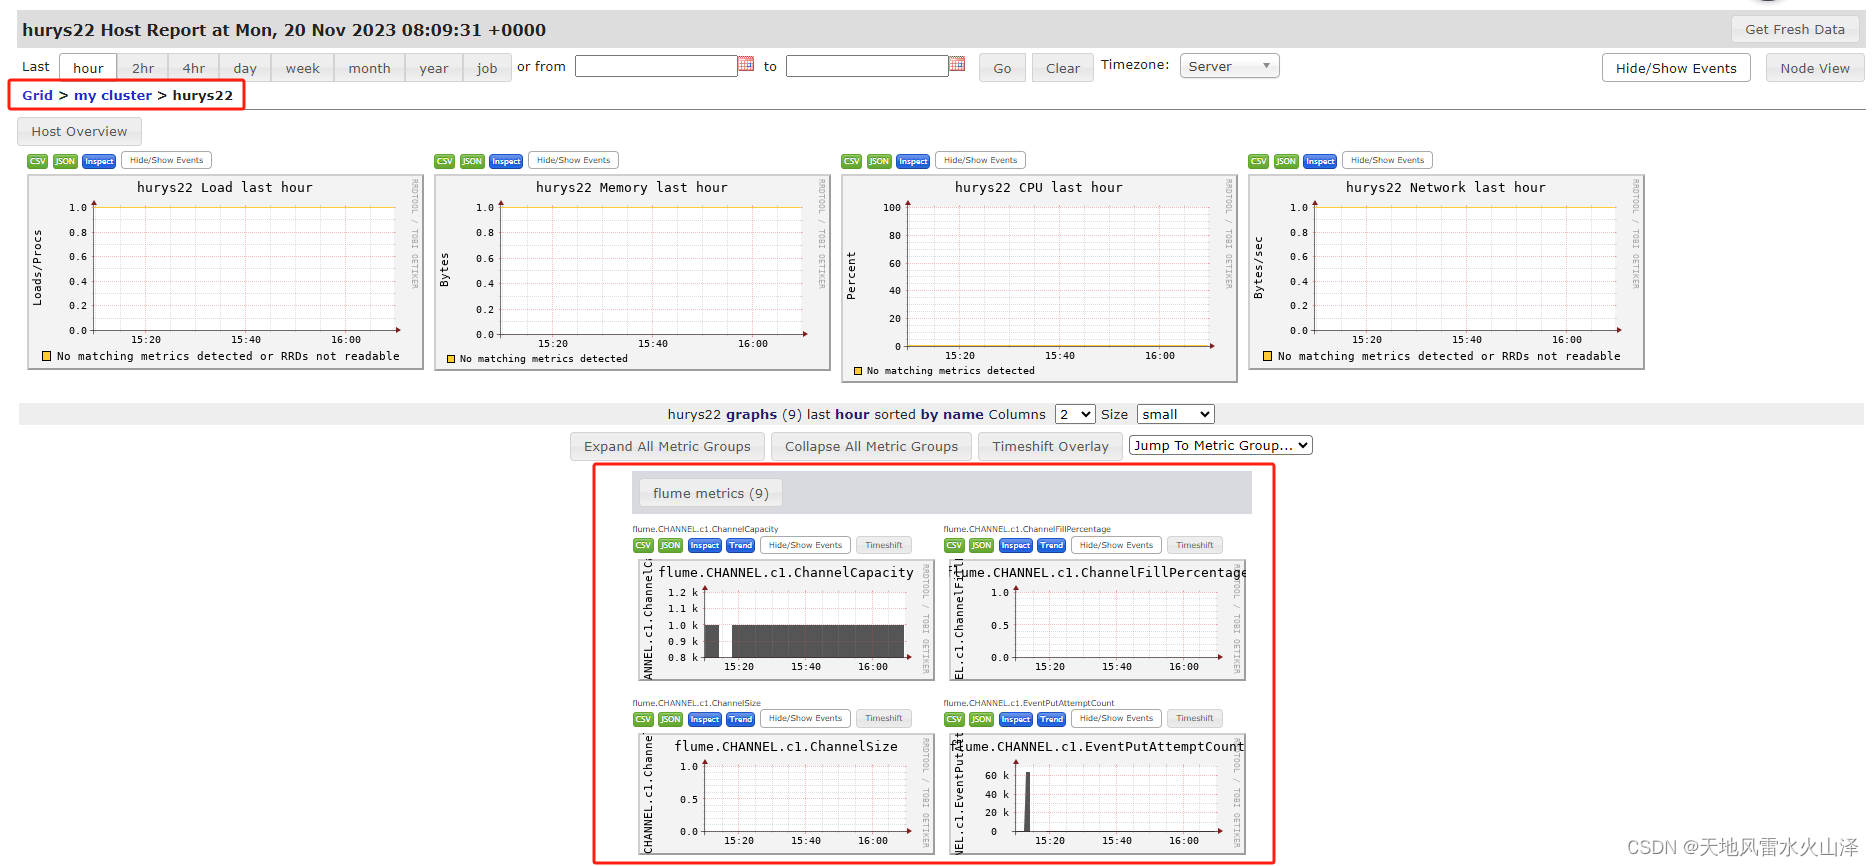
6、Ganglia监控图

这样Ganglia就能监控Flume的数据流,希望能帮到大家!
这篇关于二百零五、Flume——数据流监控工具Ganglia单机版安装以及使用Ganglia监控Flume任务的数据流(附流程截图)的文章就介绍到这儿,希望我们推荐的文章对编程师们有所帮助!


