本文主要是介绍【Python GUI 窗口句柄定位】——使用鼠标指针定位窗口句柄并获得对应的程序属性值,针对流氓软件绰绰有余,希望对大家解决编程问题提供一定的参考价值,需要的开发者们随着小编来一起学习吧!
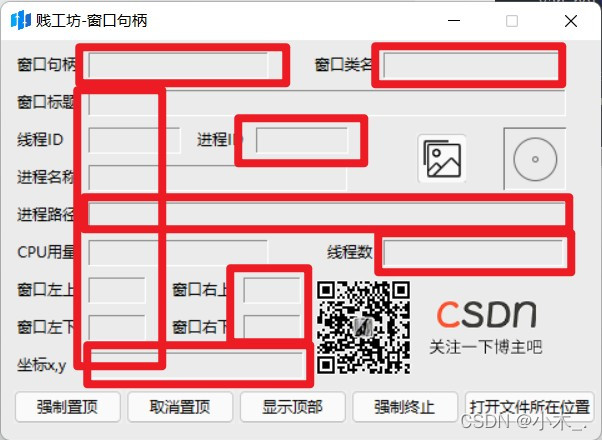
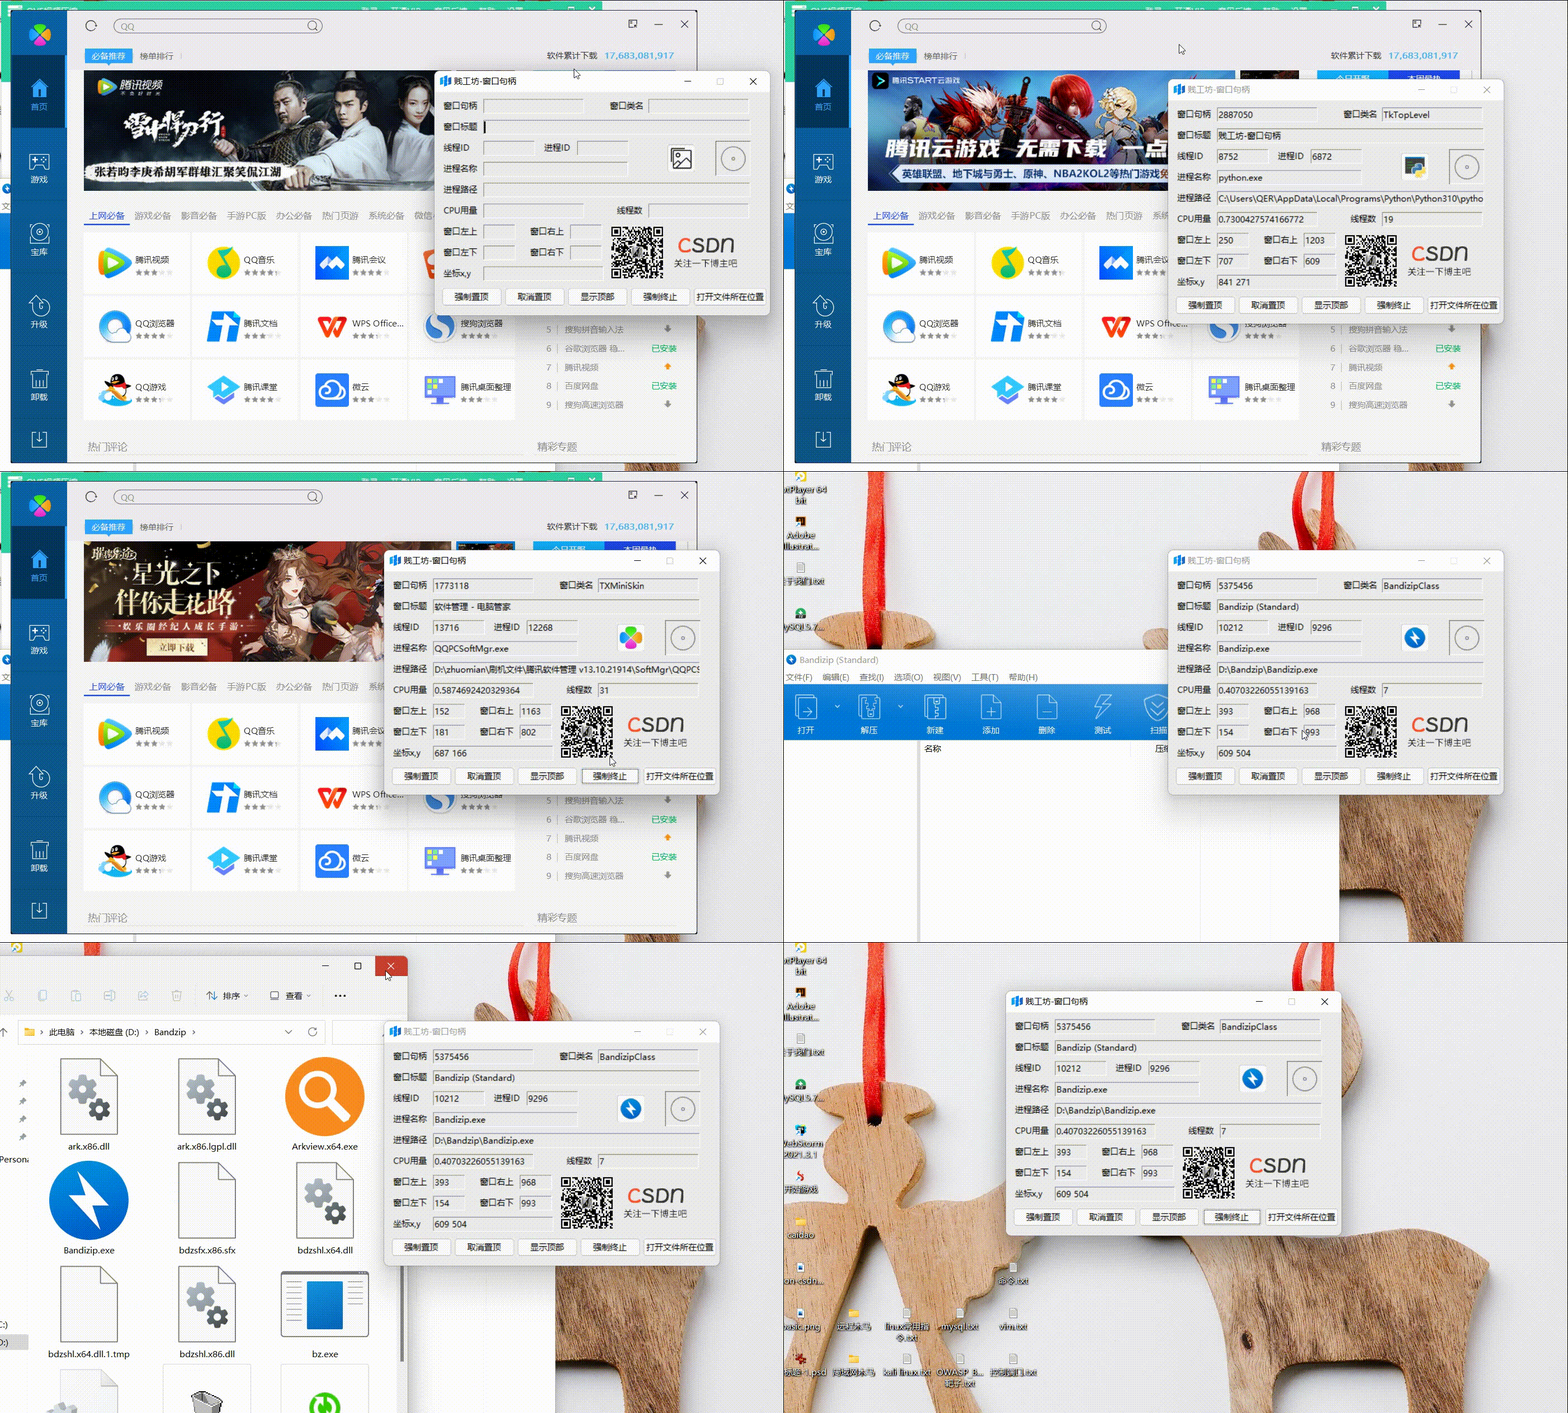
GUI窗口 使用鼠标指针进行定位程序,获得程序的窗口句柄、窗口类名、窗口标题、线程ID、进程ID、进程名称、进程路径、CPU用量、线程数、窗口定位及鼠标坐标,并附加五项可操作控件,强制置顶、取消置顶、显示顶部、前置终止、打开文件所在位置,可显示定位程序的图标。
点个赞留个关注吧!!
资料下载:提取码:n8pk 源代码及图片 资料下载 14kb
将红色框的指针拖到指定程序上,就会获得属性值


此程序使用要注意的事项:
使用须知:
1、在软件内有一个大的圆形图标,用鼠标左键进行拖拽到指定文件上会显示文件的所有属性
但不能左键一直拖动超过10秒,必须要松开一下在进行拖拽,否则会自动闪退,可能是因为电脑的性能问题导致的
2、软件内有五个按键
强制置顶可以置顶所有窗口,但不要置顶桌面,否则会覆盖你屏幕上所有的软件界面,只有使用取消置顶才可以取消掉
显示顶部,仅仅只是将某软件的界面显示到最顶层,但不是一直置顶
强制终止会终止一切的子程序,利用的是 程序名称和PID进行终止的 终止某个程序要谨慎,因为会把子程序也终止掉
3、二维码
二维码由博主设计出来,切勿乱改,如有转载或使用,请标注出处和博主身份
开始我们的程序
导入程序所需要的模块,如果没有模块的使用 pip install 进行安装,如果是版本不够可以加上-U进行更新升级,如果都不行可以去 python 模块官网 下载,然后使用 pip install *.whl 进行安装,要看清对应的版本,否则会报错
pip install 模块名
pip install -U 模块名
import tkinter
from tkinter import *
from tkinter.ttk import *
import win32api
import win32gui
import win32con
import win32ui
import time
from win32 import win32process
import psutil
import subprocess
from PIL import Image
import os
基本的GUI界面,程序的图标可要可不要,也可以自己去制作
root = Tk()
root.title('贱工坊-窗口句柄')  # 程序的标题名称
root.geometry("480x320+512+288")  # 窗口的大小及页面的显示位置
root.resizable(False, False)  # 固定页面不可放大缩小
root.iconbitmap("picture.ico")  # 程序的图标
在程序里创建画布改变颜色,添加图片,这个图片是圆形图标
canvas = tkinter.Canvas(root, bg="#ebebeb", height=400, width=700, borderwidth=-3) # 创建画布canvas.pack(side='top') # 放置画布(为上端)canvas_2 = tkinter.Canvas(root, bg="#ebebeb",cursor='target', height=50, width=50, borderwidth=-2) # 创建画布canvas_2.place(x=402, y=70) # 放置画布(为上端)image_file = tkinter.PhotoImage(file="./Key.png") # 加载图片文件canvas_2.create_image(0, 0, anchor='nw', image=image_file) # 将图片置于画布上
在程序里添加文本框,用来放置数据
# 配置窗口句柄var_hwnd = tkinter.StringVar()tkinter.Entry(root, width=20,borderwidth=1,bg='#ebebeb',textvariable=var_hwnd).place(x=70,y=10)# 配置标题名称var_title = tkinter.StringVar()tkinter.Entry(root, width=54, borderwidth=1,bg='#ebebeb', textvariable=var_title).place(x=70, y=40)# 配置窗口类名var_clsname = tkinter.StringVar()tkinter.Entry(root, width=20, borderwidth=1, bg='#ebebeb', textvariable=var_clsname).place(x=306, y=10)# 配置线程IDvar_hread_id = tkinter.StringVar()tkinter.Entry(root, width=10, borderwidth=1, bg='#ebebeb', textvariable=var_hread_id).place(x=70, y=70)# 配置进程IDvar_process_id = tkinter.StringVar()tkinter.Entry(root, width=10, borderwidth=1, bg='#ebebeb', textvariable=var_process_id).place(x=204, y=70)# 配置程序名称var_process = tkinter.StringVar()tkinter.Entry(root, width=29, borderwidth=1, bg='#ebebeb', textvariable=var_process).place(x=70, y=100)# 配置程序路径var_p_bin = tkinter.StringVar()tkinter.Entry(root, width=54, borderwidth=1, bg='#ebebeb', textvariable=var_p_bin).place(x=70, y=130)# 配置CPU利用率var_mem_percent = tkinter.StringVar()tkinter.Entry(root, width=20, borderwidth=1, bg='#ebebeb', textvariable=var_mem_percent).place(x=70, y=160)# 配置线程数var_num_threads = tkinter.StringVar()tkinter.Entry(root, width=20, borderwidth=1, bg='#ebebeb', textvariable=var_num_threads).place(x=306, y=160)# 配置窗口左上var_top = tkinter.StringVar()tkinter.Entry(root, width=6, borderwidth=1, bg='#ebebeb', textvariable=var_top).place(x=70, y=190)# 配置窗口左下var_left = tkinter.StringVar()tkinter.Entry(root, width=6, borderwidth=1, bg='#ebebeb', textvariable=var_left).place(x=70, y=220)# 配置窗口右上var_right = tkinter.StringVar()tkinter.Entry(root, width=6, borderwidth=1, bg='#ebebeb', textvariable=var_right).place(x=194, y=190)# 配置窗口右下var_bottom = tkinter.StringVar()tkinter.Entry(root, width=6, borderwidth=1, bg='#ebebeb', textvariable=var_bottom).place(x=194, y=220)# 配置坐标x,yvar_point = tkinter.StringVar()tkinter.Entry(root, width=24, borderwidth=1, bg='#ebebeb', textvariable=var_point).place(x=70, y=250)
程序添加标签,用来标注
tkinter.Label(canvas, bg="#ebebeb", text='窗口句柄').place(x=10, y=8)tkinter.Label(canvas, bg="#ebebeb", text='窗口标题').place(x=10, y=38)tkinter.Label(canvas, bg="#ebebeb", text='窗口类名').place(x=248, y=8)tkinter.Label(canvas, bg="#ebebeb", text='线程ID').place(x=10, y=68)tkinter.Label(canvas, bg="#ebebeb", text='进程ID').place(x=154, y=68)tkinter.Label(canvas, bg="#ebebeb", text='进程名称').place(x=10, y=98)tkinter.Label(canvas, bg="#ebebeb", text='进程路径').place(x=10, y=128)tkinter.Label(canvas, bg="#ebebeb", text='CPU用量').place(x=10, y=158)tkinter.Label(canvas, bg="#ebebeb", text='线程数').place(x=258, y=158)tkinter.Label(canvas, bg="#ebebeb", text='窗口左上').place(x=10, y=188)tkinter.Label(canvas, bg="#ebebeb", text='窗口左下').place(x=10, y=218)tkinter.Label(canvas, bg="#ebebeb", text='窗口右上').place(x=134, y=188)tkinter.Label(canvas, bg="#ebebeb", text='窗口右下').place(x=134, y=218)tkinter.Label(canvas, bg="#ebebeb", text='坐标x,y').place(x=10, y=248)
程序内放置一个CSDN博主二维码,直达博主主页,图片的尺寸是 200x80 ,二维码由博主制作,内置为博主的主页链接
# 放置二维码canvas_4 = tkinter.Canvas(root, bg="red", height=80, width=200, borderwidth=-2)canvas_4.place(x=250, y=190)image_file_4 = tkinter.PhotoImage(file="./share.png") # 加载图片文件canvas_4.create_image(0, 0, anchor='nw', image=image_file_4) # 将图片置于画布上
获取鼠标的坐标,通过坐标获取窗口句柄,然后通过句柄获取窗口标题、窗口类名、线程ID、进程ID和窗口坐标,然后通过进程ID获取程序名称、程序路径、CUP用量和线程数,通过程序路径获取软件图标,这里关联着鼠标的bind <B1-Motion>左键持续移动,只要鼠标左键持续移动则会执行如下代码,动一下执行一次
point = win32api.GetCursorPos() # 鼠标位置hwnd = win32gui.WindowFromPoint(point) # 窗口句柄title = win32gui.GetWindowText(hwnd) # 窗口标题clsname = win32gui.GetClassName(hwnd) # 窗口类名hread_id, process_id = win32process.GetWindowThreadProcessId(hwnd) #线程ID 进程IDprocess = psutil.Process(process_id) # 程序名称 通过进程ID获取p_bin = psutil.Process(process_id).exe() # 程序路径 通过进程ID获取mem_percent = psutil.Process(process_id).memory_percent() # CPU利用率 通过进程ID获取num_threads = psutil.Process(process_id).num_threads() # 线程数 通过进程ID获取left, top, right, bottom = win32gui.GetWindowRect(hwnd) #窗口坐标 通过窗口句柄获取 四个角的坐标picture() # 更换软件图标ICON(p_bin) # 获取软件图标var_hwnd.set(hwnd)var_title.set(title)var_clsname.set(clsname)var_hread_id.set(hread_id)var_process_id.set(process_id)var_process.set(process.name())var_p_bin.set(p_bin)var_mem_percent.set(mem_percent)var_num_threads.set(num_threads)var_left.set(left)var_top.set(top)var_right.set(right)var_bottom.set(bottom)var_point.set(point)这个代码的用处是用来获取软件的图标,通过路径获取,并持续保存替换 icon.png 图片
# 获取软件图标def ICON(exePath2):try:exePath = exePath2.replace("\\", "/") # 替换large, small = win32gui.ExtractIconEx(f'{exePath}', 0)useIcon = large[0]destroyIcon = small[0]win32gui.DestroyIcon(destroyIcon)hdc = win32ui.CreateDCFromHandle(win32gui.GetDC(0))hbmp = win32ui.CreateBitmap()hbmp.CreateCompatibleBitmap(hdc, ico_x, ico_x)hdc = hdc.CreateCompatibleDC()hdc.SelectObject(hbmp)hdc.DrawIcon((0, 0), useIcon)bmpstr = hbmp.GetBitmapBits(True)img = Image.frombuffer('RGBA',(32, 32),bmpstr, 'raw', 'BGRA', 0, 1)img.save('icon.png')except:pass将保存好扽图片进行加载进来,pictures.png 是软件的默认图标,而 icon.png 则是保存下来的图标进行替换,所以指针指向哪里就会替换为哪一个软件的图标,原理就是这样,只是有一部分的软件图标获取不了或使用不了,会造成软件内图标变白
image_file_3 = tkinter.PhotoImage(file="pictures.png") # 软件第一次打开时要呈现的图片Button_2 = Button(canvas_3,image=image_file_3).place(x=0, y=0)# 更换软件图标def picture():try:image_file_3.config(file='icon.png') # 替换except:pass这是能获取到图标的

这是获取不到图标或使用不了图标的,只有绝少部分获取不到或使用不了,不影响软件的使用。

下面的是按钮所对应的函数控件,用来置顶、取消置顶、显示顶部、终止程序和打开文件所在位置,这里要注意的是我采用的taskkill 电脑自带的终止指令,可以不会支持win7以下的电脑命令,还有就是我这个终止命令会把程序的子程序也终止掉,所以尽量不要去尝试终止文件夹和桌面之类的,如果终止掉了屏幕会全白,可以使用【ctrl+alt+delete】进入任务管理器,新建任务,explorer 回车即可恢复,但是有可能你的资料都会被强行关闭。
# 置顶 通过句柄def set_top():try:win32gui.SetWindowPos(var_hwnd.get(), win32con.HWND_TOPMOST, 0, 0, 0, 0,win32con.SWP_NOMOVE | win32con.SWP_NOACTIVATE | win32con.SWP_NOOWNERZORDER | win32con.SWP_SHOWWINDOW | win32con.SWP_NOSIZE)except:pass# 取消置顶 通过句柄def set_down():try:win32gui.SetWindowPos(var_hwnd.get(), win32con.HWND_NOTOPMOST, 0, 0, 0, 0,win32con.SWP_SHOWWINDOW | win32con.SWP_NOSIZE | win32con.SWP_NOMOVE)except:pass# 显示在顶部 通过句柄def set_yop_p():try:win32gui.SetForegroundWindow(var_hwnd.get())except:pass# 终止程序def kill():try:subprocess.Popen("taskkill /F /T /PID " + var_process_id.get(), shell=True)subprocess.Popen("taskkill /F /T /IM " + process.get(), shell=True)except:pass# 打开文件夹def bin():pbin = var_p_bin.get().replace("\\", "/") # 替换pbin = os.path.split(pbin)[0].replace("\\", "/")os.startfile(str(pbin))按钮控件
Button(root, text='强制置顶', command=set_top).place(x=10, y=280)Button(root, text='取消置顶', command=set_down).place(x=100, y=280)Button(root, text='显示顶部', command=set_yop_p).place(x=190, y=280)Button(root, text='强制终止', command=kill).place(x=280, y=280)Button(root, text='打开文件所在位置', command=bin).place(x=370, y=280)
这个是最关键的,只有这个控件才能起到指针移动是执行命令,canvas_2 指的是在 canvas_2的画布下可以使用,<B1-Motion> 指的是鼠标左键并移动 待触发控件,showMenu 指的是要执行的命令函数,
# 鼠标移动控件canvas_2.bind("<B1-Motion>", showMenu)废话不多说,上代码。
运行不成功的可以要注意,是不是没有图片,最上方有资料链接,里面包括图片和源文件,可以免费下载,代码都不用复制了
完整代码:
import tkinter
from tkinter import *
from tkinter.ttk import *
import win32api
import win32gui
import win32con
import win32ui
import time
from win32 import win32process
import psutil
import subprocess
from PIL import Image
import osdef main():root = Tk()root.title('贱工坊-窗口句柄')  # 程序的标题名称root.geometry("480x320+512+288")  # 窗口的大小及页面的显示位置root.resizable(False, False)  # 固定页面不可放大缩小root.iconbitmap("picture.ico")  # 程序的图标canvas = tkinter.Canvas(root, bg="#ebebeb", height=400, width=700, borderwidth=-3)  # 创建画布canvas.pack(side='top')  # 放置画布(为上端)canvas_2 = tkinter.Canvas(root, bg="#ebebeb",cursor='target', height=50, width=50, borderwidth=-2)  # 创建画布canvas_2.place(x=402, y=70)  # 放置画布(为上端)image_file = tkinter.PhotoImage(file="./Key.png")  # 加载图片文件canvas_2.create_image(0, 0, anchor='nw', image=image_file)  # 将图片置于画布上canvas_3 = tkinter.Canvas(root, bg="red",  height=40, width=40, borderwidth=-2)  # 创建画布canvas_3.place(x=332, y=74)  # 放置画布(为上端)# 配置窗口句柄var_hwnd = tkinter.StringVar()tkinter.Entry(root, width=20,borderwidth=1,bg='#ebebeb',textvariable=var_hwnd).place(x=70,y=10)# 配置标题名称var_title = tkinter.StringVar()tkinter.Entry(root, width=54, borderwidth=1,bg='#ebebeb', textvariable=var_title).place(x=70, y=40)# 配置窗口类名var_clsname = tkinter.StringVar()tkinter.Entry(root, width=20, borderwidth=1, bg='#ebebeb', textvariable=var_clsname).place(x=306, y=10)# 配置线程IDvar_hread_id = tkinter.StringVar()tkinter.Entry(root, width=10, borderwidth=1, bg='#ebebeb', textvariable=var_hread_id).place(x=70, y=70)# 配置进程IDvar_process_id = tkinter.StringVar()tkinter.Entry(root, width=10, borderwidth=1, bg='#ebebeb', textvariable=var_process_id).place(x=204, y=70)# 配置程序名称var_process = tkinter.StringVar()tkinter.Entry(root, width=29, borderwidth=1, bg='#ebebeb', textvariable=var_process).place(x=70, y=100)# 配置程序路径var_p_bin = tkinter.StringVar()tkinter.Entry(root, width=54, borderwidth=1, bg='#ebebeb', textvariable=var_p_bin).place(x=70, y=130)# 配置CPU利用率var_mem_percent = tkinter.StringVar()tkinter.Entry(root, width=20, borderwidth=1, bg='#ebebeb', textvariable=var_mem_percent).place(x=70, y=160)# 配置线程数var_num_threads = tkinter.StringVar()tkinter.Entry(root, width=20, borderwidth=1, bg='#ebebeb', textvariable=var_num_threads).place(x=306, y=160)# 配置窗口左上var_top = tkinter.StringVar()tkinter.Entry(root, width=6, borderwidth=1, bg='#ebebeb', textvariable=var_top).place(x=70, y=190)# 配置窗口左下var_left = tkinter.StringVar()tkinter.Entry(root, width=6, borderwidth=1, bg='#ebebeb', textvariable=var_left).place(x=70, y=220)# 配置窗口右上var_right = tkinter.StringVar()tkinter.Entry(root, width=6, borderwidth=1, bg='#ebebeb', textvariable=var_right).place(x=194, y=190)# 配置窗口右下var_bottom = tkinter.StringVar()tkinter.Entry(root, width=6, borderwidth=1, bg='#ebebeb', textvariable=var_bottom).place(x=194, y=220)# 配置坐标x,yvar_point = tkinter.StringVar()tkinter.Entry(root, width=24, borderwidth=1, bg='#ebebeb', textvariable=var_point).place(x=70, y=250)image_file_3 = tkinter.PhotoImage(file="pictures.png")  # 软件第一次打开时要呈现的图片Button_2 = Button(canvas_3, image=image_file_3).place(x=0, y=0)# 更换软件图标def picture():try:image_file_3.config(file='icon.png')   # 替换except:pass# 图标尺寸ico_x = 32# 获取软件图标def ICON(exePath2):try:exePath = exePath2.replace("\\", "/")  # 替换large, small = win32gui.ExtractIconEx(f'{exePath}', 0)useIcon = large[0]destroyIcon = small[0]win32gui.DestroyIcon(destroyIcon)hdc = win32ui.CreateDCFromHandle(win32gui.GetDC(0))hbmp = win32ui.CreateBitmap()hbmp.CreateCompatibleBitmap(hdc, ico_x, ico_x)hdc = hdc.CreateCompatibleDC()hdc.SelectObject(hbmp)hdc.DrawIcon((0, 0), useIcon)bmpstr = hbmp.GetBitmapBits(True)img = Image.frombuffer('RGBA',(32, 32),bmpstr, 'raw', 'BGRA', 0, 1)img.save('icon.png')except:pass# 通过鼠标移动获取函数def showMenu(event):try:point = win32api.GetCursorPos()  # 鼠标位置hwnd = win32gui.WindowFromPoint(point)   # 窗口句柄title = win32gui.GetWindowText(hwnd)    # 窗口标题clsname = win32gui.GetClassName(hwnd)   # 窗口类名hread_id, process_id = win32process.GetWindowThreadProcessId(hwnd)  #线程ID  进程IDprocess = psutil.Process(process_id)     # 程序名称  通过进程ID获取p_bin = psutil.Process(process_id).exe()   # 程序路径  通过进程ID获取mem_percent = psutil.Process(process_id).memory_percent()   # CPU利用率  通过进程ID获取num_threads = psutil.Process(process_id).num_threads()     # 线程数  通过进程ID获取left, top, right, bottom = win32gui.GetWindowRect(hwnd)   #窗口坐标  通过窗口句柄获取 四个角的坐标picture()    # 更换软件图标ICON(p_bin)  # 获取软件图标var_hwnd.set(hwnd)var_title.set(title)var_clsname.set(clsname)var_hread_id.set(hread_id)var_process_id.set(process_id)var_process.set(process.name())var_p_bin.set(p_bin)var_mem_percent.set(mem_percent)var_num_threads.set(num_threads)var_left.set(left)var_top.set(top)var_right.set(right)var_bottom.set(bottom)var_point.set(point)except:pass# 置顶 通过句柄def set_top():try:win32gui.SetWindowPos(var_hwnd.get(), win32con.HWND_TOPMOST, 0, 0, 0, 0,win32con.SWP_NOMOVE | win32con.SWP_NOACTIVATE | win32con.SWP_NOOWNERZORDER | win32con.SWP_SHOWWINDOW | win32con.SWP_NOSIZE)except:pass# 取消置顶 通过句柄def set_down():try:win32gui.SetWindowPos(var_hwnd.get(), win32con.HWND_NOTOPMOST, 0, 0, 0, 0,win32con.SWP_SHOWWINDOW | win32con.SWP_NOSIZE | win32con.SWP_NOMOVE)except:pass# 显示在顶部 通过句柄def set_yop_p():try:win32gui.SetForegroundWindow(var_hwnd.get())except:pass# 终止程序def kill():try:subprocess.Popen("taskkill /F /T /PID " + var_process_id.get(), shell=True)subprocess.Popen("taskkill /F /T /IM " + process.get(), shell=True)except:pass# 打开文件夹def bin():pbin = var_p_bin.get().replace("\\", "/")  # 替换pbin = os.path.split(pbin)[0].replace("\\", "/")os.startfile(str(pbin))def Label():# 标签tkinter.Label(canvas, bg="#ebebeb", text='窗口句柄').place(x=10, y=8)tkinter.Label(canvas, bg="#ebebeb", text='窗口标题').place(x=10, y=38)tkinter.Label(canvas, bg="#ebebeb", text='窗口类名').place(x=248, y=8)tkinter.Label(canvas, bg="#ebebeb", text='线程ID').place(x=10, y=68)tkinter.Label(canvas, bg="#ebebeb", text='进程ID').place(x=154, y=68)tkinter.Label(canvas, bg="#ebebeb", text='进程名称').place(x=10, y=98)tkinter.Label(canvas, bg="#ebebeb", text='进程路径').place(x=10, y=128)tkinter.Label(canvas, bg="#ebebeb", text='CPU用量').place(x=10, y=158)tkinter.Label(canvas, bg="#ebebeb", text='线程数').place(x=258, y=158)tkinter.Label(canvas, bg="#ebebeb", text='窗口左上').place(x=10, y=188)tkinter.Label(canvas, bg="#ebebeb", text='窗口左下').place(x=10, y=218)tkinter.Label(canvas, bg="#ebebeb", text='窗口右上').place(x=134, y=188)tkinter.Label(canvas, bg="#ebebeb", text='窗口右下').place(x=134, y=218)tkinter.Label(canvas, bg="#ebebeb", text='坐标x,y').place(x=10, y=248)# 鼠标移动控件canvas_2.bind("<B1-Motion>", showMenu)Button(root, text='强制置顶',   command=set_top).place(x=10, y=280)Button(root, text='取消置顶', command=set_down).place(x=100, y=280)Button(root, text='显示顶部', command=set_yop_p).place(x=190, y=280)Button(root, text='强制终止', command=kill).place(x=280, y=280)Button(root, text='打开文件所在位置', command=bin).place(x=370, y=280)# 放置二维码canvas_4 = tkinter.Canvas(root, bg="red", height=80, width=200, borderwidth=-2)canvas_4.place(x=250, y=190)image_file_4 = tkinter.PhotoImage(file="./share.png")  # 加载图片文件canvas_4.create_image(0, 0, anchor='nw', image=image_file_4)  # 将图片置于画布上Label()root.mainloop() #运行if __name__ == '__main__':main()
这篇关于【Python GUI 窗口句柄定位】——使用鼠标指针定位窗口句柄并获得对应的程序属性值,针对流氓软件绰绰有余的文章就介绍到这儿,希望我们推荐的文章对编程师们有所帮助!


