本文主要是介绍Whisper语音识别 -- 自回归解码分析,希望对大家解决编程问题提供一定的参考价值,需要的开发者们随着小编来一起学习吧!
前言
Whisper 是由 OpenAI 开发的一种先进语音识别系统。它采用深度学习技术,能够高效、准确地将语音转换为文本。Whisper 支持多种语言和口音,并且在处理背景噪音和语音变异方面表现出色。其广泛应用于语音助手、翻译服务、字幕生成等领域,为用户提供了更流畅的语音交互体验。作为一个开源项目,Whisper 鼓励开发者和研究人员进一步优化和创新。
作者将解码过程整理成 简单的python代码进行讲解
核心思想
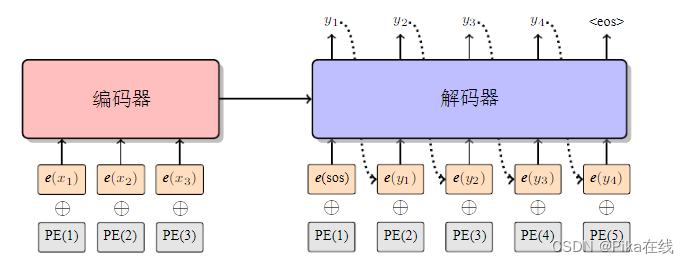
whisper解码核心是 基于自回归解码的token游戏 ,换句话说他的参数读取是通过传入token id的形式,即采用大语言模型的prompt范式(whisper的解码器一定程度上也是个大语言模型,虽然语音训练样本token数远不及纯文本token数)
图中除了识别结果的框框大多数都是prompt工程, 常用的token id 如图:
自回归解码

详细解释放在代码中啦
def main():"""解码器须构建Deocder的prompt,序列为【SOT,语种,任务】, 本文中是 model.sot_sequence其中SOT:50258语种:50332,50309,50333,50335,50273,...任务:transcribe 转写 50359, translate 翻译 50358""""""加载whisper模型"""encoder_onnx_file = './small-encoder.int8.onnx'decoder_onnx_file = './small-decoder.int8.onnx'tokenizer_file = './small-tokens.txt'model = OnnxModel(encoder_onnx_file, decoder_onnx_file)token_table = load_tokenizer(tokenizer_file) # token id to char """提取MEL特征"""wav_file = "output.wav"mel = compute_features(wav_file)"""计算encoder的K/V编码 """# 交叉注意力 encoder:K/V, with decoder:Qn_layer_cross_k, n_layer_cross_v = model.run_encoder(mel)# 自注意力 decoder:K/V, with decoder:Qn_layer_self_k_cache, n_layer_self_v_cache = model.get_self_cache()"""检测语种"""lang = model.detect_language(n_layer_cross_k, n_layer_cross_v)model.sot_sequence[1] = lang"""任务选择"""# task = model.translatetask = model.transcribemodel.sot_sequence[2] = task"""根据prompt进行首次解码"""tokens = torch.tensor([model.sot_sequence], dtype=torch.int64)offset = torch.zeros(1, dtype=torch.int64)logits, n_layer_self_k_cache, n_layer_self_v_cache = model.run_decoder(tokens=tokens,n_layer_self_k_cache=n_layer_self_k_cache,n_layer_self_v_cache=n_layer_self_v_cache,n_layer_cross_k=n_layer_cross_k,n_layer_cross_v=n_layer_cross_v,offset=offset,)offset += len(model.sot_sequence)logits = logits[0, -1] # token 声学后验model.suppress_tokens(logits, is_initial=True) # 无效token后验抑制"""自回归解码"""max_token_id = logits.argmax(dim=-1) # 选择后验中最大输出的token【贪心解码】results = []sentence = {'start':0,'end':0,'text':b""} sentences = []for i in range(model.n_text_ctx):# 打印token属性if max_token_id.item() == model.sot:print("iter:%8s docode token id:%8s [sot]"%(i,max_token_id.item()))elif max_token_id.item() == model.eot:print("iter:%8s docode token id:%8s [eot]"%(i,max_token_id.item()))elif max_token_id.item() >= model.timestamp_begin:print("iter:%8s docode token id:%8s [boundary]"%(i,max_token_id.item()))else:print("iter:%8s docode token id:%8s [char]"%(i,max_token_id.item()))# eot 结束if max_token_id.item() == model.eot:print("Finish !!")break# 检测到时间戳if max_token_id.item()>=model.timestamp_begin:timestamp = ((max_token_id.item()-model.timestamp_begin)*model.time_precision)# 遇到结束符if sentence['text']:sentence['end'] = timestampsentence['text'] = sentence['text'].decode().strip()print(sentence)sentences.append(sentence)sentence = {'start':0,'end':0,'text':b""}# 遇到开始符else:sentence['start'] = timestampelse:decode_token = base64.b64decode(token_table[max_token_id.item()])sentence['text'] += decode_tokenresults.append(max_token_id.item())tokens = torch.tensor([[results[-1]]])# deocder 单步解码logits, n_layer_self_k_cache, n_layer_self_v_cache = model.run_decoder(tokens=tokens,n_layer_self_k_cache=n_layer_self_k_cache,n_layer_self_v_cache=n_layer_self_v_cache,n_layer_cross_k=n_layer_cross_k,n_layer_cross_v=n_layer_cross_v,offset=offset,)offset += 1logits = logits[0, -1]model.suppress_tokens(logits, is_initial=False)max_token_id = logits.argmax(dim=-1) # 贪心搜索
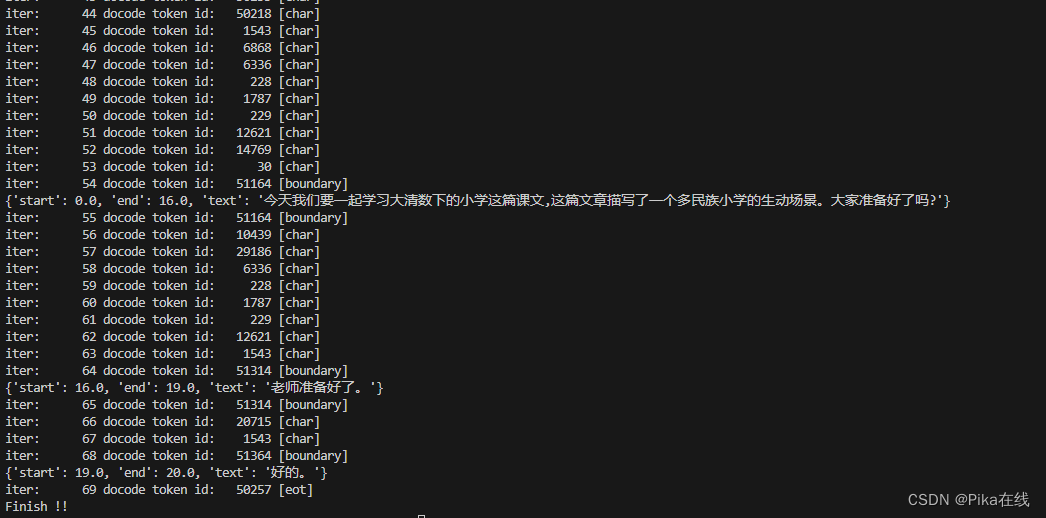
没错连时间戳也是token形式~,下面是运行结果感受一下。我们在边界处对句子进行保存
以上就是whisper解码的基本原理,感兴趣的同学关注走一波
这篇关于Whisper语音识别 -- 自回归解码分析的文章就介绍到这儿,希望我们推荐的文章对编程师们有所帮助!


