本文主要是介绍图像处理之霍夫变换圆检测算法,希望对大家解决编程问题提供一定的参考价值,需要的开发者们随着小编来一起学习吧!
- created by gloomyfish
图像处理之霍夫变换圆检测算法
之前写过一篇文章讲述霍夫变换原理与利用霍夫变换检测直线, 结果发现访问量还是蛮
多,有点超出我的意料,很多人都留言说代码写得不好,没有注释,结构也不是很清晰,所以
我萌发了再写一篇,介绍霍夫变换圆检测算法,同时也尽量的加上详细的注释,介绍代码
结构.让更多的人能够读懂与理解.
一:霍夫变换检测圆的数学原理
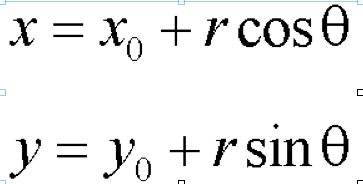
根据极坐标,圆上任意一点的坐标可以表示为如上形式, 所以对于任意一个圆, 假设
中心像素点p(x0, y0)像素点已知, 圆半径已知,则旋转360由极坐标方程可以得到每
个点上得坐标同样,如果只是知道图像上像素点, 圆半径,旋转360°则中心点处的坐
标值必定最强.这正是霍夫变换检测圆的数学原理.
二:算法流程
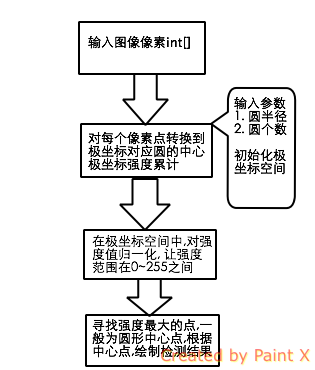
该算法大致可以分为以下几个步骤

三:运行效果
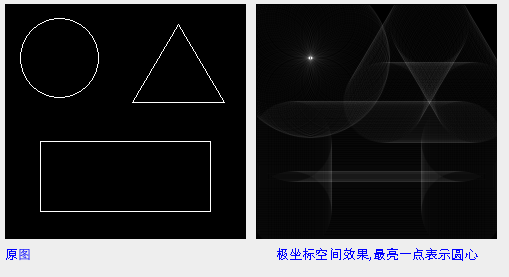
图像从空间坐标变换到极坐标效果, 最亮一点为圆心.
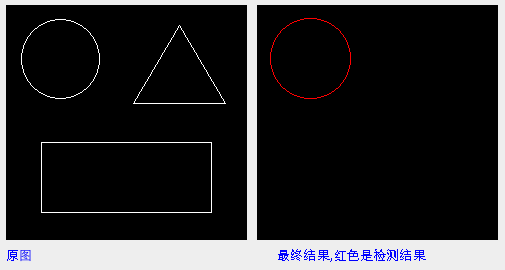
图像从极坐标变换回到空间坐标,检测结果显示:
四:关键代码解析
个人觉得这次注释已经是非常的详细啦,而且我写的还是中文注释
/** * 霍夫变换处理 - 检测半径大小符合的圆的个数 * 1. 将图像像素从2D空间坐标转换到极坐标空间 * 2. 在极坐标空间中归一化各个点强度,使之在0〜255之间 * 3. 根据极坐标的R值与输入参数(圆的半径)相等,寻找2D空间的像素点 * 4. 对找出的空间像素点赋予结果颜色(红色) * 5. 返回结果2D空间像素集合 * @return int [] */
public int[] process() {  // 对于圆的极坐标变换来说,我们需要360度的空间梯度叠加值  acc = new int[width * height];  for (int y = 0; y < height; y++) {  for (int x = 0; x < width; x++) {  acc[y * width + x] = 0;  }  }  int x0, y0;  double t;  for (int x = 0; x < width; x++) {  for (int y = 0; y < height; y++) {  if ((input[y * width + x] & 0xff) == 255) {  for (int theta = 0; theta < 360; theta++) {  t = (theta * 3.14159265) / 180; // 角度值0 ~ 2*PI  x0 = (int) Math.round(x - r * Math.cos(t));  y0 = (int) Math.round(y - r * Math.sin(t));  if (x0 < width && x0 > 0 && y0 < height && y0 > 0) {  acc[x0 + (y0 * width)] += 1;  }  }  }  }  }  // now normalise to 255 and put in format for a pixel array  int max = 0;  // Find max acc value  for (int x = 0; x < width; x++) {  for (int y = 0; y < height; y++) {  if (acc[x + (y * width)] > max) {  max = acc[x + (y * width)];  }  }  }  // 根据最大值,实现极坐标空间的灰度值归一化处理  int value;  for (int x = 0; x < width; x++) {  for (int y = 0; y < height; y++) {  value = (int) (((double) acc[x + (y * width)] / (double) max) * 255.0);  acc[x + (y * width)] = 0xff000000 | (value << 16 | value << 8 | value);  }  }  // 绘制发现的圆  findMaxima();  System.out.println("done");  return output;
} package com.gloomyfish.image.transform.hough;
/*** * * 传入的图像为二值图像,背景为黑色,目标前景颜色为为白色 * @author gloomyfish * */
public class CircleHough { private int[] input; private int[] output; private int width; private int height; private int[] acc; private int accSize = 1; private int[] results; private int r; // 圆周的半径大小 public CircleHough() { System.out.println("Hough Circle Detection..."); } public void init(int[] inputIn, int widthIn, int heightIn, int radius) { r = radius; width = widthIn; height = heightIn; input = new int[width * height]; output = new int[width * height]; input = inputIn; for (int y = 0; y < height; y++) { for (int x = 0; x < width; x++) { output[x + (width * y)] = 0xff000000; //默认图像背景颜色为黑色 } } } public void setCircles(int circles) { accSize = circles; // 检测的个数 } /** * 霍夫变换处理 - 检测半径大小符合的圆的个数 * 1. 将图像像素从2D空间坐标转换到极坐标空间 * 2. 在极坐标空间中归一化各个点强度,使之在0〜255之间 * 3. 根据极坐标的R值与输入参数(圆的半径)相等,寻找2D空间的像素点 * 4. 对找出的空间像素点赋予结果颜色(红色) * 5. 返回结果2D空间像素集合 * @return int [] */ public int[] process() { // 对于圆的极坐标变换来说,我们需要360度的空间梯度叠加值 acc = new int[width * height]; for (int y = 0; y < height; y++) { for (int x = 0; x < width; x++) { acc[y * width + x] = 0; } } int x0, y0; double t; for (int x = 0; x < width; x++) { for (int y = 0; y < height; y++) { if ((input[y * width + x] & 0xff) == 255) { for (int theta = 0; theta < 360; theta++) { t = (theta * 3.14159265) / 180; // 角度值0 ~ 2*PI x0 = (int) Math.round(x - r * Math.cos(t)); y0 = (int) Math.round(y - r * Math.sin(t)); if (x0 < width && x0 > 0 && y0 < height && y0 > 0) { acc[x0 + (y0 * width)] += 1; } } } } } // now normalise to 255 and put in format for a pixel array int max = 0; // Find max acc value for (int x = 0; x < width; x++) { for (int y = 0; y < height; y++) { if (acc[x + (y * width)] > max) { max = acc[x + (y * width)]; } } } // 根据最大值,实现极坐标空间的灰度值归一化处理 int value; for (int x = 0; x < width; x++) { for (int y = 0; y < height; y++) { value = (int) (((double) acc[x + (y * width)] / (double) max) * 255.0); acc[x + (y * width)] = 0xff000000 | (value << 16 | value << 8 | value); } } // 绘制发现的圆 findMaxima(); System.out.println("done"); return output; } private int[] findMaxima() { results = new int[accSize * 3]; int[] output = new int[width * height]; // 获取最大的前accSize个值 for (int x = 0; x < width; x++) { for (int y = 0; y < height; y++) { int value = (acc[x + (y * width)] & 0xff); // if its higher than lowest value add it and then sort if (value > results[(accSize - 1) * 3]) { // add to bottom of array results[(accSize - 1) * 3] = value; //像素值 results[(accSize - 1) * 3 + 1] = x; // 坐标X results[(accSize - 1) * 3 + 2] = y; // 坐标Y // shift up until its in right place int i = (accSize - 2) * 3; while ((i >= 0) && (results[i + 3] > results[i])) { for (int j = 0; j < 3; j++) { int temp = results[i + j]; results[i + j] = results[i + 3 + j]; results[i + 3 + j] = temp; } i = i - 3; if (i < 0) break; } } } } // 根据找到的半径R,中心点像素坐标p(x, y),绘制圆在原图像上 System.out.println("top " + accSize + " matches:"); for (int i = accSize - 1; i >= 0; i--) { drawCircle(results[i * 3], results[i * 3 + 1], results[i * 3 + 2]); } return output; } private void setPixel(int value, int xPos, int yPos) { /// output[(yPos * width) + xPos] = 0xff000000 | (value << 16 | value << 8 | value); output[(yPos * width) + xPos] = 0xffff0000; } // draw circle at x y private void drawCircle(int pix, int xCenter, int yCenter) { pix = 250; // 颜色值,默认为白色 int x, y, r2; int radius = r; r2 = r * r; // 绘制圆的上下左右四个点 setPixel(pix, xCenter, yCenter + radius); setPixel(pix, xCenter, yCenter - radius); setPixel(pix, xCenter + radius, yCenter); setPixel(pix, xCenter - radius, yCenter); y = radius; x = 1; y = (int) (Math.sqrt(r2 - 1) + 0.5); // 边缘填充算法, 其实可以直接对循环所有像素,计算到做中心点距离来做 // 这个方法是别人写的,发现超赞,超好! while (x < y) { setPixel(pix, xCenter + x, yCenter + y); setPixel(pix, xCenter + x, yCenter - y); setPixel(pix, xCenter - x, yCenter + y); setPixel(pix, xCenter - x, yCenter - y); setPixel(pix, xCenter + y, yCenter + x); setPixel(pix, xCenter + y, yCenter - x); setPixel(pix, xCenter - y, yCenter + x); setPixel(pix, xCenter - y, yCenter - x); x += 1; y = (int) (Math.sqrt(r2 - x * x) + 0.5); } if (x == y) { setPixel(pix, xCenter + x, yCenter + y); setPixel(pix, xCenter + x, yCenter - y); setPixel(pix, xCenter - x, yCenter + y); setPixel(pix, xCenter - x, yCenter - y); } } public int[] getAcc() { return acc; } } 这篇关于图像处理之霍夫变换圆检测算法的文章就介绍到这儿,希望我们推荐的文章对编程师们有所帮助!


