本文主要是介绍HuggingFace团队亲授大模型量化基础: Quantization Fundamentals with Hugging Face,希望对大家解决编程问题提供一定的参考价值,需要的开发者们随着小编来一起学习吧!
Quantization Fundamentals with Hugging Face
本文是学习https://www.deeplearning.ai/short-courses/quantization-fundamentals-with-hugging-face/ 这门课的学习笔记。

What you’ll learn in this course
Generative AI models, like large language models, often exceed the capabilities of consumer-grade hardware and are expensive to run. Compressing models through methods such as quantization makes them more efficient, faster, and accessible. This allows them to run on a wide variety of devices, including smartphones, personal computers, and edge devices, and minimizes performance degradation.
Join this course to:
- Quantize any open source model with linear quantization using the Quanto library.
- Get an overview of how linear quantization is implemented. This form of quantization can be applied to compress any model, including LLMs, vision models, etc.
- Apply “downcasting,” another form of quantization, with the Transformers library, which enables you to load models in about half their normal size in the BFloat16 data type.
By the end of this course, you will have a foundation in quantization techniques and be able to apply them to compress and optimize your own generative AI models, making them more accessible and efficient.
文章目录
- Quantization Fundamentals with Hugging Face
- What you’ll learn in this course
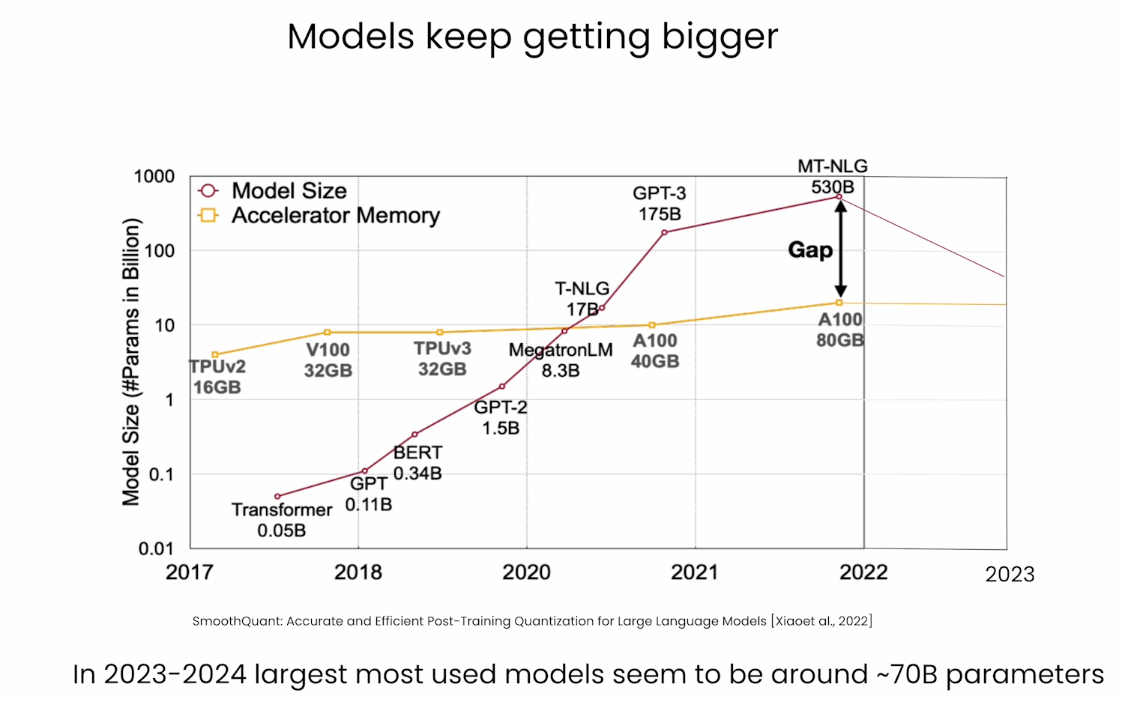
- Handling Big Models
- Lesson 2: Data Types and Sizes
- Integers
- Floating Points
- Downcasting
- Lesson 3: Loading ML Models with Different Data Types
- Model Casting: `float16`
- Model Casting: `bfloat16`
- Note about deepcopy
- Using Popular Generative Models in Different Data Types
- To get the sample code that Younes showed:
- Model Performance: `float32` vs `bfloat16`
- Default Data Type
- Note
- Lesson 4: Quantization Theory
- Libraries to install
- T5-FLAN
- Without Quantization
- Quantize the model (8-bit precision)
- Freeze the model
- Try running inference on the quantized model
- Comparing "linear quantization" to "downcasting"
- Quantization of LLMs
- 后记
Handling Big Models
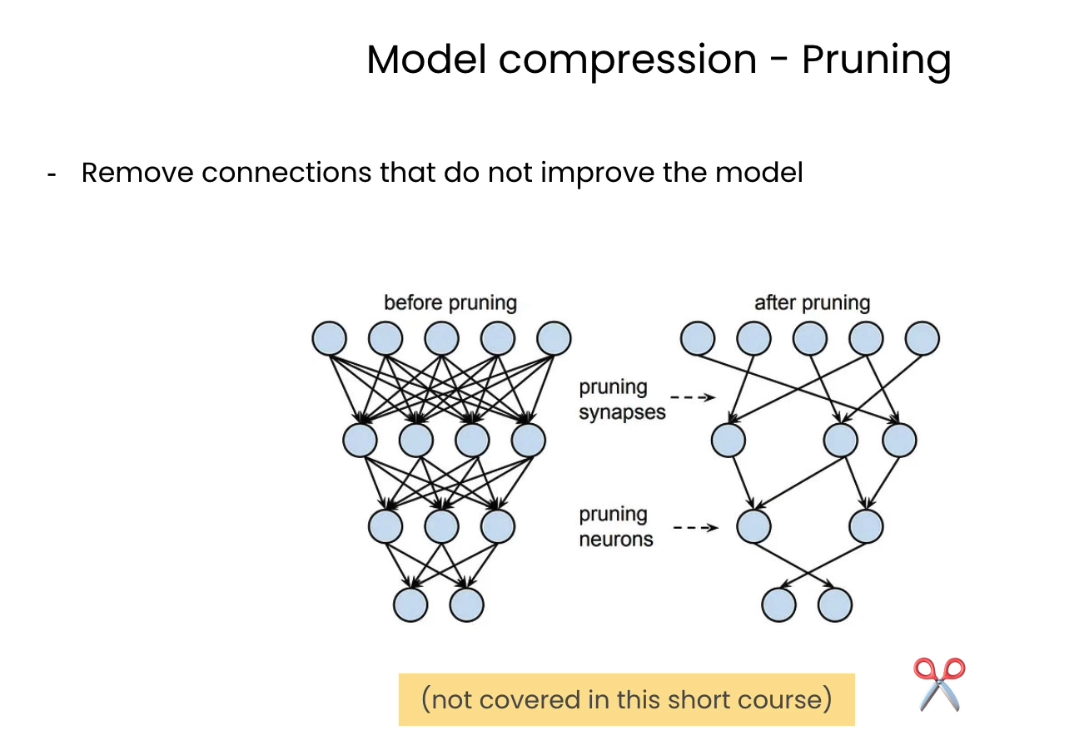
Pruning
Knowledge Distillation

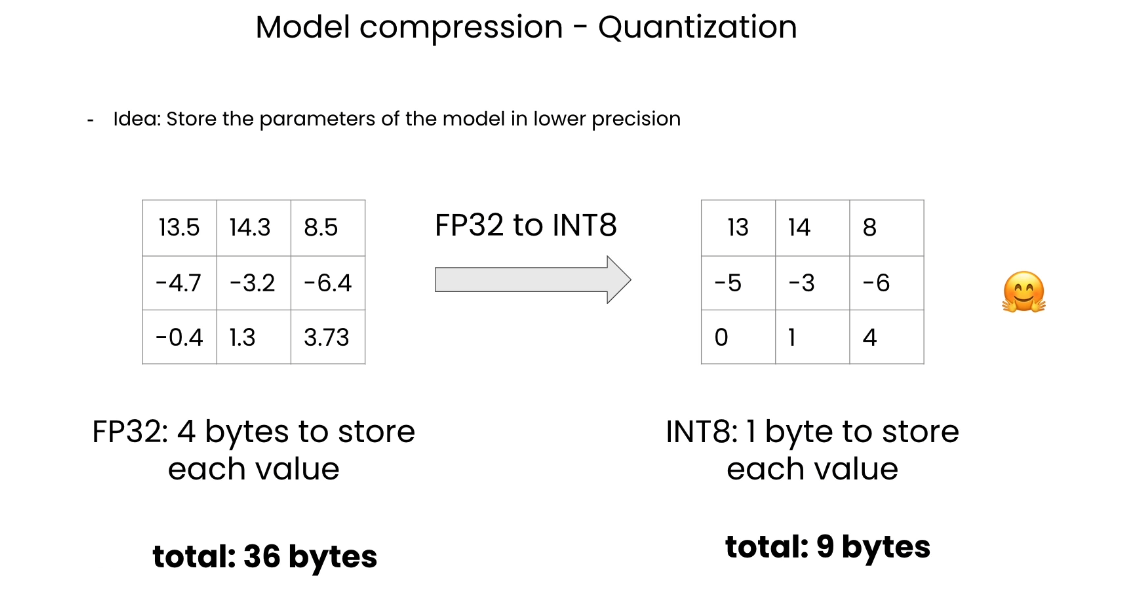
Quantization
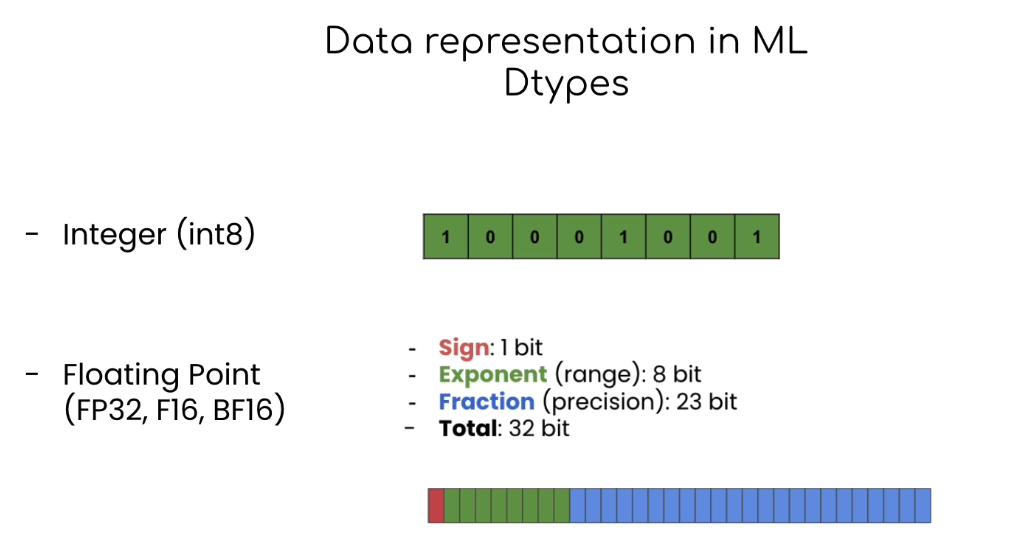
Data Types
What covers in this course
Lesson 2: Data Types and Sizes
In this lab, you will learn about the common data types used to store the parameters of machine learning models.
The libraries are already installed in the classroom. If you’re running this notebook on your own machine, you can install the following:
!pip install torch==2.1.1
import torch
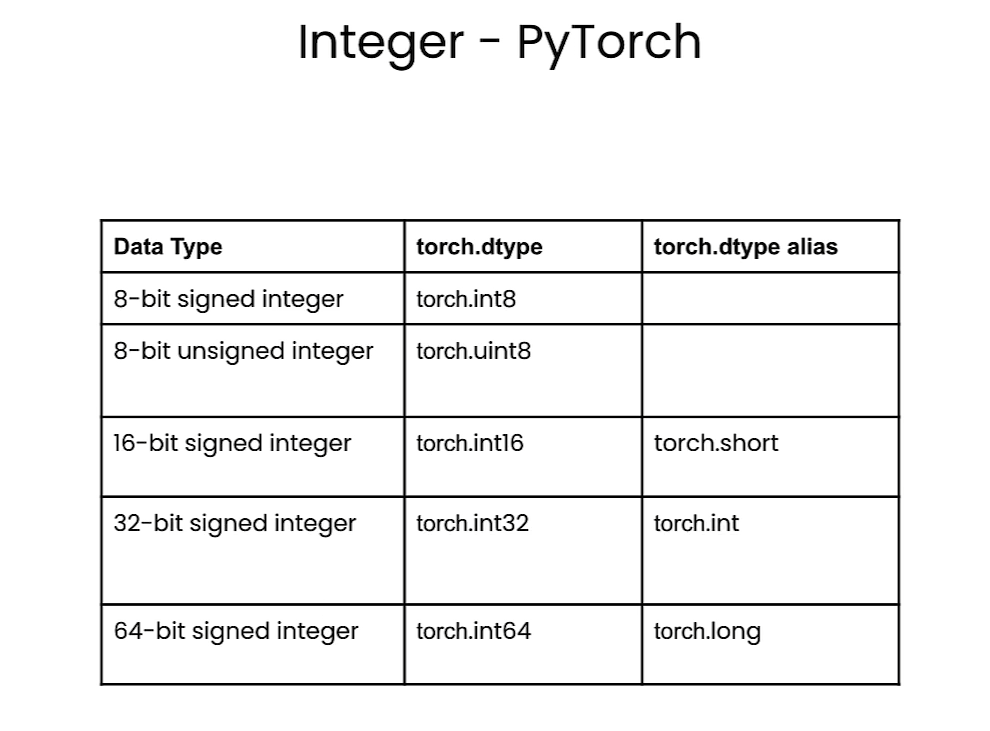
Integers
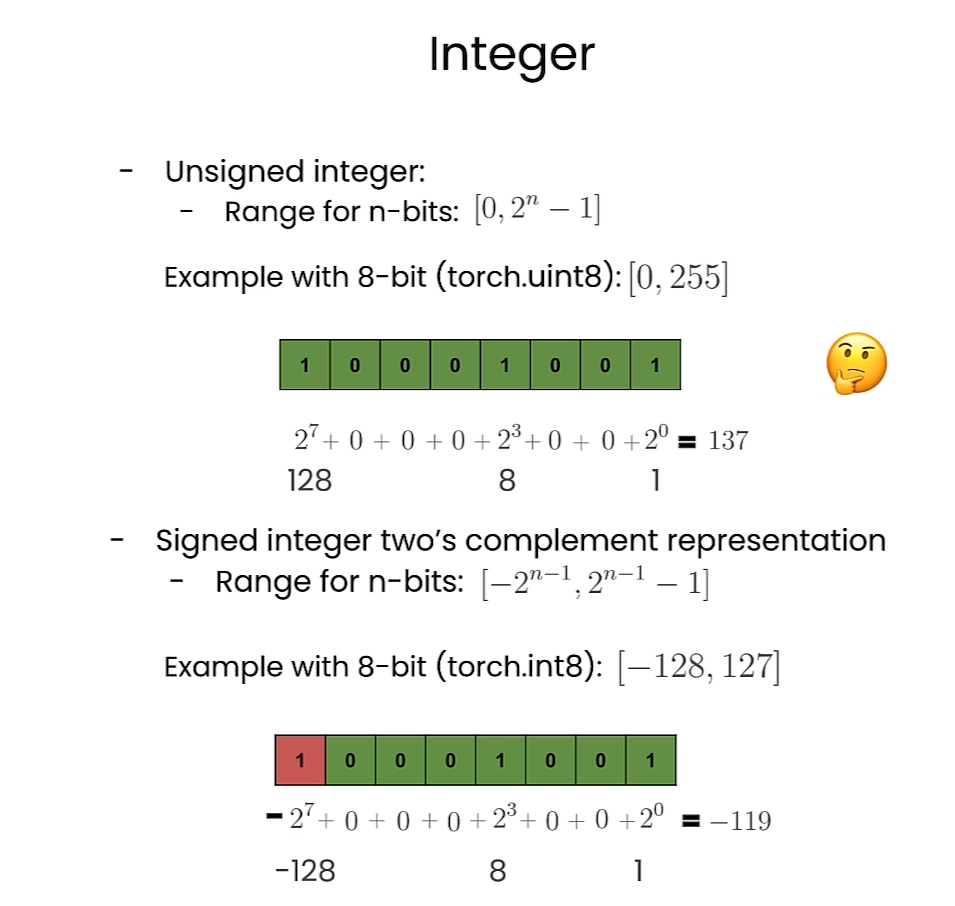
Interger in PyTorch
# Information of `8-bit unsigned integer`
torch.iinfo(torch.uint8)
Output
iinfo(min=0, max=255, dtype=uint8)
# Information of `8-bit (signed) integer`
torch.iinfo(torch.int8)
Output
iinfo(min=-128, max=127, dtype=int8)
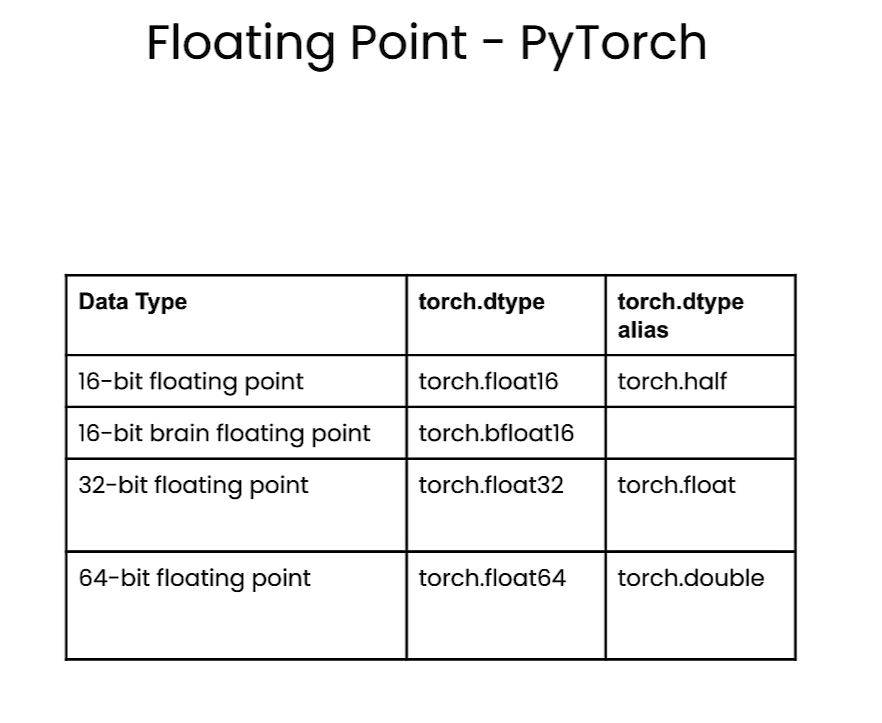
Floating Points
Floating point
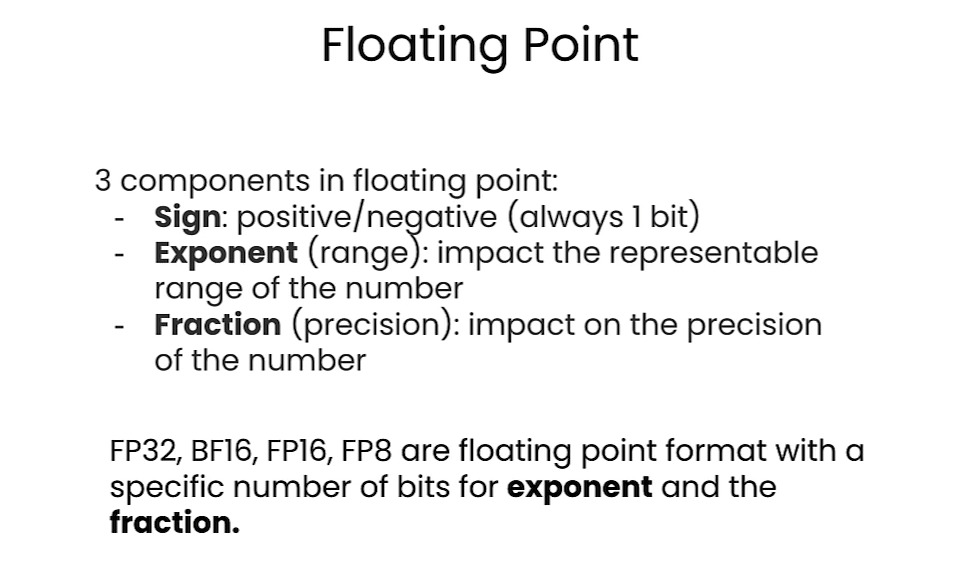
FP32
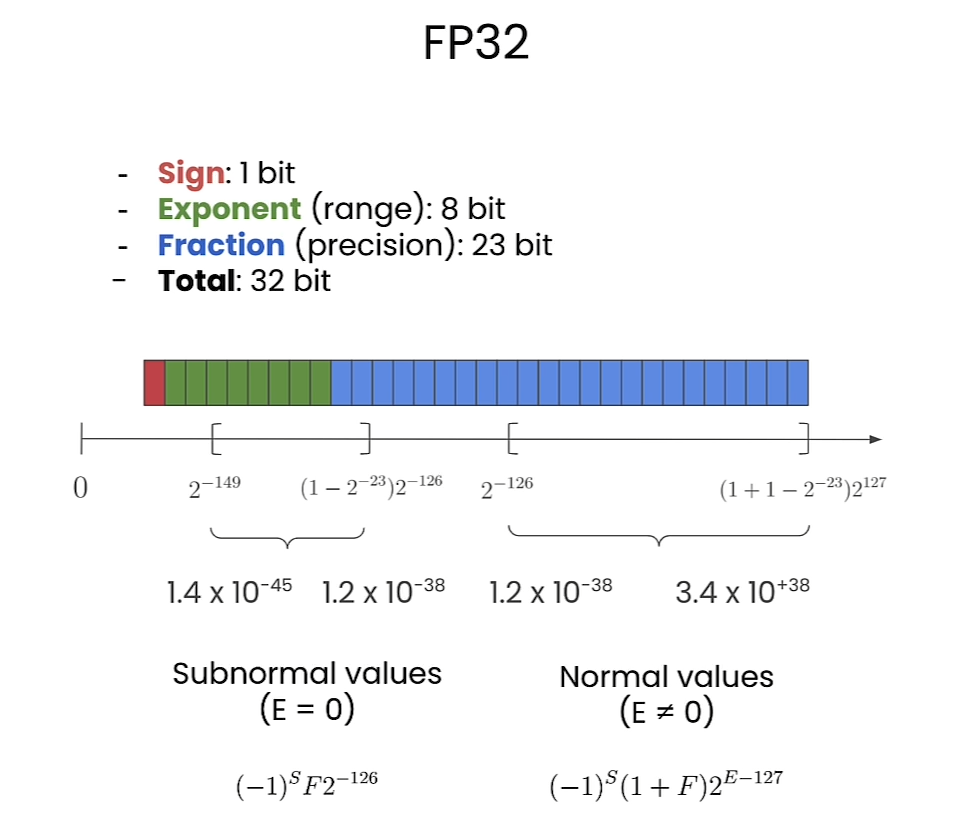
FP16

Comparison

Floating point in pytorch
# by default, python stores float data in fp64
value = 1/3
format(value, '.60f')
Output
'0.333333333333333314829616256247390992939472198486328125000000'
# 64-bit floating point
tensor_fp64 = torch.tensor(value, dtype = torch.float64)
print(f"fp64 tensor: {format(tensor_fp64.item(), '.60f')}")
Output
fp64 tensor: 0.333333333333333314829616256247390992939472198486328125000000
tensor_fp32 = torch.tensor(value, dtype = torch.float32)
tensor_fp16 = torch.tensor(value, dtype = torch.float16)
tensor_bf16 = torch.tensor(value, dtype = torch.bfloat16)print(f"fp64 tensor: {format(tensor_fp64.item(), '.60f')}")
print(f"fp32 tensor: {format(tensor_fp32.item(), '.60f')}")
print(f"fp16 tensor: {format(tensor_fp16.item(), '.60f')}")
print(f"bf16 tensor: {format(tensor_bf16.item(), '.60f')}")
Output
fp64 tensor: 0.333333333333333314829616256247390992939472198486328125000000
fp32 tensor: 0.333333343267440795898437500000000000000000000000000000000000
fp16 tensor: 0.333251953125000000000000000000000000000000000000000000000000
bf16 tensor: 0.333984375000000000000000000000000000000000000000000000000000
# Information of `16-bit brain floating point`
torch.finfo(torch.bfloat16)
Output
finfo(resolution=0.01, min=-3.38953e+38, max=3.38953e+38, eps=0.0078125, smallest_normal=1.17549e-38, tiny=1.17549e-38, dtype=bfloat16)
# Information of `32-bit floating point`
torch.finfo(torch.float32)
Output
finfo(resolution=1e-06, min=-3.40282e+38, max=3.40282e+38, eps=1.19209e-07, smallest_normal=1.17549e-38, tiny=1.17549e-38, dtype=float32)
Downcasting
# random pytorch tensor: float32, size=1000
tensor_fp32 = torch.rand(1000, dtype = torch.float32)
# first 5 elements of the random tensor
tensor_fp32[:5]
Output
tensor([0.4897, 0.0494, 0.8093, 0.6704, 0.0713])
# downcast the tensor to bfloat16 using the "to" method
tensor_fp32_to_bf16 = tensor_fp32.to(dtype = torch.bfloat16)
tensor_fp32_to_bf16[:5]
Output
tensor([0.4902, 0.0493, 0.8086, 0.6719, 0.0713], dtype=torch.bfloat16)
# tensor_fp32 x tensor_fp32
m_float32 = torch.dot(tensor_fp32, tensor_fp32)
Output
tensor(324.9693)
# tensor_fp32_to_bf16 x tensor_fp32_to_bf16
m_bfloat16 = torch.dot(tensor_fp32_to_bf16, tensor_fp32_to_bf16)
Output
tensor(326., dtype=torch.bfloat16)

Lesson 3: Loading ML Models with Different Data Types
In this lab, you will load ML models in different datatypes.
helper.py
import torch
import torch.nn as nn
import requests
from PIL import Imageimport warnings
# Ignore specific UserWarnings related to max_length in transformers
warnings.filterwarnings("ignore", message=".*Using the model-agnostic default `max_length`.*")class DummyModel(nn.Module):"""A dummy model that consists of an embedding layerwith two blocks of a linear layer followed by a layernorm layer."""def __init__(self):super().__init__()torch.manual_seed(123)self.token_embedding = nn.Embedding(2, 2)# Block 1self.linear_1 = nn.Linear(2, 2)self.layernorm_1 = nn.LayerNorm(2)# Block 2self.linear_2 = nn.Linear(2, 2)self.layernorm_2 = nn.LayerNorm(2)self.head = nn.Linear(2, 2)def forward(self, x):hidden_states = self.token_embedding(x)# Block 1hidden_states = self.linear_1(hidden_states)hidden_states = self.layernorm_1(hidden_states)# Block 2hidden_states = self.linear_2(hidden_states)hidden_states = self.layernorm_2(hidden_states)logits = self.head(hidden_states)return logitsdef get_generation(model, processor, image, dtype):inputs = processor(image, return_tensors="pt").to(dtype)out = model.generate(**inputs)return processor.decode(out[0], skip_special_tokens=True)def load_image(img_url):image = Image.open(requests.get(img_url, stream=True).raw).convert('RGB')return image
from helper import DummyModel
model = DummyModel()
model
Output
DummyModel((token_embedding): Embedding(2, 2)(linear_1): Linear(in_features=2, out_features=2, bias=True)(layernorm_1): LayerNorm((2,), eps=1e-05, elementwise_affine=True)(linear_2): Linear(in_features=2, out_features=2, bias=True)(layernorm_2): LayerNorm((2,), eps=1e-05, elementwise_affine=True)(head): Linear(in_features=2, out_features=2, bias=True)
)
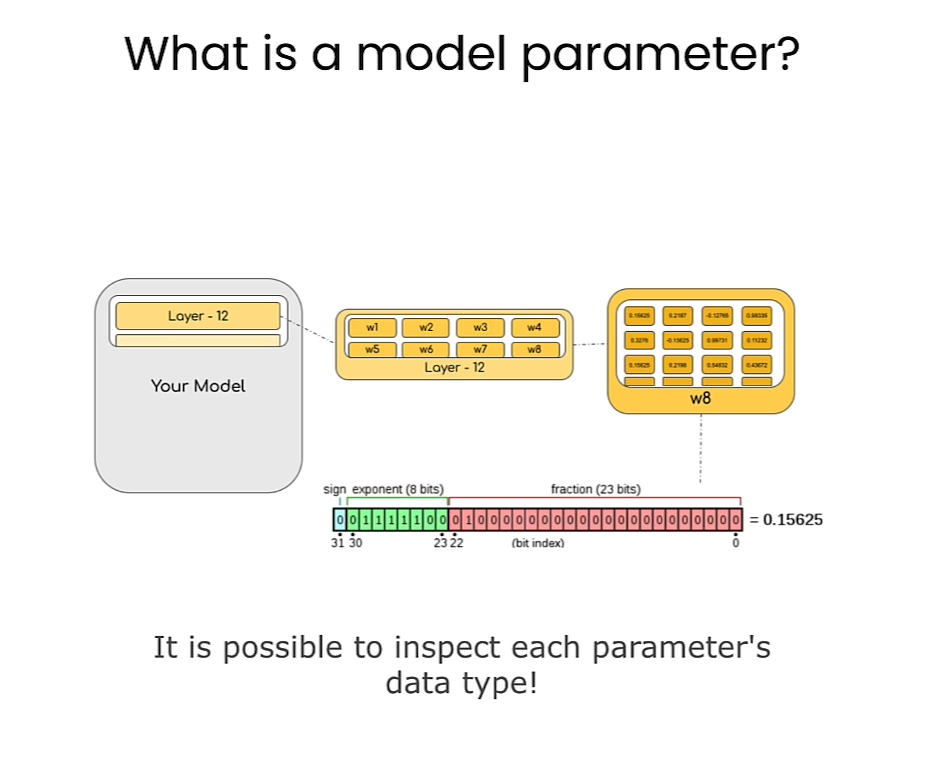
- Create a function to inspect the data types of the parameters in a model.
def print_param_dtype(model):for name, param in model.named_parameters():print(f"{name} is loaded in {param.dtype}")print_param_dtype(model)
Output
token_embedding.weight is loaded in torch.float32
linear_1.weight is loaded in torch.float32
linear_1.bias is loaded in torch.float32
layernorm_1.weight is loaded in torch.float32
layernorm_1.bias is loaded in torch.float32
linear_2.weight is loaded in torch.float32
linear_2.bias is loaded in torch.float32
layernorm_2.weight is loaded in torch.float32
layernorm_2.bias is loaded in torch.float32
head.weight is loaded in torch.float32
head.bias is loaded in torch.float32
Model Casting: float16
- Cast the model into a different precision.
# float 16
model_fp16 = DummyModel().half()
print_param_dtype(model_fp16)
Output
token_embedding.weight is loaded in torch.float16
linear_1.weight is loaded in torch.float16
linear_1.bias is loaded in torch.float16
layernorm_1.weight is loaded in torch.float16
layernorm_1.bias is loaded in torch.float16
linear_2.weight is loaded in torch.float16
linear_2.bias is loaded in torch.float16
layernorm_2.weight is loaded in torch.float16
layernorm_2.bias is loaded in torch.float16
head.weight is loaded in torch.float16
head.bias is loaded in torch.float16
- Run simple inference using model.
import torch
dummy_input = torch.LongTensor([[1, 0], [0, 1]])
# inference using float32 model
logits_fp32 = model(dummy_input)
logits_fp32
Output
tensor([[[-0.6872, 0.7132],[-0.6872, 0.7132]],[[-0.6872, 0.7132],[-0.6872, 0.7132]]], grad_fn=<ViewBackward0>)
# inference using float16 model
try:logits_fp16 = model_fp16(dummy_input)
except Exception as error:print("\033[91m", type(error).__name__, ": ", error, "\033[0m")
Model Casting: bfloat16
Note about deepcopy
copy.deepcopymakes a copy of the model that is independent of the original. Modifications you make to the copy will not affect the original, because you’re making a “deep copy”. For more details, see the Python docs on the [copy][https://docs.python.org/3/library/copy.html] library.
from copy import deepcopy
model_bf16 = deepcopy(model)
model_bf16 = model_bf16.to(torch.bfloat16)
print_param_dtype(model_bf16)
Output
token_embedding.weight is loaded in torch.bfloat16
linear_1.weight is loaded in torch.bfloat16
linear_1.bias is loaded in torch.bfloat16
layernorm_1.weight is loaded in torch.bfloat16
layernorm_1.bias is loaded in torch.bfloat16
linear_2.weight is loaded in torch.bfloat16
linear_2.bias is loaded in torch.bfloat16
layernorm_2.weight is loaded in torch.bfloat16
layernorm_2.bias is loaded in torch.bfloat16
head.weight is loaded in torch.bfloat16
head.bias is loaded in torch.bfloat16
logits_bf16 = model_bf16(dummy_input)
- Now, compare the difference between
logits_fp32andlogits_bf16.
mean_diff = torch.abs(logits_bf16 - logits_fp32).mean().item()
max_diff = torch.abs(logits_bf16 - logits_fp32).max().item()print(f"Mean diff: {mean_diff} | Max diff: {max_diff}")
Output
Mean diff: 0.0009978711605072021 | Max diff: 0.0016907453536987305
Using Popular Generative Models in Different Data Types
- Load Salesforce/blip-image-captioning-base to perform image captioning.
To get the sample code that Younes showed:
- Click on the “Model Card” tab.
- On the right, click on the button “<> Use in Transformers”, you’ll see a popup with sample code for loading this model.
# Load model directly
from transformers import AutoProcessor, AutoModelForSeq2SeqLMprocessor = AutoProcessor.from_pretrained("Salesforce/blip-image-captioning-base")
model = AutoModelForSeq2SeqLM.from_pretrained("Salesforce/blip-image-captioning-base")
- To see the sample code with an example, click on “Read model documentation” at the bottom of the popup. It opens a new tab.
https://huggingface.co/docs/transformers/main/en/model_doc/blip#transformers.BlipForConditionalGeneration - On this page, scroll down a bit, past the “parameters”, section, and you’ll see “Examples:”
from PIL import Image
import requests
from transformers import AutoProcessor, BlipForConditionalGenerationprocessor = AutoProcessor.from_pretrained("Salesforce/blip-image-captioning-base")
model = BlipForConditionalGeneration.from_pretrained("Salesforce/blip-image-captioning-base")url = "http://images.cocodataset.org/val2017/000000039769.jpg"
image = Image.open(requests.get(url, stream=True).raw)
text = "A picture of"inputs = processor(images=image, text=text, return_tensors="pt")outputs = model(**inputs)
from transformers import BlipForConditionalGeneration
model_name = "Salesforce/blip-image-captioning-base"
model = BlipForConditionalGeneration.from_pretrained(model_name)
- Check the memory footprint of the model.
fp32_mem_footprint = model.get_memory_footprint()
print("Footprint of the fp32 model in bytes: ",fp32_mem_footprint)
print("Footprint of the fp32 model in MBs: ", fp32_mem_footprint/1e+6)
Output
Footprint of the fp32 model in bytes:  989660400
Footprint of the fp32 model in MBs:  989.6604
- Load the same model in
bfloat16.
model_bf16 = BlipForConditionalGeneration.from_pretrained(model_name,torch_dtype=torch.bfloat16
)bf16_mem_footprint = model_bf16.get_memory_footprint()# Get the relative difference
relative_diff = bf16_mem_footprint / fp32_mem_footprintprint("Footprint of the bf16 model in MBs: ", bf16_mem_footprint/1e+6)
print(f"Relative diff: {relative_diff}")
Output
Footprint of the bf16 model in MBs:  494.832248
Relative diff: 0.5000020693967345
Model Performance: float32 vs bfloat16
- Now, compare the generation results of the two model.
from transformers import BlipProcessor
processor = BlipProcessor.from_pretrained(model_name)
- Load the image.
from helper import load_image, get_generation
from IPython.display import displayimg_url = 'https://storage.googleapis.com/\
sfr-vision-language-research/BLIP/demo.jpg'image = load_image(img_url)
display(image.resize((500, 350)))
Output

results_fp32 = get_generation(model, processor, image, torch.float32)print("fp32 Model Results:\n", results_fp32)
Output
fp32 Model Results:a woman sitting on the beach with her dog
results_bf16 = get_generation(model_bf16, processor, image, torch.bfloat16)
print("bf16 Model Results:\n", results_bf16)
Output
bf16 Model Results:a woman sitting on the beach with her dog
Default Data Type
- For Hugging Face Transformers library, the deafult data type to load the models in is
float32 - You can set the “default data type” as what you want.
desired_dtype = torch.bfloat16
torch.set_default_dtype(desired_dtype)
dummy_model_bf16 = DummyModel()
print_param_dtype(dummy_model_bf16)
Output
token_embedding.weight is loaded in torch.bfloat16
linear_1.weight is loaded in torch.bfloat16
linear_1.bias is loaded in torch.bfloat16
layernorm_1.weight is loaded in torch.bfloat16
layernorm_1.bias is loaded in torch.bfloat16
linear_2.weight is loaded in torch.bfloat16
linear_2.bias is loaded in torch.bfloat16
layernorm_2.weight is loaded in torch.bfloat16
layernorm_2.bias is loaded in torch.bfloat16
head.weight is loaded in torch.bfloat16
head.bias is loaded in torch.bfloat16
- Similarly, you can reset the default data type to float32.
torch.set_default_dtype(torch.float32)
print_param_dtype(dummy_model_bf16)
Output
token_embedding.weight is loaded in torch.bfloat16
linear_1.weight is loaded in torch.bfloat16
linear_1.bias is loaded in torch.bfloat16
layernorm_1.weight is loaded in torch.bfloat16
layernorm_1.bias is loaded in torch.bfloat16
linear_2.weight is loaded in torch.bfloat16
linear_2.bias is loaded in torch.bfloat16
layernorm_2.weight is loaded in torch.bfloat16
layernorm_2.bias is loaded in torch.bfloat16
head.weight is loaded in torch.bfloat16
head.bias is loaded in torch.bfloat16
Note
- You just used a simple form of quantization, in which the model’s parameters are saved in a more compact data type (bfloat16). During inference, the model performs its calculations in this data type, and its activations are in this data type.
- In the next lesson, you will use another quantization method, “linear quantization”, which enables the quantized model to maintain performance much closer to the original model by converting from the compressed data type back to the original FP32 data type during inference.
Lesson 4: Quantization Theory
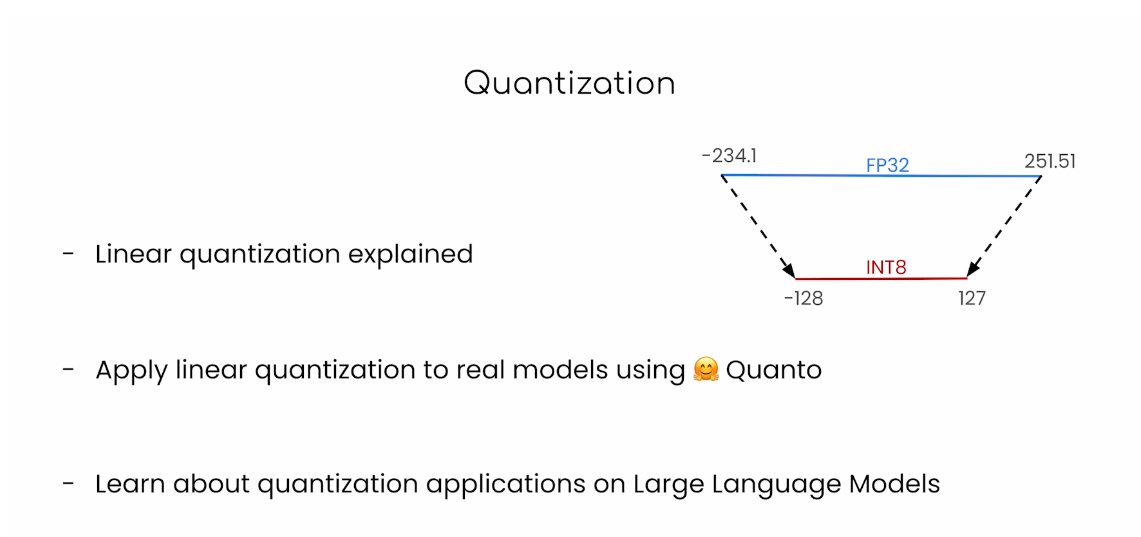
线性量化(Linear Quantization)是一种量化方法,用于将连续的实数值数据映射到离散的整数值。在线性量化中,数据范围被均匀地划分为若干个量化级别,每个级别代表一个固定的实数范围。线性量化广泛应用于信号处理、图像处理和机器学习模型的压缩和加速。
线性量化的基本原理
线性量化的过程可以概括为以下几个步骤:
-
确定数据范围:
确定需要量化的数据的最小值和最大值,通常记作 [ x m i n , x m a x ] [x_{min}, x_{max}] [xmin,xmax]。 -
确定量化级别数:
选择一个量化级别数 (N),通常是 ( 2 b 2^b 2b),其中 (b) 是量化位数。例如,对于 8 位量化,(N = 256)。 -
计算量化步长:
量化步长(step size)( Δ \Delta Δ) 计算公式为:Δ = x m a x − x m i n N − 1 \Delta = \frac{x_{max} - x_{min}}{N - 1} Δ=N−1xmax−xmin
-
量化:
将每个连续实数值 (x) 映射到离散量化级别 (q)。量化公式为:q = round ( x − x m i n Δ ) q = \text{round}\left(\frac{x - x_{min}}{\Delta}\right) q=round(Δx−xmin)
其中,( round \text{round} round) 表示四舍五入到最近的整数。
-
反量化(重建):
将量化后的整数值 (q) 映射回近似的连续实数值 ( x ^ \hat{x} x^)。反量化公式为:
x ^ = x m i n + q ⋅ Δ \hat{x} = x_{min} + q \cdot \Delta x^=xmin+q⋅Δ
线性量化的示例
假设有一组数据 ([0.0, 1.0, 2.0, 3.0]),我们希望使用 2 位量化(即 (N = 4))。
-
数据范围:
x m i n = 0.0 , x m a x = 3.0 x_{min} = 0.0,x_{max} = 3.0 xmin=0.0,xmax=3.0 -
量化步长:
Δ = 3.0 − 0.0 4 − 1 = 1.0 \Delta = \frac{3.0 - 0.0}{4 - 1} = 1.0 Δ=4−13.0−0.0=1.0 -
量化:
对每个值进行量化:
q = round ( x − 0.0 1.0 ) = round ( x ) q = \text{round}\left(\frac{x - 0.0}{1.0}\right) = \text{round}(x) q=round(1.0x−0.0)=round(x)因此:
0.0 → 0 , 1.0 → 1 , 2.0 → 2 , 3.0 → 3 0.0 \rightarrow 0, \quad 1.0 \rightarrow 1, \quad 2.0 \rightarrow 2, \quad 3.0 \rightarrow 3 0.0→0,1.0→1,2.0→2,3.0→3 -
反量化:
将量化值映射回实数:
x ^ = 0.0 + q ⋅ 1.0 = q \hat{x} = 0.0 + q \cdot 1.0 = q x^=0.0+q⋅1.0=q
因此:
0 → 0.0 , 1 → 1.0 , 2 → 2.0 , 3 → 3.0 0 \rightarrow 0.0, \quad 1 \rightarrow 1.0, \quad 2 \rightarrow 2.0, \quad 3 \rightarrow 3.0 0→0.0,1→1.0,2→2.0,3→3.0
线性量化在机器学习中的应用
在线性量化中,神经网络模型的权重和激活值可以被量化为低位整数(例如 8 位整数),以减少模型的内存占用和计算复杂度,从而提高推理速度。特别是在资源受限的设备(如移动设备和嵌入式系统)上,量化技术非常有用。
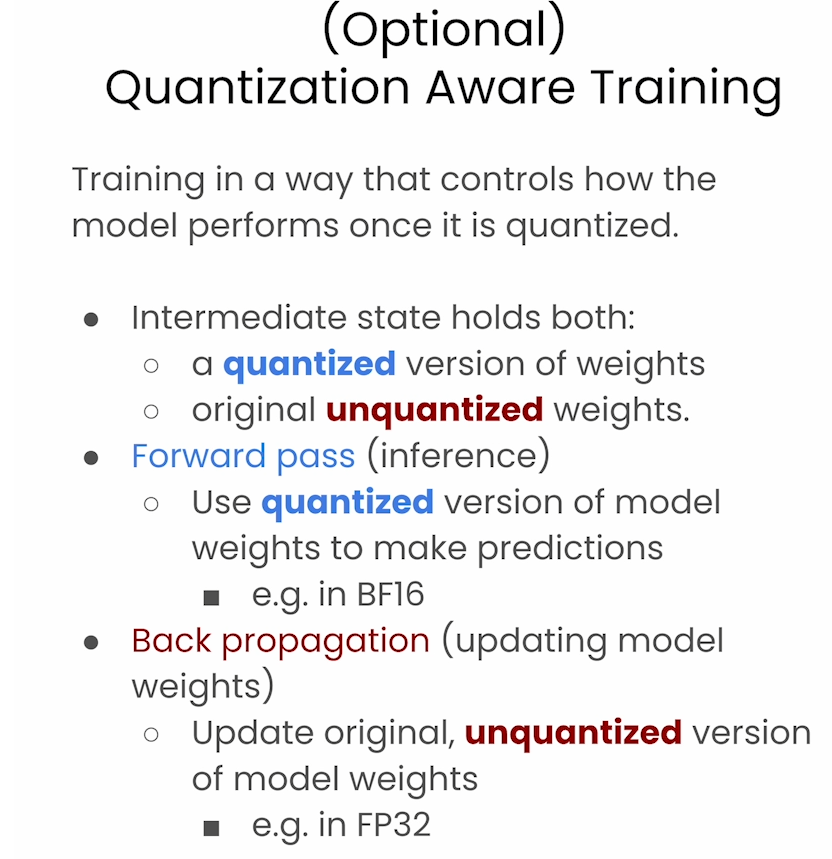
量化神经网络的主要挑战在于,如何在量化过程中尽量减少对模型精度的影响。因此,常见的方法包括对模型进行量化感知训练(Quantization-Aware Training)和后量化(Post-Training Quantization)。
总之,线性量化是一种简单而有效的数据压缩技术,在许多领域有广泛的应用。
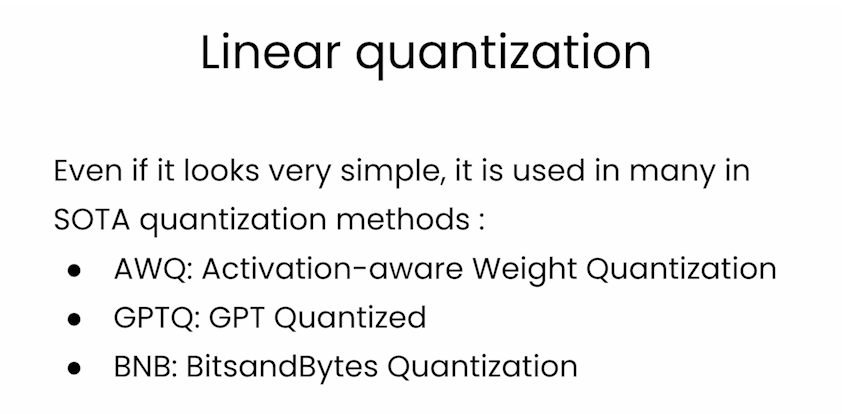
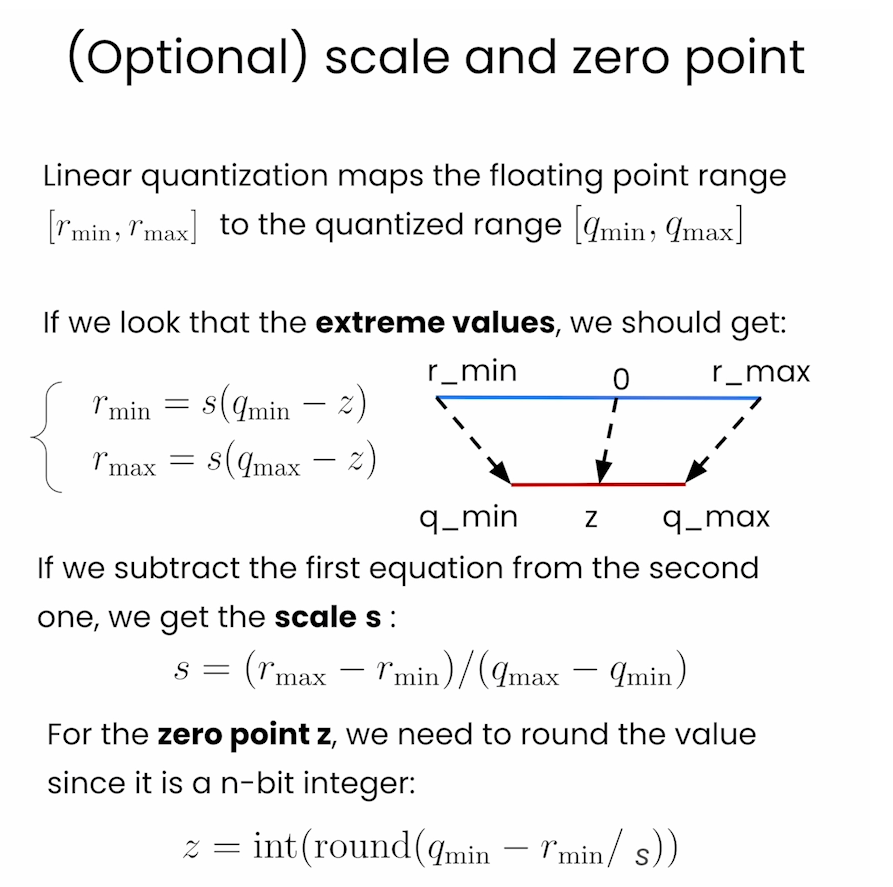
Linear quantization
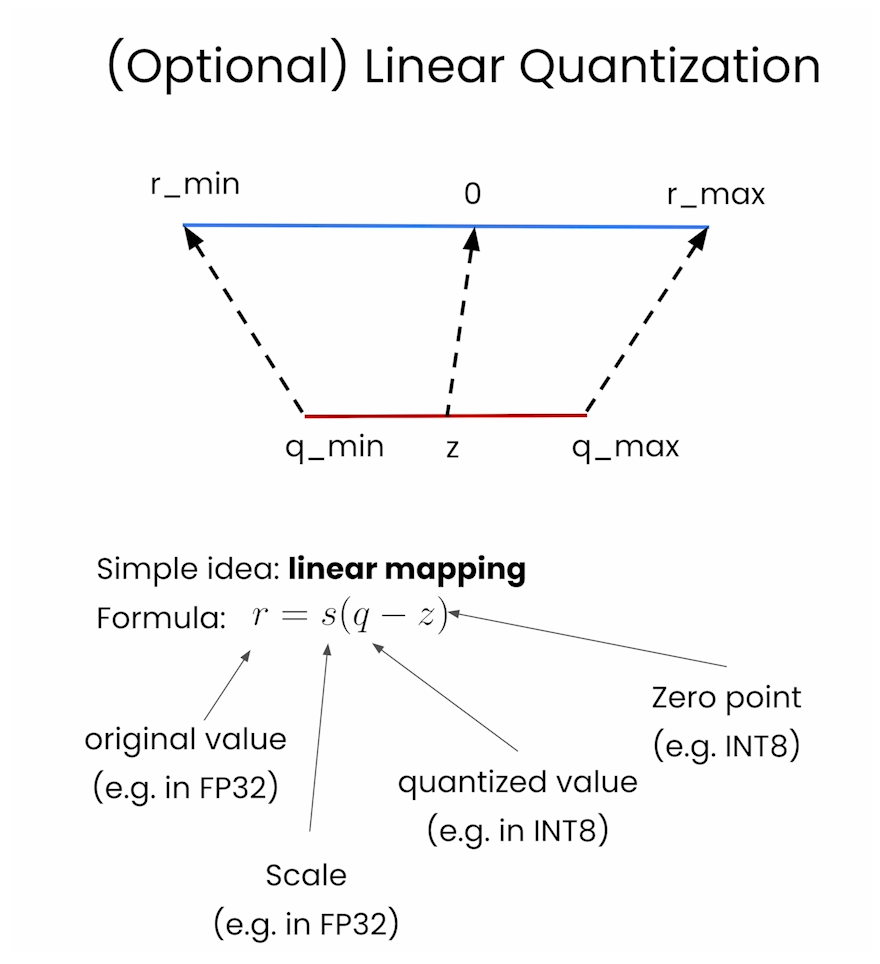
Scale and zero point
Quantization Aware Training
In this lab, you will perform Linear Quantization.
Libraries to install
- If you are running this notebook on your local machine, you can install the following:
!pip install transformers==4.35.0
!pip install quanto==0.0.11
!pip install torch==2.1.1
T5-FLAN
- Please note that due to hardware memory constraints, and in order to offer this course for free to everyone, the code you’ll run here is for the T5-FLAN model instead of the EleutherAI AI Pythia model.
- Thank you for your understanding! 🤗
For the T5-FLAN model, here is one more library to install if you are running locally:
!pip install sentencepiece==0.2.0
Without Quantization
model_name = "google/flan-t5-small"
import sentencepiece as spm
from transformers import T5Tokenizer, T5ForConditionalGenerationtokenizer = T5Tokenizer.from_pretrained("google/flan-t5-small")
model = T5ForConditionalGeneration.from_pretrained("google/flan-t5-small")input_text = "Hello, my name is "
input_ids = tokenizer(input_text, return_tensors="pt").input_idsoutputs = model.generate(input_ids)
print(tokenizer.decode(outputs[0]))
Output
<pad> annie scott</s>
helper.py
import torch# ################ monkey patch for quanto
def named_module_tensors(module, recurse=False):for named_parameter in module.named_parameters(recurse=recurse):name, val = named_parameterflag = Trueif hasattr(val,"_data") or hasattr(val,"_scale"):if hasattr(val,"_data"):yield name + "._data", val._dataif hasattr(val,"_scale"):yield name + "._scale", val._scaleelse:yield named_parameterfor named_buffer in module.named_buffers(recurse=recurse):yield named_bufferdef dtype_byte_size(dtype):"""Returns the size (in bytes) occupied by one parameter of type `dtype`."""import reif dtype == torch.bool:return 1 / 8bit_search = re.search(r"[^\d](\d+)$", str(dtype))if bit_search is None:raise ValueError(f"`dtype` is not a valid dtype: {dtype}.")bit_size = int(bit_search.groups()[0])return bit_size // 8def compute_module_sizes(model):"""Compute the size of each submodule of a given model."""from collections import defaultdictmodule_sizes = defaultdict(int)for name, tensor in named_module_tensors(model, recurse=True):size = tensor.numel() * dtype_byte_size(tensor.dtype)name_parts = name.split(".")for idx in range(len(name_parts) + 1):module_sizes[".".join(name_parts[:idx])] += sizereturn module_sizes
from helper import compute_module_sizes
module_sizes = compute_module_sizes(model)
print(f"The model size is {module_sizes[''] * 1e-9} GB")
Output
The model size is 0.307844608 GB
Quantize the model (8-bit precision)
from quanto import quantize, freeze
import torch
quantize(model, weights=torch.int8, activations=None)
Freeze the model
- This step takes a bit of memory, and so for the Pythia model that is shown in the lecture video, it will not run in the classroom.
- This will work fine with the smaller T5-Flan model.
freeze(model)
module_sizes = compute_module_sizes(model)
print(f"The model size is {module_sizes[''] * 1e-9} GB")
Output
The model size is 0.12682868 GB
Try running inference on the quantized model
input_text = "Hello, my name is "
input_ids = tokenizer(input_text, return_tensors="pt").input_idsoutputs = model.generate(input_ids)
print(tokenizer.decode(outputs[0]))
Output
<pad> annie scott</s>
Comparing “linear quantization” to “downcasting”
To recap the difference between the “linear quantization” method in this lesson with the “downcasting” method in the previous lesson:
-
When downcasting a model, you convert the model’s parameters to a more compact data type (bfloat16). During inference, the model performs its calculations in this data type, and its activations are in this data type. Downcasting may work with the bfloat16 data type, but the model performance will likely degrade with any smaller data type, and won’t work if you convert to an integer data type (like the int8 in this lesson).
-
In this lesson, you used another quantization method, “linear quantization”, which enables the quantized model to maintain performance much closer to the original model by converting from the compressed data type back to the original FP32 data type during inference. So when the model makes a prediction, it is performing the matrix multiplications in FP32, and the activations are in FP32. This enables you to quantize the model in data types smaller than bfloat16, such as int8, in this example.
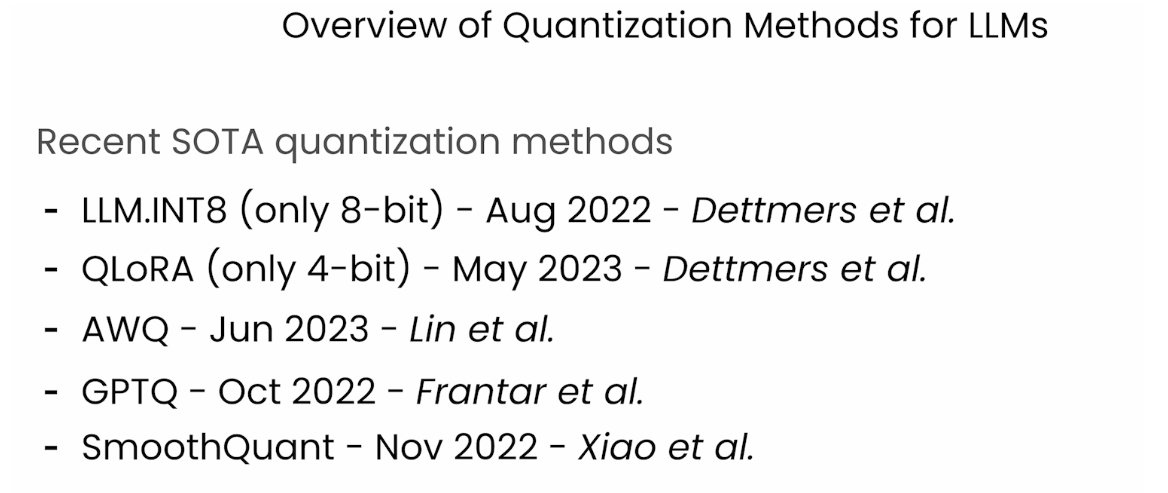
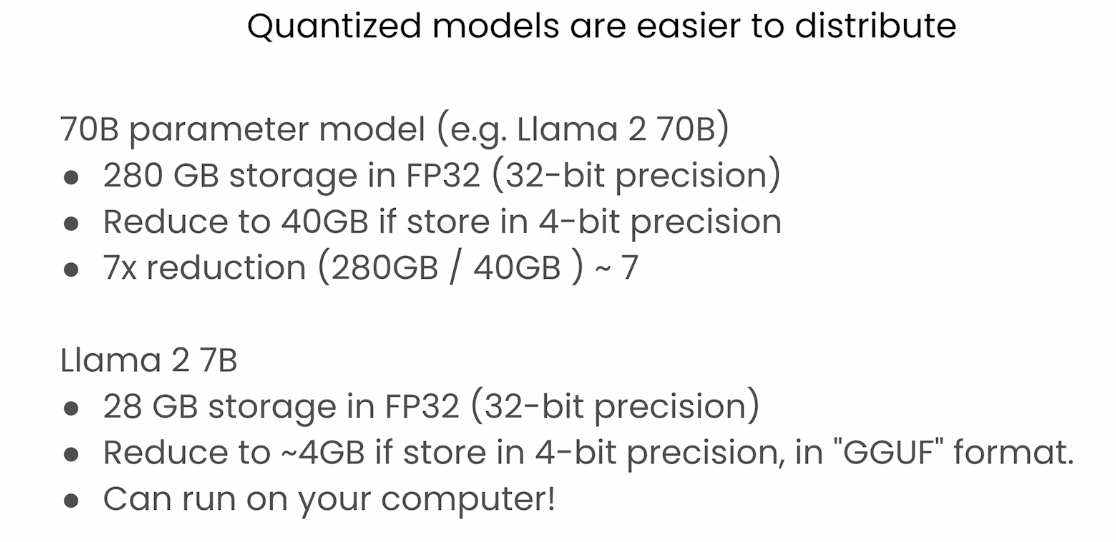
Quantization of LLMs
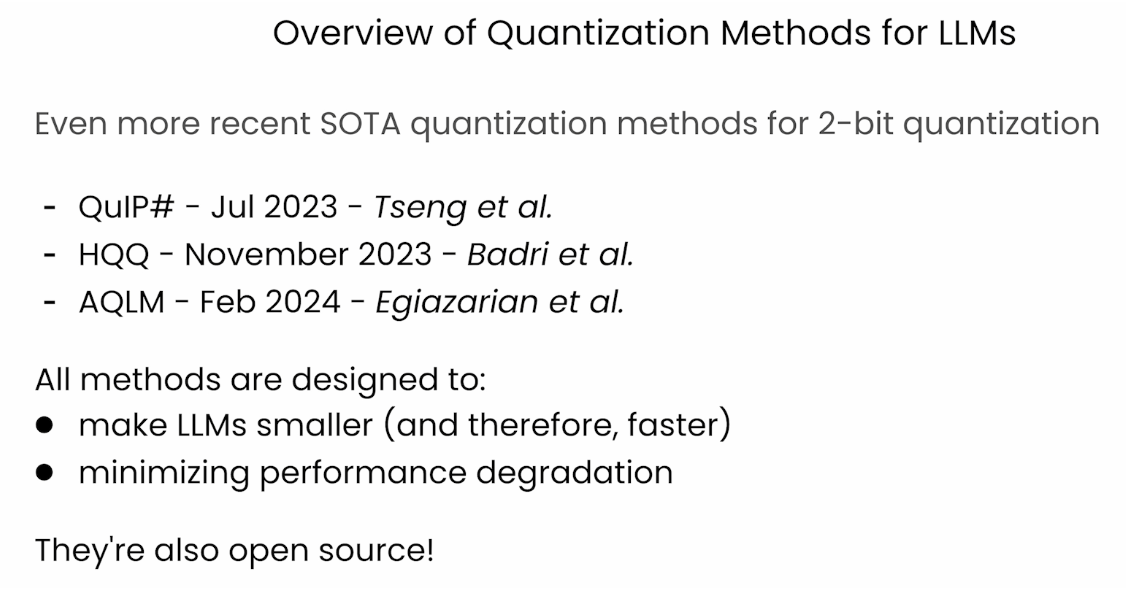
Recent SOTA quantization methods
For 2-bit quantization
Fine Tuning quantized models
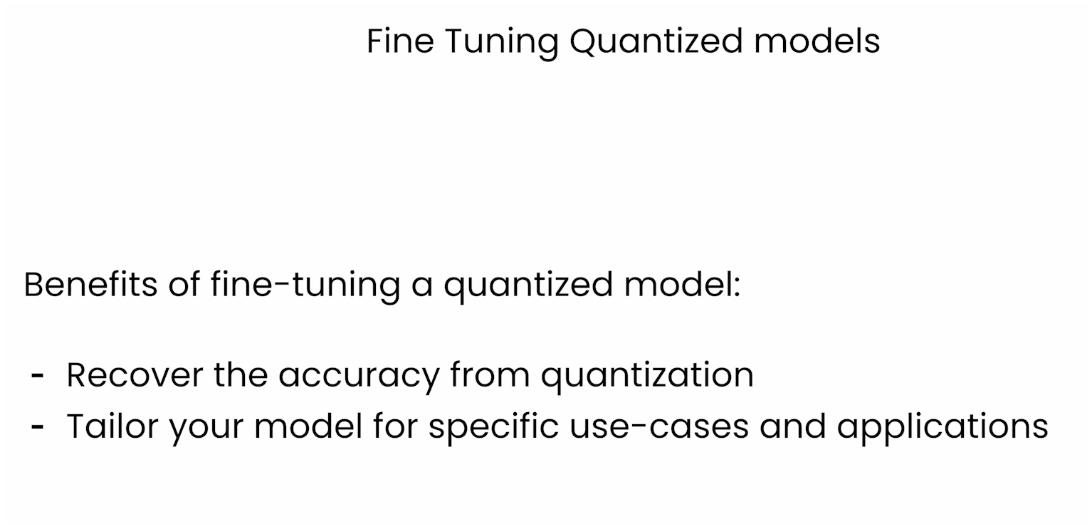
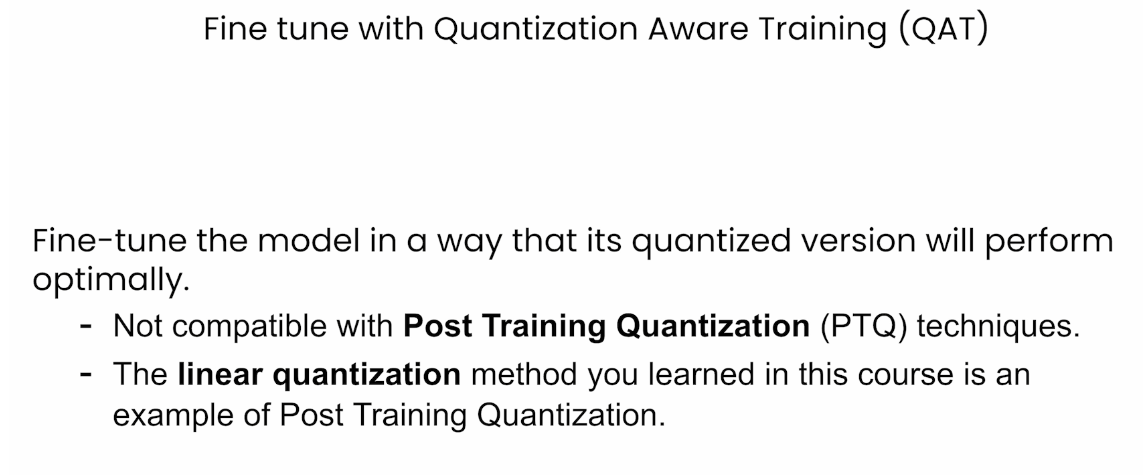
Fine tune with QAT
后记
2024年6月8日14点58分完成huggingface的这门量化基础课程。
这篇关于HuggingFace团队亲授大模型量化基础: Quantization Fundamentals with Hugging Face的文章就介绍到这儿,希望我们推荐的文章对编程师们有所帮助!


