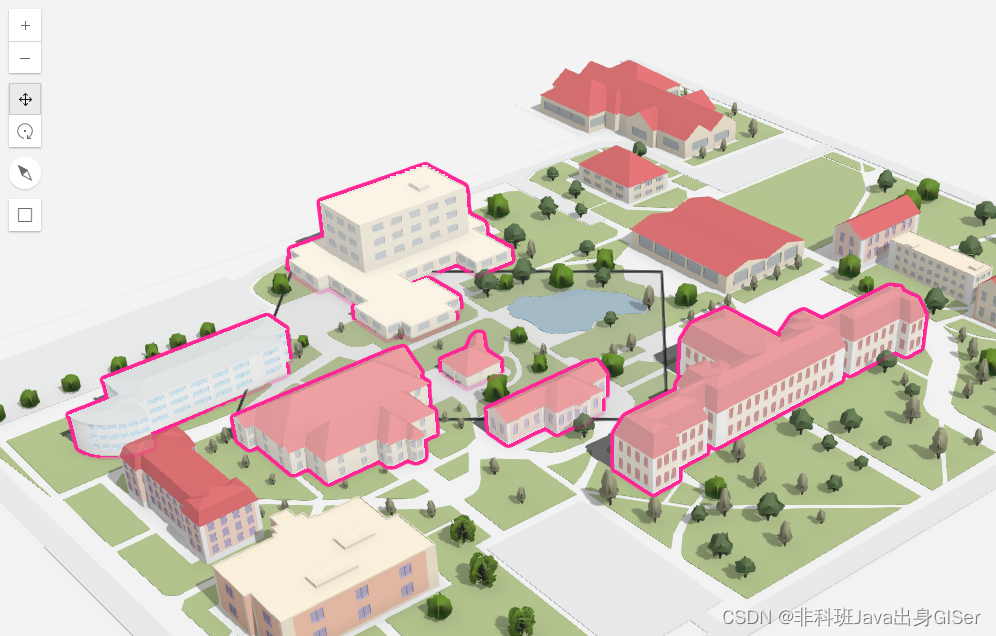
本文主要是介绍ArcGIS JSAPI 学习教程 - ArcGIS Maps SDK for JavaScript - 框选显示高亮几何对象,希望对大家解决编程问题提供一定的参考价值,需要的开发者们随着小编来一起学习吧!
ArcGIS JSAPI 学习教程 - ArcGIS Maps SDK for JavaScript - 框选显示高亮对象
- 核心代码
- 完整代码:
- 在线示例
在研究 ArcGIS JSAPI RenderNode 高亮(highlights)FBO 的时候,实现了一下框选高亮几何对象,这里分享一下。
本文包括核心代码、完整代码以及在线示例。
核心代码
实际上,就是通过标绘工具,创建矩形标绘,在判断矩形相交,然后高亮相交的几何对象。
// 监听标绘完成事件
sketchViewModel.on("create", async (event) => {if (event.state === "complete") {const queryGeometry = event.graphic.geometry;if (this.campusLayerView) {// 获取矩形内几何对象const results = await this.campusLayerView.queryFeatures({geometry: queryGeometry,});// 设置高亮results.features.forEach((feature) => {this.highlights.push(this.campusLayerView.highlight([feature.attributes.OID]));})}}
});
完整代码:
<html lang="en">
<head><meta charset="utf-8" /><meta name="viewport" content="initial-scale=1,maximum-scale=1,user-scalable=no" /><title>框选显示高亮对象 | Sample | ArcGIS Maps SDK for JavaScript 4.29</title><script type="module" src="/arcgis_api/calcite-components/2.8.1/calcite.esm.js"></script><link rel="stylesheet" type="text/css" href="/arcgis_api/calcite-components/2.8.1/calcite.css" /><link rel="stylesheet" href="/arcgis_api/4.29/esri/themes/light/main.css" /><script src="/arcgis_api/4.29/init.js"></script><script>var _hmt = _hmt || [];(function () {var hm = document.createElement("script");hm.src = "https://hm.baidu.com/hm.js?f80a36f14f8a73bb0f82e0fdbcee3058";var s = document.getElementsByTagName("script")[0];s.parentNode.insertBefore(hm, s);})();</script><script>require(["esri/WebScene","esri/views/SceneView","esri/rest/support/Query","esri/widgets/Legend","esri/core/reactiveUtils","esri/views/3d/webgl/RenderNode","esri/layers/GraphicsLayer","esri/widgets/Sketch/SketchViewModel",],(WebScene,SceneView,Query,Legend,reactiveUtils,RenderNode,GraphicsLayer,SketchViewModel,) => {// 使用官方资源const webscene = new WebScene({portalItem: {// autocasts as new PortalItem()id: "fbbc829fa7d342e7ae8d18c54a5eab37"}});// Create a view and set the highlight optionsconst view = new SceneView({container: "viewDiv",map: webscene,popup: {dockOptions: {buttonEnabled: false}},qualityProfile: "high",environment: {lighting: {directShadowsEnabled: true}},// 设置默认高亮参数highlightOptions: {haloColor: [255, 38, 150],color: [255, 255, 255],fillOpacity: 0.3}});// This variable will store the highlight handle that is used to remove the highlightthis.highlights = [];// 创建标绘图层const polygonGraphicsLayer = new GraphicsLayer({elevationInfo: {// 注意,这里设置相对于地形,否则会遮挡mode: 'relative-to-ground'}});view.map.add(polygonGraphicsLayer);// add the select by rectangle button the viewview.ui.add("select-by-rectangle", "top-left");const selectButton = document.getElementById("select-by-rectangle");// 创建标绘工具const sketchViewModel = new SketchViewModel({view: view,layer: polygonGraphicsLayer});// 监听矩形标绘事件selectButton.addEventListener("click", () => {view.closePopup();// 标绘矩形sketchViewModel.create("rectangle");// 移除上一次操作polygonGraphicsLayer.removeAll();// 移除上一次高亮对象if(this.highlights){this.highlights.forEach((highlight) => {highlight.remove();});this.highlights = [];}});// 监听标绘完成事件sketchViewModel.on("create", async (event) => {if (event.state === "complete") {const queryGeometry = event.graphic.geometry;if (this.campusLayerView) {// 获取矩形内几何对象const results = await this.campusLayerView.queryFeatures({geometry: queryGeometry,});// 设置高亮results.features.forEach((feature) => {this.highlights.push(this.campusLayerView.highlight([feature.attributes.OID]));})}}});view.when(() => {// Get layer from webSceneconst campusSceneLayer = webscene.allLayers.filter((elem) => {return elem.title === "Buildings";}).items[0];// Define the attributes which are used in the querycampusSceneLayer.outFields = ["name"];// Get DOM element where list items will be placedconst container = document.getElementById("buildingsList");const buildingCount = document.getElementById("buildingCount");// Highlight is set on the layerView, so we need to detect when the layerView is readyview.whenLayerView(campusSceneLayer).then((campusLayerView) => {this.campusLayerView = campusLayerView;// Wait for the view to finish updatingreactiveUtils.when(() => !view.updating, () => {// Query the features available for drawing and get the attributesconst query = new Query();campusLayerView.queryFeatures(query).then((result) => {// Empty the list DOM elementcontainer.innerHTML = "";buildingCount.innerHTML = `Currently in view: ${result.features.length} buildings`;// For each returned feature create a list item and append it to the containerresult.features.forEach((feature) => {const attributes = feature.attributes;// Create list elementconst li = document.createElement("calcite-pick-list-item");li.setAttribute("label", attributes.name);li.addEventListener("click", (event) => {const target = event.target;const objectId = feature.attributes.OID;// Create an extent query on the layer view that will return the 3D extent of the featureconst queryExtent = new Query({objectIds: [objectId]});campusLayerView.queryExtent(queryExtent).then((result) => {// Zoom to the extent of the feature// Use the expand method to prevent zooming in too close to the featureif (result.extent) {view.goTo(result.extent.expand(4), {speedFactor: 0.5}).catch((error) => {if (error.name != "AbortError") {console.error(error);}});}});// Remove the previous highlightsif (highlight) {highlight.remove();}// Highlight the feature passing the objectId to the methodhighlight = campusLayerView.highlight([objectId]);});container.appendChild(li);});});});});});});</script><style>html,body,#viewDiv {height: 100%;width: 100%;margin: 0;padding: 0;}.panel-side {width: 250px;position: absolute;top: 14px;right: 14px;bottom: 28px;color: #323232;background-color: rgb(255, 255, 255);box-shadow: 0 1px 2px rgba(0, 0, 0, 0.3);overflow: auto;z-index: 60;font-size: 12px;text-align: center;}.panel-side h2 {padding: 0 20px;margin: 20px 0;font-size: 14px;font-weight: 600;}#buildingCount,h2 {text-align: center;}</style>
</head><body>
<div class="panel-side esri-widget"><h2>Campus buildings</h2><p id="buildingCount">Currently in view: 0 buildings</p><calcite-panel id="buildingsList"></calcite-panel>
</div>
<div id="viewDiv"></div>
<divid="select-by-rectangle"class="esri-widget esri-widget--button esri-widget esri-interactive"title="Select features by rectangle"
><span class="esri-icon-checkbox-unchecked"></span>
</div>
</body></html>
在线示例
ArcGIS Maps SDK for JavaScript 在线示例:框选显示高亮对象
这篇关于ArcGIS JSAPI 学习教程 - ArcGIS Maps SDK for JavaScript - 框选显示高亮几何对象的文章就介绍到这儿,希望我们推荐的文章对编程师们有所帮助!


