本文主要是介绍RK3568笔记二十七:LPRNet车牌识别,希望对大家解决编程问题提供一定的参考价值,需要的开发者们随着小编来一起学习吧!
若该文为原创文章,转载请注明原文出处。
记录自训练并在RK3568上部署。
一、介绍
LPRNet的Pytorch实现,一种高性能和轻量级的车牌识别框架。完全适用于中国车牌识别(Chinese License Plate Recognition)及国外车牌识别!
目前仅支持同时识别蓝牌和绿牌,即新能源车牌等中国车牌,但可通过扩展训练数据或微调支持其他类型车牌及提高识别准确率!
该网络的特点:
1、不需要对字符进行预分割,是一个端到端的轻量化字符识别模型,速度快,精度还不错;这里主要是因为仿照squeezenet和inception的思想设计了一个轻量化的卷积模块。
2、仿照的还是经典的CRNN+CTC的思路,不过LPRNet首次将RNN删除了,整个网络只有CNN+CTC Loss。但是也不是说不要上下文信息,只是舍弃了BiLSTM那样的RNN提取上下文,而是在backbone的末尾使用了一个13x1的卷积模块提取序列方向(w)的上下文信息。而且在backbone外还额外使用一个全连接层进行全局上下文特征提取,提取之后再和backbone进行concat特征融合,再输入head。
3、损失使用的CTC Loss、推理应用了贪心算法,搜索取每个位置上类概率的最大值。
二、环境
1、开发板:ATK-DLRK3568
2、系统:buildroot
3、训练环境:Autodl

三、训练和测试
1、训练测试环境搭建
1、创建虚拟环境
conda create -n LRPNet_env python=3.82、激活
conda activate LRPNet_env3、下载代码
git clone https://github.com/sirius-ai/LPRNet_Pytorch.git注意,使用git克隆方式,不要自己下载解压,经测试自己下载解压文本格式会不同,运行会出错
4、安装依赖项
pip install torch==1.8.1+cu111 torchvision==0.9.1+cu111 torchaudio==0.8.1 -f https://download.pytorch.org/whl/torch_stable.htmlpip install imutils
pip install opencv-python安装后执行测试命令
python test_LPRNet.py在测试过程中出错了下面的错误:
出错1:
ValueError: num_samples should be a positive integer value, but got num_samples=0
pytorch报错:ValueError: num_samples should be a positive integer value, but got num_samp=0-CSDN博客
shuffle的参数设置错误导致,因为已经有batch_sample了,就不需要shuffle来进行随机的sample了,所以在这里的shuffle应该设置为FALSE才对。
修改:
train_LPRNET.py的208行,TRUE改成False
batch_iterator = iter(DataLoader(datasets, args.test_batch_size, shuffle=False, num_workers=args.num_workers, collate_fn=collate_fn))出错2:
python 代码遇到 float division by zero 怎么解决?-CSDN博客
File "train_LPRNet.py", line 261, in Greedy_Decode_Eval Acc = Tp * 1.0 / (Tp + Tn_1 + Tn_2) ZeroDivisionError: float division by zero
处理:
if Tp + Tn_1 + Tn_2 == 0:Acc = 0 # 或者 Acc = 1,根据实际需求设置
else:Acc = Tp * 1.0 / (Tp + Tn_1 + Tn_2)
出错3:
File "train_LPRNet.py", line 268, in Greedy_Decode_Eval print("[Info] Test Speed: {}s 1/{}]".format((t2 - t1) / len(datasets), len(datasets))) ZeroDivisionError: float division by zero
处理:
if len(datasets) == 0:print("[Info] 数据集为空,无法计算测试速度")
else:print("[Info] Test Speed: {}s 1/{}".format((t2 - t1) / len(datasets), len(datasets)))
出错4:
AttributeError: module 'numpy' has no attribute 'int'. np.int was a deprecated alias for the builtin int. To avoid this error in existing code, use int by itself. Doing this will not modify any behavior and is safe. When replacing np.int, you may wish to use e.g. np.int64 or np.int32 to specify the precision. If you wish to review your current use, check the release note link for additional information.
处理:
pip install numpy==1.19.0再次执行上面命令
运行正常
2、训练
训练按readme执行下面命令:
python train_LPRNet.py 但执行后会出错

原因是没有训练的数据集,为了测试,使用的是自带的测试数据集
python train_LPRNet.py --train_img_dirs ./data/test/ 默认训练只有15轮,数据集也不对,所以测试结果无法作准。

3、测试
自带的show显示不能使用,原因是没有插件,修改了显示的内容
修改test_LPRNet.py文件下的show函数
def show(img, label, target):img = np.transpose(img, (1, 2, 0))img *= 128.img += 127.5img = img.astype(np.uint8)lb = ""for i in label:lb += CHARS[i]tg = ""for j in target.tolist():tg += CHARS[int(j)]flag = "F"if lb == tg:flag = "T"# img = cv2.putText(img, lb, (0,16), cv2.FONT_HERSHEY_COMPLEX_SMALL, 0.6, (0, 0, 255), 1)img = cv2ImgAddText(img, lb, (0, 0))#cv2.imshow("test", img)cv2.imwrite("test.jpg", img)print("target: ", tg, " ### {} ### ".format(flag), "predict: ", lb)#cv2.waitKey()#cv2.destroyAllWindows()执行下面命令,执行是正常的,但模型不对,原因是数据集太少。
python test_LPRNet.py --show 1
使用官方给的模型,识别率还是挺好的。

官方训练集2W多张,自行训练测试。测试增加到1000轮,有部分可以识别了。
四、导出onnx
创建export_onnx.py文件,内容如下:
import torch.nn as nn
import torch
import os
import sys
import urllib
import urllib.request
import time
import traceback
import numpy as npMODEL_DIR = './weights/'
MODEL_PATH = MODEL_DIR + 'Final_LPRNet_model.pth'# Convert maxpool3d to the class of maxpool2d
class maxpool_3d(nn.Module):def __init__(self, kernel_size, stride):super(maxpool_3d, self).__init__()assert(len(kernel_size)==3 and len(stride)==3)kernel_size2d1 = kernel_size[-2:]stride2d1 = stride[-2:]kernel_size2d2 = (kernel_size[0],kernel_size[0])stride2d2 = (kernel_size[0], stride[0])self.maxpool1 = nn.MaxPool2d(kernel_size=kernel_size2d1, stride=stride2d1)self.maxpool2 = nn.MaxPool2d(kernel_size=kernel_size2d2, stride=stride2d2)def forward(self,x):x = self.maxpool1(x)x = x.transpose(1,3)x = self.maxpool2(x)x = x.transpose(1,3)return x class small_basic_block(nn.Module):def __init__(self, ch_in, ch_out):super(small_basic_block, self).__init__()self.block = nn.Sequential(nn.Conv2d(ch_in, ch_out // 4, kernel_size=1),nn.ReLU(),nn.Conv2d(ch_out // 4, ch_out // 4, kernel_size=(3, 1), padding=(1, 0)),nn.ReLU(),nn.Conv2d(ch_out // 4, ch_out // 4, kernel_size=(1, 3), padding=(0, 1)),nn.ReLU(),nn.Conv2d(ch_out // 4, ch_out, kernel_size=1),)def forward(self, x):return self.block(x)class LPRNet(nn.Module):def __init__(self, class_num, dropout_rate):super(LPRNet, self).__init__()self.class_num = class_numself.backbone = nn.Sequential(nn.Conv2d(in_channels=3, out_channels=64, kernel_size=3, stride=1), # 0nn.BatchNorm2d(num_features=64),nn.ReLU(),  # 2maxpool_3d(kernel_size=(1, 3, 3), stride=(1, 1, 1)),small_basic_block(ch_in=64, ch_out=128),    # *** 4 ***nn.BatchNorm2d(num_features=128),nn.ReLU(),  # 6maxpool_3d(kernel_size=(1, 3, 3), stride=(2, 1, 2)),small_basic_block(ch_in=64, ch_out=256),   # 8nn.BatchNorm2d(num_features=256),nn.ReLU(),  # 10small_basic_block(ch_in=256, ch_out=256),   # *** 11 ***nn.BatchNorm2d(num_features=256),   # 12nn.ReLU(),maxpool_3d(kernel_size=(1, 3, 3), stride=(4, 1, 2)),  # 14nn.Dropout(dropout_rate),nn.Conv2d(in_channels=64, out_channels=256, kernel_size=(1, 4), stride=1),  # 16nn.BatchNorm2d(num_features=256),nn.ReLU(),  # 18nn.Dropout(dropout_rate),nn.Conv2d(in_channels=256, out_channels=class_num, kernel_size=(13, 1), stride=1), # 20nn.BatchNorm2d(num_features=class_num),nn.ReLU(),  # *** 22 ***)self.container = nn.Sequential(nn.Conv2d(in_channels=256+class_num+128+64, out_channels=self.class_num, kernel_size=(1,1), stride=(1,1)),)def forward(self, x):keep_features = list()for i, layer in enumerate(self.backbone.children()):x = layer(x)if i in [2, 6, 13, 22]: keep_features.append(x)global_context = list()for i, f in enumerate(keep_features):if i in [0, 1]:f = nn.AvgPool2d(kernel_size=5, stride=5)(f)if i in [2]:f = nn.AvgPool2d(kernel_size=(4, 10), stride=(4, 2))(f)f_pow = torch.pow(f, 2)f_mean = torch.mean(f_pow)f = torch.div(f, f_mean)global_context.append(f)x = torch.cat(global_context, 1)x = self.container(x)logits = torch.mean(x, dim=2)return logitsdef readable_speed(speed):speed_bytes = float(speed)speed_kbytes = speed_bytes / 1024if speed_kbytes > 1024:speed_mbytes = speed_kbytes / 1024if speed_mbytes > 1024:speed_gbytes = speed_mbytes / 1024return "{:.2f} GB/s".format(speed_gbytes)else:return "{:.2f} MB/s".format(speed_mbytes)else:return "{:.2f} KB/s".format(speed_kbytes)def show_progress(blocknum, blocksize, totalsize):speed = (blocknum * blocksize) / (time.time() - start_time)speed_str = " Speed: {}".format(readable_speed(speed))recv_size = blocknum * blocksizef = sys.stdoutprogress = (recv_size / totalsize)progress_str = "{:.2f}%".format(progress * 100)n = round(progress * 50)s = ('#' * n).ljust(50, '-')f.write(progress_str.ljust(8, ' ') + '[' + s + ']' + speed_str)f.flush()f.write('\r\n')def check_and_download_origin_model():global start_timeif not os.path.exists(MODEL_PATH):print('--> Download {}'.format(MODEL_PATH))url = 'https://github.com/sirius-ai/LPRNet_Pytorch/raw/master/weights/Final_LPRNet_model.pth'download_file = MODEL_PATHtry:start_time = time.time()urllib.request.urlretrieve(url, download_file, show_progress)except:print('Download {} failed.'.format(download_file))print(traceback.format_exc())exit(-1)print('done')if __name__ == "__main__":# Download model if not exist (from https://github.com/sirius-ai/LPRNet_Pytorch/blob/master/weights)check_and_download_origin_model()device = torch.device('cpu')lprnet = LPRNet(class_num=68, dropout_rate=0).to(device)lprnet.load_state_dict(torch.load('./weights/Final_LPRNet_model.pth'))lprnet.eval()torch.onnx.export(lprnet,              torch.randn(1,3,24,94),                         MODEL_DIR + 'lprnet.onnx',   export_params=True,        input_names = ['input'],   output_names = ['output'], )if os.path.exists(MODEL_DIR + 'lprnet.onnx'):print('onnx model had been saved in '+ MODEL_DIR + 'lprnet.onnx')else:print('export onnx failed!')
执行后导出ONNX
python export_onnx.py 五、部署
五、部署
环境搭建,自行参考前面博客搭建。
下载rknn_model_zoo到虚拟机
把上面生成的onnx拷贝到/home/alientek/rknn_model_zoo/examples/LPRNet/model目录下。
1、导出RKNN模型
python convert.py ../model/lprnet.onnx rk3568
2、板载测试
1、修改GCC_COMPILER
export GCC_COMPILER=/opt/atk-dlrk356x-toolchain/usr/bin/aarch64-buildroot-linux-gnu修改成自己的路径
2、编译
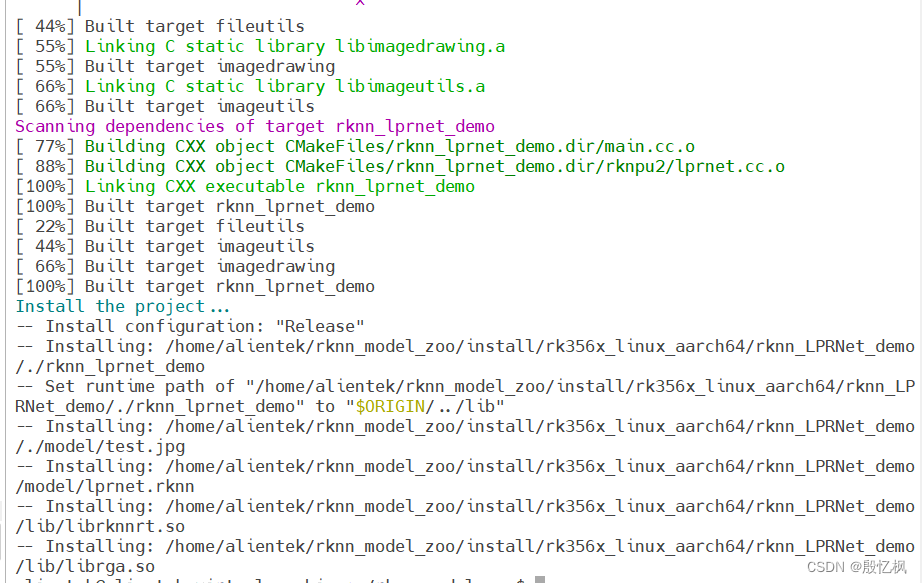
./build-linux.sh -t rk356x -a aarch64 -d LPRNet
3、运行
把编译后的执行文件通过adb或tftp上传到板子
运行下面命令测试
./rknn_lprnet_demo ./model/lprnet.rknn ./model/test.jpg 
接下来使用结合yolov5把框检测出来在识别。
如有侵权,或需要完整代码,请及时联系博主。
这篇关于RK3568笔记二十七:LPRNet车牌识别的文章就介绍到这儿,希望我们推荐的文章对编程师们有所帮助!


