本文主要是介绍【深度学习实战—8】:基于MediaPipe的人脸检测,希望对大家解决编程问题提供一定的参考价值,需要的开发者们随着小编来一起学习吧!
✨博客主页:王乐予🎈
✨年轻人要:Living for the moment(活在当下)!💪
🏆推荐专栏:【图像处理】【千锤百炼Python】【深度学习】【排序算法】
目录
- 😺一、MediaPipe概述
- 😺二、MediaPipe人脸检测概述
- 😺三、程序实现
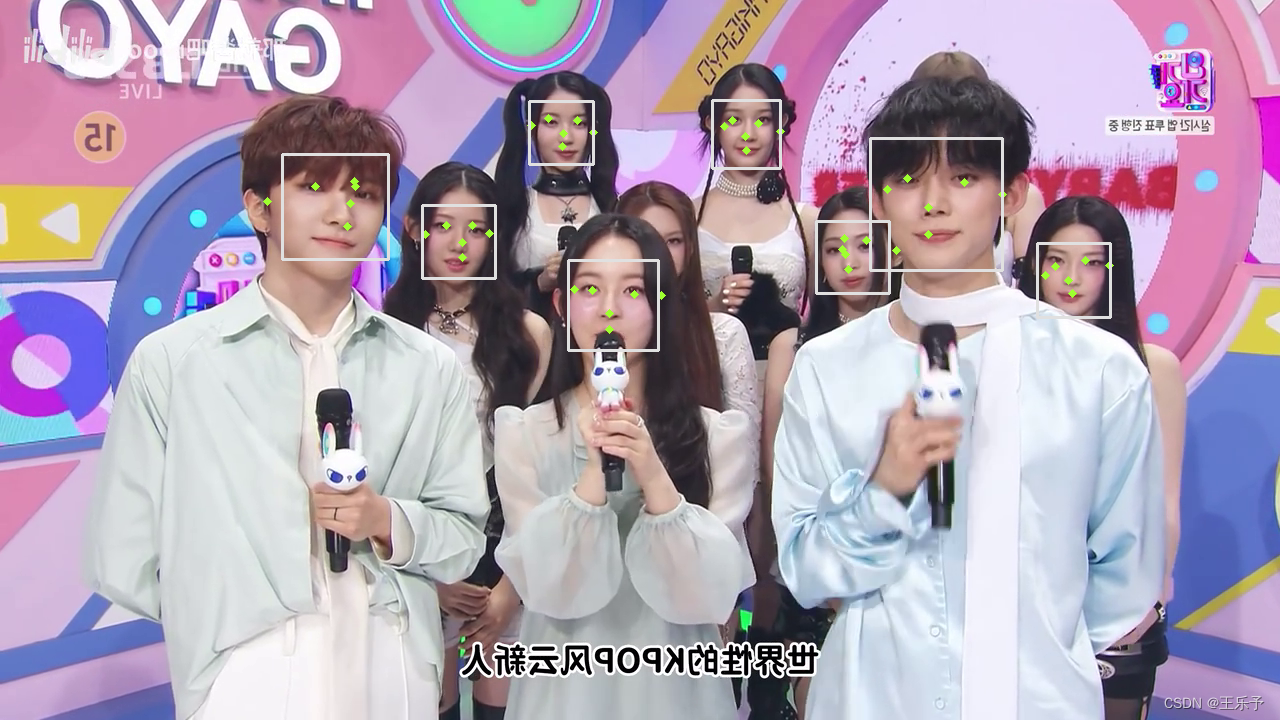
- 😺四、检测结果
😺一、MediaPipe概述
MediaPipe 是一款由 Google Research 开发并开源的多媒体机器学习模型应用框架。
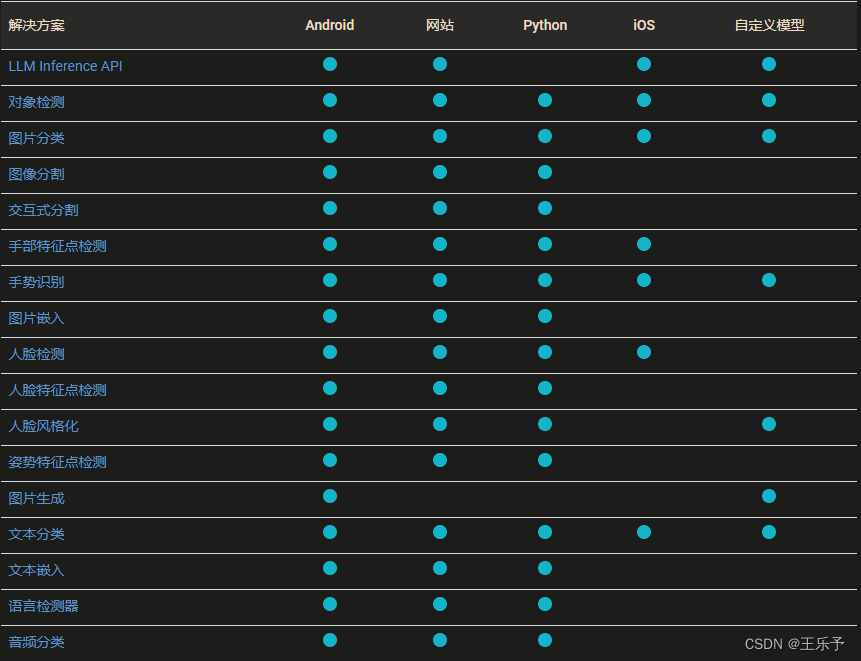
MediaPipe目前支持的解决方案(Solution)及支持的平台如下图所示:

😺二、MediaPipe人脸检测概述
MediaPipe 人脸检测器可以检测图片或视频中的人脸。可以使用此任务在帧中定位人脸和面部特征。此任务使用可处理单张图片或连续图片流的机器学习 (ML) 模型。该任务会输出人脸位置以及以下面部关键点:左眼、右眼、鼻尖、嘴巴、左眼区域和右眼区域。
MediaPipe人脸检测所用模型是BlazeFace的变体,BlazeFace 是谷歌19年提出的一种针对移动 GPU 推断进行优化的轻量级且精确的人脸检测器。
BlazeFace: Sub-millisecond Neural Face Detection on Mobile GPUs
😺三、程序实现
import cv2
import mediapipe as mpmp_face_detection = mp.solutions.face_detection
face_detection = mp_face_detection.FaceDetection(min_detection_confidence=0.5, model_selection=1)cap = cv2.VideoCapture('../test.mp4')while cap.isOpened():success, image = cap.read()# Convert color space because MediaPipe requires images in RGB formatimage = cv2.cvtColor(cv2.flip(image, 1), cv2.COLOR_BGR2RGB)# Perform facial detectionresults = face_detection.process(image)# Convert back to BGR so that OpenCV can display imagesimage = cv2.cvtColor(image, cv2.COLOR_RGB2BGR)# Draw detected facial bounding boxesif results.detections:for detection in results.detections:mp_drawing = mp.solutions.drawing_utilsmp_drawing.draw_detection(image, detection, mp_drawing.DrawingSpec(thickness=4, circle_radius=2, color=(48, 255, 159)))cv2.imshow('MediaPipe Face Detection', image)if cv2.waitKey(1) & 0xFF == ord('q'):breakcap.release()
cv2.destroyAllWindows()
😺四、检测结果

这篇关于【深度学习实战—8】:基于MediaPipe的人脸检测的文章就介绍到这儿,希望我们推荐的文章对编程师们有所帮助!


