本文主要是介绍设置Android通知栏Notification的字体/图标颜色随背景色变化而变化,希望对大家解决编程问题提供一定的参考价值,需要的开发者们随着小编来一起学习吧!
设置通知栏中的字体/按钮颜色随系统下拉菜单背景色变化而变化
本篇内容为:Android端APP在下栏菜单中发出通知(Notification)时,在设置该通知背景透明的前提下,如何使得通知中的字体颜色和图标在不同颜色的下栏菜单中均能保持较高的对比度。从中受益的两篇文章分别是Android 自定义通知Notification 适配不同背景颜色和通知栏设置系统字体颜色.
- 设置通知栏中的字体按钮颜色随系统下拉菜单背景色变化而变化
- 起因
- 方案一
- 原理
- 步骤
- 方案一的不足
- 方案二
- 原理
- 步骤
- 优劣
- 方案三
- 方式一
- 改进后的优劣
- 方式二
- 步骤一
- 步骤二
- 方式一
起因
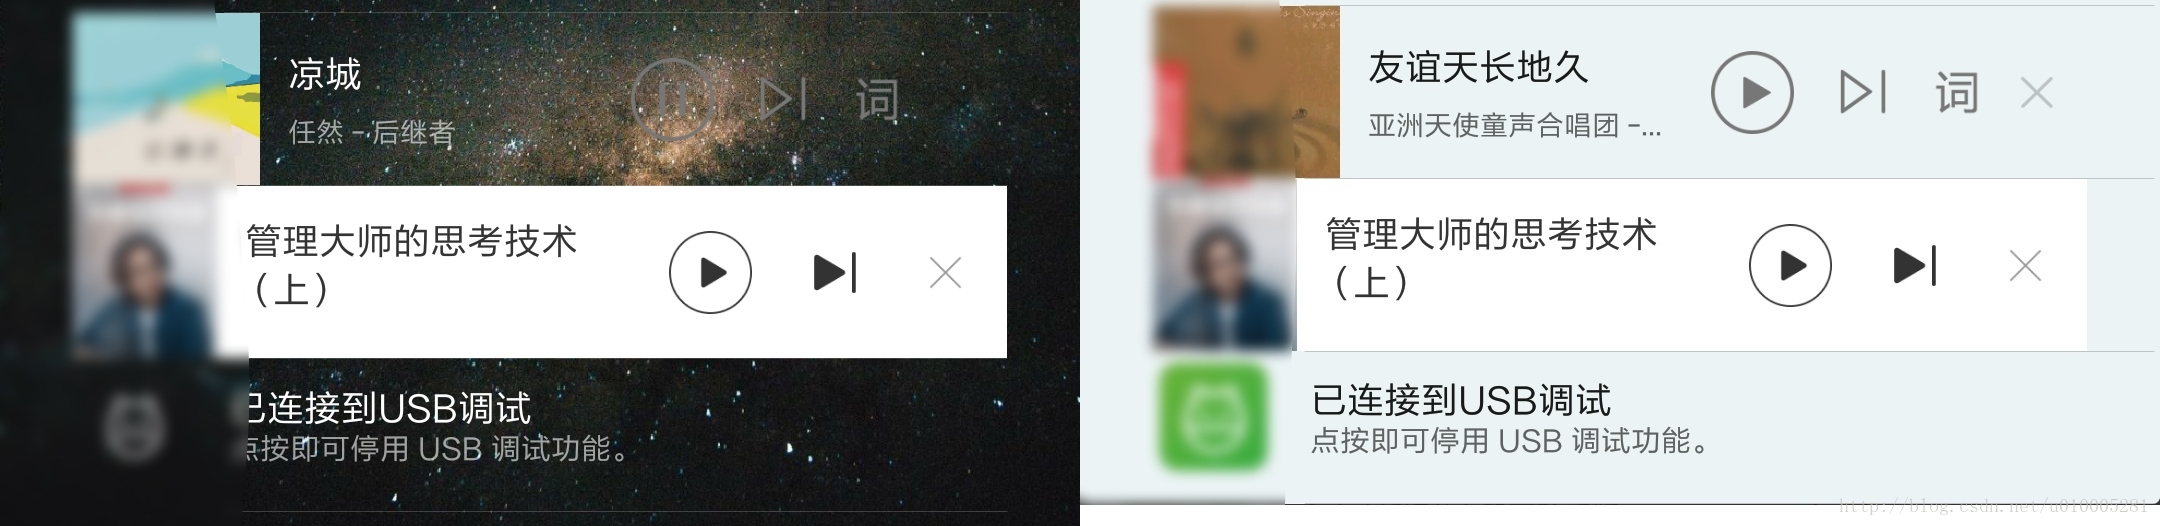
常见的方式是为通知加入背景色。有背景色的通知栏虽然保证了文字和图标的对比度,但是不能完美融入不同颜色的下拉菜单中。网易云音乐做得到了背景色透明,且通知栏字色也始终具有较高的对比度,但按钮图标只有一套,在下拉菜单的背景色和图标色相近时会导致按钮不够明显~显示效果如图:
如何使得通知中的字体颜色和图标颜色自适应不同的手机主题呢?文章开篇给出了参考的两篇文章,分别对应着两种解决方案,这里从简描述,有需要的童鞋可点击链接查看详细内容。我重点讲述取之长,补之短的方案三。
方案一
原理
因为系统通知的文字颜色会随着(不同主题的)下拉菜单的背景色变化而变化,该方法设置自定义通知的文字颜色与系统通知的文字颜色相同,从而达到保证文字对比度的目的。
步骤
这个方案给出了低于5.0的Android版本和高于5.0的Android版本的不同的方案,简而言之就是:在低于5.0的Android版本中,在通知的布局文件(.xml)中的题目Title和简介Introduction中,分别添加如下的一行语句:
...<TextView>...android:textAppearance="@style/TextAppearance.StatusBar.EventContent"...</TextView>在高于5.0的版本中,在通知的布局文件中表示Title的<TextView>中添加一行语句:
...<TextView>...android:textAppearance="@android:style/TextAppearance.Material.Notification.Title"...</TextView>在通知的布局文件中表示简介Introduction的<TextView>中添加一行语句:
...<TextView>...android:textAppearance="@android:style/TextAppearance.Material.Notification.Line2"...</TextView>即可实现自定义通知的文字颜色与系统通知的文字颜色相同。
方案一的不足
- 但是这种方案有两个不足:
- 低于5.0版本的方案Title和Introduction同色(通常都为灰色),如果要求这两项有不同对比度,则该方案欠佳;
- 高于5.0版本的方案,其限制条件“高于5.0版本”就是不足。
方案二
原理
方案二通过遍历系统通知的viewGroup,获取系统通知中的字体颜色;继而对字体颜色进行判定,是偏黑色主题还是偏浅色主题;最终根据返回的主题颜色,改变自定义通知中的字体颜色。
步骤
代码可读性较高,直接上源码。拷贝自此,根据实际项目有略微差异。
public boolean isDarkNotificationTheme() {return !isSimilarColor(Color.BLACK,getNotificationColor(musicService.getApplicationContext()));
}public static int getNotificationColor(Context context) {NotificationCompat.Builder builder=new NotificationCompat.Builder(context);Notification notification=builder.build();int layoutId=notification.contentView.getLayoutId();ViewGroup viewGroup= (ViewGroup) LayoutInflater.from(context).inflate(layoutId, null, false);if (viewGroup.findViewById(android.R.id.title)!=null) {return ((TextView) viewGroup.findViewById(android.R.id.title)).getCurrentTextColor();}return findColor(viewGroup);
}private boolean isSimilarColor(int baseColor, int color) {int simpleBaseColor=baseColor|0xff000000;int simpleColor=color|0xff000000;int baseRed=Color.red(simpleBaseColor)-Color.red(simpleColor);int baseGreen=Color.green(simpleBaseColor)-Color.green(simpleColor);int baseBlue=Color.blue(simpleBaseColor)-Color.blue(simpleColor);double value=Math.sqrt(baseRed*baseRed+baseGreen*baseGreen+baseBlue*baseBlue);if (value<180.0) {return true;}return false;
}private static int findColor(ViewGroup viewGroupSource) {int color=Color.TRANSPARENT;LinkedList<ViewGroup> viewGroups=new LinkedList<>();viewGroups.add(viewGroupSource);while (viewGroups.size()>0) {ViewGroup viewGroup1=viewGroups.getFirst();for (int i = 0; i < viewGroup1.getChildCount(); i++) {if (viewGroup1.getChildAt(i) instanceof ViewGroup) {viewGroups.add((ViewGroup) viewGroup1.getChildAt(i));}else if (viewGroup1.getChildAt(i) instanceof TextView) {if (((TextView) viewGroup1.getChildAt(i)).getCurrentTextColor()!=-1) {color=((TextView) viewGroup1.getChildAt(i)).getCurrentTextColor();}}}viewGroups.remove(viewGroup1);}return color;
}
最后通过
contentView.setInt(R.id.share_content, "setTextColor", NotificationUtils.isDarkNotificationTheme()==true?Color.WHITE:Color.BLACK);实现颜色替换的功能。
优劣
优势:可自定义通知中Title和Introduction的字体颜色;
劣势:好像依旧无法更换通知中的按钮。
此外,我尝试通过返回的isDarkNotificationTheme()的具体结果,通过以下代码更改通知中字体的颜色和图标:
private View view;
private TextView notificationTitleTextView;
private TextView notificationSubtitleTextView;
private ImageView notificationPlayorpauseImageView;View view = LayoutInflater.from(MusicPlayer.this).inflate(R.layout.music_notification, null);
notificationTitleTextView = (TextView) view.findViewById(R.id.notification_title_textView);
notificationsubTitleTextView = (TextView) view.findViewById(R.id.notification_subtitle_textView);
notificationPlayorpauseImageView = (ImageView) view.findViewById(R.id.notification_subtitle_textView);if(isDarkNotificationTheme()){notificationTitleTextView.setTextColor(getResources().getColor(R.color.black));notificationsubtitleTextView.setTextColor(getResources().getColor(R.color.gray));notificationPlayorpauseImageView.setImageResource(R.mipmap.playOrPauseImageView);
}else{
//如上,替换成不同的颜色/图标
}
但是发现在通知中并没有起效果,也就是说这种方式并不适用于通知。
方案三
方案三包括两部分内容,其一是针对方案一的一点小改动,以符合无视Android版本都能进行适配的要求;但并不能解决无法更换图标的问题。其二是结合方案一和方案二,实现最终的文字颜色/图标随手机主题更换后背景色变化而变化。
方式一:
留心方案一中高于Android 5.0版本的方法:虽然
“@android:style/TextAppearance.Material.Notification.Line2”
要求的最低版本为API 21,但
“@android:style/TextAppearance.Material.Notification.Title”
要求的最低版本为仅为API 9. 考虑到现在市面上几乎全部Android手机的Android版本的API都高于API 9, 可在Title的<TextView>中设置
android:textAppearance=”@android:style/TextAppearance.Material.Notification.Title”
在Introduction的<TextView>中设置
android:textAppearance=”@style/TextAppearance.StatusBar.EventContent”
即可实现保持Title和Introduction高对比度的前提下,Title和Introduction具有不同的灰度颜色(Title为黑/白,Introduction为不同程度的灰色)。
改进后的优劣:
优势:简单方便;更换深/浅色主题后自定义通知的字体颜色立即做响应改变。
劣势:文字颜色不能自定义;不能改变图标颜色。
方式二
1)因为方案一有简单、背景变化时文字颜色响应迅速的特点,在通知的字体颜色上采用方式一;
2)利用方案二,获知当前主题是深色还是浅色,之后根据主题色采用不同颜色的图标。
步骤一
在通知的布局文件中表示Title的<TextView>中添加一行语句:
...<TextView>...android:textAppearance="@android:style/TextAppearance.Material.Notification.Title"...</TextView>在通知的布局文件中表示简介Introduction的<TextView>中添加一行语句:
...<TextView>...android:textAppearance="@style/TextAppearance.StatusBar.EventContent"...</TextView>步骤二
首先使用方案二,获取到当前主题色是深色还是浅色:
public boolean isDarkNotificationTheme() {return !isSimilarColor(Color.BLACK,getNotificationColor(musicService.getApplicationContext()));
}public static int getNotificationColor(Context context) {NotificationCompat.Builder builder=new NotificationCompat.Builder(context);notification=builder.build();int layoutId=notification.contentView.getLayoutId();ViewGroup viewGroup= (ViewGroup) LayoutInflater.from(context).inflate(layoutId, null, false);if (viewGroup.findViewById(android.R.id.title)!=null) {return ((TextView) viewGroup.findViewById(android.R.id.title)).getCurrentTextColor();}return findColor(viewGroup);
}private boolean isSimilarColor(int baseColor, int color) {int simpleBaseColor=baseColor|0xff000000;int simpleColor=color|0xff000000;int baseRed=Color.red(simpleBaseColor)-Color.red(simpleColor);int baseGreen=Color.green(simpleBaseColor)-Color.green(simpleColor);int baseBlue=Color.blue(simpleBaseColor)-Color.blue(simpleColor);double value=Math.sqrt(baseRed*baseRed+baseGreen*baseGreen+baseBlue*baseBlue);if (value<180.0) {return true;}return false;
}private static int findColor(ViewGroup viewGroupSource) {int color=Color.TRANSPARENT;LinkedList<ViewGroup> viewGroups=new LinkedList<>();viewGroups.add(viewGroupSource);while (viewGroups.size()>0) {ViewGroup viewGroup1=viewGroups.getFirst();for (int i = 0; i < viewGroup1.getChildCount(); i++) {if (viewGroup1.getChildAt(i) instanceof ViewGroup) {viewGroups.add((ViewGroup) viewGroup1.getChildAt(i));}else if (viewGroup1.getChildAt(i) instanceof TextView) {if (((TextView) viewGroup1.getChildAt(i)).getCurrentTextColor()!=-1) {color=((TextView) viewGroup1.getChildAt(i)).getCurrentTextColor();}}}viewGroups.remove(viewGroup1);}return color;
}
之后实现更换通知中图标的函数,函数中调用Android自带的更新通知中文字和图标的方法setImageViewResource:
public void setNotificationColor(){if(isDarkNotificationTheme()){setImageViewResource(R.id.notification_play_pause, R.mipmap.ic_audio_playing_night);setImageViewResource(R.id.notification_img_next, R.mipmap.ic_audio_next_night);}else {setImageViewResource(R.id.notification_play_pause, R.mipmap.ic_audio_playing);setImageViewResource(R.id.notification_img_next, R.mipmap.ic_audio_next);}refreshView();
}// private Notification notification builder.build();
// public static NotificationManager notificationManager = (NotificationManager)service.getSystemService(Context.NOTIFICATION_SERVICE);
private void refreshView(){if(notification != null){notificationManager.notify(NOTIFICATION_ID, notification);
}
即大功告成。如果想自己定义通知中Title和Introduction的字体颜色,在setNotificationColor()方法的if语句中中添加
setTextColor(R.id.notification_title_textview, getResources().getColor(R.color.title_color));
setTextColor(R.id.notification_subtitle_textview, getResources().getColor(R.color.title_color));
最终效果如图中最顶端的通知,分别展示在深色主题下和浅色主题下的显示效果:
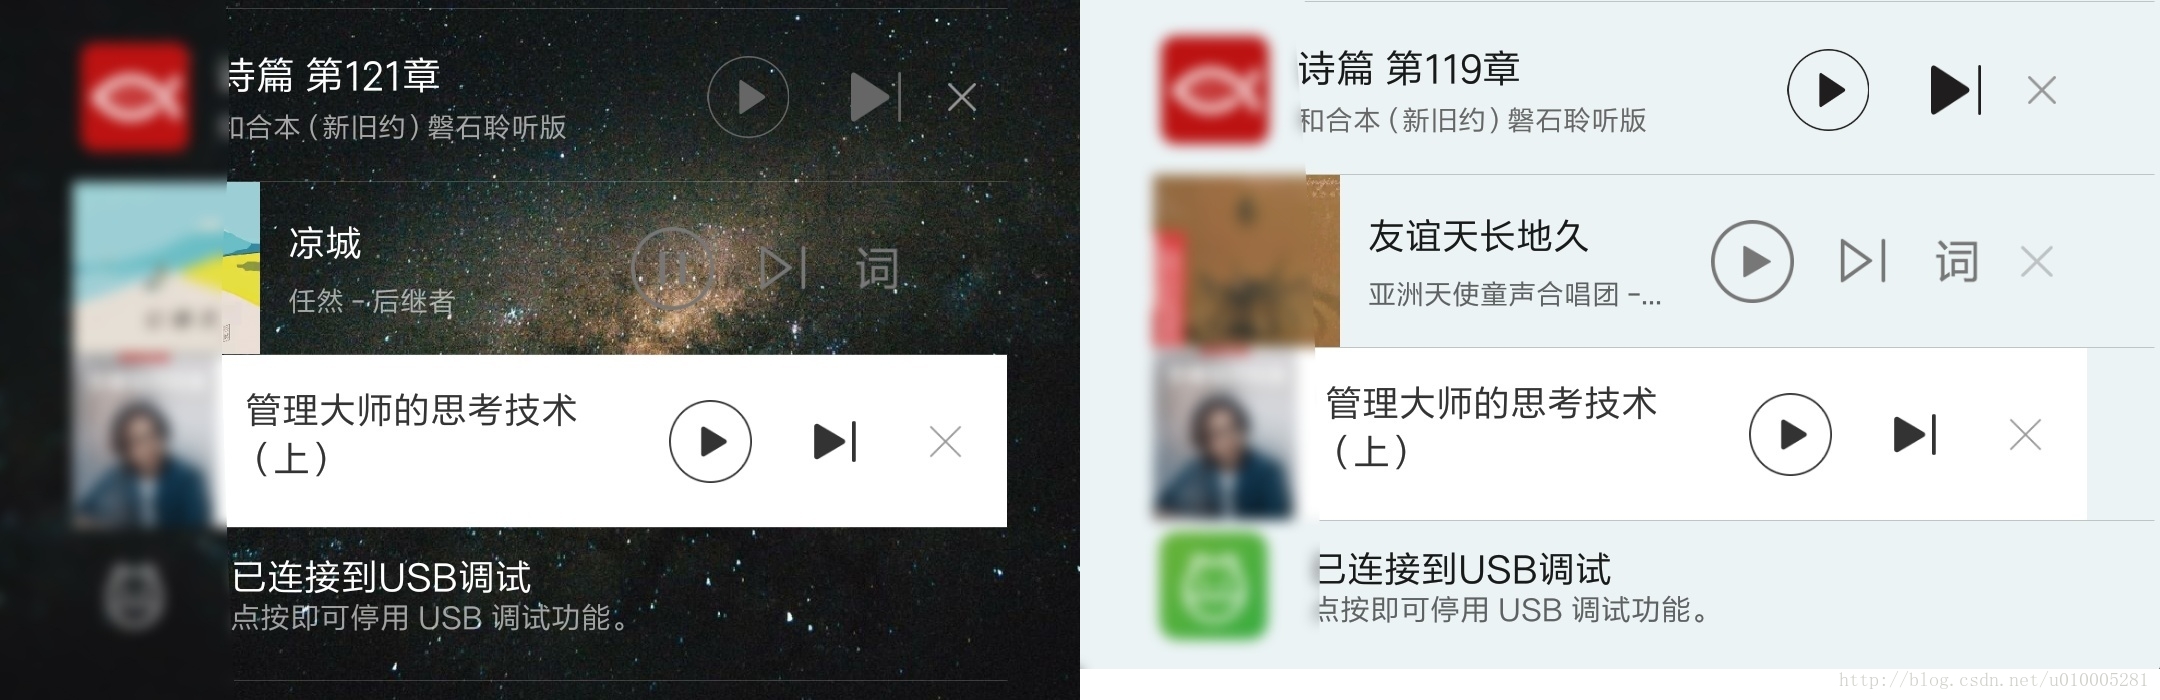
备注:其中R.mipmap.xxx是在工程中的android/src/main/res/mipmap文件夹中自行添加的图标;R.color.xxxxx是在工程中的android/src/main/res/values/color.xml中自行定义的颜色。
这篇关于设置Android通知栏Notification的字体/图标颜色随背景色变化而变化的文章就介绍到这儿,希望我们推荐的文章对编程师们有所帮助!


