本文主要是介绍前端业务开发中使用原生js和elementui两种方式实现头像裁切上传的功能,希望对大家解决编程问题提供一定的参考价值,需要的开发者们随着小编来一起学习吧!
日常业务开发中,无论是后台管理系统还是前台界面,都会遇到图片裁剪的业务需求,选择合适的尺寸或者图片的关键部分,满足我们的功能需求!!
效果预览
效果一:
 效果二:
效果二:
实现过程
1.原生js实现方式
引入cropperjs的库文件和样式
<script src="https://cdn.jsdelivr.net/npm/cropperjs/dist/cropper.js"></script>
<link rel="stylesheet" href="https://cdn.jsdelivr.net/npm/cropperjs/dist/cropper.css" rel="external nofollow" >
*{padding: 0;margin: 0;box-sizing: border-box;font-family: "Poppins",sans-serif;
}
body{background-color: #025bee;
}
.wrapper{width: min(90%,800px);position: absolute;transform: translateX(-50%);left:50%;top:1em;background-color: #fff;padding: 2em 3em;border-radius: .5em;
}
.container{display: grid;grid-template-columns: 1fr 1fr;gap:1em;
}
.container .image-container,.container .preview-container{width: 100%;/* background-color: aquamarine; */
}input[type="file"]{display: none;
}label{display: block;position: relative;background-color: #025bee;font-size: 16px;text-align: center;width: 250px;color:#fff;padding: 16px 0;margin: 16px auto;cursor: pointer;border-radius: 5px;
}img{display: block;/**is key to cropper.js**/max-width: 100%;
}.image-container{width: 60%;margin: 0 auto;
}.options{display: flex;justify-content: center;gap:1em;
}
input[type="number"]{width: 100px;padding: 16px 5px;border-radius: .3em;border: 2px solid #000;
}button{padding: 1em;border-radius: .3em;border: 2px solid #025bee;background-color: #fff;color: #025bee;
}.btns{display: flex;justify-content: center;gap: 1em;margin-top: 1em;}
.btns button{font-size: 1em;
}
.btns a {border: 2px solid #025bee;background-color: #025bee;color: #fff;text-decoration: none;padding: 1em;font-size: 1em;border-radius: .3em;
}
.hide{display: none;
}
<div class="wrapper"><div class="container"><div class="image-container"><img src="" alt="" id="image"></div><div class="preview-container"><img src="" alt="" id="preview-image"></div></div><input type="file" name="" id="file" accept="image/*"><label for="file">选择一张图片</label><div class="options hide"><input type="number" name="" id="height-input" placeholder="输入高度" max="780" min="0"><input type="number" name="" id="width-input" placeholder="输入宽度" max="780" min="0"><button class="aspect-ration-button">16:9</button><button class="aspect-ration-button">4:3</button><button class="aspect-ration-button">1:1</button><button class="aspect-ration-button">2:3</button><button class="aspect-ration-button">自由高度</button></div><div class="btns"><button id="preview" class="hide">预览</button><a href="" id="download" class="hide">下载</a></div></div>
核心步骤:
<script>const oFile = document.querySelector('#file')const oImage = document.querySelector('#image')const oDownload = document.querySelector('#download')const oAspectRation = document.querySelectorAll('.aspect-ration-button')const oOptions = document.querySelector('.options')const oPreview = document.querySelector('#preview-image')const oPreviewBtn = document.querySelector('#preview')const heightInput = document.querySelector('#height-input')const widthInput = document.querySelector('#width-input')let cropper = '',filename = ''/*** 上传事件* * /*/oFile.onchange = function(e){oPreview.src=""heightInput.value = 0widthInput.value = 0oDownload.classList.add('hide')const reader = new FileReader()reader.readAsDataURL(e.target.files[0])reader.onload = function(e){oImage.setAttribute('src',e.target.result)if(cropper){cropper.destory()}cropper = new Cropper(oImage)oOptions.classList.remove('hide')oPreviewBtn.classList.remove('hide')}filename = oFile.files[0].name.split(".")[0]oAspectRation.forEach(ele => {ele.addEventListener('click', () => {if(ele.innerText === '自由高度'){cropper.setAspectRatio(NaN)}else{cropper.setAspectRatio(eval(ele.innerText.replace(":",'/')))}}, false)})heightInput.addEventListener('input', () => {const {height} = cropper.getImageData()if(parseInt(heightInput.value) > Math.round(height)){heightInput.value = Math.round(height)}let newHeight = parseInt(heightInput.value)cropper.setCropBoxData({height:newHeight})}, false)widthInput.addEventListener('input', () => {const {width} = cropper.getImageData()if(parseInt(widthInput.value) > Math.round(width)){widthInput.value = Math.round(width)}let newWidth = parseInt(widthInput.value)cropper.setCropBoxData({width:newWidth})}, false)oPreviewBtn.addEventListener('click', (e) => {e.preventDefault();oDownload.classList.remove('hide');let imgSrc = cropper.getCroppedCanvas({}).toDataURL();oPreview.src = imgSrc;oDownload.download = `cropped_${filename}.png`;oDownload.setAttribute('href',imgSrc)}, false)}</script>
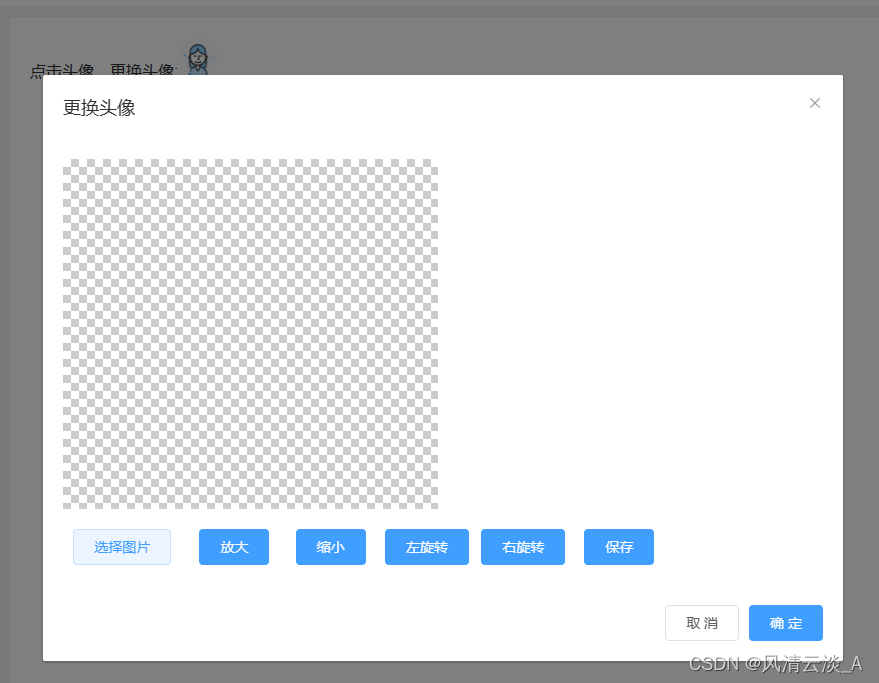
- vue2+elementui实现
安装vue-cropper库
npm i vue-cropper
静态页面
<template><g-container><div><span>点击头像,更换头像:</span><el-avatar @click.native="handleShowCropper" :src="avatarUrl"></el-avatar></div><el-dialogtitle="更换头像":visible.sync="dialogVisible"width="800px":before-close="dialogBeforeClose"v-if="dialogVisible"append-to-body><el-row :gutter="10"><el-col :span="12" :style="{ height: '350px' }"><vueCropperref="cropper":img="option.img":info="true":auto-crop="option.autoCrop":outputSize="option.size":outputType="option.outputType"@realTime="realTime"centerBox></vueCropper></el-col><el-col :span="12" class="preview-container"><div class="avatar-upload-preview"><div :style="previews.div"><img :src="previews.url" :style="previews.img" /></div></div></el-col></el-row><el-row :gutter="10" style="margin-top:20px;text-align:center" justify="center"><el-col :span="4"><el-uploadactionname="file"accept="image/*":before-upload="beforeUpload":show-upload-list="false"><el-button icon="upload">选择图片</el-button></el-upload></el-col><el-col :span="3"><el-button type="primary" @click="changeScale(1)">放大</el-button></el-col><el-col :span="3"><el-button type="primary" @click="changeScale(-1)">缩小</el-button></el-col><el-col :span="3"><el-button type="primary" @click="rotateLeft">左旋转</el-button></el-col><el-col :span="3"><el-button type="primary" @click="rotateRight">右旋转</el-button></el-col><el-col :span="3"><el-button type="primary" @click="saveHandle('blob')">保存</el-button></el-col></el-row><div slot="footer"><el-button @click="dialogVisible = false">取 消</el-button><el-button type="primary" @click="dialogVisible = false">确 定</el-button></div></el-dialog></g-container>
</template>

关键的js代码实现
export default {components: {VueCropper,},data() {return {option: { img: "", size: 1, outputType: "", autoCrop: true },dialogVisible: false,previews: {},avatarUrl:"https://cube.elemecdn.com/0/88/03b0d39583f48206768a7534e55bcpng.png",};},methods: {handleShowCropper() {this.dialogVisible = true;},dialogBeforeClose() {this.dialogVisible = false;},changeScale(num) {this.$refs.cropper.changeScale(num);},// 左旋转rotateLeft() {this.$refs.cropper.rotateLeft();},// 右旋转rotateRight() {this.$refs.cropper.rotateRight();},beforeUpload(file) {console.log("🚀 ~ beforeUpload ~ file:", file);const reader = new FileReader();//转化为base64reader.readAsDataURL(file);reader.onload = () => {console.log(reader, "reader");// this.previews.url = reader.result;this.option.img = reader.result;};},// 裁剪之后的数据realTime(data) {console.log("🚀 ~ realTime ~ data:", data);this.previews = data;},// 上传图片(点击保存按钮)saveHandle(type) {this.$refs.cropper.getCropData((data) => {this.dialogVisible = false;console.log(data);// data为base64图片,供接口使用this.avatarUrl = data;this.$emit("save", data);});},beforeDestory() {this.previews = null;this.option = null;},},
};
</script>
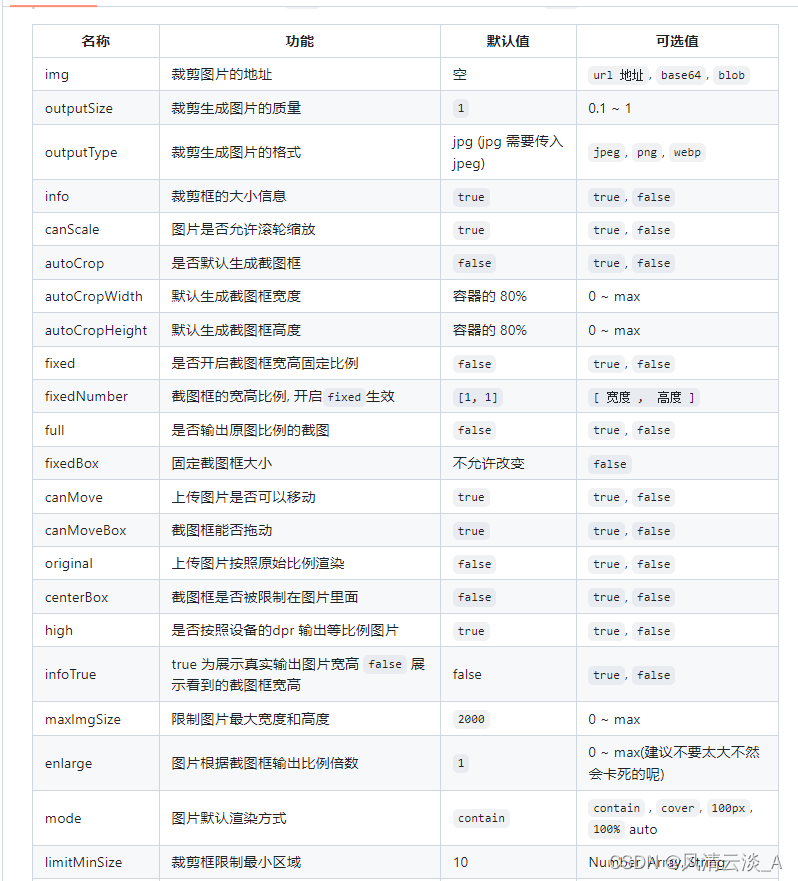
组件的option配置项,大家可以去逐个测试下,体验下效果!!
这样,我们就实现了两种不同的图像裁剪上传!!
附上参考资料:Cropperjs官网
这篇关于前端业务开发中使用原生js和elementui两种方式实现头像裁切上传的功能的文章就介绍到这儿,希望我们推荐的文章对编程师们有所帮助!


