本文主要是介绍【前沿模型解析】潜在扩散模型 2-3 | 手撕感知图像压缩 基础块 自注意力块,希望对大家解决编程问题提供一定的参考价值,需要的开发者们随着小编来一起学习吧!
1 注意力机制回顾
同ResNet一样,注意力机制应该也是神经网络最重要的一部分了。
想象一下你在观看一场电影,但你的朋友在给你发短信。虽然你正在专心观看电影,但当你听到手机响起时,你会停下来查看短信,然后这时候电影的内容就会被忽略。这就是注意力机制的工作原理。
在处理输入序列时,比如一句话中的每个单词,注意力机制允许模型像你一样,专注于输入中的不同部分。模型可以根据输入的重要性动态地调整自己的注意力,注意自己觉得比较重要的部分,忽略一些不太重要的部分,以便更好地理解和处理序列数据。
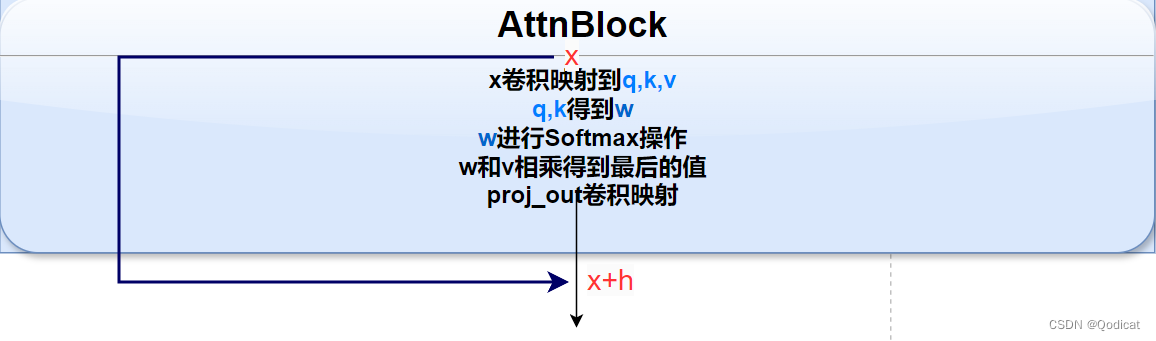
具体来说,是通过q,k,v实现的
q(查询),k(键值)之间先进行计算,获得重要性权重w,w再作用于v
利用卷积操作确定q,k,v
q,k做运算得到w,缩放w
w和v做运行
最后残差
得到
2 Atten块的实现
2.1 初始化函数
def __init__(self, in_channels):super().__init__()self.in_channels = in_channelsself.norm = torch.nn.GroupNorm(num_groups=3, num_channels=in_channels, eps=1e-6, affine=True)self.q = torch.nn.Conv2d(in_channels,in_channels,kernel_size=1,stride=1,padding=0)self.k = torch.nn.Conv2d(in_channels,in_channels,kernel_size=1,stride=1,padding=0)self.v = torch.nn.Conv2d(in_channels,in_channels,kernel_size=1,stride=1,padding=0)self.proj_out = torch.nn.Conv2d(in_channels,in_channels,kernel_size=1,stride=1,padding=0)2.2 前向传递函数
def forward(self, x):h_ = xh_ = self.norm(h_)q = self.q(h_)k = self.k(h_)v = self.v(h_)# compute attention 自注意力计算b,c,h,w = q.shapeq = q.reshape(b,c,h*w) #[4,12,1024]q = q.permute(0,2,1) # b,hw,ck = k.reshape(b,c,h*w) # b,c,hww_ = torch.bmm(q,k) # b,hw,hw w[b,i,j]=sum_c q[b,i,c]k[b,c,j]w_ = w_ * (int(c)**(-0.5))w_ = torch.nn.functional.softmax(w_, dim=2)
-
b,c,h,w = q.shape:假设q是一个四维张量,其中b表示batch size,c表示通道数,h和w表示高度和宽度。 -
q = q.reshape(b,c,h*w):将q张量重新形状为三维张量,其中第三维是原高度和宽度的乘积。这样做是为了方便后续计算。 -
q = q.permute(0,2,1):交换张量维度,将第三维移动到第二维,这是为了后续计算方便。 -
k = k.reshape(b,c,h*w):对k做和q类似的操作,将其形状改为三维张量。 -
w_ = torch.bmm(q,k):计算q和k的批次矩阵乘积(batch matrix multiplication),得到注意力权重的初始矩阵。这里的w_是一个b x (h*w) x (h*w)的张量,表示每个位置对应的注意力权重。 -
w_ = w_ * (int(c)**(-0.5)):对初始注意力权重进行缩放,这里使用了一个缩放因子,通常是通道数的倒数的平方根。这个缩放是为了确保在计算注意力时不会因为通道数过大而导致梯度消失或梯度爆炸。 -
w_ = torch.nn.functional.softmax(w_, dim=2):对注意力权重进行softmax操作,将其归一化为概率分布,表示每个位置的重要性。
这段代码的作用是实现自注意力机制中计算注意力权重的过程,其中q和k分别代表查询(query)和键(key),通过计算它们的相似度得到注意力权重。
# attend to values 加注意力到值上v = v.reshape(b,c,h*w)w_ = w_.permute(0,2,1) # b,hw,hw (first hw of k, second of q)h_ = torch.bmm(v,w_) # b, c,hw (hw of q) h_[b,c,j] = sum_i v[b,c,i] w_[b,i,j] [4,12,1024]*[4,1024,1024]h_ = h_.reshape(b,c,h,w)h_ = self.proj_out(h_)return x+h_
-
v = v.reshape(b,c,h*w):将值(value)张量v重新形状为三维张量,其中第三维是原高度和宽度的乘积。这样做是为了方便后续计算。 -
w_ = w_.permute(0,2,1):交换注意力权重w_张量的维度,将第三维移动到第二维,这是为了后续计算方便。 -
h_ = torch.bmm(v,w_):计算值v和经过缩放的注意力权重w_的批次矩阵乘积(batch matrix multiplication),得到自注意力的输出。这里的h_是一个b x c x (h*w)的张量,表示每个位置经过注意力计算后的输出。 -
h_ = h_.reshape(b,c,h,w):将h_张量重新形状为四维张量,恢复其原始的高度和宽度。 -
h_ = self.proj_out(h_):通过一个全连接层proj_out对自注意力的输出h_进行线性变换和非线性变换,这个操作有助于提取特征并保持网络的表达能力。
最后,将输入x和自注意力的输出h_相加,得到最终的自注意力输出。这样做是为了在保留原始输入信息的同时,加入了经过自注意力计算后的新信息,从而使模型能够更好地理解输入序列的语义信息。
2.3 Atten注意力完整代码
from torch import nn
import torch
from einops import rearrangeclass AttnBlock(nn.Module):def __init__(self, in_channels):super().__init__()self.in_channels = in_channelsself.norm = torch.nn.GroupNorm(num_groups=3, num_channels=in_channels, eps=1e-6, affine=True)self.q = torch.nn.Conv2d(in_channels,in_channels,kernel_size=1,stride=1,padding=0)self.k = torch.nn.Conv2d(in_channels,in_channels,kernel_size=1,stride=1,padding=0)self.v = torch.nn.Conv2d(in_channels,in_channels,kernel_size=1,stride=1,padding=0)self.proj_out = torch.nn.Conv2d(in_channels,in_channels,kernel_size=1,stride=1,padding=0)def forward(self, x):h_ = xh_ = self.norm(h_)q = self.q(h_)k = self.k(h_)v = self.v(h_)# compute attention 自注意力计算b,c,h,w = q.shapeq = q.reshape(b,c,h*w) #[4,12,1024]q = q.permute(0,2,1)   # b,hw,ck = k.reshape(b,c,h*w) # b,c,hww_ = torch.bmm(q,k)     # b,hw,hw    w[b,i,j]=sum_c q[b,i,c]k[b,c,j]w_ = w_ * (int(c)**(-0.5))w_ = torch.nn.functional.softmax(w_, dim=2)# attend to values 加注意力到值上v = v.reshape(b,c,h*w)w_ = w_.permute(0,2,1)   # b,hw,hw (first hw of k, second of q)h_ = torch.bmm(v,w_)     # b, c,hw (hw of q) h_[b,c,j] = sum_i v[b,c,i] w_[b,i,j] [4,12,1024]*[4,1024,1024]h_ = h_.reshape(b,c,h,w)h_ = self.proj_out(h_)return x+h_def make_attn(in_channels, attn_type="vanilla"):print(f"making attention of type '{attn_type}' with {in_channels} in_channels")if attn_type == "vanilla":return AttnBlock(in_channels)else:return nn.Identity(in_channels)atten_block=make_attn(12)
x=torch.ones(4,12,32,32)
y=atten_block(x)
print(y.shape)
3 源代码中的另一种注意力实现
源代码中还实现了LinearAttention,是另一种注意力机制
可以看看
class LinearAttention(nn.Module):def __init__(self, dim, heads=4, dim_head=32):super().__init__()self.heads = headshidden_dim = dim_head * headsself.to_qkv = nn.Conv2d(dim, hidden_dim * 3, 1, bias = False)self.to_out = nn.Conv2d(hidden_dim, dim, 1)def forward(self, x):b, c, h, w = x.shapeqkv = self.to_qkv(x)q, k, v = rearrange(qkv, 'b (qkv heads c) h w -> qkv b heads c (h w)', heads = self.heads, qkv=3)k = k.softmax(dim=-1) context = torch.einsum('bhdn,bhen->bhde', k, v)out = torch.einsum('bhde,bhdn->bhen', context, q)out = rearrange(out, 'b heads c (h w) -> b (heads c) h w', heads=self.heads, h=h, w=w)return self.to_out(out)class LinAttnBlock(LinearAttention):"""to match AttnBlock usage"""def __init__(self, in_channels):super().__init__(dim=in_channels, heads=1, dim_head=in_channels)对于forward函数
-
b, c, h, w = x.shape:假设输入张量x是一个四维张量,其中b表示batch size,c表示通道数,h和w表示高度和宽度。 -
qkv = self.to_qkv(x):将输入张量x通过一个线性变换(可能包括分别计算查询(query)、键(key)和值(value))得到qkv张量,其形状为b x (3*heads*c) x h x w,其中heads是多头注意力的头数。 -
q, k, v = rearrange(qkv, 'b (qkv heads c) h w -> qkv b heads c (h w)', heads=self.heads, qkv=3):将qkv张量重新排列为三个张量q、k和v,分别表示查询、键和值,形状为b x heads x c x (h*w)。 -
k = k.softmax(dim=-1):对键张量k进行softmax操作,将其归一化为概率分布,以便计算注意力权重。 -
context = torch.einsum('bhdn,bhen->bhde', k, v):使用torch.einsum函数计算注意力权重与值的加权和,得到上下文张量context,形状为b x heads x c x (h*w)。 -
out = torch.einsum('bhde,bhdn->bhen', context, q):使用torch.einsum函数计算上下文张量与查询张量的加权和,得到输出张量out,形状为b x heads x c x (h*w)。 -
out = rearrange(out, 'b heads c (h w) -> b (heads c) h w', heads=self.heads, h=h, w=w):将输出张量out重新排列为形状b x (heads*c) x h x w,恢复其原始形状。 -
return self.to_out(out):将输出张量out通过一个线性变换得到最终的输出。
如果注意力机制type=None的话,则不进行注意力机制的计算~
用一个torch函数
nn.Identity 这是一个恒等变化的一个函数,不做任何处理
4 完整代码及其测试
from torch import nn
import torch
from einops import rearrangeclass LinearAttention(nn.Module):def __init__(self, dim, heads=4, dim_head=32):super().__init__()self.heads = headshidden_dim = dim_head * headsself.to_qkv = nn.Conv2d(dim, hidden_dim * 3, 1, bias = False)self.to_out = nn.Conv2d(hidden_dim, dim, 1)def forward(self, x):b, c, h, w = x.shapeqkv = self.to_qkv(x)q, k, v = rearrange(qkv, 'b (qkv heads c) h w -> qkv b heads c (h w)', heads = self.heads, qkv=3)k = k.softmax(dim=-1)  context = torch.einsum('bhdn,bhen->bhde', k, v)out = torch.einsum('bhde,bhdn->bhen', context, q)out = rearrange(out, 'b heads c (h w) -> b (heads c) h w', heads=self.heads, h=h, w=w)return self.to_out(out)class LinAttnBlock(LinearAttention):"""to match AttnBlock usage"""def __init__(self, in_channels):super().__init__(dim=in_channels, heads=1, dim_head=in_channels)class AttnBlock(nn.Module):def __init__(self, in_channels):super().__init__()self.in_channels = in_channelsself.norm = torch.nn.GroupNorm(num_groups=3, num_channels=in_channels, eps=1e-6, affine=True)self.q = torch.nn.Conv2d(in_channels,in_channels,kernel_size=1,stride=1,padding=0)self.k = torch.nn.Conv2d(in_channels,in_channels,kernel_size=1,stride=1,padding=0)self.v = torch.nn.Conv2d(in_channels,in_channels,kernel_size=1,stride=1,padding=0)self.proj_out = torch.nn.Conv2d(in_channels,in_channels,kernel_size=1,stride=1,padding=0)def forward(self, x):h_ = xh_ = self.norm(h_)q = self.q(h_)k = self.k(h_)v = self.v(h_)# compute attention 自注意力计算b,c,h,w = q.shapeq = q.reshape(b,c,h*w) #[4,12,1024]q = q.permute(0,2,1)   # b,hw,ck = k.reshape(b,c,h*w) # b,c,hww_ = torch.bmm(q,k)     # b,hw,hw    w[b,i,j]=sum_c q[b,i,c]k[b,c,j]w_ = w_ * (int(c)**(-0.5))w_ = torch.nn.functional.softmax(w_, dim=2)# attend to values 加注意力到值上v = v.reshape(b,c,h*w)w_ = w_.permute(0,2,1)   # b,hw,hw (first hw of k, second of q)h_ = torch.bmm(v,w_)     # b, c,hw (hw of q) h_[b,c,j] = sum_i v[b,c,i] w_[b,i,j] [4,12,1024]*[4,1024,1024]h_ = h_.reshape(b,c,h,w)h_ = self.proj_out(h_)return x+h_def make_attn(in_channels, attn_type="vanilla"):print(f"making attention of type '{attn_type}' with {in_channels} in_channels")if attn_type == "vanilla":return AttnBlock(in_channels)elif attn_type=="line":return LinAttnBlock(in_channels)else:return nn.Identity(in_channels)atten_block=make_attn(12)
x=torch.ones(4,12,32,32)
y=atten_block(x)
print(y.shape)
这篇关于【前沿模型解析】潜在扩散模型 2-3 | 手撕感知图像压缩 基础块 自注意力块的文章就介绍到这儿,希望我们推荐的文章对编程师们有所帮助!


