本文主要是介绍canvas跟随鼠标移动画带透明度的线,希望对大家解决编程问题提供一定的参考价值,需要的开发者们随着小编来一起学习吧!
提示:canvas画线
文章目录
- 前言
- 一、带透明度的线
- 二、试错,只有lineTo的时候画,只有最后地方是透明度的
- 三、试错,只存上一次的点,线会出现断裂的情况
- 总结
前言
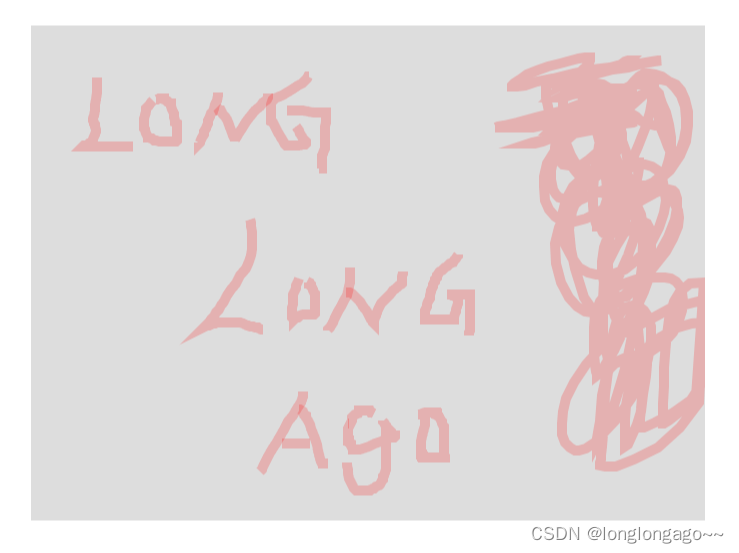
一、带透明度的线
test.html
<!DOCTYPE html>
<html lang="en">
<head><meta charset="UTF-8"><meta name="viewport" content="width=device-width, initial-scale=1.0"><title>canvas跟随鼠标移动画透明线</title><style>div,canvas,img{user-select: none;}.my_canvas,.bg_img{position: absolute;top: 50%;left: 50%;transform: translate(-50%,-50%);}.bg_img{width: 674px;height: 495px;background: #ddd;}</style>
</head>
<body><div class="bg_img"></div><canvas id="myCanvasBot" class="my_canvas" width="674" height="495"></canvas><canvas id="myCanvasTop" class="my_canvas" width="674" height="495"></canvas><script>const canvasWidth = 674;const canvasHeight = 495;//底层canvasconst botCan = document.getElementById('myCanvasBot');//顶层canvasconst topCan = document.getElementById('myCanvasTop');//底层画布const botCtx = botCan.getContext('2d');//顶层画布const topCtx = topCan.getContext('2d');//鼠标是否按下  是否移动  是否画图了let isDown = false,isMove = false,isDrawed = false;//需要画图的轨迹let drawPoints = [];//起始点x,ylet startPoint = {x:0,y:0};//图片历史let imgHistory = [];//icon历史let partHistory = [];//鼠标按下const mousedown = (e)=>{isDown = true;let x = (e||window.event).offsetX;let y = (e||window.event).offsetY;startPoint = {x,y}// drawPoints.push({x,y});drawPoints.push([{x,y}]);topCtx.beginPath();topCtx.moveTo(x,y);}//鼠标移动const mousemove = (e)=>{if(isDown){isMove = true;drawCurve(e);}}//鼠标抬起const mouseup = (e)=>{if(isDown&&isMove){isDown = false;isMove = false;drawPoints = [];//把topCan画布生成图片let img = new Image();img.src = topCan.toDataURL('image/png');img.onload = ()=>{partHistory.push(img);//添加到botCtx画布botCtx.drawImage(img,0,0);let historyImg = new Image();historyImg = botCan.toDataURL('image/png');historyImg.onload = ()=>{//添加到历史记录imgHistory.push(historyImg);}//清除topCtx画布topCtx.clearRect(0,0,canvasWidth,canvasHeight);}}}//画带透明度涂鸦const drawCurve = (e)=>{let x = (e||window.event).offsetX;let y = (e||window.event).offsetY;drawPoints.push({x,y});topCtx.strokeStyle = 'rgba(255,0,0,0.2)';topCtx.lineWidth = 10;//清空当前画布内容topCtx.clearRect(0,0,canvasWidth,canvasHeight);//必须每次都beginPath  不然会卡topCtx.beginPath();topCtx.moveTo(drawPoints[0].x,drawPoints[0].y);for(let i=1;i<drawPoints.length;i++){topCtx.lineTo(drawPoints[i].x,drawPoints[i].y);}topCtx.stroke();}//canvas添加鼠标事件topCan.addEventListener('mousedown',mousedown);topCan.addEventListener('mousemove',mousemove);topCan.addEventListener('mouseup',mouseup);//全局添加鼠标抬起事件document.addEventListener('mouseup',()=>{isDown = false;isMove = false;isDrawed = false;});</script>
</body>
</html>
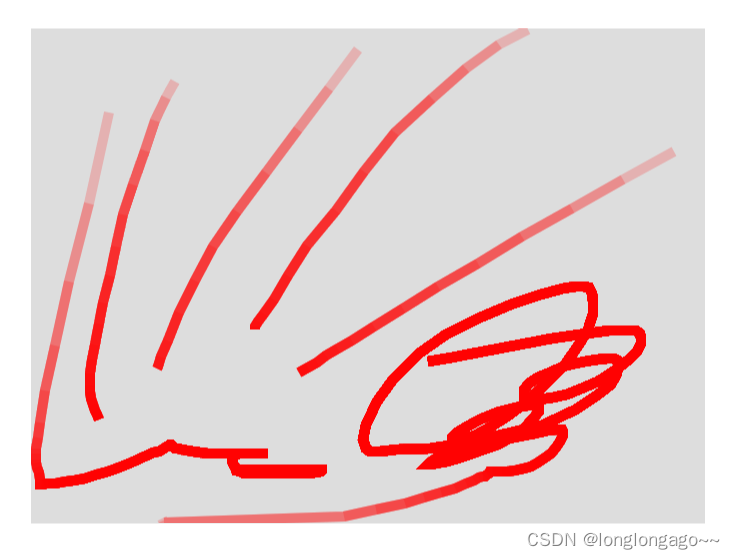
二、试错,只有lineTo的时候画,只有最后地方是透明度的
test.html
<!DOCTYPE html>
<html lang="en">
<head><meta charset="UTF-8"><meta name="viewport" content="width=device-width, initial-scale=1.0"><title>canvas跟随鼠标移动画透明线</title><style>div,canvas,img{user-select: none;}.my_canvas,.bg_img{position: absolute;top: 50%;left: 50%;transform: translate(-50%,-50%);}.bg_img{width: 674px;height: 495px;background: #ddd;}</style>
</head>
<body><div class="bg_img"></div><canvas id="myCanvasBot" class="my_canvas" width="674" height="495"></canvas><canvas id="myCanvasTop" class="my_canvas" width="674" height="495"></canvas><script>const canvasWidth = 674;const canvasHeight = 495;//底层canvasconst botCan = document.getElementById('myCanvasBot');//顶层canvasconst topCan = document.getElementById('myCanvasTop');//底层画布const botCtx = botCan.getContext('2d');//顶层画布const topCtx = topCan.getContext('2d');//鼠标是否按下  是否移动  是否画图了let isDown = false,isMove = false,isDrawed = false;//需要画图的轨迹let drawPoints = [];//起始点x,ylet startPoint = {x:0,y:0};//图片历史let imgHistory = [];//icon历史let partHistory = [];//鼠标按下const mousedown = (e)=>{isDown = true;let x = (e||window.event).offsetX;let y = (e||window.event).offsetY;startPoint = {x,y}// drawPoints.push({x,y});drawPoints.push([{x,y}]);topCtx.beginPath();topCtx.moveTo(x,y);}//鼠标移动const mousemove = (e)=>{if(isDown){isMove = true;drawCurve(e);}}//鼠标抬起const mouseup = (e)=>{if(isDown&&isMove){isDown = false;isMove = false;drawPoints = [];//把topCan画布生成图片let img = new Image();img.src = topCan.toDataURL('image/png');img.onload = ()=>{partHistory.push(img);//添加到botCtx画布botCtx.drawImage(img,0,0);let historyImg = new Image();historyImg = botCan.toDataURL('image/png');historyImg.onload = ()=>{//添加到历史记录imgHistory.push(historyImg);}//清除topCtx画布topCtx.clearRect(0,0,canvasWidth,canvasHeight);}}}//画带透明度涂鸦const drawCurve = (e)=>{let x = (e||window.event).offsetX;let y = (e||window.event).offsetY;drawPoints.push({x,y});topCtx.strokeStyle = 'rgba(255,0,0,0.2)';topCtx.lineWidth = 10;//清空当前画布内容// topCtx.clearRect(0,0,canvasWidth,canvasHeight);//必须每次都beginPath  不然会卡// topCtx.beginPath();// topCtx.moveTo(drawPoints[0].x,drawPoints[0].y);// for(let i=1;i<drawPoints.length;i++){//     topCtx.lineTo(drawPoints[i].x,drawPoints[i].y);// }topCtx.lineTo(x,y);topCtx.stroke();}//canvas添加鼠标事件topCan.addEventListener('mousedown',mousedown);topCan.addEventListener('mousemove',mousemove);topCan.addEventListener('mouseup',mouseup);//全局添加鼠标抬起事件document.addEventListener('mouseup',()=>{isDown = false;isMove = false;isDrawed = false;});</script>
</body>
</html>
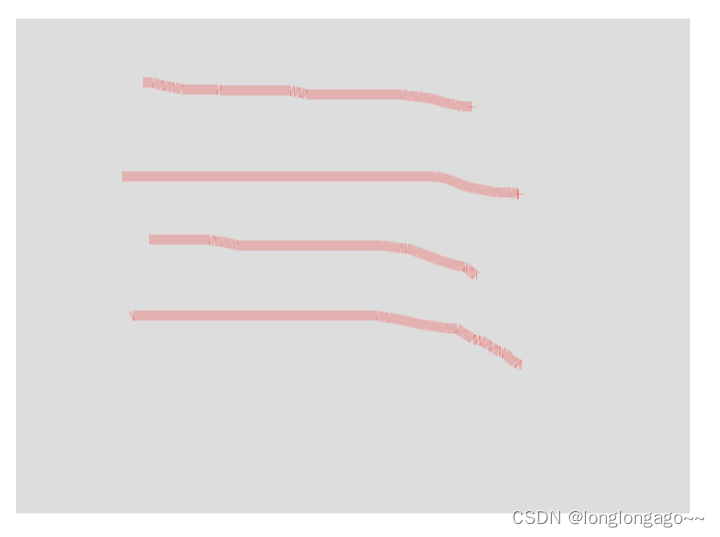
三、试错,只存上一次的点,线会出现断裂的情况
<!DOCTYPE html>
<html lang="en">
<head><meta charset="UTF-8"><meta name="viewport" content="width=device-width, initial-scale=1.0"><title>canvas跟随鼠标移动画透明线</title><style>div,canvas,img{user-select: none;}.my_canvas,.bg_img{position: absolute;top: 50%;left: 50%;transform: translate(-50%,-50%);}.bg_img{width: 674px;height: 495px;background: #ddd;}</style>
</head>
<body><div class="bg_img"></div><canvas id="myCanvasBot" class="my_canvas" width="674" height="495"></canvas><canvas id="myCanvasTop" class="my_canvas" width="674" height="495"></canvas><script>const canvasWidth = 674;const canvasHeight = 495;//底层canvasconst botCan = document.getElementById('myCanvasBot');//顶层canvasconst topCan = document.getElementById('myCanvasTop');//底层画布const botCtx = botCan.getContext('2d');//顶层画布const topCtx = topCan.getContext('2d');//鼠标是否按下  是否移动  是否画图了let isDown = false,isMove = false,isDrawed = false;//需要画图的轨迹let drawPoints = [];//起始点x,ylet startPoint = {x:0,y:0};//上一次的点let lastPoint = {x:0,y:0};//图片历史let imgHistory = [];//icon历史let partHistory = [];//鼠标按下const mousedown = (e)=>{isDown = true;let x = (e||window.event).offsetX;let y = (e||window.event).offsetY;startPoint = {x,y}// drawPoints.push({x,y});drawPoints.push([{x,y}]);lastPoint = {x,y}topCtx.beginPath();topCtx.moveTo(x,y);}//鼠标移动const mousemove = (e)=>{if(isDown){isMove = true;drawCurve(e);}}//鼠标抬起const mouseup = (e)=>{if(isDown&&isMove){isDown = false;isMove = false;drawPoints = [];//把topCan画布生成图片let img = new Image();img.src = topCan.toDataURL('image/png');img.onload = ()=>{partHistory.push(img);//添加到botCtx画布botCtx.drawImage(img,0,0);let historyImg = new Image();historyImg = botCan.toDataURL('image/png');historyImg.onload = ()=>{//添加到历史记录imgHistory.push(historyImg);}//清除topCtx画布topCtx.clearRect(0,0,canvasWidth,canvasHeight);}}}//画带透明度涂鸦const drawCurve = (e)=>{let x = (e||window.event).offsetX;let y = (e||window.event).offsetY;drawPoints.push({x,y});topCtx.strokeStyle = 'rgba(255,0,0,0.2)';topCtx.lineWidth = 10;topCtx.beginPath();topCtx.moveTo(lastPoint.x,lastPoint.y);topCtx.lineTo(x,y);topCtx.stroke();lastPoint = {x,y};}//canvas添加鼠标事件topCan.addEventListener('mousedown',mousedown);topCan.addEventListener('mousemove',mousemove);topCan.addEventListener('mouseup',mouseup);//全局添加鼠标抬起事件document.addEventListener('mouseup',()=>{isDown = false;isMove = false;isDrawed = false;});</script>
</body>
</html>
总结
踩坑路漫漫长@~@
这篇关于canvas跟随鼠标移动画带透明度的线的文章就介绍到这儿,希望我们推荐的文章对编程师们有所帮助!


