本文主要是介绍Nvidia 3060显卡 CUDA环境搭建(Ubuntu22.04+Nvidia 510+Cuda11.6+cudnn8.8),希望对大家解决编程问题提供一定的参考价值,需要的开发者们随着小编来一起学习吧!
写在前面
- 工作中遇到,简单整理
- 理解不足小伙伴帮忙指正
对每个人而言,真正的职责只有一个:找到自我。然后在心中坚守其一生,全心全意,永不停息。所有其它的路都是不完整的,是人的逃避方式,是对大众理想的懦弱回归,是随波逐流,是对内心的恐惧 ——赫尔曼·黑塞《德米安》
当前系统环境
系统环境
┌──[root@test]-[~]
└─$hostnamectlStatic hostname: testIcon name: computer-desktopChassis: desktopMachine ID: addc7ca21ef24518a9465c499eb3c8b7Boot ID: 14aa59cc6960431c95d328684b521844
Operating System: Ubuntu 22.04.2 LTSKernel: Linux 5.19.0-43-genericArchitecture: x86-64Hardware Vendor: Micro-Star International Co., Ltd.Hardware Model: MS-7C83
显卡版本
┌──[root@test]-[~]
└─$lspci -vnn | grep VGA
01:00.0 VGA compatible controller [0300]: NVIDIA Corporation GA106 [GeForce RTX 3060 Lite Hash Rate] [10de:2504] (rev a1) (prog-if 00 [VGA controller])
┌──[root@test]-[~]
└─$
安装 NVIDIA 驱动程序,在安装之前,需要禁用 Nouveau 驱动程序。
Nouveau 是一个开源的NVIDIA显卡驱动程序,它由社区开发和维护。它可以在Linux系统上替代NVIDIA官方驱动程序,但它的性能和功能可能不如官方驱动程序。
如果使用 Nouveau 驱动程序,您可能无法使用NVIDIA的高级功能,如CUDA和深度学习库。如果您需要使用这些功能,建议安装NVIDIA官方驱动程序。
禁用 Nouveau 驱动程序
┌──[root@test]-[~]
└─$sudo vim /etc/modprobe.d/blacklist-nouveau.conf
┌──[root@test]-[~]
└─$cat /etc/modprobe.d/blacklist-nouveau.conf
blacklist nouveau
options nouveau modeset=0
┌──[root@test]-[~]
└─$sudo update-initramfs -u
update-initramfs: Generating /boot/initrd.img-5.19.0-43-generic
没有输出说明操作成功
┌──[root@test]-[~]
└─$reboot
┌──[root@test]-[~]
└─$lsmod | grep nouveau
┌──[root@test]-[~]
└─$
安装Nvidia驱动
这里的版本 nvidia-driver-510 要和后面安装 cuda 的版本一样
如果之前安装过卸载驱动
# 查看显卡型号
lspci -vnn | grep VGA
# 卸载旧驱动
sudo apt-get remove --purge nvidia*
离线安装
如果离线环境需要手动安装,下载驱动: https://www.nvidia.com/Download/index.aspx?lang=en-us
# 给run文件可执行权限
sudo chmod a+x NVIDIA-Linux-x86_64-515.86.01.run
# 安装
sudo ./NVIDIA-Linux-x86_64-440.64.run -no-x-check -no-nouveau-check -no-opengl-files
# -no-x-check:安装驱动时关闭X服务
# -no-nouveau-check:安装驱动时禁用nouveau
# -no-opengl-files:只安装驱动文件,不安装OpenGL文件
非离线安装
非离线环境使用包管理工具安装,下面的选择这一种,选择安装驱动版本
┌──[root@test]-[~]
└─$ubuntu-drivers devices
== /sys/devices/pci0000:00/0000:00:01.0/0000:01:00.0 ==
modalias : pci:v000010DEd00002504sv00001462sd0000397Dbc03sc00i00
vendor   : NVIDIA Corporation
model    : GA106 [GeForce RTX 3060 Lite Hash Rate]
driver   : nvidia-driver-530-open - distro non-free
driver   : nvidia-driver-470 - distro non-free
driver   : nvidia-driver-525-open - third-party non-free
driver   : nvidia-driver-535 - third-party non-free
driver   : nvidia-driver-520 - third-party non-free
driver   : nvidia-driver-510 - distro non-free
driver   : nvidia-driver-525 - third-party non-free
driver   : nvidia-driver-515-server - distro non-free
driver   : nvidia-driver-535-open - third-party non-free recommended
driver   : nvidia-driver-530 - third-party non-free
driver   : nvidia-driver-470-server - distro non-free
driver   : nvidia-driver-515-open - distro non-free
driver   : nvidia-driver-525-server - distro non-free
driver   : nvidia-driver-515 - third-party non-free
driver   : xserver-xorg-video-nouveau - distro free builtin┌──[root@test]-[~]
└─$
安装
┌──[root@test]-[~]
└─$sudo apt install  nvidia-driver-510 -y
重启机器
┌──[root@test]-[~]
└─$reboot
查看安装是否成功,对应版本信息
┌──[root@test]-[~]
└─$nvidia-smi
Thu Jun 15 11:49:43 2023
+-----------------------------------------------------------------------------+
| NVIDIA-SMI 510.108.03   Driver Version: 510.108.03   CUDA Version: 11.6     |
|-------------------------------+----------------------+----------------------+
| GPU  Name        Persistence-M| Bus-Id        Disp.A | Volatile Uncorr. ECC |
| Fan  Temp  Perf  Pwr:Usage/Cap|         Memory-Usage | GPU-Util  Compute M. |
|                               |                      |               MIG M. |
|===============================+======================+======================|
|   0  NVIDIA GeForce ...  Off  | 00000000:01:00.0  On |                  N/A |
|  0%   38C    P8    16W / 170W |    172MiB / 12288MiB |      0%      Default |
|                               |                      |                  N/A |
+-------------------------------+----------------------+----------------------++-----------------------------------------------------------------------------+
| Processes:                                                                  |
|  GPU   GI   CI        PID   Type   Process name                  GPU Memory |
|        ID   ID                                                   Usage      |
|=============================================================================|
|    0   N/A  N/A      1386      G   /usr/lib/xorg/Xorg                 60MiB |
|    0   N/A  N/A      1650      G   /usr/bin/gnome-shell              109MiB |
+-----------------------------------------------------------------------------+
┌──[root@test]-[~]
└─$cat /proc/driver/nvidia/version
NVRM version: NVIDIA UNIX x86_64 Kernel Module  510.108.03  Thu Oct 20 05:10:45 UTC 2022
GCC version:  gcc version 11.3.0 (Ubuntu 11.3.0-1ubuntu1~22.04.1)
┌──[root@test]-[~]
└─$
安装Cuda
CUDA是NVIDIA提供的一种并行计算平台和编程模型,旨在利用GPU的并行计算能力加速计算密集型应用程序。
CUDA包括CUDA驱动程序和CUDA Toolkit。支持多种编程语言,包括C、C++、Fortran和Python等。
- CUDA驱动程序是GPU和操作系统之间的接口.
- CUDA Toolkit则包括编译器、库和工具,用于开发CUDA应用程序。
如果以前安装过,卸载
sudo /usr/local/cuda-11.6/bin/cuda-uninstaller
sudo rm  -rf /usr/local/cuda-11.6
sudo: /usr/local/cuda-11.8/bin/uninstall_cuda_8.0.pl: command not found
┌──[root@test]-[~]
└─$sudo /usr/local/cuda-11.6/bin/
bin2c                        cuda-gdbserver               ncu                          nsys-ui                      nv-nsight-cu-cli
computeprof                  cuda-memcheck                ncu-ui                       nvcc                         nvprof
compute-sanitizer            cuda-uninstaller             nsight_ee_plugins_manage.sh  __nvcc_device_query          nvprune
crt/                         cu++filt                     nsight-sys                   nvdisasm                     nvvp
cudafe++                     cuobjdump                    nsys                         nvlink                       ptxas
cuda-gdb                     fatbinary                    nsys-exporter                nv-nsight-cu
┌──[root@test]-[~]
└─$sudo /usr/local/cuda-11.6/bin/cuda-uninstaller
在输出的终端 UI页面,空格选择全部,选择完成,卸载完成之后重新安装
┌──[root@test]-[~]
└─$sudo /usr/local/cuda-11.6/bin/cuda-uninstallerSuccessfully uninstalled
┌──[root@test]-[~]
└─$sudo rm  -rf /usr/local/cuda-11.6
官网安装包下载
https://developer.nvidia.com/cuda-downloads?target_os=Linux&target_arch=x86_64&Distribution=Ubuntu&target_version=22.04&target_type=runfile_local
┌──[root@test]-[~]
└─$chmod +x cuda_*
这里cuda 选择 cuda_11.6.0_510.39.01_linux.run, 510 对应的版本
┌──[root@test]-[~]
└─$ll cuda*
-rwxr-xr-x 1 root root 3488951771  1月 11  2022 cuda_11.6.0_510.39.01_linux.run*
-rwxr-xr-x 1 root root 3490450898  5月  5  2022 cuda_11.7.0_515.43.04_linux.run*
-rwxr-xr-x 1 root root 4317456991  4月 17 23:04 cuda_12.1.1_530.30.02_linux.run*
-rwxr-xr-x 1 root root        853  5月 17 19:52 cuda_log.log*
-rw-r--r-- 1 root root 2472241638  7月 29  2021 cuda-repo-ubuntu2004-11-4-local_11.4.1-470.57.02-1_amd64.deb
-rw-r--r-- 1 root root 2699477842  5月  5  2022 cuda-repo-ubuntu2204-11-7-local_11.7.0-515.43.04-1_amd64.deb
┌──[root@test]-[~]
└─$
┌──[root@test]-[~]
└─$sudo ./cuda_12.1.1_530.30.02_linux.run
上面我们已经安装了驱动,所以不需要选择,直接安装 cuda 相关的就可以,安装成功输出
┌──[root@test]-[~]
└─$sudo ./cuda_11.6.0_510.39.01_linux.run
===========
= Summary =
===========Driver:   Not Selected
Toolkit:  Installed in /usr/local/cuda-11.6/Please make sure that-   PATH includes /usr/local/cuda-11.6/bin-   LD_LIBRARY_PATH includes /usr/local/cuda-11.6/lib64, or, add /usr/local/cuda-11.6/lib64 to /etc/ld.so.conf and run ldconfig as rootTo uninstall the CUDA Toolkit, run cuda-uninstaller in /usr/local/cuda-11.6/bin
***WARNING: Incomplete installation! This installation did not install the CUDA Driver. A driver of version at least 510.00 is required for CUDA 11.6 functionality to work.
To install the driver using this installer, run the following command, replacing <CudaInstaller> with the name of this run file:sudo <CudaInstaller>.run --silent --driverLogfile is /var/log/cuda-installer.log
添加环境变量
┌──[root@test]-[/b1205]
└─$echo $LD_LIBRARY_PATH
/usr/local/cuda-11.6/lib64:/usr/local/cuda-11.6/lib64
┌──[root@test]-[/b1205]
└─$echo $PATH
/usr/local/cuda-11.6/bin:/usr/local/sbin:/usr/local/bin:/usr/sbin:/usr/bin:/sbin:/bin:/usr/games:/usr/local/games:/snap/bin
┌──[root@test]-[/b1205]
└─$
安装 cuDNN
cuDNN 是NVIDIA提供的一个用于深度神经网络的加速库,它可以优化卷积、池化、归一化等操作,使得在GPU上运行深度神经网络的速度得到了大幅度提升。cuDNN需要与CUDA配合使用,因此在安装cuDNN之前,需要先安装相应版本的CUDA。
https://developer.nvidia.com/rdp/cudnn-download
这里需要注册账户登录一下,然后在这里下载
https://developer.nvidia.com/rdp/cudnn-archive
选择cuda对应的版本
┌──[root@test]-[~]
└─$ls cudnn*
cudnn-local-repo-ubuntu2204-8.8.1.3_1.0-1_amd64.deb
sudo dpkg -i cudnn-local-repo-ubuntu2204-8.8.1.3_1.0-1_amd64.deb
sudo cp /var/cudnn-local-repo-*/cudnn-local-*-keyring.gpg /usr/share/keyrings/
sudo apt-get update
sudoapt-get install libcudnn8=8.8.1.3-1+cuda1
sudo apt-get install libcudnn8-dev=8.8.1.3-1+cuda1
sudo apt-get install libcudnn8-samples=8.8.1.3-1+cuda1
确实安装是否成功
┌──[root@test]-[~]
└─$nvcc -V && nvidia-smi
nvcc: NVIDIA (R) Cuda compiler driver
Copyright (c) 2005-2021 NVIDIA Corporation
Built on Fri_Dec_17_18:16:03_PST_2021
Cuda compilation tools, release 11.6, V11.6.55
Build cuda_11.6.r11.6/compiler.30794723_0
Thu Jun 15 14:42:58 2023
+-----------------------------------------------------------------------------+
| NVIDIA-SMI 510.108.03   Driver Version: 510.108.03   CUDA Version: 11.6     |
|-------------------------------+----------------------+----------------------+
| GPU  Name        Persistence-M| Bus-Id        Disp.A | Volatile Uncorr. ECC |
| Fan  Temp  Perf  Pwr:Usage/Cap|         Memory-Usage | GPU-Util  Compute M. |
|                               |                      |               MIG M. |
|===============================+======================+======================|
|   0  NVIDIA GeForce ...  Off  | 00000000:01:00.0  On |                  N/A |
|  0%   51C    P8    21W / 170W |    105MiB / 12288MiB |     12%      Default |
|                               |                      |                  N/A |
+-------------------------------+----------------------+----------------------++-----------------------------------------------------------------------------+
| Processes:                                                                  |
|  GPU   GI   CI        PID   Type   Process name                  GPU Memory |
|        ID   ID                                                   Usage      |
|=============================================================================|
|    0   N/A  N/A      1386      G   /usr/lib/xorg/Xorg                 81MiB |
|    0   N/A  N/A      1650      G   /usr/bin/gnome-shell               22MiB |
+-----------------------------------------------------------------------------+
┌──[root@test]-[~]
└─$
编写测试脚本测试
(py39) test@test:~/code/Face$ cat cuda_vim.py
import numpy as np
import time
from numba import cuda@cuda.jit
def increment_kernel(array):idx = cuda.grid(1)if idx < array.size:array[idx] += 1def main():n = 1000000000a = np.zeros(n, dtype=np.int32)threads_per_block = 1024blocks_per_grid = (n + threads_per_block - 1) // threads_per_blockstart = time.time()increment_kernel[blocks_per_grid, threads_per_block](a)end = time.time()print("Time taken: ", end - start)if __name__ == "__main__":while True:main()(py39) test@test:~/code/Face$
Every 2.0s: nvidia-smi                                                                test: Thu Jun 15 14:44:47 2023Thu Jun 15 14:44:47 2023
+-----------------------------------------------------------------------------+
| NVIDIA-SMI 510.108.03   Driver Version: 510.108.03   CUDA Version: 11.6     |
|-------------------------------+----------------------+----------------------+
| GPU  Name        Persistence-M| Bus-Id        Disp.A | Volatile Uncorr. ECC |
| Fan  Temp  Perf  Pwr:Usage/Cap|         Memory-Usage | GPU-Util  Compute M. |
|                               |                      |               MIG M. |
|===============================+======================+======================|
|   0  NVIDIA GeForce ...  Off  | 00000000:01:00.0  On |                  N/A |
|  0%   55C    P2    51W / 170W |   4025MiB / 12288MiB |     22%      Default |
|                               |                      |                  N/A |
+-------------------------------+----------------------+----------------------++-----------------------------------------------------------------------------+
| Processes:                                                                  |
|  GPU   GI   CI        PID   Type   Process name                  GPU Memory |
|        ID   ID                                                   Usage      |
|=============================================================================|
|    0   N/A  N/A      1386      G   /usr/lib/xorg/Xorg                 81MiB |
|    0   N/A  N/A      1650      G   /usr/bin/gnome-shell               22MiB |
|    0   N/A  N/A     32031      C   python                           3917MiB |
+-----------------------------------------------------------------------------+
遇到的问题
安装530高版本报下面的错:
┌──[root@test]-[~]
└─$sudo ./cuda_12.1.1_530.30.02_linux.run
Error! Could not locate dkms.conf file.
File: /var/lib/dkms/nvidia-fs/2.15.3/source/dkms.conf does not exist.
cat: /var/log/nvidia/.uninstallManifests/kernelobjects-components/uninstallManifest-nvidia_fs: No such file or directory
make: *** No rule to make target 'uninstall'.  Stop.
Error! DKMS tree already contains: nvidia-fs-2.15.3
You cannot add the same module/version combo more than once.
===========
= Summary =
===========Driver:   Not Selected
Toolkit:  Installed in /usr/local/cuda-12.1/Please make sure that-   PATH includes /usr/local/cuda-12.1/bin-   LD_LIBRARY_PATH includes /usr/local/cuda-12.1/lib64, or, add /usr/local/cuda-12.1/lib64 to /etc/ld.so.conf and run ldconfig as rootTo uninstall the CUDA Toolkit, run cuda-uninstaller in /usr/local/cuda-12.1/bin
To uninstall the kernel objects, run ko-uninstaller in /usr/local/kernelobjects/bin
***WARNING: Incomplete installation! This installation did not install the CUDA Driver. A driver of version at least 530.00 is required for CUDA 12.1 functionality to work.
To install the driver using this installer, run the following command, replacing <CudaInstaller> with the name of this run file:sudo <CudaInstaller>.run --silent --driverLogfile is /var/log/cuda-installer.log
┌──[root@test]-[~]
└─$
解决办法,换了低版本的510
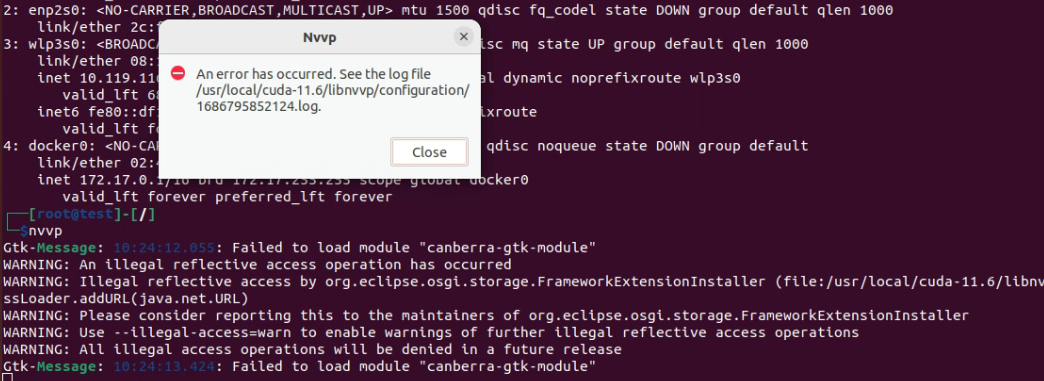
运行 nvvp 报错
┌──[root@test]-[~]
└─$nvvp
Nvvp: Cannot open display:
WARNING: An illegal reflective access operation has occurred
WARNING: Illegal reflective access by org.eclipse.osgi.storage.FrameworkExtensionInstaller (file:/usr/local/cuda-11.6/libnvvp/plugins/org.eclipse.osgi_3.10.1.v20140909-1633.jar) to method java.net.URLClassLoader.addURL(java.net.URL)
WARNING: Please consider reporting this to the maintainers of org.eclipse.osgi.storage.FrameworkExtensionInstaller
WARNING: Use --illegal-access=warn to enable warnings of further illegal reflective access operations
WARNING: All illegal access operations will be denied in a future release
Nvvp: Cannot open display:
Nvvp:
An error has occurred. See the log file
/usr/local/cuda-11.6/libnvvp/configuration/1686795694122.log.
┌──[root@test]-[~]
└─$
ssh 环境不行,需要做桌面环境
在桌面环境执行,报错
Gtk-Message: 09:10:26.571: Failed to load module "canberra-gtk-module"
安装下面的安装包
┌──[root@test]-[~]
└─$sudo apt-get install libcanberra-gtk-module
nvidia-driver-XXX-open 版本安装报错
nvidia-driver-530-open 是一个在发行版的非自由存储库中提供的NVIDIA驱动程序,它是由发行版的维护者维护的。这意味着它是与发行版的其余部分紧密集成的,并且由发行版的维护者提供支持和更新。
nvidia-driver-530 是一个第三方非自由驱动程序,它不是由发行版的维护者维护的。相反,它是由NVIDIA公司提供的,并且可能需要手动安装和配置。由于它不是由发行版的维护者提供的,因此您可能无法获得与发行版集成和支持相同的级别。
nvidia-driver-530-open是更受支持和更集成的选择,而nvidia-driver-530则需要更多的手动配置和支持。
 nvidia-driver-530-open : Depends: libnvidia-gl-530 (= 530.41.03-0ubuntu0.22.04.2) but it is not going to be installedDepends: nvidia-dkms-530-open (<= 530.41.03-1)Depends: nvidia-dkms-530-open (>= 530.41.03)Depends: nvidia-kernel-common-530 (<= 530.41.03-1) but it is not going to be installedDepends: nvidia-kernel-common-530 (>= 530.41.03) but it is not going to be installedDepends: nvidia-kernel-source-530-open (= 530.41.03-0ubuntu0.22.04.2) but it is not going to be installedDepends: libnvidia-compute-530 (= 530.41.03-0ubuntu0.22.04.2) but it is not going to be installedDepends: libnvidia-extra-530 (= 530.41.03-0ubuntu0.22.04.2) but it is not going to be installedDepends: nvidia-compute-utils-530 (= 530.41.03-0ubuntu0.22.04.2) but it is not going to be installedDepends: libnvidia-decode-530 (= 530.41.03-0ubuntu0.22.04.2) but it is not going to be installedDepends: libnvidia-encode-530 (= 530.41.03-0ubuntu0.22.04.2) but it is not going to be installedDepends: nvidia-utils-530 (= 530.41.03-0ubuntu0.22.04.2) but it is not going to be installedDepends: xserver-xorg-video-nvidia-530 (= 530.41.03-0ubuntu0.22.04.2) but it is not going to be installedDepends: libnvidia-cfg1-530 (= 530.41.03-0ubuntu0.22.04.2) but it is not going to be installedDepends: libnvidia-fbc1-530 (= 530.41.03-0ubuntu0.22.04.2) but it is not going to be installedRecommends: libnvidia-compute-530:i386 (= 530.41.03-0ubuntu0.22.04.2)Recommends: libnvidia-decode-530:i386 (= 530.41.03-0ubuntu0.22.04.2)Recommends: libnvidia-encode-530:i386 (= 530.41.03-0ubuntu0.22.04.2)Recommends: libnvidia-fbc1-530:i386 (= 530.41.03-0ubuntu0.22.04.2)Recommends: libnvidia-gl-530:i386 (= 530.41.03-0ubuntu0.22.04.2)
E: Unable to correct problems, you have held broken packages.
解决办法,下面的方式进行了尝试,未解决。换了不带 open 的版本
# 更新你的软件包列表和已安装的软件包:
sudo apt update
sudo apt upgrade
# 尝试使用以下命令来修复可能存在的损坏软件包:
sudo apt --fix-broken install
# 使用以下命令来清理系统中已经安装的软件包的缓存:
sudo apt clean
# 尝试使用以下命令来删除已经损坏的软件包并重新安装
sudo apt remove nvidia-driver-530-open
sudo apt autoremove
sudo apt install nvidia-driver-530-open
博文部分内容参考
© 文中涉及参考链接内容版权归原作者所有,如有侵权请告知,这是一个开源项目,如果你认可它,不要吝啬星星哦 😃
https://docs.nvidia.com/deeplearning/cudnn/install-guide/index.html
https://docs.nvidia.com/cuda/cuda-quick-start-guide/index.html#id8
https://blog.51cto.com/u_4029519/5909904
© 2018-2023 liruilonger@gmail.com, All rights reserved. 保持署名-非商用-相同方式共享(CC BY-NC-SA 4.0)
这篇关于Nvidia 3060显卡 CUDA环境搭建(Ubuntu22.04+Nvidia 510+Cuda11.6+cudnn8.8)的文章就介绍到这儿,希望我们推荐的文章对编程师们有所帮助!


