本文主要是介绍YOLOv5区域检测计数+声音警报,希望对大家解决编程问题提供一定的参考价值,需要的开发者们随着小编来一起学习吧!
YOLOv5区域检测计数+声音警报
- 1. 相关配置
- 2. 检测区域设置
- 3. 画检测区域线(不想显示也可以不画)
- 4. 报警模块
- 5. 计数模块
- 6. 代码修改
- 6.1 主代码
- 6.2 细节修改(可忽略)
- 6. 实验效果
本篇博文工程源码下载
链接1:https://github.com/up-up-up-up/yolov5-area-detection( 求 STAR )
链接2:https://pan.baidu.com/s/1WFVMow_-4M5Cc6P3nY63Sw?pwd=nucv
具体实现效果已在Bilibili发布,点击跳转
1. 相关配置
系统:win 10
YOLO版本:yolov5 6.1
电脑显卡:NVIDIA 2080Ti(CPU也可以跑,GPU只是起到加速推理效果)
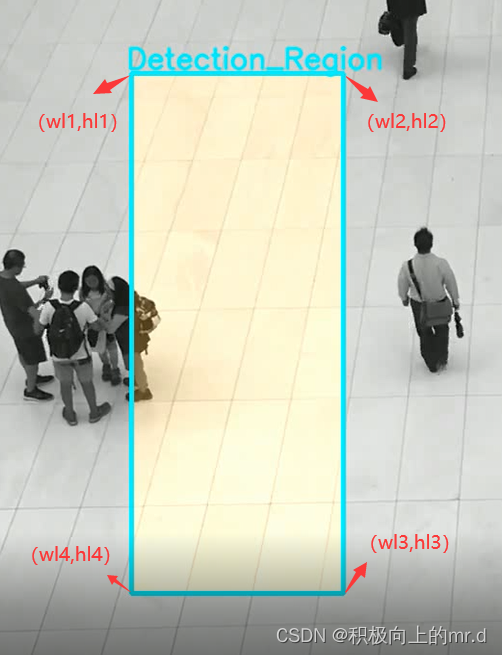
2. 检测区域设置
设置区域范围由四个点围成,四个点的坐标分别为(wl1,hl1),(wl2,hl2),(wl3,hl3),(wl4,hl4)
 # 1,2,3,4分别代表左上,右上,右下,左下四个点坐标,即(480,270)(700,270)(700,810)(480,810)
hl1 = 270 / 1080  # 左上纵坐标/图片高度
wl1 = 480 / 1920  # 左上横坐标/图片宽度
hl2 = 270 / 1080  # 右上横坐标/图片宽度
wl2 = 700 / 1920  # 右上横坐标/图片宽度
hl3 = 810 / 1080  # 右下横坐标/图片宽度
wl3 = 700 / 1920  # 右下横坐标/图片宽度
hl4 = 810 / 1080  # 左下横坐标/图片宽度
wl4 = 480 / 1920  # 左下横坐标/图片宽度
具体把这部分代码加在了摄像头循环 for path, im, im0s, vid_cap, s in dataset 下:
for path, im, im0s, vid_cap, s in dataset:# 1,2,3,4分别代表左上,右上,右下,左下四个点坐标,即(480,270)(700,270)(700,810)(480,810)hl1 = 270 / 1080 # 左上纵坐标/图片高度wl1 = 480 / 1920 # 左上横坐标/图片宽度hl2 = 270 / 1080 # 右上横坐标/图片宽度wl2 = 700 / 1920 # 右上横坐标/图片宽度hl3 = 810 / 1080 # 右下横坐标/图片宽度wl3 = 700 / 1920 # 右下横坐标/图片宽度hl4 = 810 / 1080 # 左下横坐标/图片宽度wl4 = 480 / 1920 # 左下横坐标/图片宽度if webcam:for b in range(0, im.shape[0]):mask = np.zeros([im[b].shape[1], im[b].shape[2]], dtype=np.uint8)# mask[round(img[b].shape[1] * hl1):img[b].shape[1], round(img[b].shape[2] * wl1):img[b].shape[2]] = 255pts = np.array([[int(im[b].shape[2] * wl1), int(im[b].shape[1] * hl1)], # pts1[int(im[b].shape[2] * wl2), int(im[b].shape[1] * hl2)], # pts2[int(im[b].shape[2] * wl3), int(im[b].shape[1] * hl3)], # pts3[int(im[b].shape[2] * wl4), int(im[b].shape[1] * hl4)]], np.int32) # 将四个点坐标存储为数组形式mask = cv2.fillPoly(mask, [pts], (255, 255, 255)) # 设置四个点围成的区域为分割区域imgc = im[b].transpose((1, 2, 0))imgc = cv2.add(imgc, np.zeros(np.shape(imgc), dtype=np.uint8), mask=mask) #将分割区域添加进图像中# cv2.imshow('1',imgc)im[b] = imgc.transpose((2, 0, 1))else:mask = np.zeros([im.shape[1], im.shape[2]], dtype=np.uint8)# mask[round(img.shape[1] * hl1):img.shape[1], round(img.shape[2] * wl1):img.shape[2]] = 255pts = np.array([[int(im.shape[2] * wl1), int(im.shape[1] * hl1)], # pts1[int(im.shape[2] * wl2), int(im.shape[1] * hl2)], # pts2[int(im.shape[2] * wl3), int(im.shape[1] * hl3)], # pts3[int(im.shape[2] * wl4), int(im.shape[1] * hl4)]], np.int32)mask = cv2.fillPoly(mask, [pts], (255, 255, 255))img = im.transpose((1, 2, 0))img = cv2.add(img, np.zeros(np.shape(img), dtype=np.uint8), mask=mask)im = img.transpose((2, 0, 1))
3. 画检测区域线(不想显示也可以不画)
在 for i, det in enumerate(pred) 后添加以下代码:
for i, det in enumerate(pred): # per imageseen += 1if webcam: # batch_size >= 1p, im0, frame = path[i], im0s[i].copy(), dataset.counts += f'{i}: 'cv2.putText(im0, "Detection_Region", (int(im0.shape[1] * wl1 - 5), int(im0.shape[0] * hl1 - 5)),cv2.FONT_HERSHEY_SIMPLEX,1.0, (255, 255, 0), 2, cv2.LINE_AA) # 将 Detection_Region 这几个字写进图片pts = np.array([[int(im0.shape[1] * wl1), int(im0.shape[0] * hl1)], # pts1[int(im0.shape[1] * wl2), int(im0.shape[0] * hl2)], # pts2[int(im0.shape[1] * wl3), int(im0.shape[0] * hl3)], # pts3[int(im0.shape[1] * wl4), int(im0.shape[0] * hl4)]], np.int32) # pts4,将四个点坐标存储为数组# pts = pts.reshape((-1, 1, 2))zeros = np.zeros((im0.shape), dtype=np.uint8)mask = cv2.fillPoly(zeros, [pts], color=(0, 165, 255)) # 将分割区域填充为浅蓝色im0 = cv2.addWeighted(im0, 1, mask, 0.2, 0) # 在图上显示cv2.polylines(im0, [pts], True, (255, 255, 0), 3) # 画边框线else:p, im0, frame = path, im0s.copy(), getattr(dataset, 'frame', 0)cv2.putText(im0, "Detection_Region", (int(im0.shape[1] * wl1 - 5), int(im0.shape[0] * hl1 - 5)),cv2.FONT_HERSHEY_SIMPLEX,1.0, (255, 255, 0), 2, cv2.LINE_AA)pts = np.array([[int(im0.shape[1] * wl1), int(im0.shape[0] * hl1)], # pts1[int(im0.shape[1] * wl2), int(im0.shape[0] * hl2)], # pts2[int(im0.shape[1] * wl3), int(im0.shape[0] * hl3)], # pts3[int(im0.shape[1] * wl4), int(im0.shape[0] * hl4)]], np.int32) # pts4# pts = pts.reshape((-1, 1, 2))zeros = np.zeros((im0.shape), dtype=np.uint8)mask = cv2.fillPoly(zeros, [pts], color=(0, 165, 255))im0 = cv2.addWeighted(im0, 1, mask, 0.2, 0)cv2.polylines(im0, [pts], True, (255, 255, 0), 3)
4. 报警模块
当画框区域里检测到行人,进行报警
if save_img or save_crop or view_img: # Add bbox to imageif names[int(cls)] == "person":c = int(cls) # integer classlabel = None if hide_labels else (names[c] if hide_conf else f'{names[c]} {conf:.2f}')annotator.box_label(xyxy, label, color=colors(c, True))pygame.mixer.init() # 初始化pygame.mixer.music.load('out.wav') # 加载音频out.wav文件pygame.mixer.music.set_volume(1) # 设置音量pygame.mixer.music.play() # 播放音效if save_crop:save_one_box(xyxy, imc, file=save_dir / 'crops' / names[c] / f'{p.stem}.jpg', BGR=True)
5. 计数模块
首先定义一个全局变量person_count,具体写在if len(det)上方,需要注意这个全局变量需要与if view_img和if save_img同梯度,#111是我添加的代码
global person_count  # 111
person_count = 0   # 111
p = Path(p)  # to Path
save_path = str(save_dir / p.name)  # im.jpg
txt_path = str(save_dir / 'labels' / p.stem) + ('' if dataset.mode == 'image' else f'_{frame}')  # im.txt
s += '%gx%g ' % im.shape[2:]  # print string
gn = torch.tensor(im0.shape)[[1, 0, 1, 0]]  # normalization gain whwh
imc = im0.copy() if save_crop else im0  # for save_crop
annotator = Annotator(im0, line_width=line_thickness, example=str(names))
if len(det):# Rescale boxes from img_size to im0 sizedet[:, :4] = scale_coords(im.shape[2:], det[:, :4], im0.shape).round()# Print resultsfor c in det[:, -1].unique():n = (det[:, -1] == c).sum()  # detections per classs += f"{n} {names[int(c)]}{'s' * (n > 1)}, "  # add to string
然后在if save_img or save_crop or view_img添加计数
for *xyxy, conf, cls in reversed(det):if save_txt: # Write to filexywh = (xyxy2xywh(torch.tensor(xyxy).view(1, 4)) / gn).view(-1).tolist() # normalized xywhline = (cls, *xywh, conf) if save_conf else (cls, *xywh) # label formatwith open(txt_path + '.txt', 'a') as f:f.write(('%g ' * len(line)).rstrip() % line + '\n')if save_img or save_crop or view_img: # Add bbox to imageif names[int(cls)] == "person":c = int(cls) # integer classlabel = None if hide_labels else (names[c] if hide_conf else f'{names[c]} {conf:.2f}')annotator.box_label(xyxy, label, color=colors(c, True))person_count += 1 # 111pygame.mixer.init()pygame.mixer.music.load('out.wav')pygame.mixer.music.set_volume(1)pygame.mixer.music.play()
最后在view_img和save_img里画图显示
# Stream results
im0 = annotator.result()
if view_img:text = 'person_num:%d ' % (person_count)         # 111cv2.putText(im0, text, (180, 50), cv2.FONT_HERSHEY_SIMPLEX, 2, (0, 0, 255), 3)      # 111cv2.namedWindow("Webcam", cv2.WINDOW_NORMAL)cv2.resizeWindow("Webcam", 1280, 720)cv2.moveWindow("Webcam", 0, 100)cv2.imshow("Webcam", im0)cv2.waitKey(1)# Save results (image with detections)
if save_img:text = 'person_num:%d ' % (person_count)       # 111cv2.putText(im0, text, (180, 50), cv2.FONT_HERSHEY_SIMPLEX, 2, (0, 0, 255), 3)     # 111if dataset.mode == 'image':cv2.imwrite(save_path, im0)else:  # 'video' or 'stream'if vid_path[i] != save_path:  # new videovid_path[i] = save_pathif isinstance(vid_writer[i], cv2.VideoWriter):vid_writer[i].release()  # release previous video writerif vid_cap:  # videofps = vid_cap.get(cv2.CAP_PROP_FPS)w = int(vid_cap.get(cv2.CAP_PROP_FRAME_WIDTH))h = int(vid_cap.get(cv2.CAP_PROP_FRAME_HEIGHT))else:  # streamfps, w, h = 30, im0.shape[1], im0.shape[0]save_path = str(Path(save_path).with_suffix('.mp4'))  # force *.mp4 suffix on results videosvid_writer[i] = cv2.VideoWriter(save_path, cv2.VideoWriter_fourcc(*'mp4v'), fps, (w, h))vid_writer[i].write(im0)
6. 代码修改
6.1 主代码
import argparse
import os
import sys
from pathlib import Pathimport cv2
import numpy as np
import pygame
import torch
import torch.backends.cudnn as cudnnFILE = Path(__file__).resolve()
ROOT = FILE.parents[0]  # YOLOv5 root directory
if str(ROOT) not in sys.path:sys.path.append(str(ROOT))  # add ROOT to PATH
ROOT = Path(os.path.relpath(ROOT, Path.cwd()))  # relativefrom models.common import DetectMultiBackend
from utils.datasets import IMG_FORMATS, VID_FORMATS, LoadImages, LoadStreams
from utils.general import (LOGGER, check_file, check_img_size, check_imshow, check_requirements, colorstr,increment_path, non_max_suppression, print_args, scale_coords, strip_optimizer, xyxy2xywh)
from utils.plots import Annotator, colors, save_one_box
from utils.torch_utils import select_device, time_sync@torch.no_grad()
def run(weights=ROOT / 'yolov5s.pt',  # model.pt path(s)source=ROOT / 'data/images',  # file/dir/URL/glob, 0 for webcamdata=ROOT / 'data/coco128.yaml',  # dataset.yaml pathimgsz=(640, 640),  # inference size (height, width)conf_thres=0.25,  # confidence thresholdiou_thres=0.45,  # NMS IOU thresholdmax_det=1000,  # maximum detections per imagedevice='',  # cuda device, i.e. 0 or 0,1,2,3 or cpuview_img=False,  # show resultssave_txt=False,  # save results to *.txtsave_conf=False,  # save confidences in --save-txt labelssave_crop=False,  # save cropped prediction boxesnosave=False,  # do not save images/videosclasses=None,  # filter by class: --class 0, or --class 0 2 3agnostic_nms=False,  # class-agnostic NMSaugment=False,  # augmented inferencevisualize=False,  # visualize featuresupdate=False,  # update all modelsproject=ROOT / 'runs/detect',  # save results to project/namename='exp',  # save results to project/nameexist_ok=False,  # existing project/name ok, do not incrementline_thickness=3,  # bounding box thickness (pixels)hide_labels=False,  # hide labelshide_conf=False,  # hide confidenceshalf=False,  # use FP16 half-precision inferencednn=False,  # use OpenCV DNN for ONNX inference):source = str(source)save_img = not nosave and not source.endswith('.txt')  # save inference imagesis_file = Path(source).suffix[1:] in (IMG_FORMATS + VID_FORMATS)is_url = source.lower().startswith(('rtsp://', 'rtmp://', 'http://', 'https://'))webcam = source.isnumeric() or source.endswith('.txt') or (is_url and not is_file)if is_url and is_file:source = check_file(source)  # download# Directoriessave_dir = increment_path(Path(project) / name, exist_ok=exist_ok)  # increment run(save_dir / 'labels' if save_txt else save_dir).mkdir(parents=True, exist_ok=True)  # make dir# Load modeldevice = select_device(device)model = DetectMultiBackend(weights, device=device, dnn=dnn, data=data)stride, names, pt, jit, onnx, engine = model.stride, model.names, model.pt, model.jit, model.onnx, model.engineimgsz = check_img_size(imgsz, s=stride)  # check image size# Halfhalf &= (pt or jit or onnx or engine) and device.type != 'cpu'  # FP16 supported on limited backends with CUDAif pt or jit:model.model.half() if half else model.model.float()# Dataloaderif webcam:view_img = check_imshow()cudnn.benchmark = True  # set True to speed up constant image size inferencedataset = LoadStreams(source, img_size=imgsz, stride=stride, auto=pt)bs = len(dataset)  # batch_sizeelse:dataset = LoadImages(source, img_size=imgsz, stride=stride, auto=pt)bs = 1  # batch_sizevid_path, vid_writer = [None] * bs, [None] * bs# Run inferencemodel.warmup(imgsz=(1 if pt else bs, 3, *imgsz), half=half)  # warmupdt, seen = [0.0, 0.0, 0.0], 0for path, im, im0s, vid_cap, s in dataset:# 1,2,3,4分别代表左上,右上,右下,左下四个点坐标,即(480,270)(700,270)(700,810)(480,810)hl1 = 270 / 1080  # 左上纵坐标/图片高度wl1 = 620 / 1920  # 左上横坐标/图片宽度hl2 = 270 / 1080  # 右上横坐标/图片宽度wl2 = 820 / 1920  # 右上横坐标/图片宽度hl3 = 630 / 1080  # 右下横坐标/图片宽度wl3 = 820 / 1920  # 右下横坐标/图片宽度hl4 = 630 / 1080  # 左下横坐标/图片宽度wl4 = 620 / 1920  # 左下横坐标/图片宽度if webcam:for b in range(0, im.shape[0]):mask = np.zeros([im[b].shape[1], im[b].shape[2]], dtype=np.uint8)# mask[round(img[b].shape[1] * hl1):img[b].shape[1], round(img[b].shape[2] * wl1):img[b].shape[2]] = 255pts = np.array([[int(im[b].shape[2] * wl1), int(im[b].shape[1] * hl1)],  # pts1[int(im[b].shape[2] * wl2), int(im[b].shape[1] * hl2)],  # pts2[int(im[b].shape[2] * wl3), int(im[b].shape[1] * hl3)],  # pts3[int(im[b].shape[2] * wl4), int(im[b].shape[1] * hl4)]], np.int32)mask = cv2.fillPoly(mask, [pts], (255, 255, 255))imgc = im[b].transpose((1, 2, 0))imgc = cv2.add(imgc, np.zeros(np.shape(imgc), dtype=np.uint8), mask=mask)# cv2.imshow('1',imgc)im[b] = imgc.transpose((2, 0, 1))else:mask = np.zeros([im.shape[1], im.shape[2]], dtype=np.uint8)# mask[round(img.shape[1] * hl1):img.shape[1], round(img.shape[2] * wl1):img.shape[2]] = 255pts = np.array([[int(im.shape[2] * wl1), int(im.shape[1] * hl1)],  # pts1[int(im.shape[2] * wl2), int(im.shape[1] * hl2)],  # pts2[int(im.shape[2] * wl3), int(im.shape[1] * hl3)],  # pts3[int(im.shape[2] * wl4), int(im.shape[1] * hl4)]], np.int32)mask = cv2.fillPoly(mask, [pts], (255, 255, 255))img = im.transpose((1, 2, 0))img = cv2.add(img, np.zeros(np.shape(img), dtype=np.uint8), mask=mask)im = img.transpose((2, 0, 1))t1 = time_sync()im = torch.from_numpy(im).to(device)im = im.half() if half else im.float()  # uint8 to fp16/32im /= 255  # 0 - 255 to 0.0 - 1.0if len(im.shape) == 3:im = im[None]  # expand for batch dimt2 = time_sync()dt[0] += t2 - t1# Inferencevisualize = increment_path(save_dir / Path(path).stem, mkdir=True) if visualize else Falsepred = model(im, augment=augment, visualize=visualize)t3 = time_sync()dt[1] += t3 - t2# NMSpred = non_max_suppression(pred, conf_thres, iou_thres, classes, agnostic_nms, max_det=max_det)dt[2] += time_sync() - t3# Second-stage classifier (optional)# pred = utils.general.apply_classifier(pred, classifier_model, im, im0s)# Process predictionsfor i, det in enumerate(pred):  # per imageseen += 1if webcam:  # batch_size >= 1p, im0, frame = path[i], im0s[i].copy(), dataset.counts += f'{i}: 'cv2.putText(im0, "Detection_Region", (int(im0.shape[1] * wl1 - 5), int(im0.shape[0] * hl1 - 5)),cv2.FONT_HERSHEY_SIMPLEX,1.0, (255, 255, 0), 2, cv2.LINE_AA)pts = np.array([[int(im0.shape[1] * wl1), int(im0.shape[0] * hl1)],  # pts1[int(im0.shape[1] * wl2), int(im0.shape[0] * hl2)],  # pts2[int(im0.shape[1] * wl3), int(im0.shape[0] * hl3)],  # pts3[int(im0.shape[1] * wl4), int(im0.shape[0] * hl4)]], np.int32)  # pts4# pts = pts.reshape((-1, 1, 2))zeros = np.zeros((im0.shape), dtype=np.uint8)mask = cv2.fillPoly(zeros, [pts], color=(0, 165, 255))im0 = cv2.addWeighted(im0, 1, mask, 0.2, 0)cv2.polylines(im0, [pts], True, (255, 255, 0), 3)else:p, im0, frame = path, im0s.copy(), getattr(dataset, 'frame', 0)cv2.putText(im0, "Detection_Region", (int(im0.shape[1] * wl1 - 5), int(im0.shape[0] * hl1 - 5)),cv2.FONT_HERSHEY_SIMPLEX,1.0, (255, 255, 0), 2, cv2.LINE_AA)pts = np.array([[int(im0.shape[1] * wl1), int(im0.shape[0] * hl1)],  # pts1[int(im0.shape[1] * wl2), int(im0.shape[0] * hl2)],  # pts2[int(im0.shape[1] * wl3), int(im0.shape[0] * hl3)],  # pts3[int(im0.shape[1] * wl4), int(im0.shape[0] * hl4)]], np.int32)  # pts4# pts = pts.reshape((-1, 1, 2))zeros = np.zeros((im0.shape), dtype=np.uint8)mask = cv2.fillPoly(zeros, [pts], color=(0, 165, 255))im0 = cv2.addWeighted(im0, 1, mask, 0.2, 0)cv2.polylines(im0, [pts], True, (255, 255, 0), 3)global person_countperson_count = 0p = Path(p)  # to Pathsave_path = str(save_dir / p.name)  # im.jpgtxt_path = str(save_dir / 'labels' / p.stem) + ('' if dataset.mode == 'image' else f'_{frame}')  # im.txts += '%gx%g ' % im.shape[2:]  # print stringgn = torch.tensor(im0.shape)[[1, 0, 1, 0]]  # normalization gain whwhimc = im0.copy() if save_crop else im0  # for save_cropannotator = Annotator(im0, line_width=line_thickness, example=str(names))if len(det):# Rescale boxes from img_size to im0 sizedet[:, :4] = scale_coords(im.shape[2:], det[:, :4], im0.shape).round()# Print resultsfor c in det[:, -1].unique():n = (det[:, -1] == c).sum()  # detections per classs += f"{n} {names[int(c)]}{'s' * (n > 1)}, "  # add to string# Write resultsfor *xyxy, conf, cls in reversed(det):if save_txt:  # Write to filexywh = (xyxy2xywh(torch.tensor(xyxy).view(1, 4)) / gn).view(-1).tolist()  # normalized xywhline = (cls, *xywh, conf) if save_conf else (cls, *xywh)  # label formatwith open(txt_path + '.txt', 'a') as f:f.write(('%g ' * len(line)).rstrip() % line + '\n')if save_img or save_crop or view_img:  # Add bbox to imageif names[int(cls)] == "person":c = int(cls)  # integer classlabel = None if hide_labels else (names[c] if hide_conf else f'{names[c]} {conf:.2f}')annotator.box_label(xyxy, label, color=colors(c, True))person_count += 1pygame.mixer.init()pygame.mixer.music.load('out.wav')pygame.mixer.music.set_volume(1)pygame.mixer.music.play()if save_crop:save_one_box(xyxy, imc, file=save_dir / 'crops' / names[c] / f'{p.stem}.jpg', BGR=True)# Stream resultsim0 = annotator.result()if view_img:text = 'person_num:%d ' % (person_count)cv2.putText(im0, text, (180, 50), cv2.FONT_HERSHEY_SIMPLEX, 2, (0, 0, 255), 3)cv2.namedWindow("Webcam", cv2.WINDOW_NORMAL)cv2.resizeWindow("Webcam", 1280, 720)cv2.moveWindow("Webcam", 0, 100)cv2.imshow("Webcam", im0)cv2.waitKey(1)# Save results (image with detections)if save_img:text = 'person_num:%d ' % (person_count)cv2.putText(im0, text, (180, 50), cv2.FONT_HERSHEY_SIMPLEX, 2, (0, 0, 255), 3)#text = 'tie_num:%d ' % (tie_count)#cv2.putText(im0, text, (180, 120), cv2.FONT_HERSHEY_SIMPLEX, 2, (255, 0, 0), 5)if dataset.mode == 'image':cv2.imwrite(save_path, im0)else:  # 'video' or 'stream'if vid_path[i] != save_path:  # new videovid_path[i] = save_pathif isinstance(vid_writer[i], cv2.VideoWriter):vid_writer[i].release()  # release previous video writerif vid_cap:  # videofps = vid_cap.get(cv2.CAP_PROP_FPS)w = int(vid_cap.get(cv2.CAP_PROP_FRAME_WIDTH))h = int(vid_cap.get(cv2.CAP_PROP_FRAME_HEIGHT))else:  # streamfps, w, h = 30, im0.shape[1], im0.shape[0]save_path = str(Path(save_path).with_suffix('.mp4'))  # force *.mp4 suffix on results videosvid_writer[i] = cv2.VideoWriter(save_path, cv2.VideoWriter_fourcc(*'mp4v'), fps, (w, h))vid_writer[i].write(im0)# Print time (inference-only)LOGGER.info(f'{s}Done. ({t3 - t2:.3f}s)')# Print resultst = tuple(x / seen * 1E3 for x in dt)  # speeds per imageLOGGER.info(f'Speed: %.1fms pre-process, %.1fms inference, %.1fms NMS per image at shape {(1, 3, *imgsz)}' % t)if save_txt or save_img:s = f"\n{len(list(save_dir.glob('labels/*.txt')))} labels saved to {save_dir / 'labels'}" if save_txt else ''LOGGER.info(f"Results saved to {colorstr('bold', save_dir)}{s}")if update:strip_optimizer(weights)  # update model (to fix SourceChangeWarning)def parse_opt():parser = argparse.ArgumentParser()parser.add_argument('--weights', nargs='+', type=str, default=ROOT / 'yolov5s.pt', help='model path(s)')parser.add_argument('--source', type=str, default=ROOT / './data/images/1.mp4', help='file/dir/URL/glob, 0 for webcam')parser.add_argument('--data', type=str, default=ROOT / 'data/coco128.yaml', help='(optional) dataset.yaml path')parser.add_argument('--imgsz', '--img', '--img-size', nargs='+', type=int, default=[640], help='inference size h,w')parser.add_argument('--conf-thres', type=float, default=0.25, help='confidence threshold')parser.add_argument('--iou-thres', type=float, default=0.45, help='NMS IoU threshold')parser.add_argument('--max-det', type=int, default=1000, help='maximum detections per image')parser.add_argument('--device', default='', help='cuda device, i.e. 0 or 0,1,2,3 or cpu')parser.add_argument('--view-img', action='store_true',default=True, help='show results')parser.add_argument('--save-txt', action='store_true', help='save results to *.txt')parser.add_argument('--save-conf', action='store_true', help='save confidences in --save-txt labels')parser.add_argument('--save-crop', action='store_true', help='save cropped prediction boxes')parser.add_argument('--nosave', action='store_true', help='do not save images/videos')parser.add_argument('--classes', nargs='+', type=int, help='filter by class: --classes 0, or --classes 0 2 3')parser.add_argument('--agnostic-nms', action='store_true', help='class-agnostic NMS')parser.add_argument('--augment', action='store_true', help='augmented inference')parser.add_argument('--visualize', action='store_true', help='visualize features')parser.add_argument('--update', action='store_true', help='update all models')parser.add_argument('--project', default=ROOT / 'runs/detect', help='save results to project/name')parser.add_argument('--name', default='exp', help='save results to project/name')parser.add_argument('--exist-ok', action='store_true', help='existing project/name ok, do not increment')parser.add_argument('--line-thickness', default=3, type=int, help='bounding box thickness (pixels)')parser.add_argument('--hide-labels', default=False, action='store_true', help='hide labels')parser.add_argument('--hide-conf', default=False, action='store_true', help='hide confidences')parser.add_argument('--half', action='store_true', help='use FP16 half-precision inference')parser.add_argument('--dnn', action='store_true', help='use OpenCV DNN for ONNX inference')opt = parser.parse_args()opt.imgsz *= 2 if len(opt.imgsz) == 1 else 1  # expandprint_args(FILE.stem, opt)return optdef main(opt):check_requirements(exclude=('tensorboard', 'thop'))run(**vars(opt))if __name__ == "__main__":opt = parse_opt()main(opt)
6.2 细节修改(可忽略)
到上述步骤就已经实现了单目测距过程,下边是一些小细节修改,可以不看
为了实时显示画面,对运行的py文件点击编辑配置,在形参那里输入–view-img --save-txt

但实时显示画面太大,我们对显示部分做了修改,这部分也可以不要,具体是把代码
if view_img:cv2.imshow(str(p), im0)cv2.waitKey(1) # 1 millisecond
替换成
if view_img:cv2.namedWindow("Webcam", cv2.WINDOW_NORMAL)cv2.resizeWindow("Webcam", 1280, 720)cv2.moveWindow("Webcam", 0, 100)cv2.imshow("Webcam", im0)cv2.waitKey(1)
6. 实验效果
图片效果
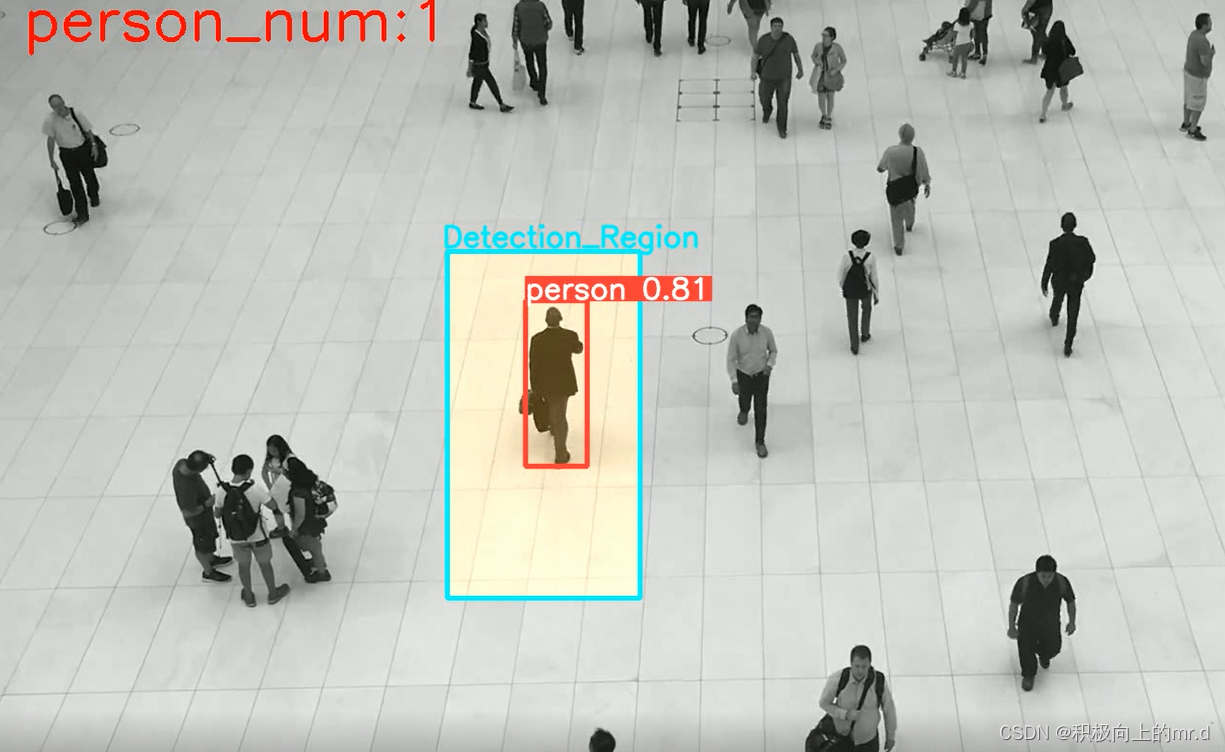
视频效果
这篇关于YOLOv5区域检测计数+声音警报的文章就介绍到这儿,希望我们推荐的文章对编程师们有所帮助!