NVIDIA-SMI has failed because it couldn’t communicate with the NVIDIA driver

2024-03-07 14:28

本文主要是介绍NVIDIA-SMI has failed because it couldn’t communicate with the NVIDIA driver,希望对大家解决编程问题提供一定的参考价值,需要的开发者们随着小编来一起学习吧!

1、NVIDIA-SMI has failed because it couldn’t communicate with the NVIDIA driver

在这里插入图片描述
解决过程:
1.sudo apt-get install dkms
2.sudo apt-get install nvidia-driver-550
但是在进行第二步之前,不知道自己服务器nvidia-driver的版本号,可以采用命令来查找一下ubuntu-drivers devices,截图如下所示:
在这里插入图片描述
再次输入nvidia-smi时,你熟悉的界面就会回来啦。

2、禁止内核自动更新

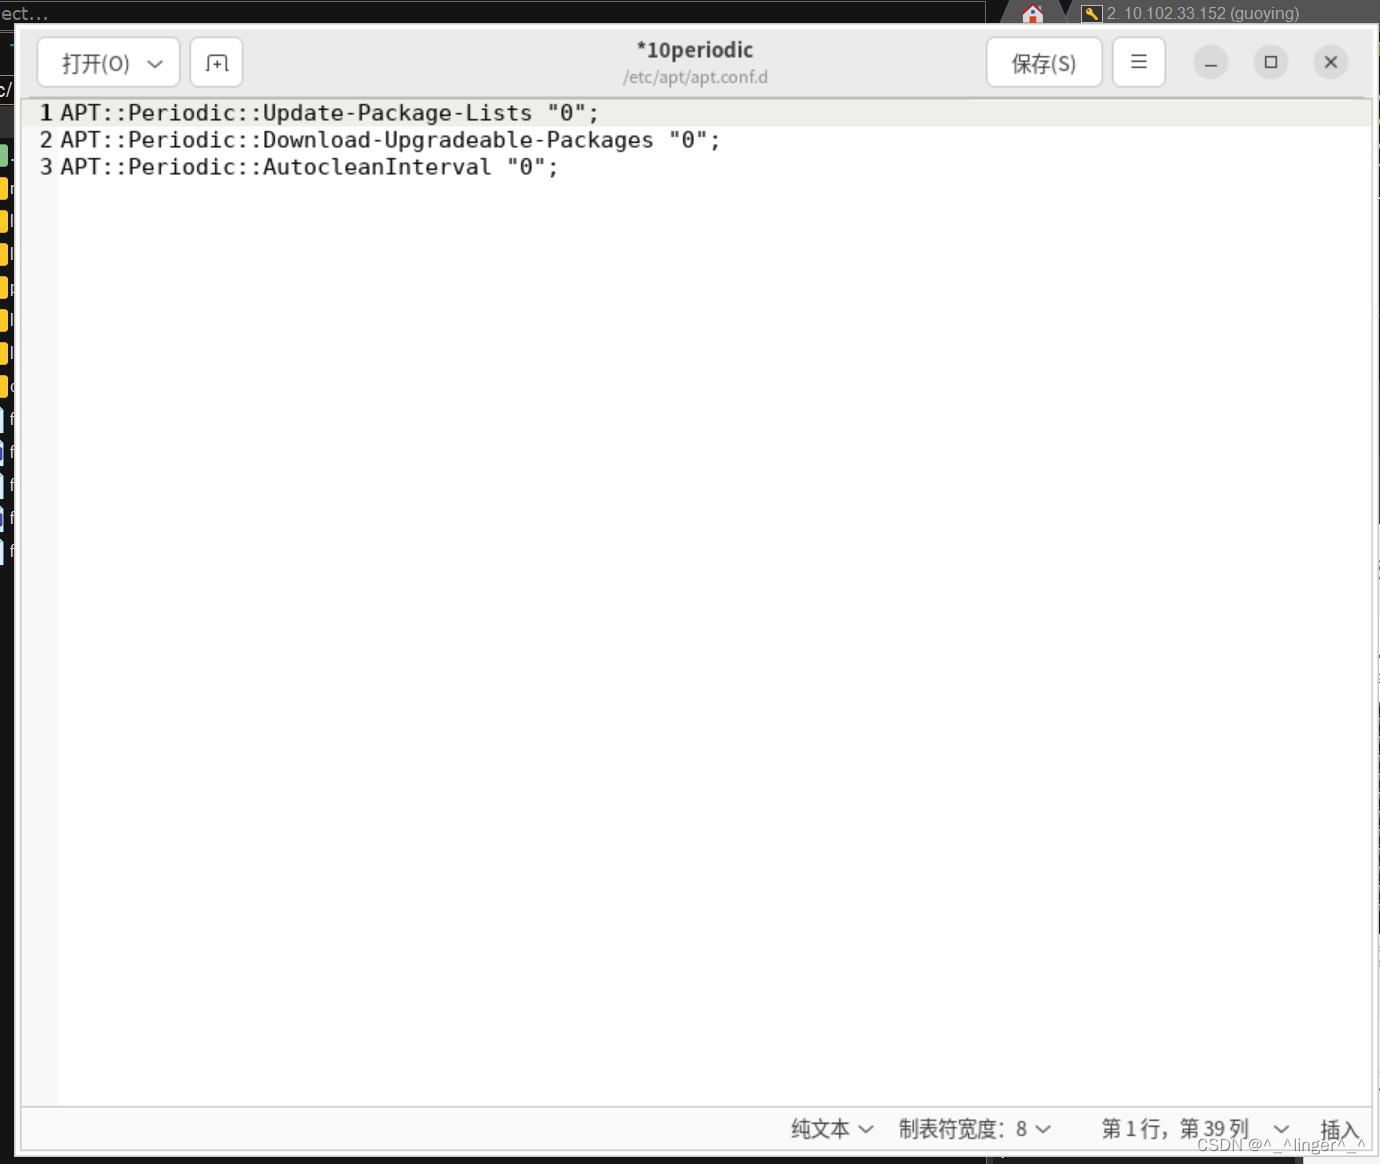
命令行关闭系统自动更新,使用命令打开文件并编辑sudo gedit /etc/apt/apt.conf.d/10periodic,打开后的界面:
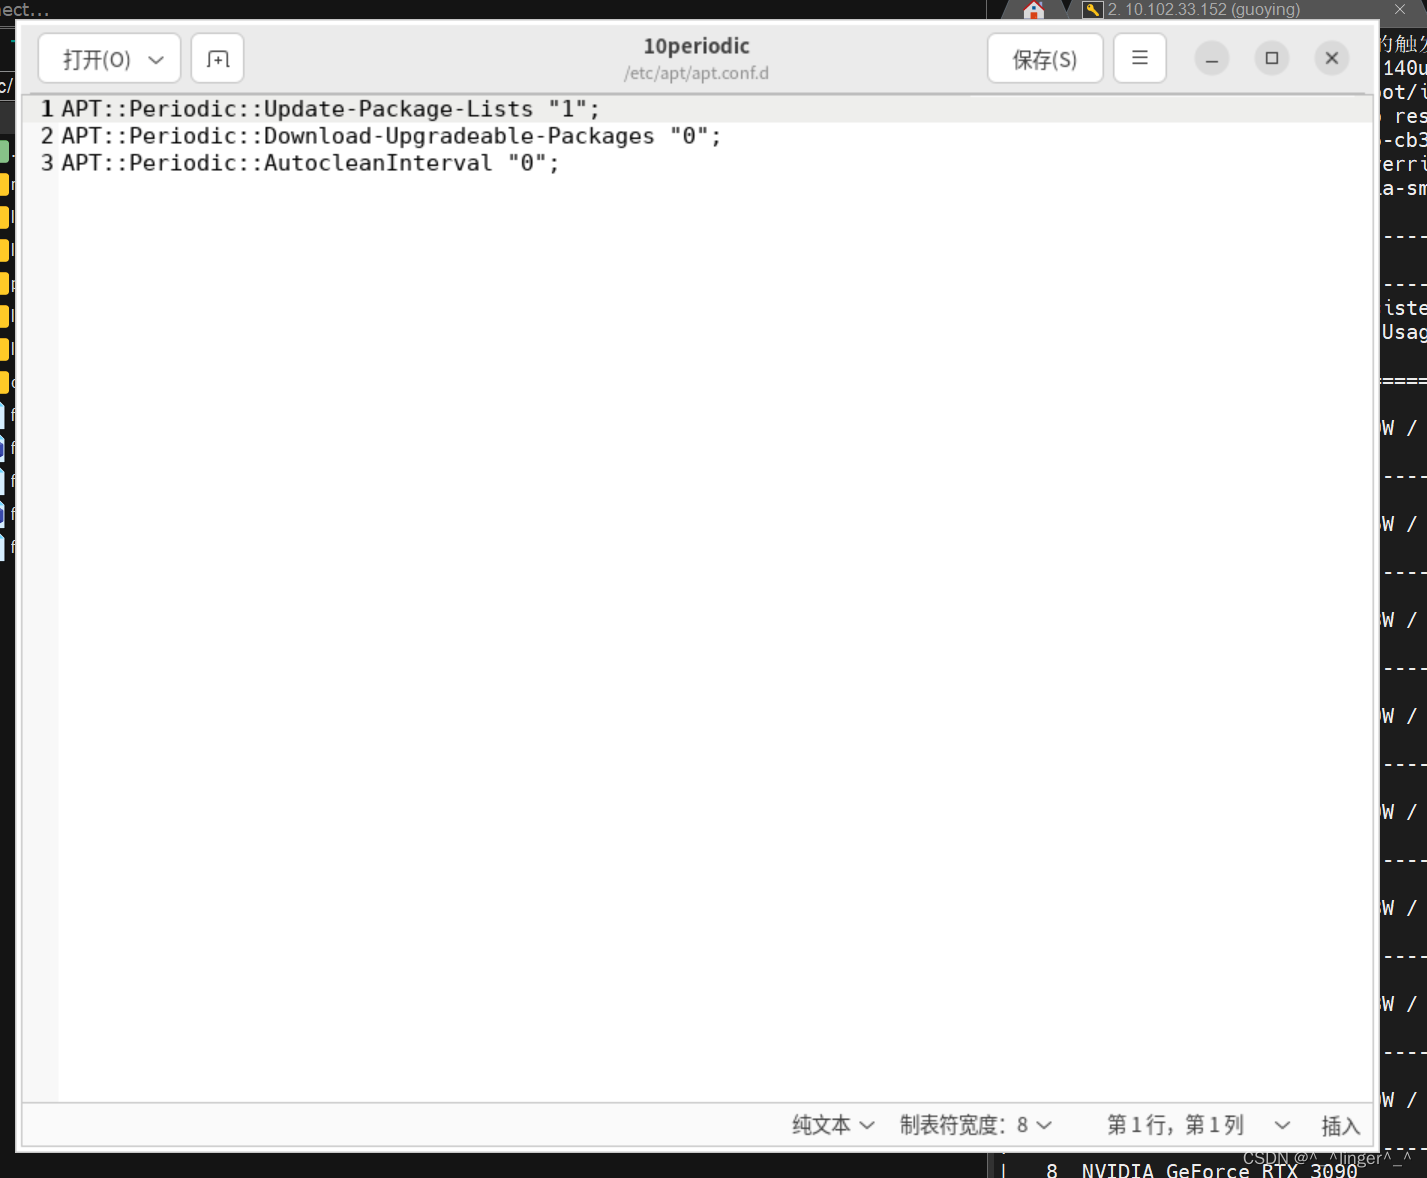
在这里插入图片描述将双引号中的“1”全部置“0”即可,修改后保存,如图所示。
在这里插入图片描述

3、参考链接

  1. 无法连接NVIDIA驱动:NVIDIA-SMI has failed because it couldn’t communicate with the NVIDIA driver
  2. Ubuntu 如何根据NVIDIA显卡型号确定对应的显卡驱动版本并安装
  3. NVIDIA-SMI 显示的cuda version 是指当前版本还是最大可以支持的 cuda 版本?
  4. 解决NVIDIA-SMI has failed because it couldn‘t communicate with the NVIDIA driver

这篇关于NVIDIA-SMI has failed because it couldn’t communicate with the NVIDIA driver的文章就介绍到这儿,希望我们推荐的文章对编程师们有所帮助!


http://www.chinasem.cn/article/783813

相关文章

android java.io.IOException: open failed: ENOENT (No such file or directory)-api23+权限受权

问题描述 在安卓上,清单明明已经受权了读写文件权限,但偏偏就是创建不了目录和文件 调用mkdirs()总是返回false. <uses-permission android:name="android.permission.WRITE_EXTERNAL_STORAGE"/><uses-permission android:name="android.permission.READ_E

UserWarning: mkl-service package failed to import

安装完成anaconda,并设置了两个环境变量  之后再控制台运行python环境,输入import numpy as np,提示错误 D:\InstallFolder\Anaconda3\lib\site-packages\numpy\__init__.py:143: UserWarning: mkl-service package failed to import, therefore

Python安装llama库出错“metadata-generation-failed”

Python安装llama库出错“metadata-generation-failed” 1. 安装llama库时出错2. 定位问题1. 去官网下载llama包 2.修改配置文件2.1 解压文件2.2 修改配置文件 3. 本地安装文件 1. 安装llama库时出错 2. 定位问题 根据查到的资料,发现时llama包中的execfile函数已经被下线了,需要我们手动修改代码后

SQLException: No Suitable Driver Found - 完美解决方法详解

🚨 SQLException: No Suitable Driver Found - 完美解决方法详解 🚨 **🚨 SQLException: No Suitable Driver Found - 完美解决方法详解 🚨****摘要 📝****引言 🎯****正文 📚****1. 问题概述 ❗****2. JDBC 驱动程序的工作原理 🔧****3. 错误的根本原因 🕵️**

Typora配置PicGo时,提示Failed to fetch

Typora配置PicGo时,提示Failed to fetch 两者配置的端口不一致造成的 打开Typora,选择文件-偏好设置-图像-验证图片上传选项,点击验证图片上传选项 会提示错误:Failed to fetch,此时可以发现typora中设置的上传端口为36677 打开PigGo,选择PicGo设置-设置server,会发现监听端口为36678 修改监听接口为366

Tomcat启动报错:transport error 202: bind failed: Address already in use

Tomcat启动报错:transport error 202: bind failed: Address already in use 了,上网查找了下面这篇文章。也是一种解决办法。 下文来自:http://blog.csdn.net/sam031503/article/details/7037033 tomcat 启动日志报出以下错误:  ERROR: transport err

Kubernetes的alpha.kubernetes.io/nvidia-gpu无法限制GPU个数

问题描述: Pod.yaml文件中关于GPU资源的设置如下: 然而在docker中运行GPU程序时,发现宿主机上的两块GPU都在跑。甚至在yaml文件中删除关于GPU的请求,在docker中都可以运行GPU。 原因: 上例说明alpha.kubernetes.io/nvidia-gpu无效。查看yaml文件,发现该docker开启了特权模式(privileged:ture): 而

Ubuntu安装docker及nvidia-docker2

Ubuntu 通过apt安装 Ubuntu安装docker后再安装nvidia-docker2时经常出现版本不匹配的问题,可以分以下两步安装: # 安装dockerexport VERSION=18.06.1-ce && curl -sSL get.docker.com | sh# 安装nvidia-docker2curl -s -L https://nvidia.github.io/nv

SpringBoot启动报错Failed to determine a suitable driver class

两种解决办法 1.在Application类上加 ` @EnableAutoConfiguration(exclude={DataSourceAutoConfiguration.class}) package com.example.demo3;import org.springframework.boot.SpringApplication;import org.springframewo

Failed to pull selection解决办法

今天在使用DDMS导出文档到PC端的时候,明明在file explorer里面有文件,导出时候就是失败,出现了“Failed to pull selection”错误。百度了一下,还是重启Eclipse最靠谱。