本文主要是介绍【使用autoware中的标定工具包进行相机和激光雷达联合标定】,希望对大家解决编程问题提供一定的参考价值,需要的开发者们随着小编来一起学习吧!
使用autoware中的标定工具包进行相机和激光雷达联合标定
- 一、工具安装
- 1.catkin_make(Could not find the required component 'jsk_recognition_msgs'. )
- 2. catkin_make(undefined reference to `cv::Mat::Mat()')
- 3. rosrun calibration_camera_lidar(Couldn't find executable named calibration_toolkit below /home/chen/桌面/Project/CL_calibration_ws/src/calibration_camera_lidar/ls_calibration/calibration_camera_lidar)
- 4、重新编译(没有那个文件或目录)
- 5、重新编译,出现大片错误(PCL)
- 6、重新编译(Opencv版本问题)
- 7、重新编译(camera_lidar2d_offline_calib余下问题)
- 8、安装opencv3
- 9、重新编译(error: ‘CV_RGB’ was not declared in this scope; did you mean ‘CV_YUV2RGB’?)
- 10、重新编译(undefined reference to `std::__exception_ptr::exception_ptr::_M_release()@CXXABI_1.3.13'
- 二、录制包
- 1、流程
- 2、注意事项
- 三、回放、标定
- 1、回放点云数据
- 2、标定
- (1)准备工作
- (2)标定
- 四、查看融合结果
- 1、安装autoware
- 2、查看融合结果
链接: 如何使用Autoware标定工具包进行相机和激光雷达的联合标定(无需完整安装Autoware)
一、工具安装
1.catkin_make(Could not find the required component ‘jsk_recognition_msgs’. )
-- Could NOT find jsk_recognition_msgs (missing: jsk_recognition_msgs_DIR)
-- Could not find the required component 'jsk_recognition_msgs'. The following CMake error indicates that you either need to install the package with the same name or change your environment so that it can be found.
CMake Error at /opt/ros/noetic/share/catkin/cmake/catkinConfig.cmake:83 (find_package):Could not find a package configuration file provided by"jsk_recognition_msgs" with any of the following names:jsk_recognition_msgsConfig.cmakejsk_recognition_msgs-config.cmakeAdd the installation prefix of "jsk_recognition_msgs" to CMAKE_PREFIX_PATHor set "jsk_recognition_msgs_DIR" to a directory containing one of theabove files.  If "jsk_recognition_msgs" provides a separate developmentpackage or SDK, be sure it has been installed.
解决办法,安装jsk_recognition_msgs
sudo apt-get install ros-noetic-jsk-recognition-msgs
2. catkin_make(undefined reference to `cv::Mat::Mat()')
/usr/bin/ld: CMakeFiles/calibration_publisher.dir/nodes/calibration_publisher/calibration_publisher.cpp.o: in function `void cv::operator>><cv::Mat>(cv::FileNode const&, cv::Mat&)':
/usr/local/opencv4/include/opencv4/opencv2/core/persistence.hpp:1281: undefined reference to `cv::Mat::Mat()'
/usr/bin/ld: CMakeFiles/calibration_publisher.dir/nodes/calibration_publisher/calibration_publisher.cpp.o: in function `_GLOBAL__sub_I_calibration_publisher.cpp':
/home/chen/桌面/Project/CL_calibration_ws/src/calibration_camera_lidar/ls_calibration/calibration_camera_lidar/nodes/calibration_publisher/calibration_publisher.cpp:10: undefined reference to `cv::Mat::Mat()'
/usr/bin/ld: CMakeFiles/calibration_publisher.dir/nodes/calibration_publisher/calibration_publisher.cpp.o: in function `__static_initialization_and_destruction_0':
/home/chen/桌面/Project/CL_calibration_ws/src/calibration_camera_lidar/ls_calibration/calibration_camera_lidar/nodes/calibration_publisher/calibration_publisher.cpp:11: undefined reference to `cv::Mat::Mat()'
/usr/bin/ld: /home/chen/桌面/Project/CL_calibration_ws/src/calibration_camera_lidar/ls_calibration/calibration_camera_lidar/nodes/calibration_publisher/calibration_publisher.cpp:12: undefined reference to `cv::Mat::Mat()'
collect2: error: ld returned 1 exit status
make[2]: *** [calibration_camera_lidar/ls_calibration/calibration_camera_lidar/CMakeFiles/calibration_publisher.dir/build.make:296:/home/chen/桌面/Project/CL_calibration_ws/devel/lib/calibration_camera_lidar/calibration_publisher] 错误 1
make[1]: *** [CMakeFiles/Makefile2:5174:calibration_camera_lidar/ls_calibration/calibration_camera_lidar/CMakeFiles/calibration_publisher.dir/all] 错误 2
make: *** [Makefile:161:all] 错误 2
Invoking "make -j16 -l16" failed
解决办法,ubuntu18.04安装calibration_toolkit标定工具箱可能遇到的编译错误
在 target_link_libraries(calibration_publisher	${catkin_LIBRARIES} 后面添加
${OpenCV_LIBS} #added
# 注意opencv大小写
编译成功
3. rosrun calibration_camera_lidar(Couldn’t find executable named calibration_toolkit below /home/chen/桌面/Project/CL_calibration_ws/src/calibration_camera_lidar/ls_calibration/calibration_camera_lidar)
[rosrun] Couldn't find executable named calibration_toolkit below /home/chen/桌面/Project/CL_calibration_ws/src/calibration_camera_lidar/ls_calibration/calibration_camera_lidar
[rosrun] Found the following, but they're either not files,
[rosrun] or not executable:
[rosrun]   /home/chen/桌面/Project/CL_calibration_ws/src/calibration_camera_lidar/ls_calibration/calibration_camera_lidar/nodes/calibration_toolkit
参考链接:https://github.com/XidianLemon/calibration_camera_lidar/issues/7
4、重新编译(没有那个文件或目录)
参考:https://blog.csdn.net/yuteng12138/article/details/105204292
1、fatal error: opencv/cv.h: 没有那个文件或目录
将各文件中的 #include <opencv/cv.h>
替换为
#include <opencv2/imgproc.hpp>2、fatal error: opencv/highgui.h: 没有那个文件或目录
将 #include <opencv/highgui.h>
替换成
#include "opencv2/highgui.hpp"3、fatal error: opencv/cxcore.h: 没有那个文件或目录
将#include <opencv/cxcore.h>
替换成
#include <opencv2/core/core.hpp>
//在 OpenCV 4 中,cxcore.h 文件已被移除,可以使用opencv2/core.hpp或opencv2/core/types.hpp替代
5、重新编译,出现大片错误(PCL)
/usr/include/pcl-1.10/pcl/point_representation.h:308:7:   required from here
/usr/include/pcl-1.10/pcl/point_representation.h:252:48: error: the value of ‘NrDims’ is not usable in a constant expression
/usr/include/pcl-1.10/pcl/point_representation.h:251:19: note: ‘NrDims’ was not initialized with a constant expression251 |         const int NrDims = pcl::traits::datatype<PointDefault, Key>::size;|                   ^~~~~~
/usr/include/pcl-1.10/pcl/point_representation.h:252:48: note: in template argument for type ‘int’252 |         Helper<Key, FieldT, NrDims>::copyPoint (p1_, p2_, f_idx_);|         ~~~~~~~~~~~~~~~~~~~~~~~~~~~~~~~~~~~~~~~^~~~~~~~~~~~~~~~~~
参考:https://github.com/XidianLemon/calibration_camera_lidar/issues/28
# 原因分析
pcl1.10需要用更高级别的C++编译
# 解决过程
dpkg -l libpcl-dev    #查看pcl版本
在cmakelist.txt文件中添加
set(CMAKE_CXX_STANDARD 14)
# 具体文件:
CL_calibration_ws/src/calibration_camera_lidar/ls_calibration/calibration_camera_lidar
CL_calibration_ws/src/calibration_camera_lidar/ls_calibration/glviewer
CL_calibration_ws/src/calibration_camera_lidar/ls_calibration/rosinterface
6、重新编译(Opencv版本问题)
参考:
https://blog.csdn.net/Toky_min/article/details/107107708
https://blog.csdn.net/weixin_44235615/article/details/125803414
https://blog.csdn.net/libaineu2004/article/details/104454933
问题
‘IplImage’ was not declared in this scope
//在OpenCV 4及更高版本中,IplImage结构已被弃用,取而代之的是cv::Mat类作为主映像容器。
‘CvMat’ does not name a type
//在OpenCV 4及更高版本中,CvMat结构已被更通用的cv::Mat类取代
。。。
解决办法,在报错文件中添加
#include <opencv2/core.hpp>
#include <opencv2/imgproc.hpp>
#include <opencv2/imgproc/types_c.h>
#include <opencv2/imgproc/imgproc_c.h>
#include <opencv2/highgui/highgui_c.h>
7、重新编译(camera_lidar2d_offline_calib余下问题)
1. error: conversion from ‘cv::Mat’ to non-scalar type ‘IplImage’ {aka ‘_IplImage’} requested
//https://blog.csdn.net/weixin_44694952/article/details/109221487
//camera_lidar2d_offline_calib.cpp:132行
IplImage temp = cv_image->image;————》IplImage temp = cvIplImage(cv_image->image);2.error: ‘cvFindExtrinsicCameraParams2’ was not declared in this scope3. error: ‘cvRodrigues2’ was not declared in this scope
//In OpenCV 4 and later versions, the function cvRodrigues2 has been replaced with the cv::Rodrigues function for computing the Rodrigues rotation matrix.
//camera_lidar2d_offline_calib.cpp:161行
cvRodrigues2(v_rotation, m_rotation);————》cv::Rodrigues(v_rotation, m_rotation)4. error: could not convert ‘cv::Scalar_<double>((double)0, (double)0, (double)255, (double)0)’ from ‘cv::Scalar’ {aka ‘cv::Scalar_<double>’} to ‘CvScalar’
需要修改的问题过多,重新安装opencv3
8、安装opencv3
链接: ubuntu20.04下多版本opencv共存和切换
安装完成后重新下载项目,将修改过的cmakelist文件复制过来
指定cmake时opencv版本,仍然报错
安装对应的cv_bridge
https://zhuanlan.zhihu.com/p/617289094sudo make installed 报错 error: option --install-layout not recognized
参考:https://blog.csdn.net/qq_17130909/article/details/97933582cmake ..  -DCMAKE_BUILD_TYPE=Release -DSETUPTOOLS_DEB_LAYOUT=OFF .
make
sudo make installed在工程cmakelist文件中添加
set(cv_bridge_DIR "/home/chen/下载/opencv3.4.5/vision_opencv-melodic/installed/usr/local/share/cv_bridge/cmake")
Set(OpenCV_DIR "/home/chen/下载/opencv3.4.5/opencv-3.4.5/installed/share/OpenCV")
Set(OpenCV_INCLUDE_DIRS "/home/chen/下载/opencv3.4.5/opencv-3.4.5/installed/include")
Set(OpenCV_LIBRARIES "/home/chen/下载/opencv3.4.5/opencv-3.4.5/installed")
9、重新编译(error: ‘CV_RGB’ was not declared in this scope; did you mean ‘CV_YUV2RGB’?)
对应.h文件添加头文件:#include <opencv2/imgproc.hpp>
10、重新编译(undefined reference to `std::__exception_ptr::exception_ptr::_M_release()@CXXABI_1.3.13’
)
/usr/bin/ld: /home/chen/anaconda3/lib/libQt5Core.so.5.15.2: undefined reference to `std::__exception_ptr::exception_ptr::_M_release()@CXXABI_1.3.13'
/usr/bin/ld: /home/chen/anaconda3/lib/libQt5Widgets.so.5.15.2: undefined reference to `std::__throw_bad_array_new_length()@GLIBCXX_3.4.29'
/usr/bin/ld: /home/chen/anaconda3/lib/libQt5Core.so.5.15.2: undefined reference to `std::__exception_ptr::exception_ptr::_M_addref()@CXXABI_1.3.13'
collect2: error: ld returned 1 exit status
make[2]: *** [calibration_camera_lidar/ls_calibration/calibration_camera_lidar/CMakeFiles/calibration_toolkit.dir/build.make:451:/home/chen/桌面/Project/CL_calibration_ws/devel/lib/calibration_camera_lidar/calibration_toolkit] 错误 1
make[1]: *** [CMakeFiles/Makefile2:4362:calibration_camera_lidar/ls_calibration/calibration_camera_lidar/CMakeFiles/calibration_toolkit.dir/all] 错误 2
make: *** [Makefile:161:all] 错误 2
原因:anaconda中的qt5与系统中安装的qt5冲突。查找了很多办法,无法完全解决。
一个一次性办法:
在涉及到QT的CMakeLists文件中,在find QT包前添加
SET(CMAKE_PREFIX_PATH "/usr/lib/x86_64-linux-gnu/cmake")
重新编译,终于完成
二、录制包
1、流程
1.运行对应节点文件
roscore
//激光雷达
roslaunch innovusion_pointcloud innovusion_points.launch device_ip:=192.168.0.10 port:=8010 processed:=1
//相机
cd ~/桌面/Project/rtsp_ws
roslaunch rocon_rtsp_camera_relay rtsp_camera_relay.launch --screen2.录制包
在存放录制数据的文件夹下
rosbag record -O 自己命令.bag /rtsp_camera_relay/image/compressed  /iv_points
2、注意事项
- 标定板位置要求参考前文链接
- 录制时最好录制压缩后的图像数据
- 开始使用 rosbag record -a 图像卡顿、花屏
- 指定图像和点云节点 rosbag record -O 001.bag /rtsp_camera_relay/image /iv_points
- 警告:rosbag record buffer exceeded. Dropping oldest queued message
- 参考https://blog.csdn.net/lemonxiaoxiao/article/details/113357811,解决
三、回放、标定
1、回放点云数据
rosrun image_transport republish compressed in:=/rtsp_camera_relay/image raw out:=/rtsp_camera_relay/image
// 从压缩后的图像数据还原原始数据
rosbag play data.bag  /iv_points:=/points_raw --pause -l  //暂停播放留时间打开软件
2、标定
(1)准备工作
打开工具包
rosrun calibration_camera_lidar calibration_toolkit
报错
[ERROR] [1684421099.331560215]: Client [/calibration_toolkit] wants topic /rtsp_camera_relay/image/compressed to have datatype/md5sum [sensor_msgs/Image/060021388200f6f0f447d0fcd9c64743], but our version has [sensor_msgs/CompressedImage/8f7a12909da2c9d3332d540a0977563f]. Dropping connection.
猜测原因:
工具需要接收image类型的数据,但是由于图像数据太大,之前录制的时候选择的是CompressedImage
参考链接解决:https://blog.csdn.net/lemonxiaoxiao/article/details/119637749
将下图四个参数改为自己标定板的数据,关闭软件保存配置
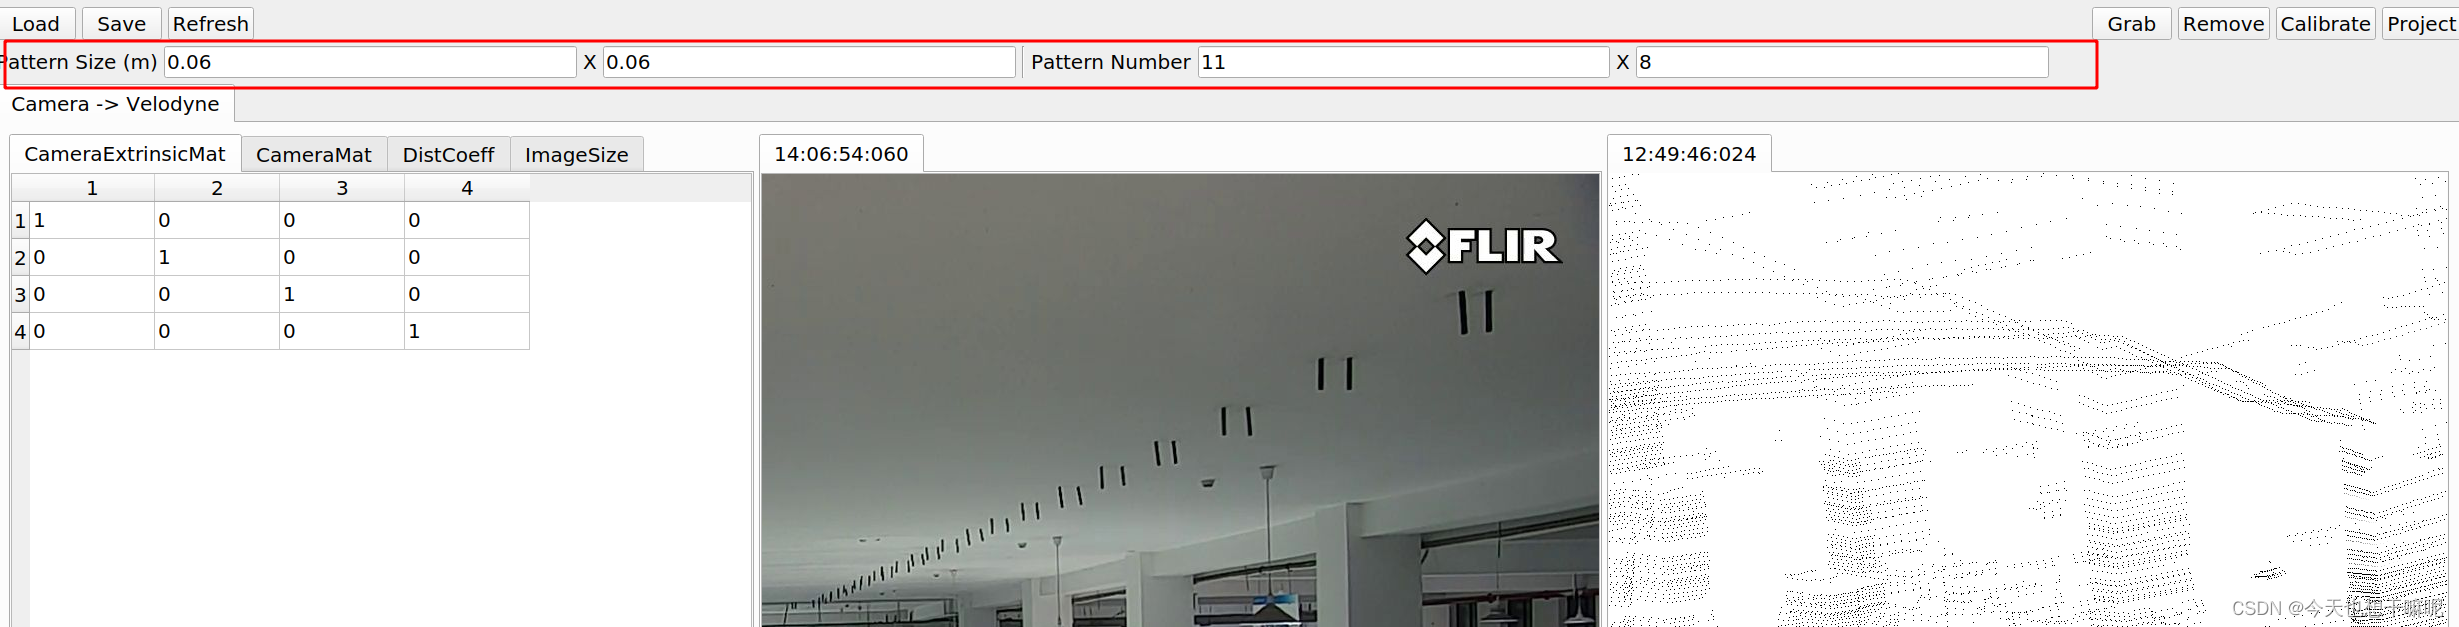
(2)标定
按照https://blog.csdn.net/zbr794866300/article/details/107144682进行
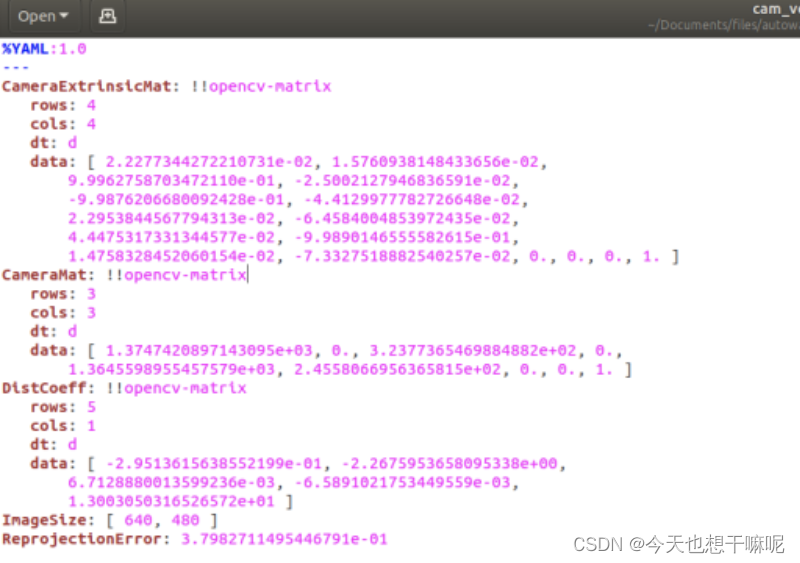
最终保存的文件
四、查看融合结果
1、安装autoware
基本参考:https://blog.csdn.net/qq_21692851/article/details/128909367
2、查看融合结果
- 将数据文件夹挂载在容器内
将run.sh最后一段修改为下图所示
#docker run \
#    -it --rm \
docker run \-it -v /home/chen/桌面/Project:/home/autoware/data \$VOLUMES \--env="XAUTHORITY=${XAUTH}" \--env="DISPLAY=${DISPLAY}" \--env="USER_ID=$USER_ID" \--privileged \--net=host \$RUNTIME \$IMAGE
- 进入容器
// 1. 进入容器,并启动程序
cd autoware_ai_docker/generic
./run.sh
cd ~/Autoware
roslaunch runtime_manager runtime_manager.launch// 2.播放数据包
sudo docker ps -a  //查看容器id
sudo docker exec -it 005d30c2f918 /bin/bash  //在新终端进入容器
cd ~
source /opt/ros/melodic/setup.bash  //加载ROS
rosrun image_transport republish compressed in:=/rtsp_camera_relay/image raw out:=/rtsp_camera_relay/image  //将压缩节点转为原始节点//在另一终端进入容器,并播放数据包
cd /home/autoware/data/Result/data
rosbag play data.bag  /iv_points:=/points_raw --pause -l
- 可视化操作
參考如下链接进行:
https://blog.csdn.net/weixin_43687753/article/details/127227686
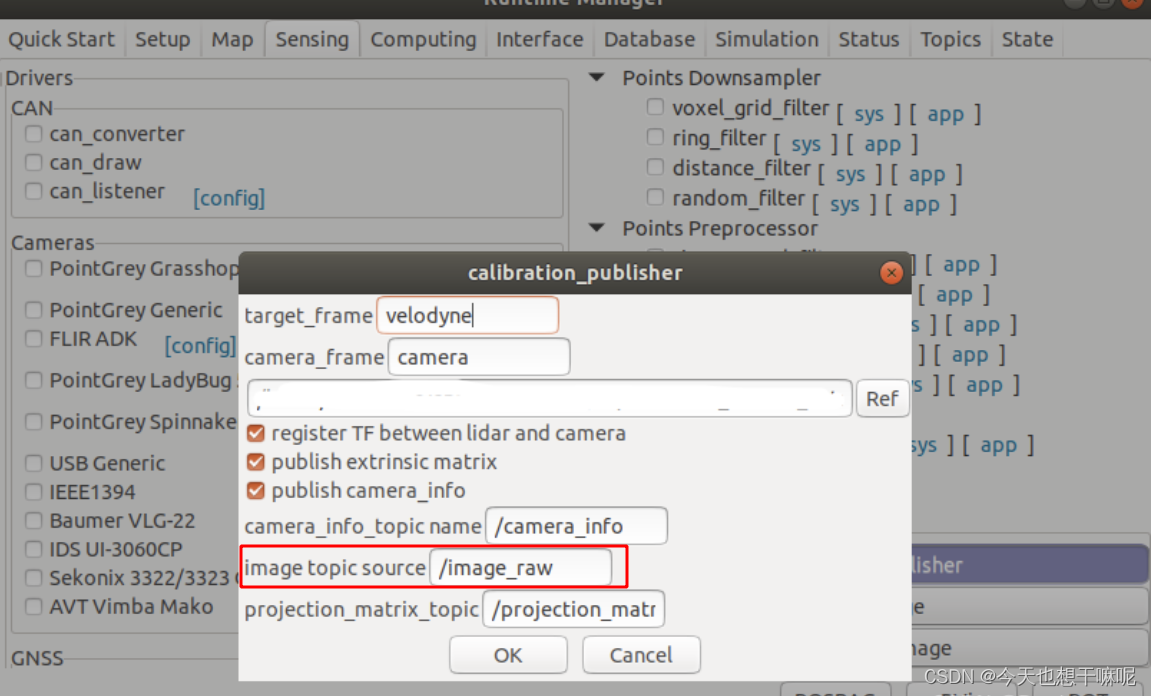
https://blog.csdn.net/nuo112/article/details/116404760
注意将image话题来源替换成自己录制的包中的图像话题,比如我的就是/rtsp_camera_relay/image。
这篇关于【使用autoware中的标定工具包进行相机和激光雷达联合标定】的文章就介绍到这儿,希望我们推荐的文章对编程师们有所帮助!


