本文主要是介绍skia DrawLooper,希望对大家解决编程问题提供一定的参考价值,需要的开发者们随着小编来一起学习吧!
本次学习drawLooper.cpp中有关SkDrawLooper类的用法,并且分析了canvas draw api中的二层循环的作用。
SkDrawLooper有两个子类:SkLayerDrawLooper和SkBlurDrawLooper。
先看一下drawLooper.cpp里面的例子,主要看onDraw()做什么:
virtual void onDraw(SkCanvas* canvas) SK_OVERRIDE {this->init();//初始化SkPaint paint;paint.setAntiAlias(true);//设置抗锯齿paint.setTextSize(SkIntToScalar(72));//文字大小paint.setLooper(fLooper);//设置SkDrawLoopercanvas->drawCircle(SkIntToScalar(50), SkIntToScalar(50),SkIntToScalar(30), paint);//画圆canvas->drawRectCoords(SkIntToScalar(150), SkIntToScalar(50),SkIntToScalar(200), SkIntToScalar(100), paint);//画矩形canvas->drawText("Looper", 6, SkIntToScalar(230), SkIntToScalar(100),paint);//画文字
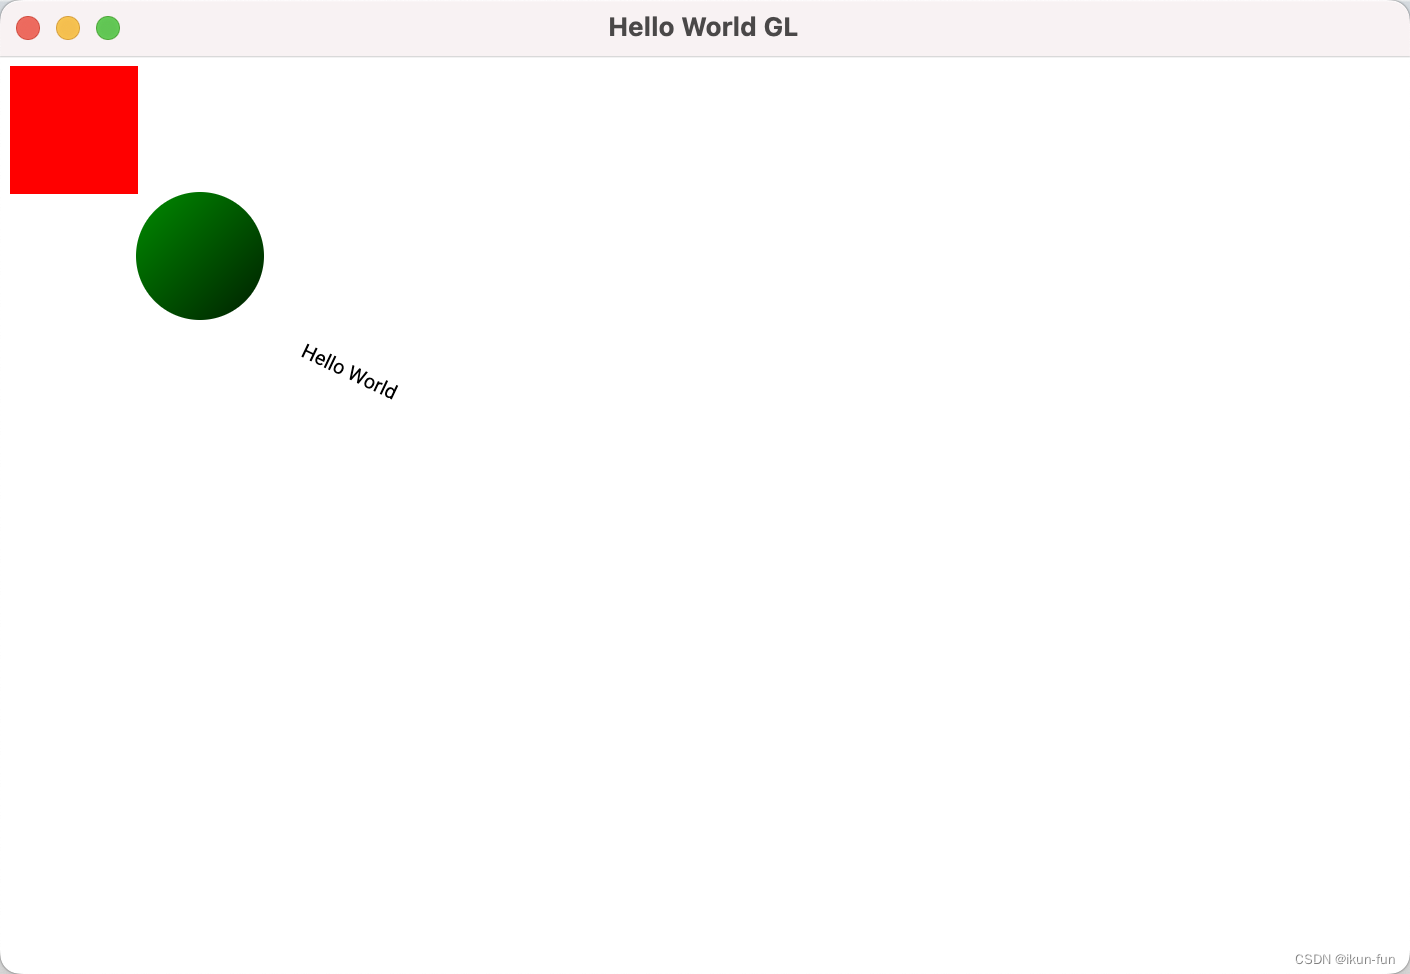
}在onDraw()可以看到,这个函数在固定位置绘制了一个圆、一个矩形和一个“looper”文字。而在最终跑出的结果中可以看到,绘制的这三个图形都有一个模糊阴影,并且三个图形的边缘为红白相间,中间为蓝色填充。

造成这样结果的始作俑者是init()函数:
void init() {if (fLooper) return;static const struct { //匿名结构体定义了一组描述参数SkColor fColor; //颜色SkPaint::Style fStyle; //path styleSkScalar fWidth; //线宽SkScalar fOffset; //blur偏移SkScalar fBlur; //blur sigma输入参数} gParams[] = { //gParams定义了4组不同效果 { SK_ColorWHITE, SkPaint::kStroke_Style, SkIntToScalar(1)*3/4, 0, 0 }, { SK_ColorRED, SkPaint::kStroke_Style, SkIntToScalar(4), 0, 0 },{ SK_ColorBLUE, SkPaint::kFill_Style, 0, 0, 0 },{ 0x88000000, SkPaint::kFill_Style, 0, SkIntToScalar(10), SkIntToScalar(3) }};SkLayerDrawLooper::Builder looperBuilder;//SkLayerDrawLooper的内部类SkLayerDrawLooper::LayerInfo info;info.fPaintBits = SkLayerDrawLooper::kStyle_Bit | SkLayerDrawLooper::kMaskFilter_Bit;info.fColorMode = SkXfermode::kSrc_Mode;for (size_t i = 0; i < SK_ARRAY_COUNT(gParams); i++) {info.fOffset.set(gParams[i].fOffset, gParams[i].fOffset);SkPaint* paint = looperBuilder.addLayer(info);paint->setColor(gParams[i].fColor);paint->setStyle(gParams[i].fStyle);paint->setStrokeWidth(gParams[i].fWidth);if (gParams[i].fBlur > 0) {SkMaskFilter* mf = SkBlurMaskFilter::Create(kNormal_SkBlurStyle,SkBlurMask::ConvertRadiusToSigma(gParams[i].fBlur));paint->setMaskFilter(mf)->unref();}}fLooper = looperBuilder.detachLooper();}对于SkLayerDrawLooper::LayerInfo,skia的描述如下:
/*** Info for how to apply the layer's paint and offset.** fColorMode controls how we compute the final color for the layer:* The layer's paint's color is treated as the SRC* The draw's paint's color is treated as the DST* final-color = Mode(layers-color, draws-color);* Any SkXfermode::Mode will work. Two common choices are:* kSrc_Mode: to use the layer's color, ignoring the draw's* kDst_Mode: to just keep the draw's color, ignoring the layer's*/struct SK_API LayerInfo {BitFlags fPaintBits;SkXfermode::Mode fColorMode;SkVector fOffset;bool fPostTranslate; //!< applies to fOffset/*** Initial the LayerInfo. Defaults to settings that will draw the* layer with no changes: e.g.* fPaintBits == 0* fColorMode == kDst_Mode* fOffset == (0, 0)*/LayerInfo();};再来看SkLayerDrawLooper::Builder:
class SK_API Builder {public:Builder();~Builder();/*** Call for each layer you want to add (from top to bottom).* This returns a paint you can modify, but that ptr is only valid until* the next call made to addLayer().*/SkPaint* addLayer(const LayerInfo&);/*** This layer will draw with the original paint, at the specified offset*/void addLayer(SkScalar dx, SkScalar dy);/*** This layer will with the original paint and no offset.*/void addLayer() { this->addLayer(0, 0); }/// Similar to addLayer, but adds a layer to the top.SkPaint* addLayerOnTop(const LayerInfo&);/*** Pass list of layers on to newly built looper and return it. This will* also reset the builder, so it can be used to build another looper.*/SkLayerDrawLooper* detachLooper();private:Rec* fRecs;Rec* fTopRec;int fCount;};SkPaint* SkLayerDrawLooper::Builder::addLayer(const LayerInfo& info) {fCount += 1;Rec* rec = SkNEW(Rec);rec->fNext = fRecs;rec->fInfo = info;fRecs = rec;if (NULL == fTopRec) {fTopRec = rec;}return &rec->fPaint;
}struct Rec {Rec* fNext;SkPaint fPaint;LayerInfo fInfo;};到这里,fLooper中保存了四种不同的paint,因此在onDraw()中调用各种draw api时产生了四种不同图形叠加到一起的效果。
但,在draw api中是draw looper是怎样工作的呢?
可以拿onDraw()中的drawCircle()作为切入点,看一下draw looper的到底是怎样工作的。
void SkCanvas::drawCircle(SkScalar cx, SkScalar cy, SkScalar radius,const SkPaint& paint) {if (radius < 0) {radius = 0;}SkRect  r;r.set(cx - radius, cy - radius, cx + radius, cy + radius);this->drawOval(r, paint);
}
void SkCanvas::drawOval(const SkRect& oval, const SkPaint& paint) {SkRect storage;const SkRect* bounds = NULL;if (paint.canComputeFastBounds()) { //判断是否可以快速计算绘制边界(主要判断当前paint和skdrawlooper中的paint是否有mask)bounds = &paint.computeFastBounds(oval, &storage);if (this->quickReject(*bounds)) {return;}}LOOPER_BEGIN(paint, SkDrawFilter::kOval_Type, bounds)while (iter.next()) {iter.fDevice->drawOval(iter, oval, looper.paint());}LOOPER_END
}drawOval()函数可以看出做了三件事情:
1.计算绘制边界;
2.外层循环AutoDrawLooper;
3.内层循环DrawIter。
在第一点中,由于drawOval()的参数中已经有了一个skrect,这可以看做一个初始的绘制边界,之后这个初始边界会被SkDrawLooper中所保存的paint去计算一些变换(比如maskfilter、patheffect),这些变换可能会改变最终的一个绘制边界。如果绘制边界为空,或者为无限,那就拒绝绘制。
第二点,从代码中看LOOPER_BEGIN是一个宏定义,宏展开代码如下:
#define LOOPER_BEGIN(paint, type, bounds) \this->predrawNotify(); \AutoDrawLooper looper(this, paint, false, bounds); \while (looper.next(type)) { \SkAutoBounderCommit ac(fBounder); \SkDrawIter iter(this);#define LOOPER_END } AutoDrawLooper(SkCanvas* canvas, const SkPaint& paint,bool skipLayerForImageFilter = false,const SkRect* bounds = NULL) : fOrigPaint(paint) {fCanvas = canvas;fFilter = canvas->getDrawFilter();fPaint = NULL;fSaveCount = canvas->getSaveCount();fDoClearImageFilter = false;fDone = false;if (!skipLayerForImageFilter && fOrigPaint.getImageFilter()) {SkPaint tmp;tmp.setImageFilter(fOrigPaint.getImageFilter());(void)canvas->internalSaveLayer(bounds, &tmp, SkCanvas::kARGB_ClipLayer_SaveFlag,true, SkCanvas::kFullLayer_SaveLayerStrategy);// we'll clear the imageFilter for the actual draws in next(), so// it will only be applied during the restore().fDoClearImageFilter = true;}if (SkDrawLooper* looper = paint.getLooper()) {void* buffer = fLooperContextAllocator.reserveT<SkDrawLooper::Context>(looper->contextSize());fLooperContext = looper->createContext(canvas, buffer);fIsSimple = false;} else {fLooperContext = NULL;// can we be marked as simple?fIsSimple = !fFilter && !fDoClearImageFilter;}}在构造函数中可以直接去看第二个if语句,这个语句里所做的事情是:如果paint设置了SkDrawLooper对象,则会在给定的一块buffer创建一个context。如果paint设置的DrawLooper对象是SkLayerDrawLooper对象,则创建的context实际是LayerDrawLooperContext。在构造LayerDrawLooperContext时,它的成员是一个Rec结构指针fCurrRec,fCurrRec会指向paint中的SkLayerDrawLooper对象中的Rec结构链表头。
我们再来看一下SkLayerDrawLooper中Rec这个结构体:(对于SkDrawLooper另一个子类暂时不分析)
struct Rec {Rec* fNext;SkPaint fPaint;LayerInfo fInfo;}; /*** Info for how to apply the layer's paint and offset.** fColorMode controls how we compute the final color for the layer:* The layer's paint's color is treated as the SRC* The draw's paint's color is treated as the DST* final-color = Mode(layers-color, draws-color);* Any SkXfermode::Mode will work. Two common choices are:* kSrc_Mode: to use the layer's color, ignoring the draw's* kDst_Mode: to just keep the draw's color, ignoring the layer's*/struct SK_API LayerInfo {BitFlags fPaintBits;SkXfermode::Mode fColorMode;SkVector fOffset;bool fPostTranslate; //!< applies to fOffset对于成员fPaintBits,它的有关解释在以下枚举结构中:
/*** Bits specifies which aspects of the layer's paint should replace the* corresponding aspects on the draw's paint.* kEntirePaint_Bits means use the layer's paint completely.* 0 means ignore the layer's paint... except for fColorMode, which is* always applied.*/enum Bits {kStyle_Bit = 1 << 0, //!< use this layer's Style/stroke settingskTextSkewX_Bit = 1 << 1, //!< use this layer's textskewxkPathEffect_Bit = 1 << 2, //!< use this layer's patheffectkMaskFilter_Bit = 1 << 3, //!< use this layer's maskfilterkShader_Bit = 1 << 4, //!< use this layer's shaderkColorFilter_Bit = 1 << 5, //!< use this layer's colorfilterkXfermode_Bit = 1 << 6, //!< use this layer's xfermode/*** Use the layer's paint entirely, with these exceptions:* - We never override the draw's paint's text_encoding, since that is* used to interpret the text/len parameters in draw[Pos]Text.* - Color is always computed using the LayerInfo's fColorMode.*/kEntirePaint_Bits = -1};对于成员fOffset和fPostTranslate,它们用来处理当前layer的位置偏移,会改变canvas的matrix。
因此,layerinfo保存了SkLayerDrawLooper中的每一个layer的paint mode flag和偏移信息。
然后回到之前的外层循环宏展开,构造完AutoDrawLooper对象looper,就会执行looper.next(type)。 bool next(SkDrawFilter::Type drawType) {if (fDone) {return false;} else if (fIsSimple) {fDone = true;fPaint = &fOrigPaint;return !fPaint->nothingToDraw();} else {return this->doNext(drawType);}}bool AutoDrawLooper::doNext(SkDrawFilter::Type drawType) {fPaint = NULL;SkASSERT(!fIsSimple);SkASSERT(fLooperContext || fFilter || fDoClearImageFilter);SkPaint* paint = fLazyPaint.set(fOrigPaint);if (fDoClearImageFilter) {paint->setImageFilter(NULL);}if (fLooperContext && !fLooperContext->next(fCanvas, paint)) {fDone = true;return false;}if (fFilter) {if (!fFilter->filter(paint, drawType)) {fDone = true;return false;}if (NULL == fLooperContext) {// no looper means we only draw oncefDone = true;}}fPaint = paint;// if we only came in here for the imagefilter, mark us as doneif (!fLooperContext && !fFilter) {fDone = true;}// call this after any possible paint modifiersif (fPaint->nothingToDraw()) {fPaint = NULL;return false;}return true;
}
bool SkLayerDrawLooper::LayerDrawLooperContext::next(SkCanvas* canvas,SkPaint* paint) {canvas->restore();if (NULL == fCurrRec) {return false;}ApplyInfo(paint, fCurrRec->fPaint, fCurrRec->fInfo);canvas->save();if (fCurrRec->fInfo.fPostTranslate) {postTranslate(canvas, fCurrRec->fInfo.fOffset.fX,fCurrRec->fInfo.fOffset.fY);} else {canvas->translate(fCurrRec->fInfo.fOffset.fX,fCurrRec->fInfo.fOffset.fY);}fCurrRec = fCurrRec->fNext;return true;
}
看到这里就比较明显了,我们在drawLooper.cpp中的init()函数中定义的四种效果会在这里进行处理。首先是在ApplyInfo()中处理我们定义的color、style、width和maskfilter;然后处理offset;最后fCurrRec指向下一个Rec节点。如果到了Rec链表尾,则外层循环结束。看一下ApplyInfo()设置的info的过程:
    void SkLayerDrawLooper::LayerDrawLooperContext::ApplyInfo(SkPaint* dst, const SkPaint& src, const LayerInfo& info) {dst->setColor(xferColor(src.getColor(), dst->getColor(), info.fColorMode));BitFlags bits = info.fPaintBits;SkPaint::TextEncoding encoding = dst->getTextEncoding();if (0 == bits) {return;}if (kEntirePaint_Bits == bits) {// we've already computed these, so save it from the assignmentuint32_t f = dst->getFlags();SkColor c = dst->getColor();*dst = src;dst->setFlags(f);dst->setColor(c);dst->setTextEncoding(encoding);return;}if (bits & kStyle_Bit) {dst->setStyle(src.getStyle());dst->setStrokeWidth(src.getStrokeWidth());dst->setStrokeMiter(src.getStrokeMiter());dst->setStrokeCap(src.getStrokeCap());dst->setStrokeJoin(src.getStrokeJoin());}if (bits & kTextSkewX_Bit) {dst->setTextSkewX(src.getTextSkewX());}if (bits & kPathEffect_Bit) {dst->setPathEffect(src.getPathEffect());}if (bits & kMaskFilter_Bit) {dst->setMaskFilter(src.getMaskFilter());}if (bits & kShader_Bit) {dst->setShader(src.getShader());}if (bits & kColorFilter_Bit) {dst->setColorFilter(src.getColorFilter());}if (bits & kXfermode_Bit) {dst->setXfermode(src.getXfermode());}// we don't override these
#if 0dst->setTypeface(src.getTypeface());dst->setTextSize(src.getTextSize());dst->setTextScaleX(src.getTextScaleX());dst->setRasterizer(src.getRasterizer());dst->setLooper(src.getLooper());dst->setTextEncoding(src.getTextEncoding());dst->setHinting(src.getHinting());
#endif
}
dst指的是draw api中的paint(跟着函数调用一层层传下来),也就是即将要绘制的layer's paint ;src指的是SkLayerDrawLooper中Rec结构成员中的paint。dst设置当前paint的颜色时是根据layerinfo成员fColorMode决定的(如上面layerinfo中的注释)。
我们回到DrawLooper这个例子,只拿绘制的圆形来说明:gParams数组定义的每组效果的颜色依次是白色,红色,蓝色,灰色;绘制圆形时先绘制白色的圆环(style=stroke),然后时红色的圆环(style=stroke),之后是蓝色的圆盘(style=full),最后是灰色的圆盘(style=full),这里每次绘制都是绘制到一个layer上;由于每组效果的layerinfo成员fColorMode都设置的是kSrc_mode,因此这些layer上的图案混合在一起的时候,在相互重叠的地方都保持的是绘制时当前layer的颜色。直观的效果看上去就是后面绘制的图案被之前的layer的图案挡住,白色圆环盖在了红色圆环上,蓝色圆盘的边缘被上面两层图案盖住,灰色圆盘被之前三层的图案盖住。
下面我们再看内存循环,先看SkDrawIter的构造函数:
SkDrawIter(SkCanvas* canvas, bool skipEmptyClips = true) {canvas = canvas->canvasForDrawIter();fCanvas = canvas;canvas->updateDeviceCMCache();fClipStack = &canvas->fClipStack;fBounder = canvas->getBounder();fCurrLayer = canvas->fMCRec->fTopLayer;fSkipEmptyClips = skipEmptyClips;}对于SkDrawIter类,它的基类是SkDraw;它的会在构造函数中为每一层layer(这个layer指的是图层)更新相对应的MCRec状态(图层链表DeviceCM中每一个layer与状态栈中的栈帧MCRec有着一一对应关系,但有的栈帧MCRec可能没有layer);这是为了在正式绘制在layer上之前,调整好layer的空间关系(matrix)和剪裁区域(clip),后面正式开始绘制的时候都按照调整好的matrix和clip去绘制。
内存循环的判断条件是iter.next():
bool next() {// skip over recs with empty clipsif (fSkipEmptyClips) {while (fCurrLayer && fCurrLayer->fClip.isEmpty()) {fCurrLayer = fCurrLayer->fNext;}}const DeviceCM* rec = fCurrLayer;if (rec && rec->fDevice) {fMatrix = rec->fMatrix;fClip = &((SkRasterClip*)&rec->fClip)->forceGetBW();fRC = &rec->fClip;fDevice = rec->fDevice;fBitmap = &fDevice->accessBitmap(true);fPaint = rec->fPaint;SkDEBUGCODE(this->validate();)fCurrLayer = rec->fNext;if (fBounder) {fBounder->setClip(fClip);}// fCurrLayer may be NULL nowreturn true;}return false;}SkDrawIter类的next()方法的作用是:在正式绘制每一层layer之前,首先跳过clip为空的layer(即clip为空的layer不绘制);然后把当前要绘制的layer一些有用参数传递给SkDrawIter对象的成员,这些成员都是已经更新过matrix和clip状态的,已经具备了绘制条件;最后判断是否到了图层链表尾,用于内层循环判断条件。
从代码中看出内层循环依然是对layer的MC状态一些迭代更新,并在循环体中调用实际绘制函数去绘制当前状态所依附的所有Layer,这里与SkDrawLooper没有关系。
总结:
看到这里可以对SkDrawLooper(针对子类SkLayerDrawLooper)的作用作以下总结:1.paint可比喻为画笔,画笔可以画出各种效果;这些效果会分布在不同的效果层。SkLayerDrawLooper::LayerInfo定义效果层的paint mode flag和偏移;它决定了在绘制前使用当前效果层的paint效果还是使用即将绘制的paint效果,每一个paint对应的它对应的效果用Rec节点保存在SkLayerDrawLooper中,这个Rec结构可以认为是一个效果层。
2.SkLayerDrawLooper::Builder的对象调用addLayer()函数首先创建Rec结构单链表节点,然后把不同的layerInfo插入到该节点中,最后返回每个节点中与新添加的layerinfo对应的fPaint。有了Rec结构链表,SkLayerDrawLooper::Builder会调用detachLooper()方法返回一个SkLayerDrawLooper对象,这个SkLayerDrawLooper对象可以设置到即将绘制的paint中。这里的addLayer就是添加效果层。
3.把SkLayerDrawLooper对象设置给一个paint,当canvas调用draw api时会使用SkLayerDrawLooper对象去计算绘制边界,然后在draw api的外层循环中使用SkLayerDrawLooper::LayerDrawLooperContext::next()函数去判断使用即将绘制的paint效果还是looper中paint效果,并且会处理每一层的偏移。
对于二层循环总结如下:
1.外层循环的作用是判断使用即将绘制的paint效果还是looper中paint效果,并且会处理每一层的偏移;
2.内层循环是在正式绘制在layer(这个layer是图层)上之前,调整好layer的空间关系(matrix)和剪裁区域(clip),然后跳过clip为空的layer,把当前要绘制的layer一些有用参数传递给SkDrawIter对象的成员,后面让SkDrawIter中的Device去调用实际的绘制函数;这个过程依次迭代。
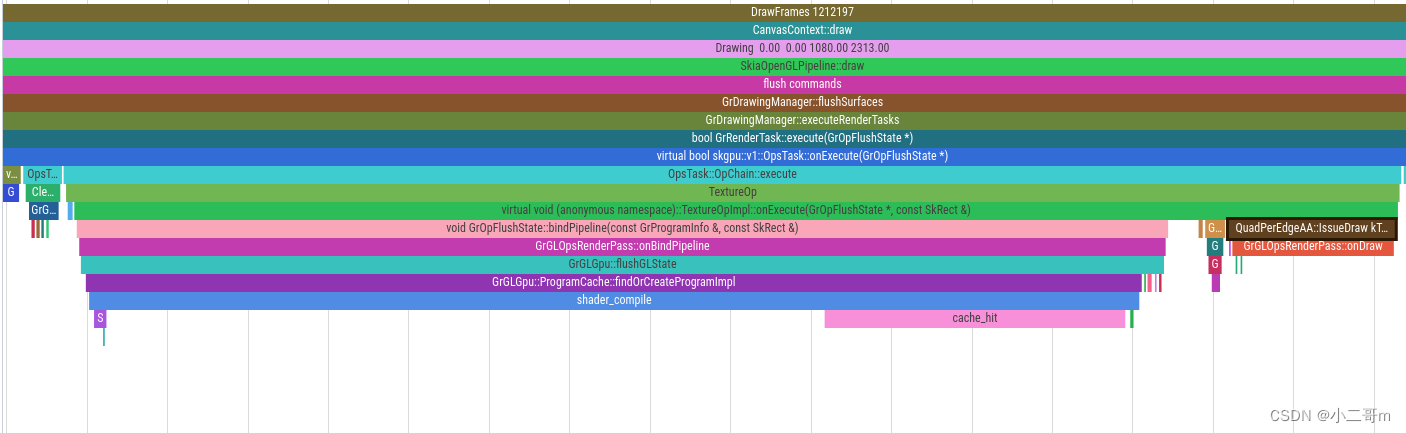
假设SkLayerDrawLooper对象为looper,SkDrawIter对象为iter,下面这张图简单的描述了两层循环的行为,绿色虚线内为一次外层循环,红色虚线为一次内层循环。

这篇关于skia DrawLooper的文章就介绍到这儿,希望我们推荐的文章对编程师们有所帮助!


![[转]Skia之五 SkMaskFilter (SkBlurMaskFilter的使用) 篇](https://pic.xiahunao.cn/getimgs/?img=http://pic002.cnblogs.com/images/2011/195641/2011113018333741.jpg)