本文主要是介绍【计算机视觉】OpenCV实现身份证号识别:从图像到文本,希望对大家解决编程问题提供一定的参考价值,需要的开发者们随着小编来一起学习吧!
目录
项目介绍:
代码详解:
完整代码展示:
项目介绍:
本文是一个基于Python和OpenCV的身份证号识别项目。它的主要目标是自动识别和提取身份证上的身份证号码。
下面是项目所用到的图片,大家可以自行下载:
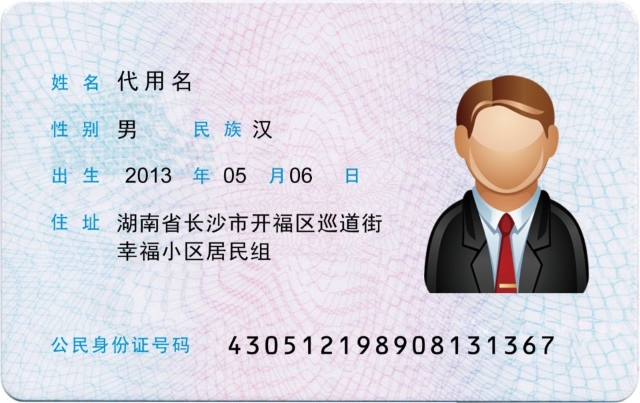
- 待识别身份证照片:

- 用于数字模板匹配的图片:

该项目的工作流程大致如下:
- 图像预处理:首先,需要对输入的身份证图像进行预处理,包括灰度化、二值化、去噪等操作,以便后续能更准确地进行文字识别。
- 文字定位和分割:接着,使用OpenCV中的图像处理技术,如边缘检测、形态学操作等,对预处理后的图像进行文字定位和分割,获取每个数字或字母的位置。
- 模板匹配:然后,利用模板匹配技术,对每个分割出来的数字或字母进行匹配。
- 信息整合:最后,将所有识别出的数字或字母按照它们在身份证上的位置进行排列,得到完整的身份证号码。
这个项目有很多实际的应用场景,比如在自动化办公、身份验证等场合,可以大大提高工作效率和准确性,话不多说,直接进入正题。
代码详解:
1.安装Python和导入所需的库
import cv2
import numpy as np
2.定义绘图函数,以便后续便于展示图片
#绘图展示
def cv_show(name,image):cv2.imshow(name,image)cv2.waitKey(0)
3.定义排序函数,用于排序轮廓(contours)
def sort_contours(cnts,method='left-to-right'):reverse=Falsei=0if method=="right-to-left" or method=='bottom-to-top':reverse=Trueif method=='top-to-bottom' or method=='bottom-to-top':i=1boundingBoxes=[cv2.boundingRect(c) for c in cnts](cnts,boundingBoxes)=zip(*sorted(zip(cnts,boundingBoxes),key=lambda b :b[1][i],reverse=reverse))#返回排序后的轮廓列表和相应的边界框列表。return cnts,boundingBoxes4.定义一个resize函数,用于调整图像大小。与cv2.resize不同的是,允许你基于指定的高度和/或宽度来调整图像的大小
def resize(image,width=None,height=None,inter=cv2.INTER_AREA):dim=None(h,w)=image.shape[:2]if width is None and height is None:return imageif width is None:r=height/float(h)dim=(int(w*r),height)else:r=width/float(w)dim=(width,int(h*r))resize=cv2.resize(image,dim,interpolation=inter)return resize5.模板图像中的数字定位处理
'''模板图像中的数字定位处理'''
img=cv2.imread("TP.png")
cv_show('img',img)
gray=cv2.imread("TP.png",0)
ref=cv2.threshold(gray,150,255,cv2.THRESH_BINARY_INV)[1]
cv_show('ref',ref)# 计算轮廓: cv2.findContours()数接受的参数为二值图,即黑白的(不是灰度图)
# CV2.RETR_EXTERNAL 只检测外轮廓,CV2.CHAIN APPROX SIMPLE只保留终点坐标
refCnts,hierarchy=cv2.findContours(ref.copy(),cv2.RETR_EXTERNAL,cv2.CHAIN_APPROX_SIMPLE)
cv2.drawContours(img,refCnts,-1,(0,255,0),2)
cv_show('img',img)refCnts=sort_contours(refCnts,method='left-to-right')[0]
# 保在模板中每个数字对应的像素值
digits={}
for (i,c) in enumerate(refCnts):(x,y,w,h)=cv2.boundingRect(c)roi=ref[y-2:y+h+2,x-2:x+w+2]roi=cv2.resize(roi,(57,88))roi=cv2.bitwise_not(roi)# cv_show('roi',roi)digits[i]=roi
cv2.destroyAllWindows()
图片处理结果展示:

6.身份证图像处理
'''身份证号识别'''img=cv2.imread('./card_id.jpg')
cv_show('img',img)gray=cv2.imread('./card_id.jpg',0)
cv_show('gray',gray)ref=cv2.threshold(gray,120,255,cv2.THRESH_BINARY_INV)[1]
cv_show('ref',ref)# 计算轮廓: cv2.findContours()数接受的参数为二值图,即黑白的(不是灰度图)
# CV2.RETR_EXTERNAL 只检测外轮廓,CV2.CHAIN APPROX SIMPLE只保留终点坐标
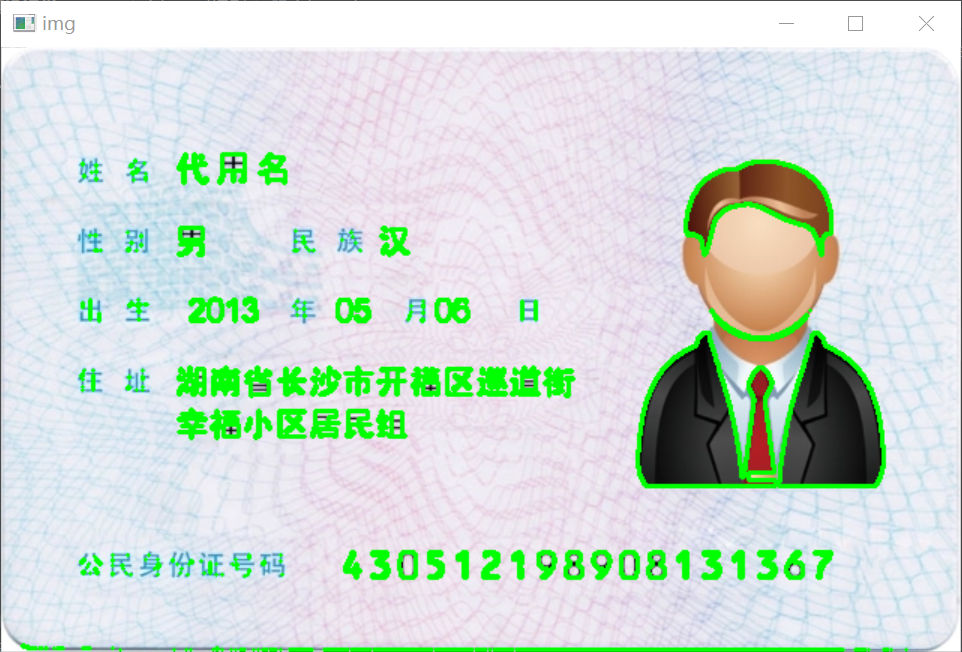
refCnts,hierarchy=cv2.findContours(ref.copy(),cv2.RETR_EXTERNAL,cv2.CHAIN_APPROX_SIMPLE)
cv2.drawContours(img,refCnts,-1,(0,255,0),2)
cv_show('img',img)cv2.destroyAllWindows()# 遍历轮廓,找到数字部分像素区城
locs = []
for (i, c) in enumerate(refCnts):(x,y,w,h) = cv2.boundingRect(c) # 计外接知形# 选择合适的区域,根据实际任务来if (y > 330 and y< 360) and x>220: #符的留下来locs.append((x,y,w,h))
locs = sorted(locs, key=lambda x:x[0])
处理结果展示:

7.模板匹配并添加文本
output = [] # 用于存储最终结果
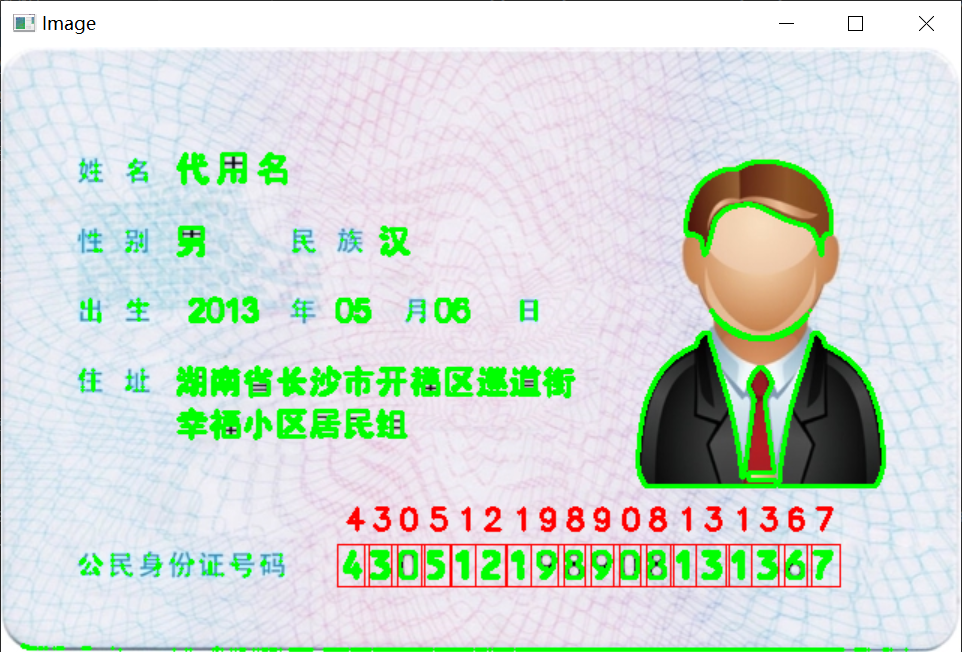
for (i, (gX,gY,gW, gH)) in enumerate(locs):groupOutput = []group = gray[gY - 2:gY + gH + 2,gX - 2:gX + gW + 2]# 适当加一点边界cv_show('group',group)#预处理group = cv2.threshold(group,0,255,cv2.THRESH_BINARY | cv2.THRESH_OTSU)[1]# cv_show('group',group)# 计算每一组的轮廓digitCnts,hierarchy = cv2.findContours(group.copy(),cv2.RETR_EXTERNAL ,cv2.CHAIN_APPROX_SIMPLE)digitCnts = sort_contours(digitCnts,method='left-to-right')[0]# 计算每一组中的每一个数值for c in digitCnts:#找到当前数值的轮廓,resize成合适的的大小(x,y,w,h) = cv2.boundingRect(c)roi = group[y:y + h,x:x + w]roi = cv2.resize(roi,(57,88))# cv_show('roi',roi)'''-------使用模板匹配,计算匹配得分-----------'''scores = []# 在模板中计算每一个得分for (digit, digitROI) in digits.items():# 模板匹配result = cv2.matchTemplate(roi, digitROI, cv2.TM_CCOEFF)(_, score, _, _) = cv2.minMaxLoc(result)scores.append(score)# 得到最合适的数字groupOutput.append(str(np.argmax(scores)))# 画出来cv2.rectangle(img, (gX - 5, gY - 5), (gX + gW + 5, gY + gH + 5), (0, 0, 255), 1)# cv2.putText()是OpenCV库中的一个函数,用于在图像上添加文本。cv2.putText(img, "".join(groupOutput), (gX, gY - 15), cv2.FONT_HERSHEY_SIMPLEX, 0.65, (0, 0, 255), 2)output.extend(groupOutput)  # 得到结果
模板匹配后的识别结果:

8.打印结果
# 打印结果
print("ID Card  #: {}".format("".join(output)))
cv2.imshow("Image", img)
cv2.waitKey(0)
cv2.destroyAllWindows() ![]()
完整代码展示:
# -*- coding: utf-8 -*-
# @Time : 2023/10/18 9:32
# @Author :Muzi
# @File : id_card.py
# @Software: PyCharmimport cv2
#绘图展示
def cv_show(name,image):cv2.imshow(name,image)cv2.waitKey(0)def sort_contours(cnts,method='left-to-right'):reverse=Falsei=0if method=="right-to-left" or method=='bottom-to-top':reverse=Trueif method=='top-to-bottom' or method=='bottom-to-top':i=1boundingBoxes=[cv2.boundingRect(c) for c in cnts](cnts,boundingBoxes)=zip(*sorted(zip(cnts,boundingBoxes),key=lambda b :b[1][i],reverse=reverse))return cnts,boundingBoxesdef resize(image,width=None,height=None,inter=cv2.INTER_AREA):dim=None(h,w)=image.shape[:2]if width is None and height is None:return imageif width is None:r=height/float(h)dim=(int(w*r),height)else:r=width/float(w)dim=(width,int(h*r))resize=cv2.resize(image,dim,interpolation=inter)return resize
'''模板图像中的数字定位处理'''
img=cv2.imread("TP.png")
cv_show('img',img)
gray=cv2.imread("TP.png",0)
ref=cv2.threshold(gray,150,255,cv2.THRESH_BINARY_INV)[1]
cv_show('ref',ref)# 计算轮廓: cv2.findContours()数接受的参数为二值图,即黑白的(不是灰度图)
# CV2.RETR_EXTERNAL 只检测外轮廓,CV2.CHAIN APPROX SIMPLE只保留终点坐标
refCnts,hierarchy=cv2.findContours(ref.copy(),cv2.RETR_EXTERNAL,cv2.CHAIN_APPROX_SIMPLE)
cv2.drawContours(img,refCnts,-1,(0,255,0),2)
cv_show('img',img)refCnts=sort_contours(refCnts,method='left-to-right')[0]
# 保在模板中每个数字对应的像素值
digits={}
for (i,c) in enumerate(refCnts):(x,y,w,h)=cv2.boundingRect(c)roi=ref[y-2:y+h+2,x-2:x+w+2]roi=cv2.resize(roi,(57,88))roi=cv2.bitwise_not(roi)# cv_show('roi',roi)digits[i]=roi
cv2.destroyAllWindows()'''身份证号识别'''img=cv2.imread('./card_id.jpg')
cv_show('img',img)gray=cv2.imread('./card_id.jpg',0)
cv_show('gray',gray)ref=cv2.threshold(gray,120,255,cv2.THRESH_BINARY_INV)[1]
cv_show('ref',ref)# 计算轮廓: cv2.findContours()数接受的参数为二值图,即黑白的(不是灰度图)
# CV2.RETR_EXTERNAL 只检测外轮廓,CV2.CHAIN APPROX SIMPLE只保留终点坐标
refCnts,hierarchy=cv2.findContours(ref.copy(),cv2.RETR_EXTERNAL,cv2.CHAIN_APPROX_SIMPLE)
cv2.drawContours(img,refCnts,-1,(0,255,0),2)
cv_show('img',img)cv2.destroyAllWindows()# 遍历轮廓,找到数字部分像素区城
locs = []
for (i, c) in enumerate(refCnts):(x,y,w,h) = cv2.boundingRect(c) # 计外接知形ar = w / float(h)# 选择合适的区域,根据实际任务来if (y > 330 and y< 360) and x>220: #符的留下来locs.append((x,y,w,h))cnt = refCnts[20](x, y), r = cv2.minEnclosingCircle(cnt)  # 计算轮廓的外接圆
locs = sorted(locs, key=lambda x:x[0])
import numpy as np
output = []
for (i, (gX,gY,gW, gH)) in enumerate(locs):groupOutput = []group = gray[gY - 2:gY + gH + 2,gX - 2:gX + gW + 2]# 适当加一点边界cv_show('group',group)#预处理group = cv2.threshold(group,0,255,cv2.THRESH_BINARY | cv2.THRESH_OTSU)[1]# cv_show('group',group)# 计算每一组的轮廓digitCnts,hierarchy = cv2.findContours(group.copy(),cv2.RETR_EXTERNAL ,cv2.CHAIN_APPROX_SIMPLE)digitCnts = sort_contours(digitCnts,method='left-to-right')[0]# 计算每一组中的每一个数值for c in digitCnts:#找到当前数值的轮廓,resize成合适的的大小(x,y,w,h) = cv2.boundingRect(c)roi = group[y:y + h,x:x + w]roi = cv2.resize(roi,(57,88))# cv_show('roi',roi)'''-------使用模板匹配,计算匹配得分-----------'''scores = []# 在模板中计算每一个得分for (digit, digitROI) in digits.items():# 模板匹配result = cv2.matchTemplate(roi, digitROI, cv2.TM_CCOEFF)(_, score, _, _) = cv2.minMaxLoc(result)scores.append(score)# 得到最合适的数字groupOutput.append(str(np.argmax(scores)))# 画出来cv2.rectangle(img, (gX - 5, gY - 5), (gX + gW + 5, gY + gH + 5), (0, 0, 255), 1)# cv2.putText()是OpenCV库中的一个函数,用于在图像上添加文本。cv2.putText(img, "".join(groupOutput), (gX, gY - 15), cv2.FONT_HERSHEY_SIMPLEX, 0.65, (0, 0, 255), 2)output.extend(groupOutput)  # 得到结果# 打印结果
print("Card ID #: {}".format("".join(output)))
cv2.imshow("Image", img)
cv2.waitKey(0)
cv2.destroyAllWindows()
这篇关于【计算机视觉】OpenCV实现身份证号识别:从图像到文本的文章就介绍到这儿,希望我们推荐的文章对编程师们有所帮助!


