本文主要是介绍240107-RHEL8+RHEL9配置安装:NVIDIA驱动(15步)+CUDA(4步)+CUDNN(5步)+GPU压力测试,希望对大家解决编程问题提供一定的参考价值,需要的开发者们随着小编来一起学习吧!
Section 0: 基础知识
-
CUDA、cuDNN 和 PyTorch 版本的选择与搭配指南
-
安装优先级: 显卡驱动 → CUDA → CUDA Toolkit → cuDNN → Pytorch
- 即显卡驱动决定了CUDA版本,CUDA版本决定了CUDA Toolkit、cuDNN、Pytorch各自的版本
- 提前下载 | CUDA
- 提前下载 | CUDNN
- 在线下载 | PyTorch
-
最终检测
Section 1: 注意事项
⚠️ 注意事项1: RHEL除非注册付费,否则如法直接使用yum
- 解决方法 | RHEL配置其它yum源
⚠️ 注意事项2: 通过本地yum源安装kernel-devel,kernel-headers,gcc等工具包
- 常见问题 | 很多博客直接提供安装命令,但没有提到内核kernel版本冲突的问题
yum -y install kernel-devel
yum -y install epel-release
yum -y install gcc
-
解决方案1: 通过配置本地Yum源,解决内核冲突问题,推荐使用 ⭐️
-
解决方案2: 通过在线查询并下载对应的内核版本,解决内核冲突问题,尚未验证 🤷
-
正确配置安装工具库之后,可通过下面两行命令查看版本是否一致,例如:是否都会
el8_8,如果不一致,则安装有问题
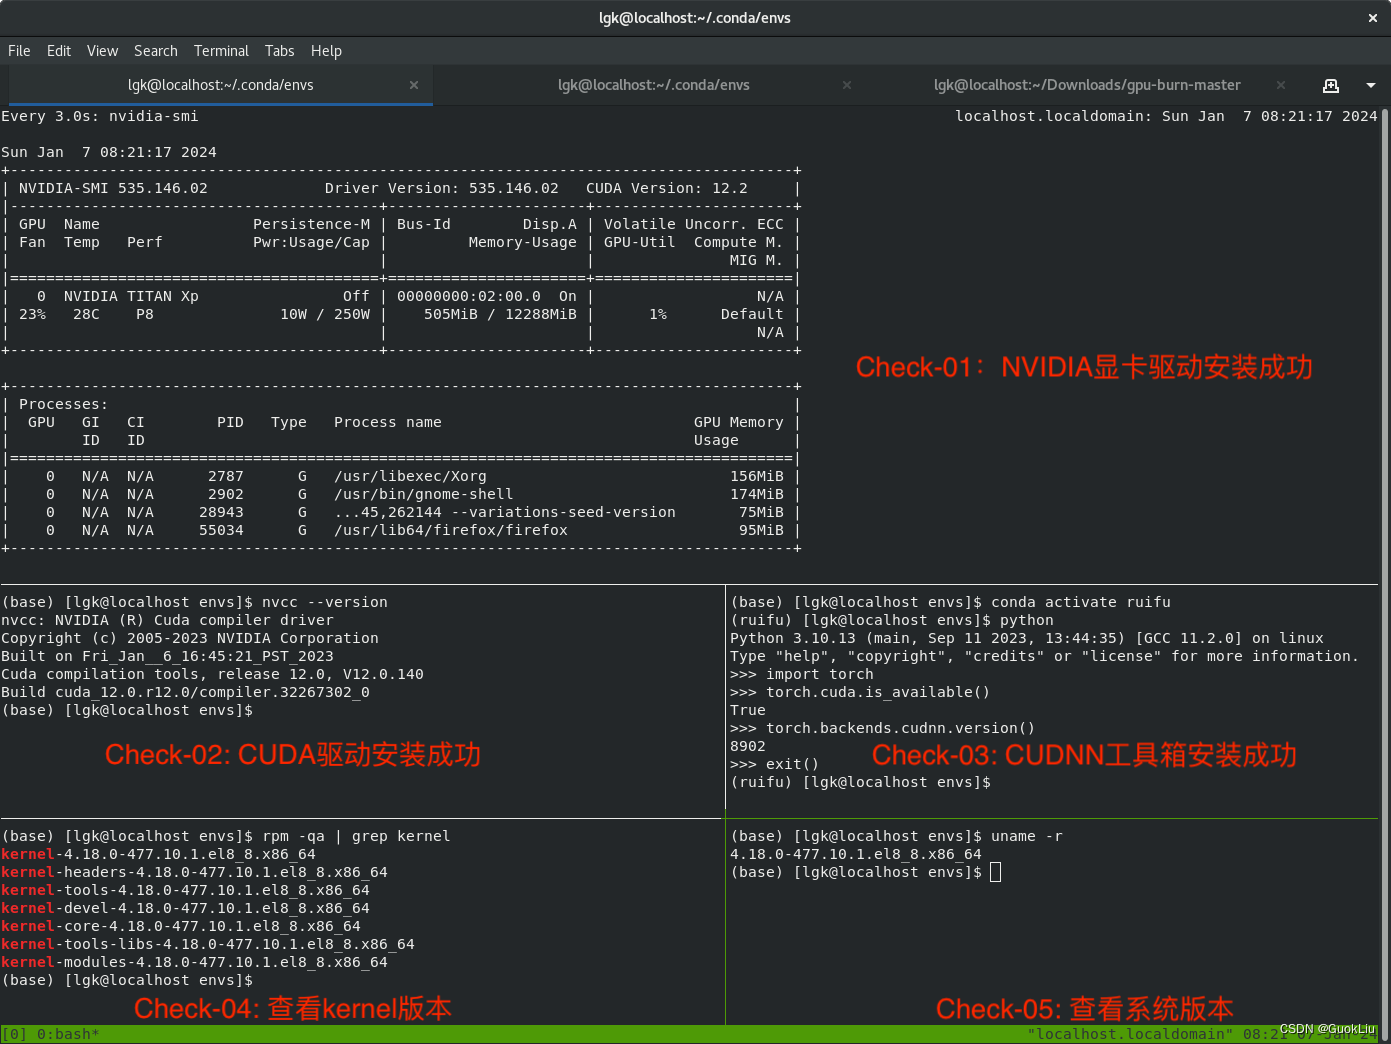
(base) [root@localhost gpu-burn-master]# uname -r ⭐️
4.18.0-477.10.1.el8_8.x86_64
(base) [root@localhost gpu-burn-master]# rpm -qa | grep kernel ⭐️
kernel-4.18.0-477.10.1.el8_8.x86_64
kernel-headers-4.18.0-477.10.1.el8_8.x86_64
kernel-tools-4.18.0-477.10.1.el8_8.x86_64
kernel-devel-4.18.0-477.10.1.el8_8.x86_64
kernel-core-4.18.0-477.10.1.el8_8.x86_64
kernel-tools-libs-4.18.0-477.10.1.el8_8.x86_64
kernel-modules-4.18.0-477.10.1.el8_8.x86_64
Section 2: RHEL8+RHEL9安装NVIDIA驱动
- 参考视频 | RHEL9.0测试安装nvidia显卡驱动_哔哩哔哩_bilibili
- 驱动下载 | 如图所示意,选择自己显卡所对应的驱动,然后下载

🎯 Step 01: 查看是否已禁用`nouveau`
(base) [root@localhost clash-for-linux-master]# lsmod | grep nouveau🎯 Step 02: 查看显卡是否能被检测到
(base) [root@localhost clash-for-linux-master]# lspci | grep VGA
02:00.0 VGA compatible controller: NVIDIA Corporation GP102 [TITAN Xp] (rev a1)🎯 Step 03: 通过`vim`,设置并禁用`nouveau`
(base) [root@localhost clash-for-linux-master]# vim /etc/modprobe.d/blacklist-nouveau.conf
(base) [root@localhost clash-for-linux-master]# cat /etc/modprobe.d/blacklist-nouveau.conf
blacklist nouveau
options nouveau modeset=0🎯 Step 04: 重新初始化RAM磁盘,确保系统包含了最新的驱动程序和配置
(base) [root@localhost clash-for-linux-master]# dracut -f 🎯 Step 06: 选用本地的`yum`源配置
- 详情参阅:https://blog.csdn.net/qq_33039859/article/details/135256790?spm=1001.2014.3001.5501(base) [root@localhost clash-for-linux-master]# cd /etc/yum.repos.d/
(base) [root@localhost yum.repos.d]# ls
bak  centos8.repo  config_cuda_cudnn  docker-ce.repo  microsoft-edge.repo  redhat.repo
(base) [root@localhost yum.repos.d]# mkdir config_ali_repo
(base) [root@localhost yum.repos.d]# mv *.* config_ali_repo/
(base) [root@localhost yum.repos.d]# ls
bak  config_ali_repo  config_cuda_cudnn
(base) [root@localhost yum.repos.d]# cp config_cuda_cudnn/* .
(base) [root@localhost yum.repos.d]# ls -al
total 28
drwxr-xr-x.   5 root root  164 Jan  7 06:32 .
drwxr-xr-x. 154 root root 8192 Jan  7 04:52 ..
drwxr-xr-x.   2 root root  125 Jan  6 23:16 bak
drwxr-xr-x.   2 root root   94 Jan  7 06:31 config_ali_repo
drwxr-xr-x.   2 root root  105 Jan  7 04:17 config_cuda_cudnn
-rw-r--r--.   1 root root  210 Jan  7 06:32 cudnn-local-rhel8-8.9.6.50.repo
-rw-r--r--.   1 root root  358 Jan  7 06:32 redhat.repo
-rw-r--r--.   1 root root  333 Jan  7 06:32 redhat.repo.bak
-rw-r--r--.   1 root root  159 Jan  7 06:32 rhel8.repo🎯 Step 07: 查看本地`yum`源的配置信息
(base) [root@localhost yum.repos.d]# cat rhel8.repo
[RHEL-BaseOS]
name=BaseOS
baseurl=file:///iso/BaseOS
gpgcheck=0
enabled=1[RHEL-AppStream]
name= AppStream
baseurl=file:///iso/AppStream
gpgcheck=0
enabled=1🎯 Step 08: 重启系统
(base) [root@localhost yum.repos.d]# reboot🎯 Step 09: 安装一系列开发工具和编程语言编译器,如gcc,mark,debugging tools等
(base) [root@localhost yum.repos.d]# yum group install "Development Tools" ⭐️
Updating Subscription Management repositories.
Unable to read consumer identityThis system is not registered with an entitlement server. You can use subscription-manager to register.cudnn-local-rhel8-8.9.6.50                                                          2.9 MB/s | 3.0 kB     00:00
BaseOS                                                                              2.7 MB/s | 2.8 kB     00:00
AppStream                                                                           3.1 MB/s | 3.2 kB     00:00
Dependencies resolved.
====================================================================================================================Package                    Architecture              Version                      Repository                  Size
====================================================================================================================
Installing Groups:Development Tools                                                                                                 Transaction Summary
====================================================================================================================Is this ok [y/N]: y
Complete!🎯 Step 10: 安装用于处理ELF(可执行和链接格式)文件的开发工具库:elfutils-libelf-devel
(base) [root@localhost yum.repos.d]# yum install elfutils-libelf-devel ⭐️
Updating Subscription Management repositories.
Unable to read consumer identityThis system is not registered with an entitlement server. You can use subscription-manager to register.Last metadata expiration check: 0:01:11 ago on Sun 07 Jan 2024 06:34:14 AM EST.
Package elfutils-libelf-devel-0.188-3.el8.x86_64 is already installed.
Dependencies resolved.
Nothing to do.
Complete!🎯 Step 11: 切换到CUDA和CUDNN的下载文件夹
(base) [root@localhost yum.repos.d]# cd /home/lgk/Downloads/
(base) [root@localhost Downloads]# ls -al
total 6427280
drwxr-xr-x.  4 lgk  lgk        4096 Jan  7 05:41 .
drwx------. 18 lgk  lgk        4096 Jan  7 03:15 ..
drwxr-xr-x.  9 root root        180 Jan  7 05:39 clash-for-linux-master
-rw-rw-r--.  1 lgk  lgk    16784320 Jan  7 05:31 clash-for-linux-master.zip
-rw-rw-r--.  1 lgk  lgk   111225075 Jan  7 05:41 Clash.for.Windows-0.20.28-x64-linux.tar.gz
-rwxr-x---.  1 lgk  lgk  4207617207 Jan  6 22:50 cuda_12.0.1_525.85.12_linux.run
-rw-rw-r--.  1 lgk  lgk  1430362197 Jan  6 22:51 cudnn-local-repo-rhel8-8.9.6.50-1.0-1.x86_64.rpm
-rw-rw-r--.  1 lgk  lgk       25128 Jan  6 22:48 epel-release-latest-8.noarch.rpm
-rw-r--r--.  1 root root     348036 Jan 11  2022 freeimage-3.17.0-5.el8.x86_64.rpm
-rw-r--r--.  1 root root      39676 Jan 11  2022 freeimage-devel-3.17.0-5.el8.x86_64.rpm
drwxr-xr-x.  2 root root       4096 Jan  7 04:41 gpu-burn-master
-rw-rw-r--.  1 lgk  lgk       14391 Jan  7 04:30 gpu-burn-master.zip
-rw-r--r--.  1 root root     451848 Apr  7  2020 jxrlib-1.1-1.el8.x86_64.rpm
-rw-rw-r--.  1 lgk  lgk   164378334 Jan  6 22:33 microsoft-edge-stable_120.0.2210.121-1_amd64.deb
-rw-rw-r--.  1 lgk  lgk   166605200 Jan  7 04:48 microsoft-edge-stable-120.0.2210.121-1.x86_64.rpm
-rw-rw-r--.  1 lgk  lgk   141613749 Jan  7 02:56 Miniconda3-latest-Linux-x86_64.sh
-rwxrwxr-x.  1 lgk  lgk   341737575 Jan  7 00:49 NVIDIA-Linux-x86_64-535.146.02.run
-rw-rw-r--.  1 lgk  lgk      209952 Jan  6 22:48 yum-4.7.0-4.el8.noarch.rpm
-rw-rw-r--.  1 lgk  lgk       74276 Jan  6 22:48 yum-utils-4.0.21-3.el8.noarch.rpm🎯 Step 12: 切换到文本命令模式安装驱动 ⭐️
(base) [root@localhost Downloads]# # init 3
(base) [root@localhost Downloads]# # localhost login: root
(base) [root@localhost Downloads]# # Password: 🎯 Step 13: 改变run文件为可执行文件,并运行安装 ⭐️
(base) [root@localhost Downloads]# chmod +x NVIDIA-Linux-x86_64-535.146.02.run
(base) [root@localhost Downloads]# # ./NVIDIA-Linux-x86_64-535.146.02.run 🎯 Step 14: 在后续所有交互界面中只用选择yes or ok ⭐️
(base) [root@localhost Downloads]# # click yes or ok🎯 Step 15: 检查NVIDIA驱动是否安装成功
(base) [root@localhost Downloads]# nvidia-smi ⭐️
Sun Jan  7 06:48:41 2024
+---------------------------------------------------------------------------------------+
| NVIDIA-SMI 535.146.02             Driver Version: 535.146.02   CUDA Version: 12.2     |
|-----------------------------------------+----------------------+----------------------+
| GPU  Name                 Persistence-M | Bus-Id        Disp.A | Volatile Uncorr. ECC |
| Fan  Temp   Perf          Pwr:Usage/Cap |         Memory-Usage | GPU-Util  Compute M. |
|                                         |                      |               MIG M. |
|=========================================+======================+======================|
|   0  NVIDIA TITAN Xp                Off | 00000000:02:00.0  On |                  N/A |
| 23%   29C    P5              23W / 250W |    508MiB / 12288MiB |      1%      Default |
|                                         |                      |                  N/A |
+-----------------------------------------+----------------------+----------------------++---------------------------------------------------------------------------------------+
| Processes:                                                                            |
|  GPU   GI   CI        PID   Type   Process name                            GPU Memory |
|        ID   ID                                                             Usage      |
|=======================================================================================|
|    0   N/A  N/A      2787      G   /usr/libexec/Xorg                           124MiB |
|    0   N/A  N/A      2902      G   /usr/bin/gnome-shell                        133MiB |
|    0   N/A  N/A     28574      G   /usr/lib64/firefox/firefox                   11MiB |
|    0   N/A  N/A     28943      G   ...45,262144 --variations-seed-version      235MiB |
+---------------------------------------------------------------------------------------+
Section 3: RHEL8+RHEL9安装CUDA+CUDNN
- Redhat8 安装 cuda11.8 + cudnn 8.6 + trt8.5.3 保姆级教程_redhat安装cudnn-CSDN博客
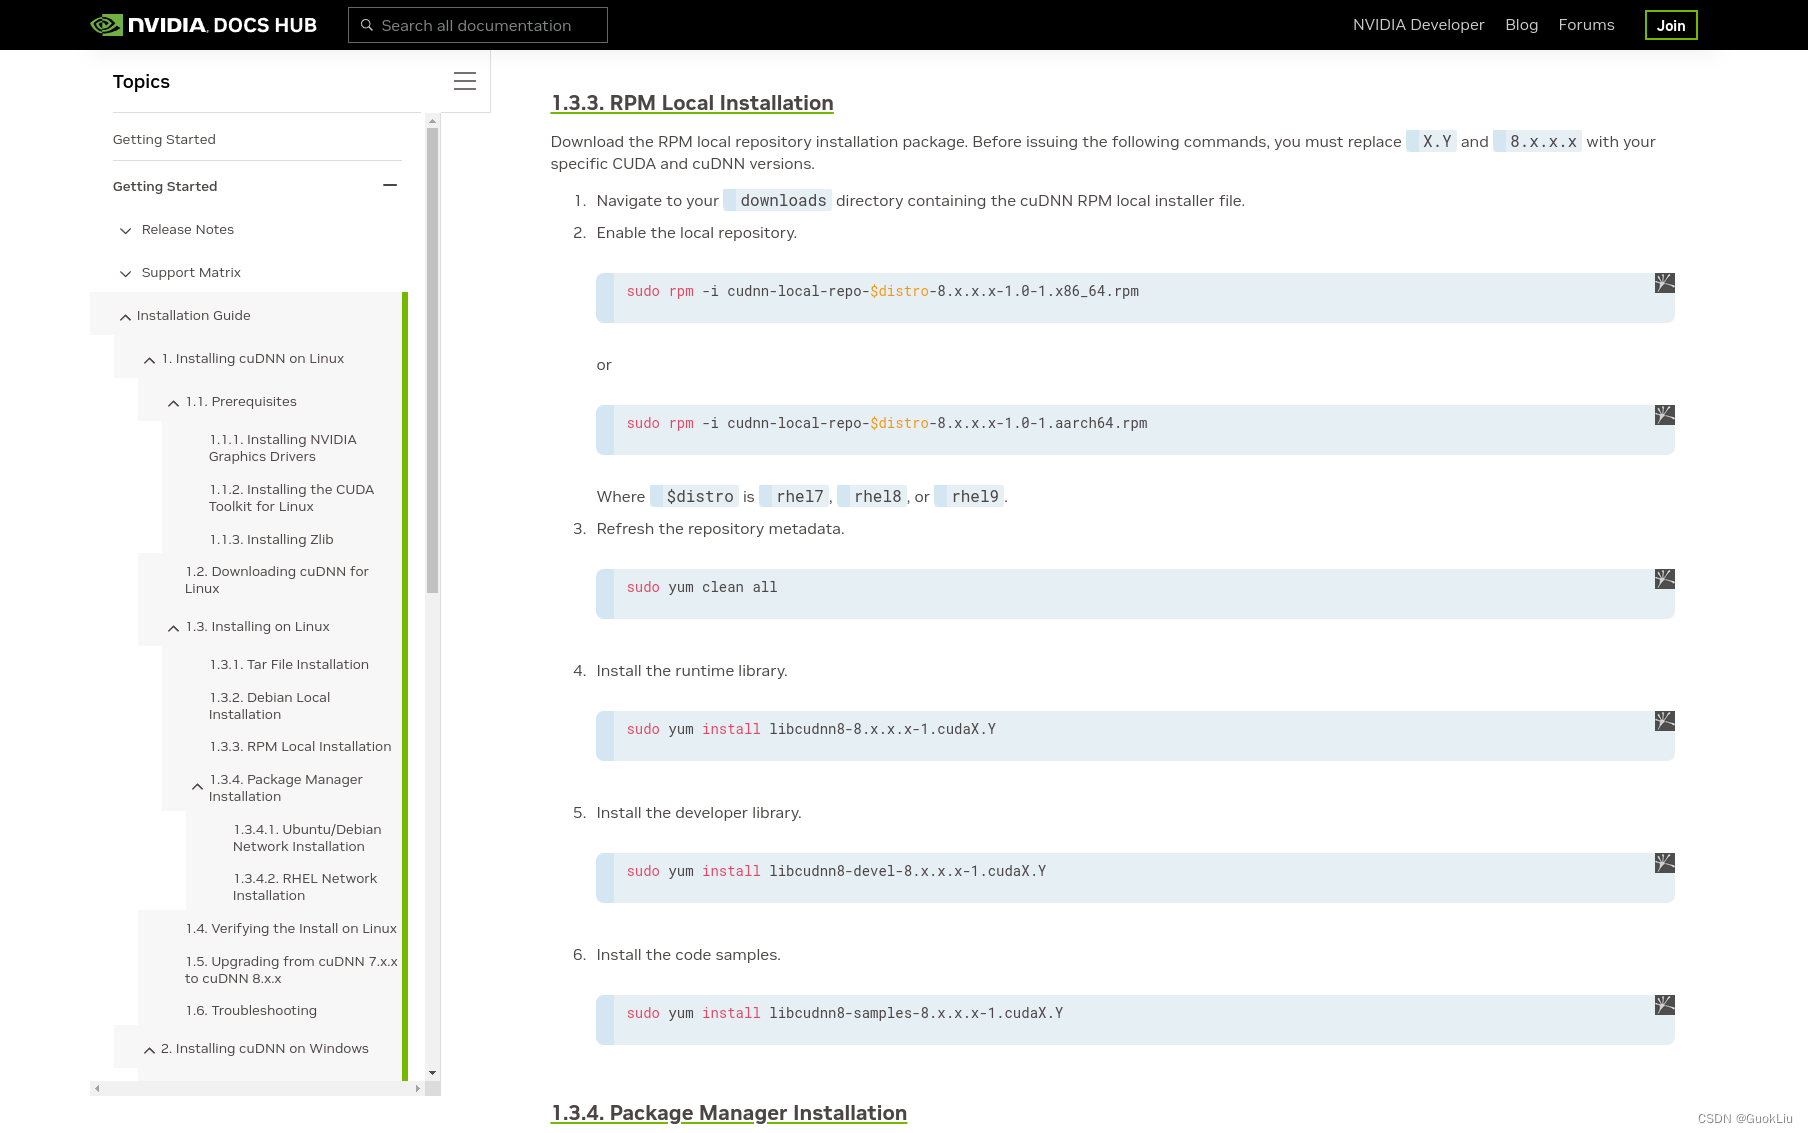
- Installation Guide - NVIDIA Docs
Section 3.1: 安装CUDA
🎯 Step 01: 切换到CUDA下载目录
(base) [root@localhost Downloads]# ls -al
total 6427280
drwxr-xr-x. 4 lgk lgk 4096 Jan 7 05:41 .
drwx------. 18 lgk lgk 4096 Jan 7 03:15 ..
drwxr-xr-x. 9 root root 180 Jan 7 05:39 clash-for-linux-master
-rw-rw-r--. 1 lgk lgk 16784320 Jan 7 05:31 clash-for-linux-master.zip
-rw-rw-r--. 1 lgk lgk 111225075 Jan 7 05:41 Clash.for.Windows-0.20.28-x64-linux.tar.gz
-rwxr-x---. 1 lgk lgk 4207617207 Jan 6 22:50 cuda_12.0.1_525.85.12_linux.run ⭐️
-rw-rw-r--. 1 lgk lgk 1430362197 Jan 6 22:51 cudnn-local-repo-rhel8-8.9.6.50-1.0-1.x86_64.rpm ⭐️
-rw-rw-r--. 1 lgk lgk 25128 Jan 6 22:48 epel-release-latest-8.noarch.rpm
-rw-r--r--. 1 root root 348036 Jan 11 2022 freeimage-3.17.0-5.el8.x86_64.rpm
-rw-r--r--. 1 root root 39676 Jan 11 2022 freeimage-devel-3.17.0-5.el8.x86_64.rpm
drwxr-xr-x. 2 root root 4096 Jan 7 04:41 gpu-burn-master
-rw-rw-r--. 1 lgk lgk 14391 Jan 7 04:30 gpu-burn-master.zip
-rw-r--r--. 1 root root 451848 Apr 7 2020 jxrlib-1.1-1.el8.x86_64.rpm
-rw-rw-r--. 1 lgk lgk 164378334 Jan 6 22:33 microsoft-edge-stable_120.0.2210.121-1_amd64.deb
-rw-rw-r--. 1 lgk lgk 166605200 Jan 7 04:48 microsoft-edge-stable-120.0.2210.121-1.x86_64.rpm
-rw-rw-r--. 1 lgk lgk 141613749 Jan 7 02:56 Miniconda3-latest-Linux-x86_64.sh
-rwxrwxr-x. 1 lgk lgk 341737575 Jan 7 00:49 NVIDIA-Linux-x86_64-535.146.02.run
-rw-rw-r--. 1 lgk lgk 209952 Jan 6 22:48 yum-4.7.0-4.el8.noarch.rpm
-rw-rw-r--. 1 lgk lgk 74276 Jan 6 22:48 yum-utils-4.0.21-3.el8.noarch.rpm🎯 Step 02: 通过命令行安装`CUDA`
- i:安装
- v:显示安装进度
- h:hash验证
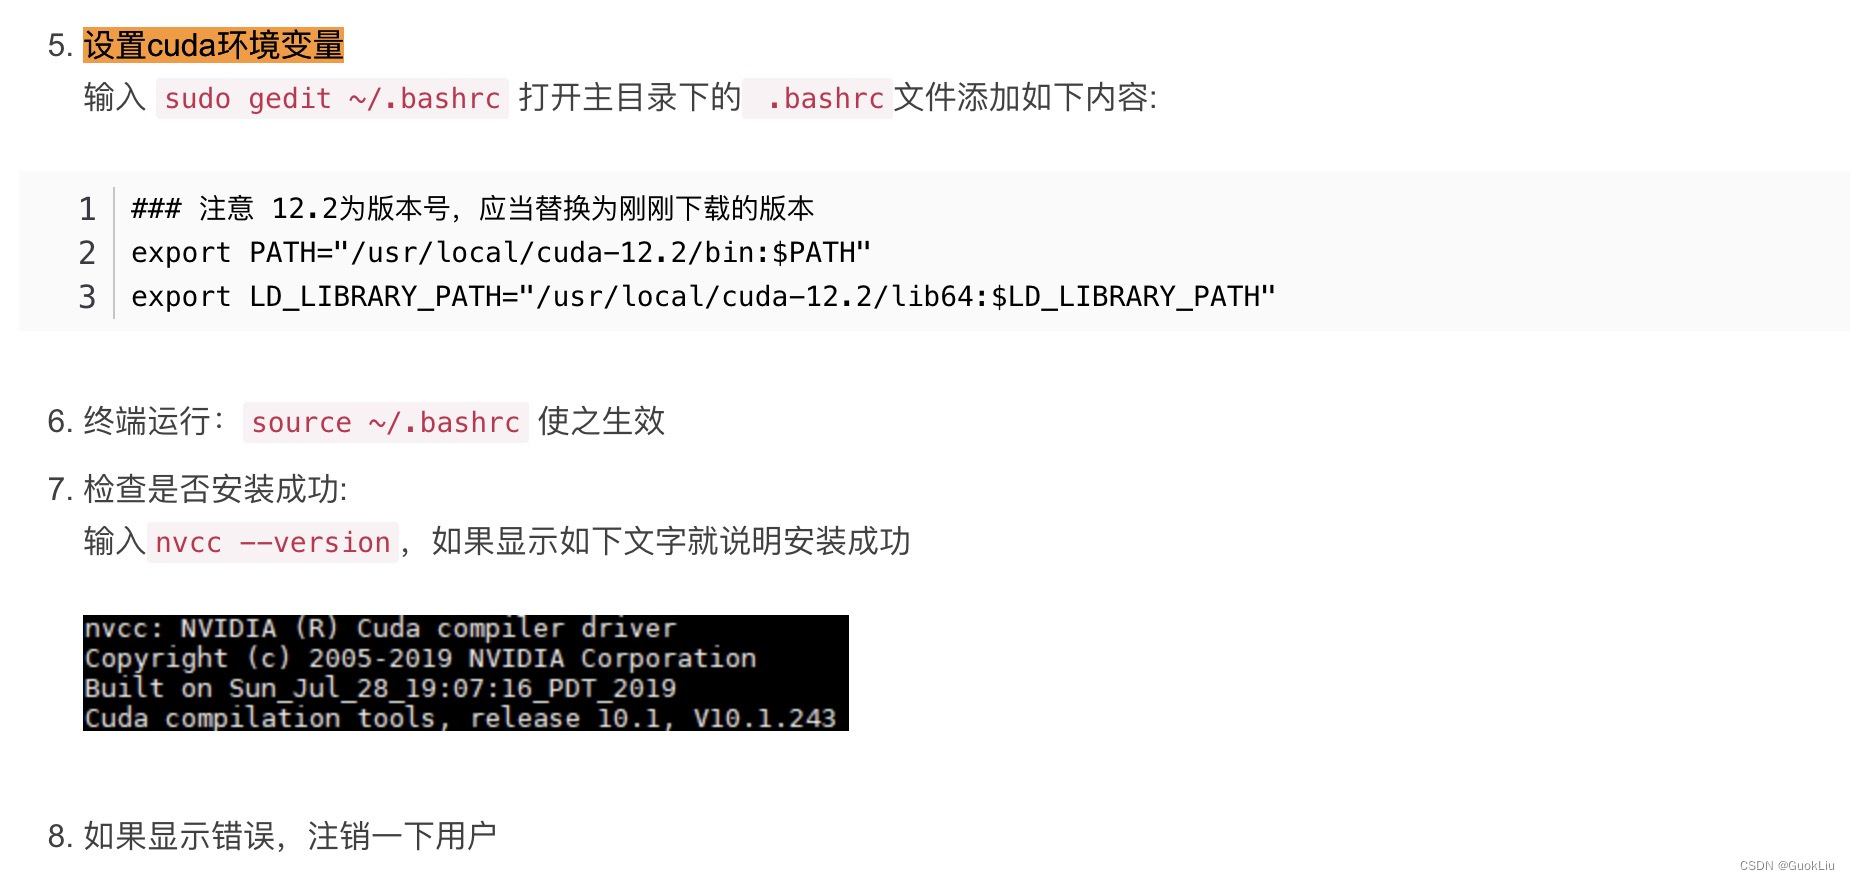
(base) [root@localhost mnistCUDNN]# sudo rpm -ivh cuda_12.0.1_525.85.12_linux.run🎯 Step 03: 配置`.bashrc`文件
sudo vim ~/.bashrc
export PATH="/usr/local/cuda-12.0/bin:$PATH"
export LD_LIBRARY_PATH="/usr/local/cuda-12.0/lib64:$LD_LIBRARY_PATH"
source ~/.bashrc🎯 Step 04: 检查NVIDIA驱动师傅哦安装成功
(base) [root@localhost mnistCUDNN]# nvcc --version
nvcc: NVIDIA (R) Cuda compiler driver
Copyright (c) 2005-2023 NVIDIA Corporation
Built on Fri_Jan__6_16:45:21_PST_2023
Cuda compilation tools, release 12.0, V12.0.140
Build cuda_12.0.r12.0/compiler.32267302_0
Section 3.2: 安装CUDNN
-
参考官网:Installation Guide - NVIDIA Docs
-
注意事项:
cuda.X.Y中的X与Y是NVIDIA的驱动版本,而非CUDA版本
-
具体操作
🎯 Step 01: 通过命令行安装`CUDNN`
(base) [root@localhost Downloads]# sudo rpm -ivh cudnn-local-repo-rhel8-8.9.6.50-1.0-1.x86_64.rpm
Verifying...                          ################################# [100%]
Preparing...                          ################################# [100%]package cudnn-local-repo-rhel8-8.9.6.50-1.0-1.x86_64 is already installed🎯 Step 02: 通过命令行安装`libcudnn8`
- i:安装
- v:显示安装进度
- h:hash验证(base) [root@localhost Downloads]# sudo yum install libcudnn8-8.9.6.50-1.cuda12.2
Updating Subscription Management repositories.
Unable to read consumer identity
This system is not registered with an entitlement server. You can use subscription-manager to register.Last metadata expiration check: 0:22:45 ago on Sun 07 Jan 2024 06:34:14 AM EST.
Package libcudnn8-8.9.6.50-1.cuda12.2.x86_64 is already installed.
Dependencies resolved.
Nothing to do.
Complete!🎯 Step 03: 通过命令行安装`libcudnn8-devel`
(base) [root@localhost Downloads]# sudo yum install libcudnn8-devel-8.9.6.50-1.cuda12.2
Updating Subscription Management repositories.
Unable to read consumer identityThis system is not registered with an entitlement server. You can use subscription-manager to register.Last metadata expiration check: 0:23:11 ago on Sun 07 Jan 2024 06:34:14 AM EST.
Package libcudnn8-devel-8.9.6.50-1.cuda12.2.x86_64 is already installed.
Dependencies resolved.
Nothing to do.
Complete!🎯 Step 04: 通过命令行安装`libcudnn8-samples`
(base) [root@localhost Downloads]# sudo yum install libcudnn8-samples-8.9.6.50-1.cuda12.2
Updating Subscription Management repositories.
Unable to read consumer identityThis system is not registered with an entitlement server. You can use subscription-manager to register.Last metadata expiration check: 0:23:36 ago on Sun 07 Jan 2024 06:34:14 AM EST.
Package libcudnn8-samples-8.9.6.50-1.cuda12.2.x86_64 is already installed.
Dependencies resolved.
Nothing to do.
Complete!🎯 Step 05: 测试cudnn是否安装成功
cd /usr/src/cudnn_samples_v8/mnistCUDNN
make clean && make
./mnistCUDNN...
...
...Test passed!
Section 3.3: 测试CUDA与CUDNN
- 通过
Pytorch验证CUDA及CUDNN已经配置成功
(base) [lgk@localhost gpu-burn-master]$ conda activate ruifu
(ruifu) [lgk@localhost gpu-burn-master]$ python
Python 3.10.13 (main, Sep 11 2023, 13:44:35) [GCC 11.2.0] on linux
Type "help", "copyright", "credits" or "license" for more information.
>>> import torch
>>> torch.cuda.is_available()
True
>>> torch.backends.cudnn.version()
8902
>>>
Section 4: GPU压力测试
- GPU压力测试工具安装指导(RHEL8.2) - 知乎
(base) [root@localhost gpu-burn-master]# cd /home/lgk/Downloads/gpu-burn-master/
(base) [root@localhost gpu-burn-master]# make
make: 'gpu_burn' is up to date.
(base) [root@localhost gpu-burn-master]# ./gpu_burn
Run length not specified in the command line. Using compare file: compare.ptx
Burning for 10 seconds.
GPU 0: NVIDIA TITAN Xp (UUID: GPU-c2611617-5a63-404d-571b-afe332aae1e7)
Initialized device 0 with 12186 MB of memory (11510 MB available, using 10359 MB of it), using FLOATS
Results are 268435456 bytes each, thus performing 38 iterations
50.0%  proc'd: 38 (9356 Gflop/s)   errors: 0   temps: 26 C Summary at:   Sun Jan  7 07:55:53 EST 202490.0%  proc'd: 76 (9728 Gflop/s)   errors: 0   temps: 38 C Summary at:   Sun Jan  7 07:55:57 EST 2024100.0%  proc'd: 114 (9784 Gflop/s)   errors: 0   temps: 42 C
Killing processes with SIGTERM (soft kill)
Freed memory for dev 0
Uninitted cublas
doneTested 1 GPUs:GPU 0: OK
Section 5: 参考文献
Section 5.1: RHEL系统安装
-
光驱下载 | 通过Rufus制作RHEL的启动盘,并用于系统安装
-
参考链接 | 通过Rufus制作RHEL的启动盘,并用于系统安装 — Ref1
-
参考链接 | 通过Rufus制作RHEL的启动盘,并用于系统安装 — Ref2
Section 5.2: RHEL相关软件
-
软件下载|Miniconda
-
软件下载 | Edge
- 解决方案 | Edge安装时报错及其解决方案
-
上网配置 | GitHub - wnlen/clash-for-linux: clash-for-linux
-
代理设置 | GitHub - ghostxu97/clash-for-linux
Section 5.3: 常见问题
- 问题1: nividia-smi命令提供了哪些信息?
- 答案1:
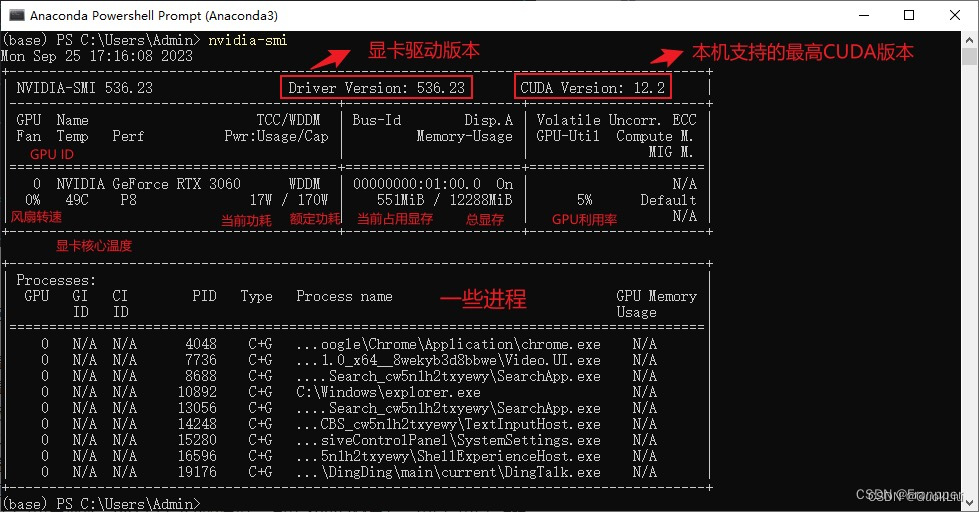
- 问题2: 如何选择CUDA版本?
- 答案2:
如果对于CUDA版本没有要求,一般选择一个不高于本机支持的最高CUDA版本安装即可,然后按照CUDA版本去下载对应的cuDNN版本
- 问题3: 当前PyTorch最新支持的版本是多少?
- 答案3:
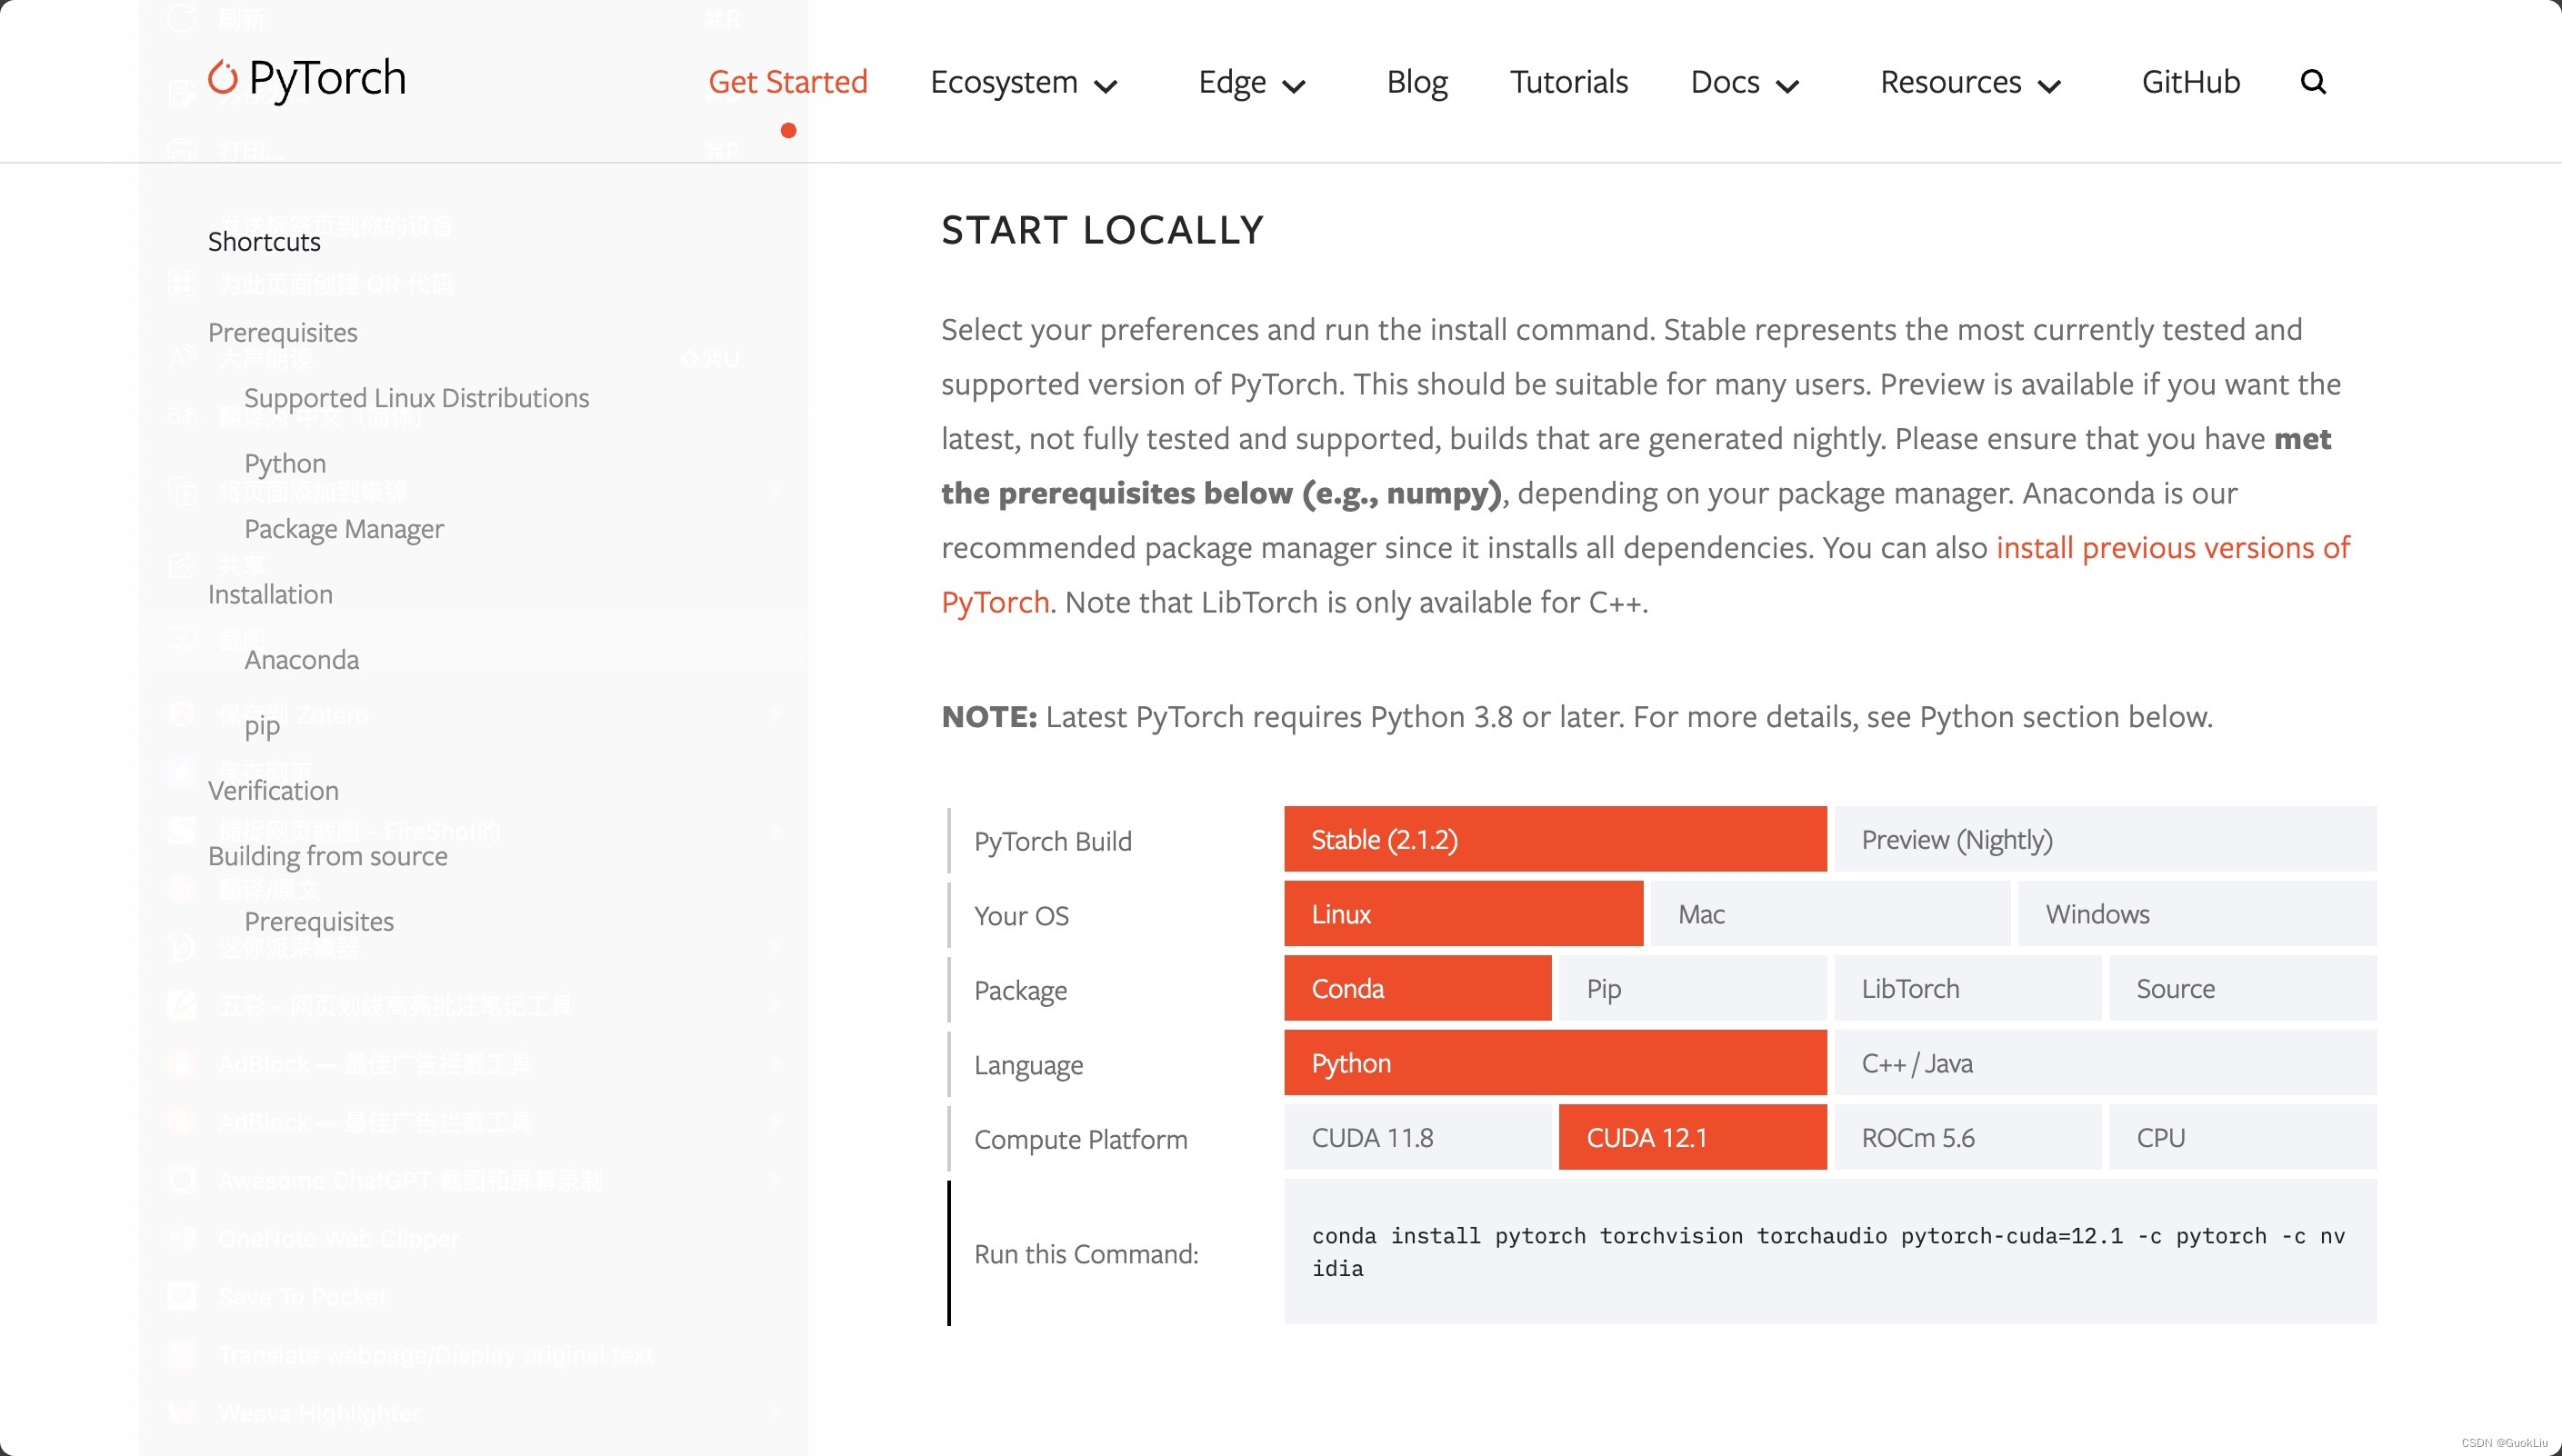
截止20240104,PyTorch支持的CUDA版本:CUDA 11.8, CUDA 12.1
- 问题 4:20240104: CUDNN有多个版本,如何选择?
- 答案 4:
知识点:cuda版本中的.x是什么意思?以Download cuDNN v8.9.4 (August 8th, 2023), for CUDA 12.x为例。“12.x” 表示 CUDA 版本号的一种通用表示法,其中 “x” 表示可以是任何数字,表示适用于该主要 CUDA 版本的所有次要版本。具体来说,CUDA 包括一个主要版本号和一个次要版本号,例如 CUDA 11.0、CUDA 11.1、CUDA 11.2 等。主要版本号通常表示 CUDA 的重大更新或变化,而次要版本号表示小的修复或改进。“cuDNN v8.9.4 for CUDA 12.x” 表示 cuDNN v8.9.4 是为 CUDA 12.x 系列的所有 CUDA 12 版本而设计的。也就是说,cuDNN v8.9.4 支持 CUDA 12.0、CUDA 12.1、CUDA 12.2 等所有的 CUDA 12.x 版本。这种表示法使得 cuDNN 能够与多个 CUDA 12 的次要版本兼容。
- 问题 5:当需要的CUDA版本高于当前驱动最高支持的CUDA版本时,怎么办?
- 答案 5:

- 问题6: 如何切换CUDA版本?
- 回答6:
- https://blog.csdn.net/JianJuly/article/details/102793103
- 如果有安装多个cuda, 只需修改.bashrc文件中的版本号即可随意切换cuda版本。具体方法见安装cuda一节中的 5. 设置cuda环境变量。
这篇关于240107-RHEL8+RHEL9配置安装:NVIDIA驱动(15步)+CUDA(4步)+CUDNN(5步)+GPU压力测试的文章就介绍到这儿,希望我们推荐的文章对编程师们有所帮助!


