本文主要是介绍jetson AGC orin 配置pytorch和cuda使用、yolov8 TensorRt测试,希望对大家解决编程问题提供一定的参考价值,需要的开发者们随着小编来一起学习吧!
文章目录
- 1、安装环境
- 1.1、检查系统环境
- 1.2、下载安装pytorch
- 1.3、下载安装torchvision
- 1.3、测试安装是否成功
- 2、yolov8测试
- 2.1、官方python脚本测试
- 2.2、tensorrt 模型转换
- 2.3、tensorrt c++ 测试
1、安装环境
1.1、检查系统环境
检查系统环境、安装jetpack版本,执行 cat /etc/nv_tegra_release 和 sudo apt-cache show nvidia-jetpack 查看。
$  cat /etc/nv_tegra_release
# R35 (release), REVISION: 4.1, GCID: 33958178, BOARD: t186ref, EABI: aarch64, DATE: Tue Aug  1 19:57:35 UTC 2023$ sudo apt-cache show nvidia-jetpack
Package: nvidia-jetpack
Version: 5.1.2-b104
Architecture: arm64
Maintainer: NVIDIA Corporation
Installed-Size: 194
Depends: nvidia-jetpack-runtime (= 5.1.2-b104), nvidia-jetpack-dev (= 5.1.2-b104)
Homepage: http://developer.nvidia.com/jetson
Priority: standard
Section: metapackages
Filename: pool/main/n/nvidia-jetpack/nvidia-jetpack_5.1.2-b104_arm64.deb
Size: 29304
SHA256: fda2eed24747319ccd9fee9a8548c0e5dd52812363877ebe90e223b5a6e7e827
SHA1: 78c7d9e02490f96f8fbd5a091c8bef280b03ae84
MD5sum: 6be522b5542ab2af5dcf62837b34a5f0
Description: NVIDIA Jetpack Meta Package
Description-md5: ad1462289bdbc54909ae109d1d32c0a8
1.2、下载安装pytorch
根据官网提供链接安装适配的 pytorch-gpu版本(cpu直接pip install pytorch即可)。例如本机使用的 jetpack 5.1.2,选择安装 PyTorch v2.1.0 版本即可。
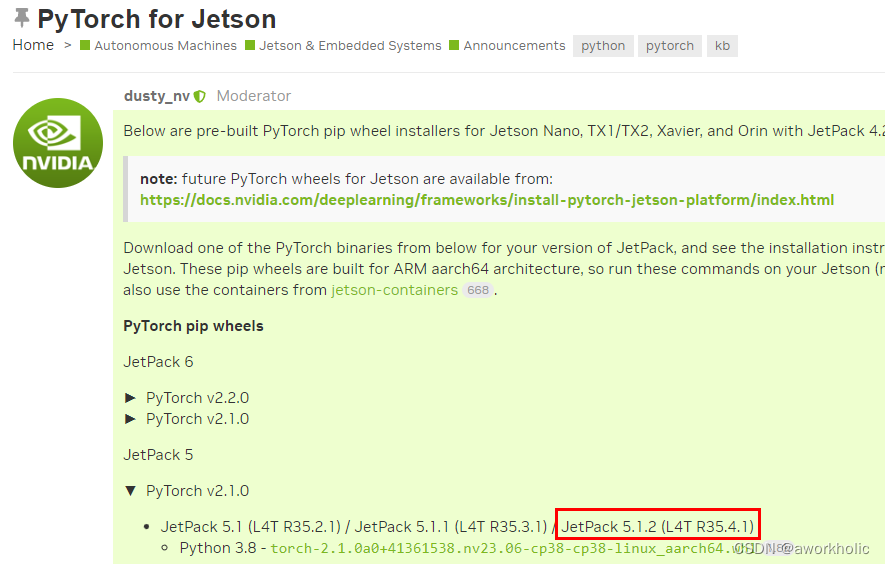
下载 whl 文件,之后pip install 即可。
$ wget https://developer.download.nvidia.cn/compute/redist/jp/v512/pytorch/torch-2.1.0a0+41361538.nv23.06-cp38-cp38-linux_aarch64.whl$ pip install torch-2.1.0a0+41361538.nv23.06-cp38-cp38-linux_aarch64.whl
安装后,在python中执行
import torch
可能出现的错误,和解决办法
- ImportError: libopenblas.so.0: cannot open shared object file: No such file or directory
sudo apt-get install libopenblas-base
1.3、下载安装torchvision
需要便于安装对应版本torchvision,查看 官网链接 ,要求PyTorch v2.1.0 安装 0.16 版本
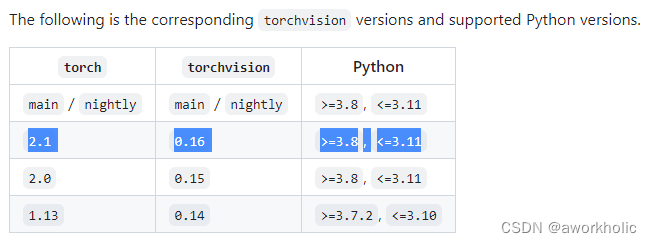
这里选择 0.16.1 版本,下载指定源码进行编译安装
$ git clone --branch v0.16.1 https://github.com/pytorch/vision torchvision`
$ export BUILD_VERSION=0.16.1
$ python setup.py install --user
编译中出现依赖,根据情况安装
# sudo apt-get install libjpeg-dev zlib1g-dev libpython3-dev libopenblas-dev libavcodec-dev libavformat-dev libswscale-dev
编译后验证,
import torchvision
可能的错误,
-
/home/hard_disk/downloads/torchvision/torchvision/io/image.py:13: UserWarning: Failed to load image Python extension: ''If you don’t plan on using image functionality from
torchvision.io, you can ignore this warning. Otherwise, there might be something wrong with your environment. Did you havelibjpegorlibpnginstalled before buildingtorchvisionfrom source?安装 sudo apt-get install libjpeg-dev zlib1g-dev 之后,删除所有缓存和编译零时文件,再重新编译安装即可。
1.3、测试安装是否成功
测试安装是否成功,
>>> import torch
>>> print(torch.__version__)
>>> print('CUDA available: ' + str(torch.cuda.is_available()))
>>> print('cuDNN version: ' + str(torch.backends.cudnn.version()))
>>> a = torch.cuda.FloatTensor(2).zero_()
>>> print('Tensor a = ' + str(a))
>>> b = torch.randn(2).cuda()
>>> print('Tensor b = ' + str(b))
>>> c = a + b
>>> print('Tensor c = ' + str(c))>>> import torchvision
>>> print(torchvision.__version__)
若均不报错,且能正常输出说明安装成功,如下图
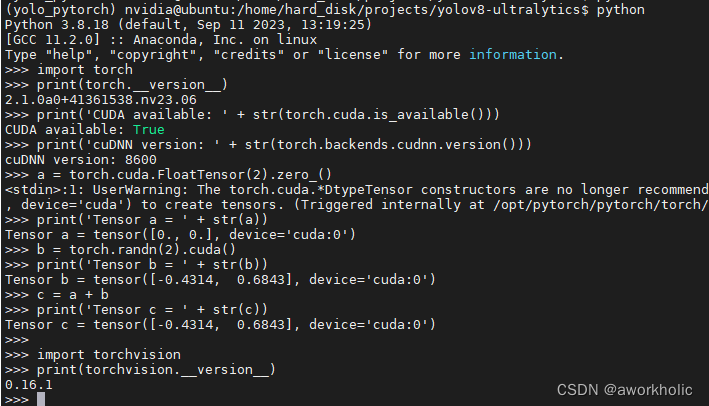
2、yolov8测试
使用yolov8m.pt进行测试
2.1、官方python脚本测试
$ yolo predict model=yolov8m.pt source=bus.jpg device=cpu
Ultralytics YOLOv8.0.227 🚀 Python-3.8.18 torch-2.1.0a0+41361538.nv23.06 CPU (ARMv8 Processor rev 1 (v8l))
YOLOv8m summary (fused): 218 layers, 25886080 parameters, 0 gradients, 78.9 GFLOPsimage 1/1 /home/hard_disk/projects/yolov8-ultralytics/bus.jpg: 640x480 4 persons, 1 bus, 1492.5ms
Speed: 12.5ms preprocess, 1492.5ms inference, 9.3ms postprocess per image at shape (1, 3, 640, 480)
使用cpu推理耗时1.5s,gpu耗时0.35s。
s$ yolo predict model=yolov8m.pt source=bus.jpg device=0
Ultralytics YOLOv8.0.227 🚀 Python-3.8.18 torch-2.1.0a0+41361538.nv23.06 CUDA:0 (Orin, 30593MiB)
YOLOv8m summary (fused): 218 layers, 25886080 parameters, 0 gradients, 78.9 GFLOPsimage 1/1 /home/hard_disk/projects/yolov8-ultralytics/bus.jpg: 640x480 4 persons, 1 bus, 349.9ms
Speed: 8.7ms preprocess, 349.9ms inference, 6.8ms postprocess per image at shape (1, 3, 640, 480)
由于gpu推理通常需要预热,拷贝图像(bus.jpg)到文件夹重复多张(以10张为例)即可,重新运行,基本推理耗时28ms。
$ yolo predict model=yolov8m.pt source=imgs device=0
Ultralytics YOLOv8.0.227 🚀 Python-3.8.18 torch-2.1.0a0+41361538.nv23.06 CUDA:0 (Orin, 30593MiB)
YOLOv8m summary (fused): 218 layers, 25886080 parameters, 0 gradients, 78.9 GFLOPsimage 1/10 /home/hard_disk/projects/yolov8-ultralytics/imgs/bus.jpg: 640x480 4 persons, 1 bus, 341.4ms
image 2/10 /home/hard_disk/projects/yolov8-ultralytics/imgs/bus_1.jpg: 640x480 4 persons, 1 bus, 43.2ms
image 3/10 /home/hard_disk/projects/yolov8-ultralytics/imgs/bus_2.jpg: 640x480 4 persons, 1 bus, 37.2ms
image 4/10 /home/hard_disk/projects/yolov8-ultralytics/imgs/bus_3.jpg: 640x480 4 persons, 1 bus, 28.5ms
image 5/10 /home/hard_disk/projects/yolov8-ultralytics/imgs/bus_4.jpg: 640x480 4 persons, 1 bus, 31.1ms
image 6/10 /home/hard_disk/projects/yolov8-ultralytics/imgs/bus_5.jpg: 640x480 4 persons, 1 bus, 28.4ms
image 7/10 /home/hard_disk/projects/yolov8-ultralytics/imgs/bus_6.jpg: 640x480 4 persons, 1 bus, 28.3ms
image 8/10 /home/hard_disk/projects/yolov8-ultralytics/imgs/bus_7.jpg: 640x480 4 persons, 1 bus, 28.8ms
image 9/10 /home/hard_disk/projects/yolov8-ultralytics/imgs/bus_8.jpg: 640x480 4 persons, 1 bus, 28.3ms
image 10/10 /home/hard_disk/projects/yolov8-ultralytics/imgs/bus_9.jpg: 640x480 4 persons, 1 bus, 28.5ms
Speed: 7.9ms preprocess, 62.4ms inference, 5.0ms postprocess per image at shape (1, 3, 640, 480)
2.2、tensorrt 模型转换
默认安装在系统环境中,若在虚拟环境中,可以创建软连接到虚拟环境中
sudo ln -s /usr/lib/python3.8/dist-packages/tensorrt* /home/hard_disk/miniconda3/envs/yolo_pytorch/lib/python3.8/site-packages/
# 验证安装 输出 8.5.2.2
python -c "import tensorrt;  print(tensorrt.__version__);"
使用/usr/src/tensorrt/bin/trtexec --onnx=yolov8m.onnx --saveEngine=yolov8m.onnx.trt导出默认的fp32模型,耗时11分钟,40qps,加载测试如下
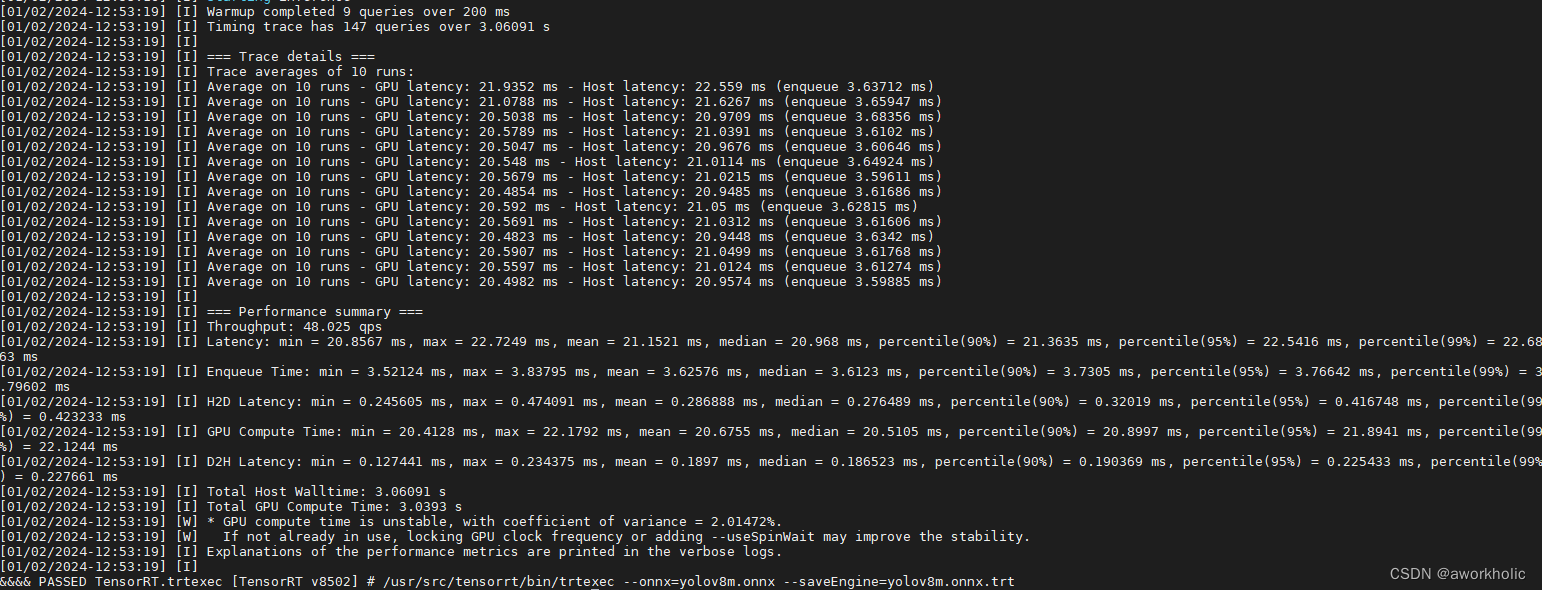
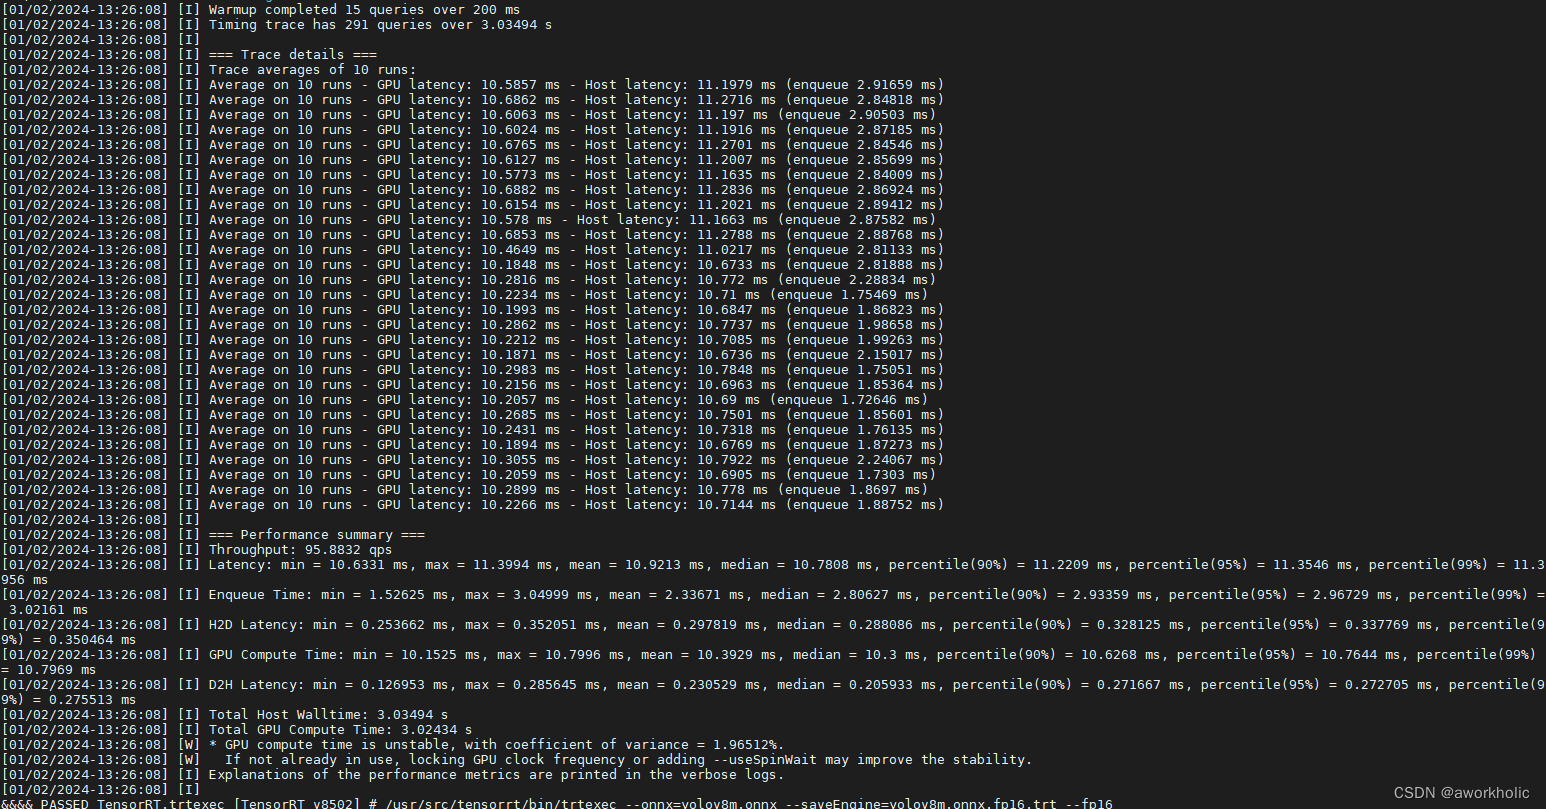
使用半精度浮点进行模型转换测试/usr/src/tensorrt/bin/trtexec --onnx=yolov8m.onnx --saveEngine=yolov8m.onnx.trt --fp16,执行耗时32分钟(模型文件大小缩小一半),95qps,,如下
2.3、tensorrt c++ 测试
先给出 cmake 文件
cmake_minimum_required(VERSION 3.0)
project(yolov8)#set(CMAKE_CXX_FLAGS "${CMAKE_CXX_FLAGS} -Wno-deprecated-declarations")# opencv
find_package(OpenCV 4.5.4 REQUIRED)
include_directories(${OpenCV_INCLUDE_DIRS})include_directories("/usr/local/cuda-11.4/include")
link_directories("/usr/local/cuda-11.4/lib64")# tensorrt
include_directories("/usr/include/aarch64-linux-gnu")
link_directories("/usr/lib/aarch64-linux-gnu")# target and lib
add_executable(${PROJECT_NAME} main.cpp)target_link_libraries(${PROJECT_NAME}  ${OpenCV_LIBS}  nvinfernvparserscudartcublascudnn
)
直接给出完整cpp代码
#include "opencv2/opencv.hpp"#include "NvInfer.h"
#include <cuda_runtime_api.h>
#include <random>#include <fstream>
#include <string>#define CHECK(status)                                                                      \do                                                                                     \{                                                                                      \auto ret = (status);                                                               \if (ret != 0)                                                                      \{                                                                                  \std::cerr << "Cuda failure: " << ret << std::endl;                             \abort();                                                                       \}                                                                                  \} while (0)class Logger : public nvinfer1::ILogger
{
public:Logger(Severity severity = Severity::kWARNING) : severity_(severity) {}virtual void log(Severity severity, const char* msg) noexcept override{// suppress info-level messagesif(severity <= severity_)std::cout << msg << std::endl;}nvinfer1::ILogger& getTRTLogger() noexcept{return *this;}
private:Severity severity_;
};struct InferDeleter
{template <typename T>void operator()(T* obj) const{delete obj;}
};template <typename T>
using SampleUniquePtr = std::unique_ptr<T, InferDeleter>;//int build();
int inference();int main(int argc, char** argv)
{return inference();
}void drawPred(int classId, float conf, int left, int top, int right, int bottom, cv::Mat& frame);
void postprocess(cv::Mat& frame, const cv::Mat outs);auto confThreshold = 0.25f;
auto scoreThreshold = 0.45f;
auto nmsThreshold = 0.5f;
auto inpWidth = 640.f;
auto inpHeight = 640.f;
auto classesSize = 80;#include <numeric>
#include <opencv2/dnn.hpp>int inference()
{Logger logger(nvinfer1::ILogger::Severity::kVERBOSE);/*trtexec.exe --onnx=yolov8m.onnx --explicitBatch --fp16 --saveEngine=model.trt*/std::string trtFile = R"(E:\DeepLearning\yolov8-ultralytics/yolov8m.onnx.trt)";//std::string trtFile = "model.test.trt";std::ifstream ifs(trtFile, std::ifstream::binary);if(!ifs) {return false;}ifs.seekg(0, std::ios_base::end);int size = ifs.tellg();ifs.seekg(0, std::ios_base::beg);std::unique_ptr<char> pData(new char[size]);ifs.read(pData.get(), size);ifs.close();// engine模型std::shared_ptr<nvinfer1::ICudaEngine> mEngine;{SampleUniquePtr<nvinfer1::IRuntime> runtime{nvinfer1::createInferRuntime(logger.getTRTLogger())};mEngine = std::shared_ptr<nvinfer1::ICudaEngine>(runtime->deserializeCudaEngine(pData.get(), size), InferDeleter());}auto context = SampleUniquePtr<nvinfer1::IExecutionContext>(mEngine->createExecutionContext());// 显存分配std::vector<void*> bindings(mEngine->getNbBindings());//auto t1 = mEngine->getBindingDataType(0);//auto t2 = mEngine->getBindingDataType(1);//CHECK(cudaMalloc(&bindings[0], sizeof(float) * 1 * 3 * 640 * 640)); // type: float32[1,3,640,640]//CHECK(cudaMalloc(&bindings[1], sizeof(int) * 1 * 84 * 8400));   // type: float32[1,84,8400]for(int i = 0; i < bindings.size(); i++) {nvinfer1::DataType type = mEngine->getBindingDataType(i);nvinfer1::Dims dims = mEngine->getBindingDimensions(i);size_t volume = std::accumulate(dims.d, dims.d + dims.nbDims, 1, std::multiplies<size_t>());switch(type) {case nvinfer1::DataType::kINT32:case nvinfer1::DataType::kFLOAT: volume *= 4; break;  // 明确为类型 floatcase nvinfer1::DataType::kHALF: volume *= 2; break;case nvinfer1::DataType::kBOOL:case nvinfer1::DataType::kINT8:default:break;}CHECK(cudaMalloc(&bindings[i], volume));}// 输入cv::Mat img = cv::imread(R"(E:\DeepLearning\yolov5\data\images\bus.jpg)");cv::Mat blob = cv::dnn::blobFromImage(img, 1 / 255., cv::Size(inpWidth,inpHeight), {0,0,0}, true, false);//blob = blob * 2 - 1;cv::Mat pred(cv::Size(8400, 84), CV_32F, {255,255,255});// 推理CHECK(cudaMemcpy(bindings[0], static_cast<const void*>(blob.data), 1 * 3 * 640 * 640 * sizeof(float), cudaMemcpyHostToDevice));context->executeV2(bindings.data());context->executeV2(bindings.data());context->executeV2(bindings.data());context->executeV2(bindings.data());CHECK(cudaMemcpy(static_cast<void*>(pred.data), bindings[1], 1 * 84 * 8400 * sizeof(int), cudaMemcpyDeviceToHost));auto t1 = cv::getTickCount();CHECK(cudaMemcpy(bindings[0], static_cast<const void*>(blob.data), 1 * 3 * 640 * 640 * sizeof(float), cudaMemcpyHostToDevice));context->executeV2(bindings.data());CHECK(cudaMemcpy(static_cast<void*>(pred.data), bindings[1], 1 * 84 * 8400 * sizeof(int), cudaMemcpyDeviceToHost));auto t2 = cv::getTickCount();std::string label = cv::format("inference time: %.2f ms", (t2 - t1) / cv::getTickFrequency() * 1000);std::cout << label << std::endl;cv::putText(img, label, cv::Point(10, 50), cv::FONT_HERSHEY_SIMPLEX, 0.5, cv::Scalar(0, 255, 0));// 后处理cv::Mat tmp = pred.t();postprocess(img, tmp);cv::imshow("res",img);cv::waitKey();// 资源释放cudaFree(bindings[0]);cudaFree(bindings[1]);return 0;
}void postprocess(cv::Mat& frame, const cv::Mat tmp)
{using namespace cv;using namespace cv::dnn;// yolov8 has an output of shape (batchSize, 84, 8400) (box[x,y,w,h] + confidence[c])auto tt1 = cv::getTickCount();auto inputSz = frame.size();float x_factor = inputSz.width / inpWidth;float y_factor = inputSz.height / inpHeight;std::vector<int> class_ids;std::vector<float> confidences;std::vector<cv::Rect> boxes;float* data = (float*)tmp.data;for(int i = 0; i < tmp.rows; ++i) {//float confidence = data[4];//if(confidence >= confThreshold) {float* classes_scores = data + 4;cv::Mat scores(1, classesSize, CV_32FC1, classes_scores);cv::Point class_id;double max_class_score;minMaxLoc(scores, 0, &max_class_score, 0, &class_id);if(max_class_score > scoreThreshold) {confidences.push_back(max_class_score);class_ids.push_back(class_id.x);float x = data[0];float y = data[1];float w = data[2];float h = data[3];int left = int((x - 0.5 * w) * x_factor);int top = int((y - 0.5 * h) * y_factor);int width = int(w * x_factor);int height = int(h * y_factor);boxes.push_back(cv::Rect(left, top, width, height));}//}data += tmp.cols;}std::vector<int> indices;NMSBoxes(boxes, confidences, scoreThreshold, nmsThreshold, indices);auto tt2 = cv::getTickCount();std::string label = format("postprocess time: %.2f ms", (tt2 - tt1) / cv::getTickFrequency() * 1000);cv::putText(frame, label, Point(10, 30), FONT_HERSHEY_SIMPLEX, 0.5, Scalar(0, 255, 0));for(size_t i = 0; i < indices.size(); ++i) {int idx = indices[i];Rect box = boxes[idx];drawPred(class_ids[idx], confidences[idx], box.x, box.y,box.x + box.width, box.y + box.height, frame);}
}void drawPred(int classId, float conf, int left, int top, int right, int bottom, cv::Mat& frame)
{using namespace cv;rectangle(frame, Point(left, top), Point(right, bottom), Scalar(0, 255, 0));std::string label = format("%d: %.2f", classId, conf);Scalar color(rand(), rand(), rand());int baseLine;Size labelSize = getTextSize(label, FONT_HERSHEY_SIMPLEX, 0.5, 1, &baseLine);top = max(top, labelSize.height);rectangle(frame, Point(left, top - labelSize.height),Point(left + labelSize.width, top + baseLine), color, FILLED);cv::putText(frame, label, Point(left, top), FONT_HERSHEY_SIMPLEX, 0.5, Scalar());
}
运行命令行截图如

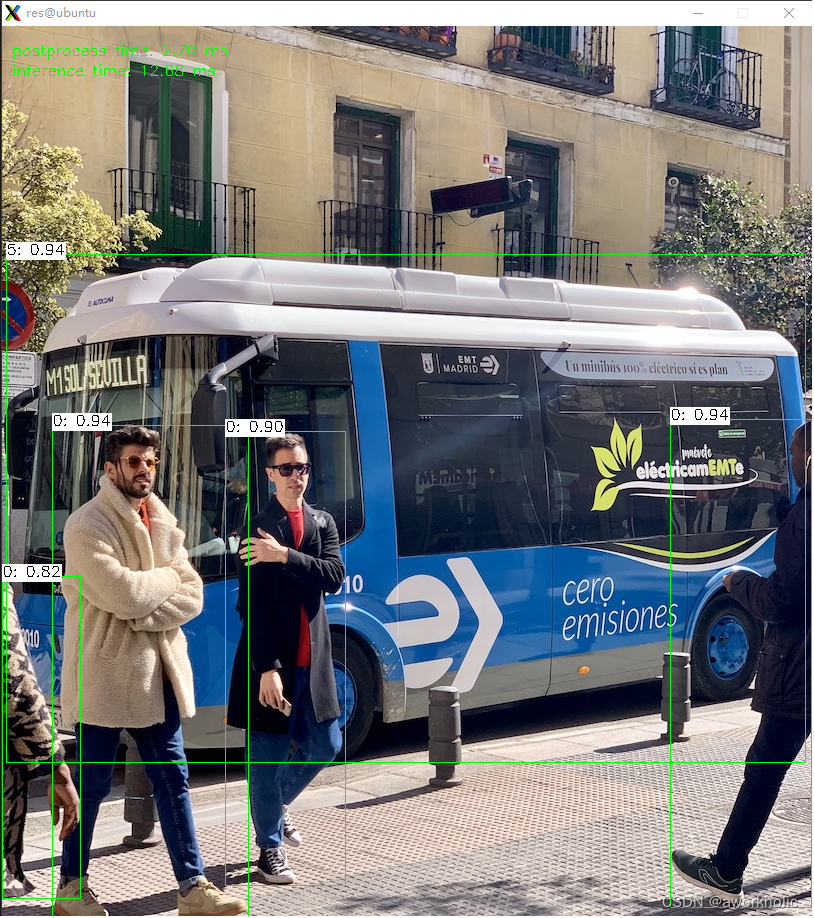
前向推理耗时12.68ms,NMS耗时2.7ms,检测结果显示如下
这篇关于jetson AGC orin 配置pytorch和cuda使用、yolov8 TensorRt测试的文章就介绍到这儿,希望我们推荐的文章对编程师们有所帮助!


