本文主要是介绍YOLOv8改进 | 2023主干篇 | FasterNeT跑起来的主干网络( 提高FPS和检测效率),希望对大家解决编程问题提供一定的参考价值,需要的开发者们随着小编来一起学习吧!
一、本文介绍
本文给大家带来的改进机制是FasterNet网络,将其用来替换我们的特征提取网络,其旨在提高计算速度而不牺牲准确性,特别是在视觉任务中。它通过一种称为部分卷积(PConv)的新技术来减少冗余计算和内存访问。这种方法使得FasterNet在多种设备上运行速度比其他网络快得多,同时在各种视觉任务中保持高准确率。经过我的实验该主干网络确实能够涨点在大中小三种物体检测上,同时该主干网络也提供多种版本,大家可以在源代码中进行修改版本的使用。本文通过介绍其主要框架原理,然后教大家如何添加该网络结构到网络模型中。
推荐指数:⭐⭐⭐⭐⭐
涨点效果:⭐⭐⭐⭐⭐
专栏回顾:YOLOv8改进系列专栏——本专栏持续复习各种顶会内容——科研必备
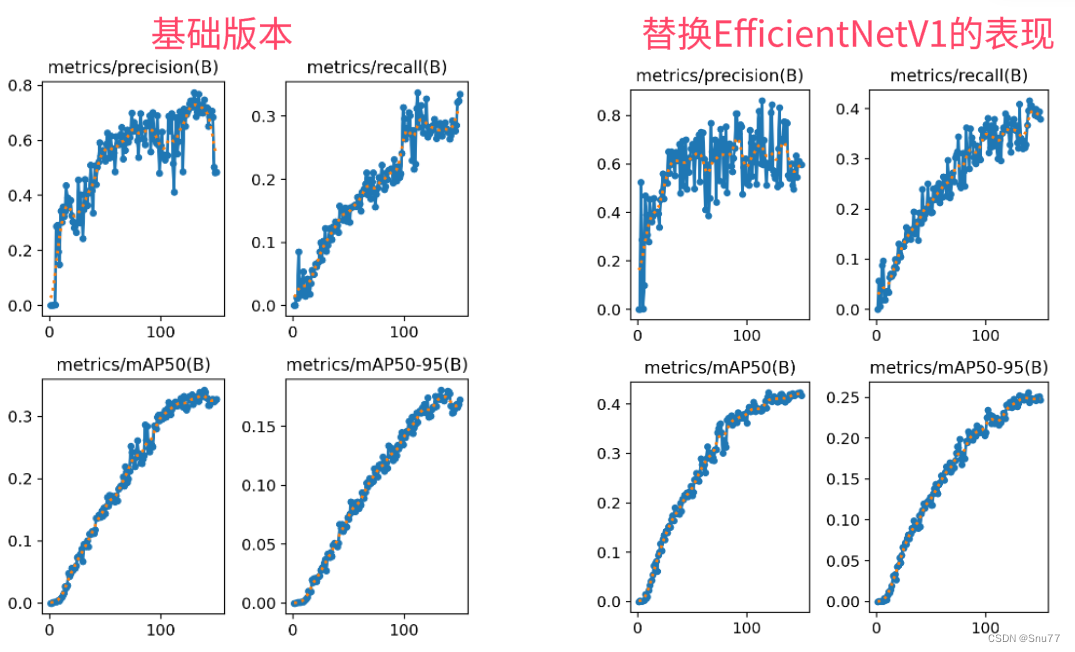
训练结果对比图->
二、FasterNet原理
 论文地址:官方论文地址
代码地址:官方代码地址

2.1 FasterNet的基本原理
FasterNet是一种高效的神经网络架构,旨在提高计算速度而不牺牲准确性,特别是在视觉任务中。它通过一种称为部分卷积(PConv)的新技术来减少冗余计算和内存访问。这种方法使得FasterNet在多种设备上运行速度比其他网络快得多,同时在各种视觉任务中保持高准确率。例如,FasterNet在ImageNet-1k数据集上的表现超过了其他模型,如MobileViT-XXS,展现了其在速度和准确度方面的优势。
FasterNet的基本原理可以总结为以下几点:
1. 部分卷积(PConv): FasterNet引入了部分卷积(PConv),这是一种新型的卷积方法,它通过只处理输入通道的一部分来减少计算量和内存访问。
2. 加速神经网络: FasterNet利用PConv的优势,实现了在多种设备上比其他现有神经网络更快的运行速度,同时保持了较高的准确度。
下面为大家展示的是FasterNet的整体架构。
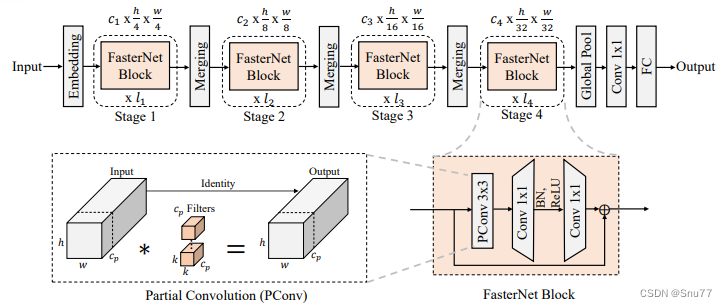
它包括四个层次化的阶段,每个阶段由一系列FasterNet块组成,并由嵌入或合并层开头。最后三层用于特征分类。在每个FasterNet块中,PConv层之后是两个点状卷积(PWConv)层。为了保持特征多样性并实现更低的延迟,仅在中间层之后放置了归一化和激活层。
2.2 部分卷积
部分卷积(PConv)是一种卷积神经网络中的操作,旨在提高计算效率。它通过只在输入特征图的一部分上执行卷积操作,而非传统卷积操作中的全面应用。这样,PConv可以减少不必要的计算和内存访问,因为它忽略了输入中认为是冗余的部分。这种方法特别适合在资源有限的设备上运行深度学习模型,因为它可以在不牺牲太多性能的情况下,显著降低计算需求。
下面我为大家展示了FasterNet中的部分卷积(PConv)与传统卷积和深度卷积/分组卷积的比较:
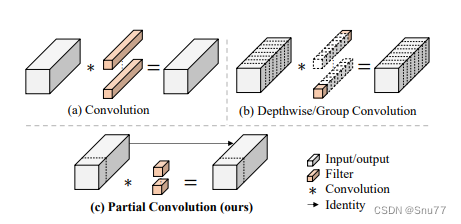
PConv通过仅对输入通道的一小部分应用滤波器,同时保持其余通道不变,实现了快速和高效的特性提取。PConv的计算复杂度(FLOPs)低于常规卷积,但高于深度卷积/分组卷积,这样在减少计算资源的同时提高了运算性能。
2.3 加速神经网络
加速神经网络主要通过优化计算路径、减少模型大小和复杂性、提高操作效率,以及使用高效的硬件实现等方式来降低模型的推理时间。这些方法包括简化网络层、使用更快的激活函数、采用量化技术将浮点运算转换为整数运算,以及使用特殊的算法来减少内存访问次数等。通过这些策略,可以在不损害模型准确性的前提下,使神经网络能够更快地处理数据和做出预测。
三、FasterNet的核心代码
# Copyright (c) Microsoft Corporation.
# Licensed under the MIT License.
import torch
import torch.nn as nn
from timm.models.layers import DropPath, trunc_normal_
from functools import partial
from typing import List
from torch import Tensor
import copy
import osclass Partial_conv3(nn.Module):def __init__(self, dim, n_div, forward):super().__init__()self.dim_conv3 = dim // n_divself.dim_untouched = dim - self.dim_conv3self.partial_conv3 = nn.Conv2d(self.dim_conv3, self.dim_conv3, 3, 1, 1, bias=False)if forward == 'slicing':self.forward = self.forward_slicingelif forward == 'split_cat':self.forward = self.forward_split_catelse:raise NotImplementedErrordef forward_slicing(self, x: Tensor) -> Tensor:# only for inferencex = x.clone()   # !!! Keep the original input intact for the residual connection laterx[:, :self.dim_conv3, :, :] = self.partial_conv3(x[:, :self.dim_conv3, :, :])return xdef forward_split_cat(self, x: Tensor) -> Tensor:# for training/inferencex1, x2 = torch.split(x, [self.dim_conv3, self.dim_untouched], dim=1)x1 = self.partial_conv3(x1)x = torch.cat((x1, x2), 1)return xclass MLPBlock(nn.Module):def __init__(self,dim,n_div,mlp_ratio,drop_path,layer_scale_init_value,act_layer,norm_layer,pconv_fw_type):super().__init__()self.dim = dimself.mlp_ratio = mlp_ratioself.drop_path = DropPath(drop_path) if drop_path > 0. else nn.Identity()self.n_div = n_divmlp_hidden_dim = int(dim * mlp_ratio)mlp_layer: List[nn.Module] = [nn.Conv2d(dim, mlp_hidden_dim, 1, bias=False),norm_layer(mlp_hidden_dim),act_layer(),nn.Conv2d(mlp_hidden_dim, dim, 1, bias=False)]self.mlp = nn.Sequential(*mlp_layer)self.spatial_mixing = Partial_conv3(dim,n_div,pconv_fw_type)if layer_scale_init_value > 0:self.layer_scale = nn.Parameter(layer_scale_init_value * torch.ones((dim)), requires_grad=True)self.forward = self.forward_layer_scaleelse:self.forward = self.forwarddef forward(self, x: Tensor) -> Tensor:shortcut = xx = self.spatial_mixing(x)x = shortcut + self.drop_path(self.mlp(x))return xdef forward_layer_scale(self, x: Tensor) -> Tensor:shortcut = xx = self.spatial_mixing(x)x = shortcut + self.drop_path(self.layer_scale.unsqueeze(-1).unsqueeze(-1) * self.mlp(x))return xclass BasicStage(nn.Module):def __init__(self,dim,depth,n_div,mlp_ratio,drop_path,layer_scale_init_value,norm_layer,act_layer,pconv_fw_type):super().__init__()blocks_list = [MLPBlock(dim=dim,n_div=n_div,mlp_ratio=mlp_ratio,drop_path=drop_path[i],layer_scale_init_value=layer_scale_init_value,norm_layer=norm_layer,act_layer=act_layer,pconv_fw_type=pconv_fw_type)for i in range(depth)]self.blocks = nn.Sequential(*blocks_list)def forward(self, x: Tensor) -> Tensor:x = self.blocks(x)return xclass PatchEmbed(nn.Module):def __init__(self, patch_size, patch_stride, in_chans, embed_dim, norm_layer):super().__init__()self.proj = nn.Conv2d(in_chans, embed_dim, kernel_size=patch_size, stride=patch_stride, bias=False)if norm_layer is not None:self.norm = norm_layer(embed_dim)else:self.norm = nn.Identity()def forward(self, x: Tensor) -> Tensor:x = self.norm(self.proj(x))return xclass PatchMerging(nn.Module):def __init__(self, patch_size2, patch_stride2, dim, norm_layer):super().__init__()self.reduction = nn.Conv2d(dim, 2 * dim, kernel_size=patch_size2, stride=patch_stride2, bias=False)if norm_layer is not None:self.norm = norm_layer(2 * dim)else:self.norm = nn.Identity()def forward(self, x: Tensor) -> Tensor:x = self.norm(self.reduction(x))return xclass FasterNet(nn.Module):def __init__(self,in_chans=3,num_classes=1000,embed_dim=96,depths=(1, 2, 8, 2),mlp_ratio=2.,n_div=4,patch_size=4,patch_stride=4,patch_size2=2,  # for subsequent layerspatch_stride2=2,patch_norm=True,feature_dim=1280,drop_path_rate=0.1,layer_scale_init_value=0,norm_layer='BN',act_layer='RELU',fork_feat=True,init_cfg=None,pretrained=None,pconv_fw_type='split_cat',**kwargs):super().__init__()if norm_layer == 'BN':norm_layer = nn.BatchNorm2delse:raise NotImplementedErrorif act_layer == 'GELU':act_layer = nn.GELUelif act_layer == 'RELU':act_layer = partial(nn.ReLU, inplace=True)else:raise NotImplementedErrorif not fork_feat:self.num_classes = num_classesself.num_stages = len(depths)self.embed_dim = embed_dimself.patch_norm = patch_normself.num_features = int(embed_dim * 2 ** (self.num_stages - 1))self.mlp_ratio = mlp_ratioself.depths = depths# split image into non-overlapping patchesself.patch_embed = PatchEmbed(patch_size=patch_size,patch_stride=patch_stride,in_chans=in_chans,embed_dim=embed_dim,norm_layer=norm_layer if self.patch_norm else None)# stochastic depth decay ruledpr = [x.item()for x in torch.linspace(0, drop_path_rate, sum(depths))]# build layersstages_list = []for i_stage in range(self.num_stages):stage = BasicStage(dim=int(embed_dim * 2 ** i_stage),n_div=n_div,depth=depths[i_stage],mlp_ratio=self.mlp_ratio,drop_path=dpr[sum(depths[:i_stage]):sum(depths[:i_stage + 1])],layer_scale_init_value=layer_scale_init_value,norm_layer=norm_layer,act_layer=act_layer,pconv_fw_type=pconv_fw_type)stages_list.append(stage)# patch merging layerif i_stage < self.num_stages - 1:stages_list.append(PatchMerging(patch_size2=patch_size2,patch_stride2=patch_stride2,dim=int(embed_dim * 2 ** i_stage),norm_layer=norm_layer))self.stages = nn.Sequential(*stages_list)self.fork_feat = fork_featself.forward = self.forward_det# add a norm layer for each outputself.out_indices = [0, 2, 4, 6]for i_emb, i_layer in enumerate(self.out_indices):if i_emb == 0 and os.environ.get('FORK_LAST3', None):raise NotImplementedErrorelse:layer = norm_layer(int(embed_dim * 2 ** i_emb))layer_name = f'norm{i_layer}'self.add_module(layer_name, layer)self.apply(self.cls_init_weights)self.init_cfg = copy.deepcopy(init_cfg)if self.fork_feat and (self.init_cfg is not None or pretrained is not None):self.init_weights()self.width_list = [i.size(1) for i in self.forward(torch.randn(1, 3, 640, 640))]def cls_init_weights(self, m):if isinstance(m, nn.Linear):trunc_normal_(m.weight, std=.02)if isinstance(m, nn.Linear) and m.bias is not None:nn.init.constant_(m.bias, 0)elif isinstance(m, (nn.Conv1d, nn.Conv2d)):trunc_normal_(m.weight, std=.02)if m.bias is not None:nn.init.constant_(m.bias, 0)elif isinstance(m, (nn.LayerNorm, nn.GroupNorm)):nn.init.constant_(m.bias, 0)nn.init.constant_(m.weight, 1.0)def forward_det(self, x: Tensor) -> Tensor:# output the features of four stages for dense predictionx = self.patch_embed(x)outs = []for idx, stage in enumerate(self.stages):x = stage(x)if self.fork_feat and idx in self.out_indices:norm_layer = getattr(self, f'norm{idx}')x_out = norm_layer(x)outs.append(x_out)return outsif __name__ == "__main__":# Generating Sample imageimage_size = (1, 3, 640, 640)image = torch.rand(*image_size)# Modelmodel = FasterNet()out = model(image)print(len(out))
四、手把手教你添加FasterNet机制
这个主干的网络结构添加起来算是所有的改进机制里最麻烦的了,因为有一些网略结构可以用yaml文件搭建出来,有一些网络结构其中的一些细节根本没有办法用yaml文件去搭建,用yaml文件去搭建会损失一些细节部分(而且一个网络结构设计很多细节的结构修改方式都不一样,一个一个去修改大家难免会出错),所以这里让网络直接返回整个网络,然后修改部分 yolo代码以后就都以这种形式添加了,以后我提出的网络模型基本上都会通过这种方式修改,我也会进行一些模型细节改进。创新出新的网络结构大家直接拿来用就可以的。下面开始添加教程->
(同时每一个后面都有代码,大家拿来复制粘贴替换即可,但是要看好了不要复制粘贴替换多了)
修改一
我们复制网络结构代码到“ultralytics/nn/modules”目录下创建一个py文件复制粘贴进去 ,我这里起的名字是FasterNet。
修改二
找到如下的文件"ultralytics/nn/tasks.py" 在开始的部分导入我们的模型如下图。
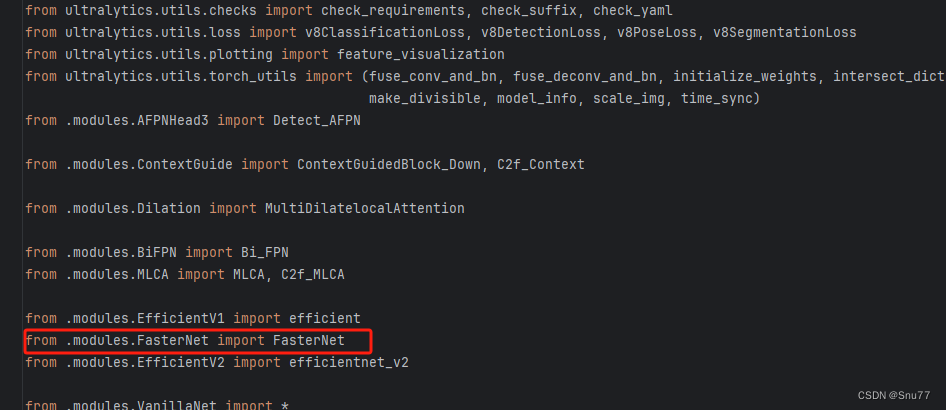
from .modules.FasterNet import FasterNet修改三
添加如下两行代码!!!

修改四
找到七百多行大概把具体看图片,按照图片来修改就行,添加红框内的部分,注意没有()只是函数名,我这里只添加了部分的版本,大家有兴趣这个FasterNet还有更多的版本可以添加,这个需要按照官方的代码里面根据参数改配置就行了,后期我提供的文件里面会集成所有的版本。

elif m in {自行添加对应的模型即可,下面都是一样的}:m = m()c2 = m.width_list # 返回通道列表backbone = True修改五
下面的两个红框内都是需要改动的。

if isinstance(c2, list):m_ = mm_.backbone = Trueelse:m_ = nn.Sequential(*(m(*args) for _ in range(n))) if n > 1 else m(*args) # modulet = str(m)[8:-2].replace('__main__.', '') # module typem.np = sum(x.numel() for x in m_.parameters()) # number paramsm_.i, m_.f, m_.type = i + 4 if backbone else i, f, t # attach index, 'from' index, type修改六
如下的也需要修改,全部按照我的来。

代码如下把原先的代码替换了即可。
if verbose:LOGGER.info(f'{i:>3}{str(f):>20}{n_:>3}{m.np:10.0f} {t:<45}{str(args):<30}') # printsave.extend(x % (i + 4 if backbone else i) for x in ([f] if isinstance(f, int) else f) if x != -1) # append to savelistlayers.append(m_)if i == 0:ch = []if isinstance(c2, list):ch.extend(c2)if len(c2) != 5:ch.insert(0, 0)else:ch.append(c2)修改七
修改七和前面的都不太一样,需要修改前向传播中的一个部分, 已经离开了parse_model方法了。
可以在图片中开代码行数,没有离开task.py文件都是同一个文件。 同时这个部分有好几个前向传播都很相似,大家不要看错了,是70多行左右的!!!,同时我后面提供了代码,大家直接复制粘贴即可,有时间我针对这里会出一个视频。

代码如下->
def _predict_once(self, x, profile=False, visualize=False):"""Perform a forward pass through the network.Args:x (torch.Tensor): The input tensor to the model.profile (bool): Print the computation time of each layer if True, defaults to False.visualize (bool): Save the feature maps of the model if True, defaults to False.Returns:(torch.Tensor): The last output of the model."""y, dt = [], [] # outputsfor m in self.model:if m.f != -1: # if not from previous layerx = y[m.f] if isinstance(m.f, int) else [x if j == -1 else y[j] for j in m.f] # from earlier layersif profile:self._profile_one_layer(m, x, dt)if hasattr(m, 'backbone'):x = m(x)if len(x) != 5: # 0 - 5x.insert(0, None)for index, i in enumerate(x):if index in self.save:y.append(i)else:y.append(None)x = x[-1] # 最后一个输出传给下一层else:x = m(x) # runy.append(x if m.i in self.save else None) # save outputif visualize:feature_visualization(x, m.type, m.i, save_dir=visualize)return x到这里就完成了修改部分,但是这里面细节很多,大家千万要注意不要替换多余的代码,导致报错,也不要拉下任何一部,都会导致运行失败,而且报错很难排查!!!很难排查!!!
修改八
我们找到如下文件'ultralytics/utils/torch_utils.py'按照如下的图片进行修改,否则容易打印不出来计算量。
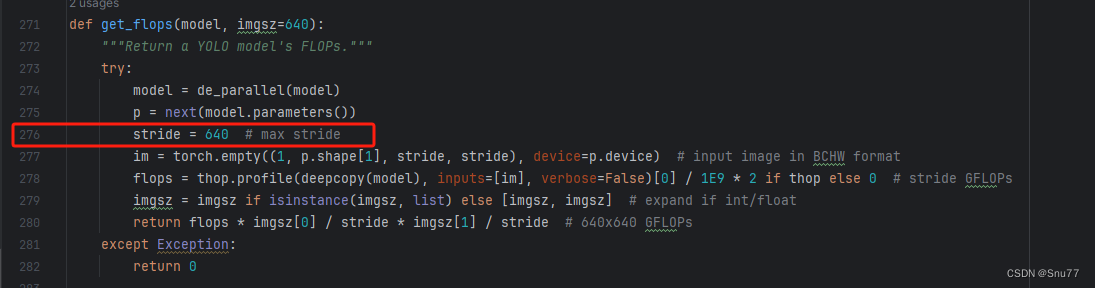
五、FasterNet的yaml文件
复制如下yaml文件进行运行!!!
# Ultralytics YOLO 🚀, AGPL-3.0 license
# YOLOv8 object detection model with P3-P5 outputs. For Usage examples see https://docs.ultralytics.com/tasks/detect# Parameters
nc: 80  # number of classes
scales: # model compound scaling constants, i.e. 'model=yolov8n.yaml' will call yolov8.yaml with scale 'n'# [depth, width, max_channels]n: [0.33, 0.25, 1024]  # YOLOv8n summary: 225 layers,  3157200 parameters,  3157184 gradients,   8.9 GFLOPss: [0.33, 0.50, 1024]  # YOLOv8s summary: 225 layers, 11166560 parameters, 11166544 gradients,  28.8 GFLOPsm: [0.67, 0.75, 768]   # YOLOv8m summary: 295 layers, 25902640 parameters, 25902624 gradients,  79.3 GFLOPsl: [1.00, 1.00, 512]   # YOLOv8l summary: 365 layers, 43691520 parameters, 43691504 gradients, 165.7 GFLOPsx: [1.00, 1.25, 512]   # YOLOv8x summary: 365 layers, 68229648 parameters, 68229632 gradients, 258.5 GFLOP# YOLOv8.0n backbone
backbone:# [from, repeats, module, args]- [-1, 1, FasterNet, []]  # 4- [-1, 1, SPPF, [1024, 5]]  # 5# YOLOv8.0n head
head:- [-1, 1, nn.Upsample, [None, 2, 'nearest']] # 6- [[-1, 3], 1, Concat, [1]]  # 7 cat backbone P4- [-1, 3, C2f, [512]]  # 8- [-1, 1, nn.Upsample, [None, 2, 'nearest']] # 9- [[-1, 2], 1, Concat, [1]]  # 10 cat backbone P3- [-1, 3, C2f, [256]]  # 11 (P3/8-small)- [-1, 1, Conv, [256, 3, 2]] # 12- [[-1, 8], 1, Concat, [1]]  # 13 cat head P4- [-1, 3, C2f, [512]]  # 14 (P4/16-medium)- [-1, 1, Conv, [512, 3, 2]] # 15- [[-1, 5], 1, Concat, [1]]  # 16 cat head P5- [-1, 3, C2f, [1024]]  # 17 (P5/32-large)- [[11, 14, 17], 1, Detect, [nc]]  # Detect(P3, P4, P5)
六、成功运行记录
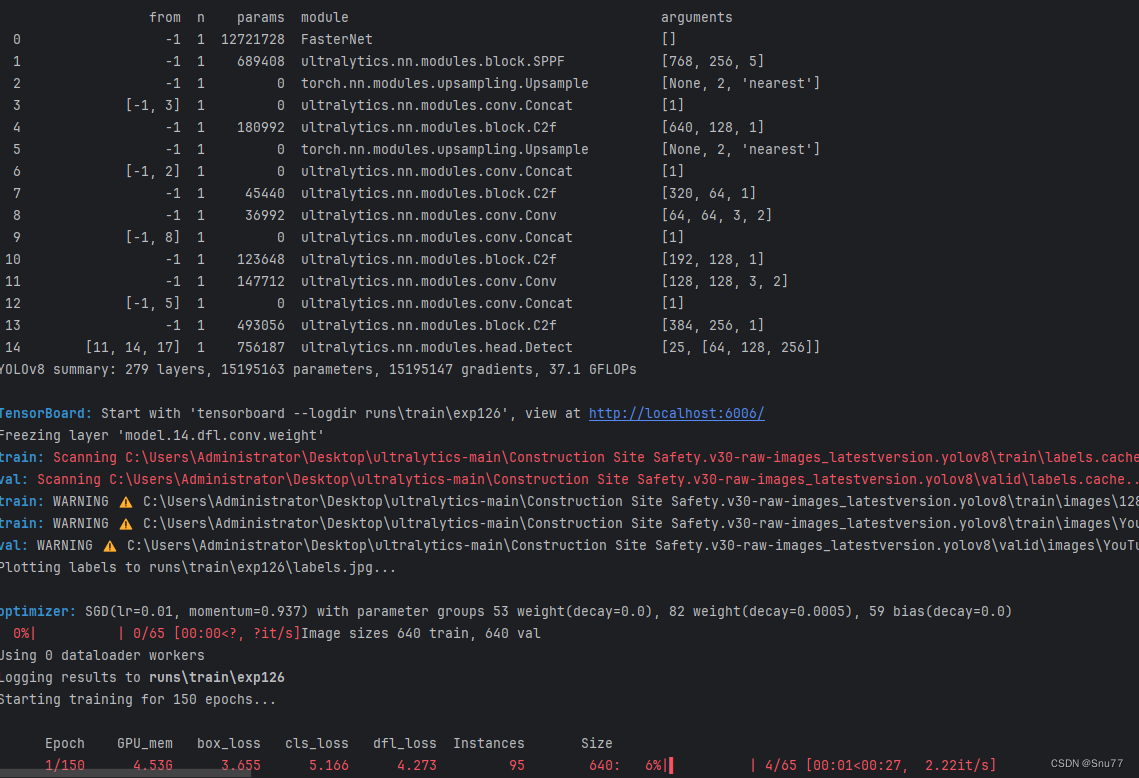
下面是成功运行的截图,已经完成了有1个epochs的训练,图片太大截不全第2个epochs了。
七、本文总结
到此本文的正式分享内容就结束了,在这里给大家推荐我的YOLOv8改进有效涨点专栏,本专栏目前为新开的平均质量分98分,后期我会根据各种最新的前沿顶会进行论文复现,也会对一些老的改进机制进行补充,目前本专栏免费阅读(暂时,大家尽早关注不迷路~),如果大家觉得本文帮助到你了,订阅本专栏,关注后续更多的更新~
专栏回顾:YOLOv8改进系列专栏——本专栏持续复习各种顶会内容——科研必备

这篇关于YOLOv8改进 | 2023主干篇 | FasterNeT跑起来的主干网络( 提高FPS和检测效率)的文章就介绍到这儿,希望我们推荐的文章对编程师们有所帮助!


