本文主要是介绍ROS仿真R2机器人之安装运行及MoveIt的介绍,希望对大家解决编程问题提供一定的参考价值,需要的开发者们随着小编来一起学习吧!
R2(Robonaut 2)是NASA美国宇航局与GM通用联合推出的宇航人形机器人,能在国际空间站使用,可想而知其价格是非常昂贵,几百万美刀吧,还好NASA发布了一个R2机器人的Gazebo模型,使用模型就不需要花钱了,由于我们的机器人软件通常是不依赖于具体机器人的,所以在R2学到的东西也可以应用到其他的机器人身上,所以我们在仿真平台上来操作它。
1、安装R2机器人
1.1、OS版本
使用的是虚拟机上的一个Ubuntu18的版本系统来安装,我们先来查看下版本:cat /etc/os-release
NAME="Ubuntu"
VERSION="18.04.6 LTS (Bionic Beaver)"
ID=ubuntu
ID_LIKE=debian
PRETTY_NAME="Ubuntu 18.04.6 LTS"
VERSION_ID="18.04"
HOME_URL="https://www.ubuntu.com/"
SUPPORT_URL="https://help.ubuntu.com/"
BUG_REPORT_URL="https://bugs.launchpad.net/ubuntu/"
PRIVACY_POLICY_URL="https://www.ubuntu.com/legal/terms-and-policies/privacy-policy"
VERSION_CODENAME=bionic
UBUNTU_CODENAME=bionic
1.2、安装ROS
在前面的 Ubuntu18.04版本安装ROS及出现错误的处理方法
有介绍不同OS版本对应着不同的ROS版本安装,所以这里我的是melodic版本
分别输入命令安装,也可以使用空格隔开写在一条指令上进行安装:
sudo apt-get install ros-melodic-ros-control
sudo apt-get install ros-melodic-gazebo-ros-control
sudo apt-get install ros-melodic-joint-state-controller
sudo apt-get install ros-melodic-effort-controllers
sudo apt-get install ros-melodic-joint-trajectory-controller
sudo apt-get install ros-melodic-moveit*
sudo apt-get install ros-melodic-object-recognition-*从名称也可以知道,除了ROS之外,还有一些关节状态控制器,路径控制器以及后面重点介绍的MoveIt
1.3、创建工作空间
创建一个名为chessbot的工作空间,这里我想用R2来做下棋的机器人。
mkdir -p ~/chessbot/src
cd ~/chessbot/src
catkin_init_workspace
1.4、下载编译
网上好像也只有下面这个貌似要被弃用的包,哈哈。所以也会在后面带来一个我没有解决的问题或许是这个原因。
git clone https://bitbucket.org/nasa_ros_pkg/deprecated_nasa_r2_simulator.git
git clone https://bitbucket.org/nasa_ros_pkg/deprecated_nasa_r2_common.git
其余包来源:https://bitbucket.org/nasa_ros_pkg/workspace/repositories/
下载好了之后,进行编译:
cd ..
catkin_make
1.5、显示机器人
编译好了之后,就可以显示R2双臂机器人了
cd ~/chessbot
source devel/setup.bash
roslaunch r2_gazebo r2_display.launch
如下图: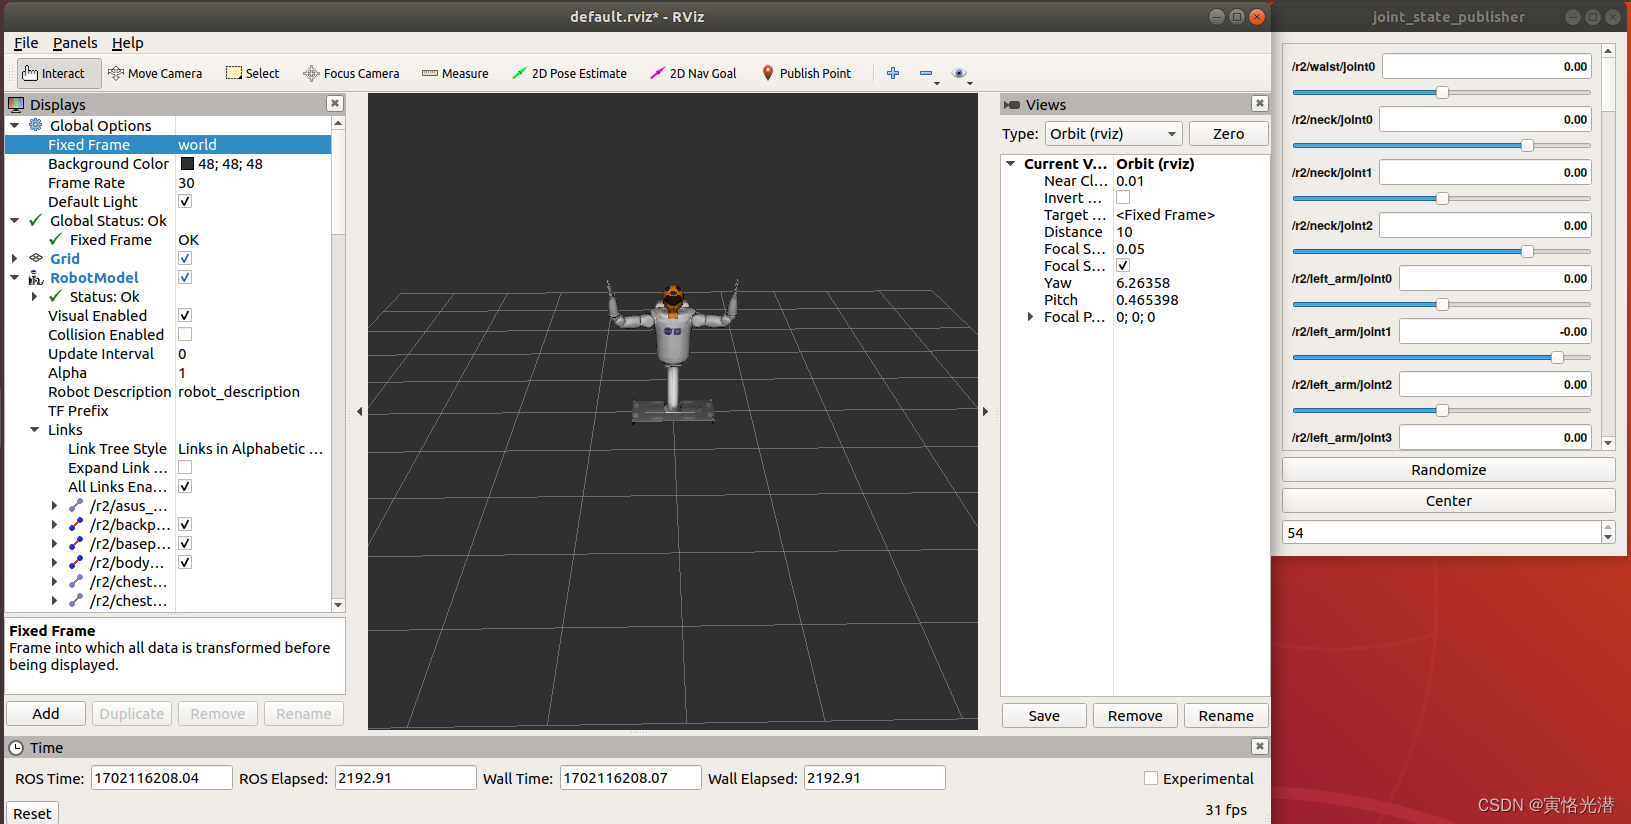
运行robot_state_publisher节点,会使用R2的几何描述和它的关节状态向量,持续地计算并更新机器人上的所有坐标系(前向运动学计算),这种操作的是标准的ROS实现,不依赖机器人,所以我们只需要直接启动它,它就能为R2机器人做正确的事情。
cd ~/chessbot
source devel/setup.bash
rosrun robot_state_publisher robot_state_publisher
然后我们试着让机器人的双臂挥动起来,代码如下:
cd ~/chessbot/src
gedit r2_move.py
#!/usr/bin/env python
import sys,rospy,tf,moveit_commander,random
from geometry_msgs.msg import Pose,Point,Quaternion
from math import piQ=Quaternion(*tf.transformations.quaternion_from_euler(pi,-pi/2,-pi/2))
orient=[Q,Q]
pose=[Pose(Point(0.5,-0.5,1.3),orient[0]),Pose(Point(-0.5,-0.5,1.3),orient[1])]
moveit_commander.roscpp_initialize(sys.argv)
rospy.init_node('r2_wave_arm',anonymous=True)
group=[moveit_commander.MoveGroupCommander("left_arm"),moveit_commander.MoveGroupCommander("right_arm")]
while not rospy.is_shutdown():pose[0].position.x = 0.5+random.uniform(-0.1,0.1)pose[1].position.x = -0.5+random.uniform(-0.1,0.1)for side in [0,1]:pose[side].position.z = 1.5+random.uniform(-0.1,0.1)group[side].set_pose_target(pose[side])group[side].go(True)moveit_commander.roscpp_shutdown()代码的意思比较简单,首先将欧拉角转成四元数(tf.transformations.quaternion_from_euler(pi,-pi/2,-pi/2)),因为四元数在计算几何软件包中更为常用,因为它的数值稳定性较好,然后我们设置左右臂的位姿,通过MoveIt里面的moveit_commander的Python接口来驱动双臂的随机挥动。
加个可执行权限:chmod u+x r2_move.py
./r2_move.py不出意外的话就会出现意外,报错如下:
[ INFO] [1702101228.432735750]: Loading robot model 'r2'...
[ INFO] [1702101228.434537951]: No root/virtual joint specified in SRDF. Assuming fixed joint
[FATAL] [1702101228.847908597]: Group 'left_arm' was not found.
Traceback (most recent call last):
File "./r2_move.py", line 11, in <module>
group=[moveit_commander.MoveGroupCommander("left_arm"),moveit_commander.MoveGroupCommander("right_arm")]
File "/opt/ros/melodic/lib/python2.7/dist-packages/moveit_commander/move_group.py", line 66, in __init__
name, robot_description, ns, wait_for_servers
RuntimeError: Group 'left_arm' was not found.
SRDF中没有指定根/虚拟关节。找不到这个'left_arm' 组,也就是没有定义它,这个错误涉及到了MoveIt软件包,由于比较复杂,放在后面进行单独说明。
2、R2关节
R2机器人由于完全模拟了人体的各个关节,所以会出现很多的关节(手臂、手指、手掌等),那么对于这些关节的英文名称还是需要非常熟悉的:
backpack:背包、行囊
baseplate:底座
bodycover:机身罩(类似衣服)
chest base:胸部区域
shoulder:肩膀
arm:手臂
elbow:肘部
distal:末端的(比如手指的指尖)
medial:中间的
proximal:近端的(比如手指靠近手掌的关节部分)
tip:末梢 尖端
lower arm:前臂(手垂直向下的下面部分)
upper arm:上臂(手垂直向下的上面部分)
palm:手掌
wrist:手腕
neck:脖子
waist:腰部
五根手指的名称:
thumb:大拇指;index:食指;middle:中指; ring:无名指;little:小指
3、MoveIt
我们可以看到在上面想要让机器人运动的时候,会报错:Group 'left_arm' was not found.
就是这个left_arm和right_arm左右两个手臂的组,找不到,这里就需要MoveIt这个软件包,功能强大但也比较复杂,一起来看下是如何通过MoveIt来制作机器人运动所需要的相关操作:
3.1、创建SRDF文件
打开MoveIt辅助安装工具:
cd ~/chessbot
source devel/setup.bash
rosrun moveit_setup_assistant moveit_setup_assistant这里我们选择创建新的MoveIt包,选择的路径在deprecated_nasa_r2_common包里面的
r2_description/robots/r2.display.urdf.xacro文件,然后点击右下角 Load Files 加载文件
根据机器人的URDF(Unified Robot Description Format统一机器人描述格式)文件生成SRDF(Semantic Robot Description Format语义机器人描述格式)文件。
如下图: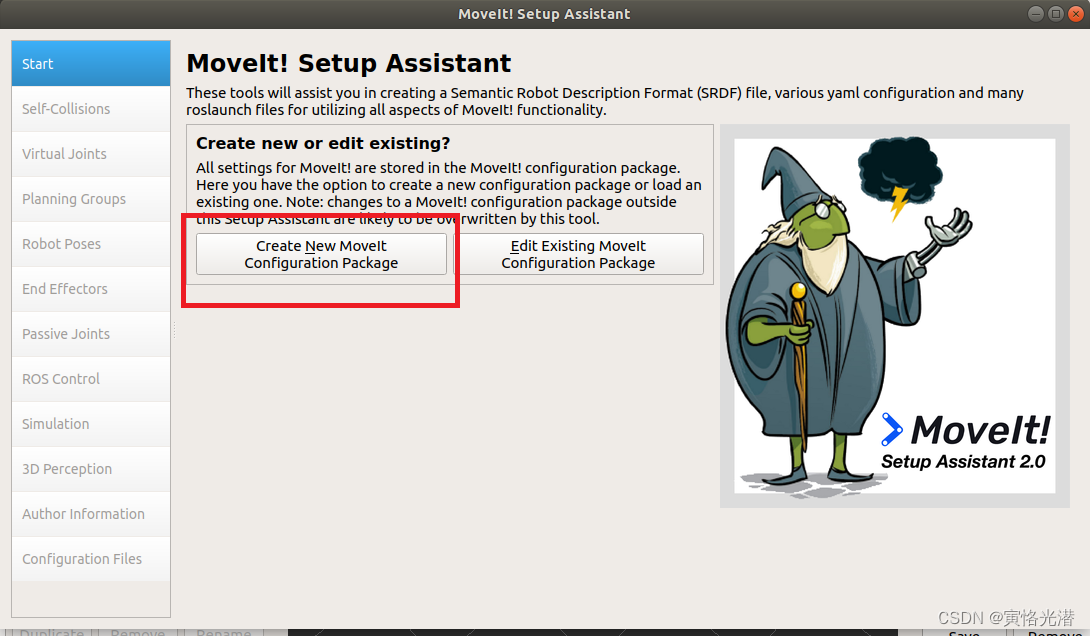
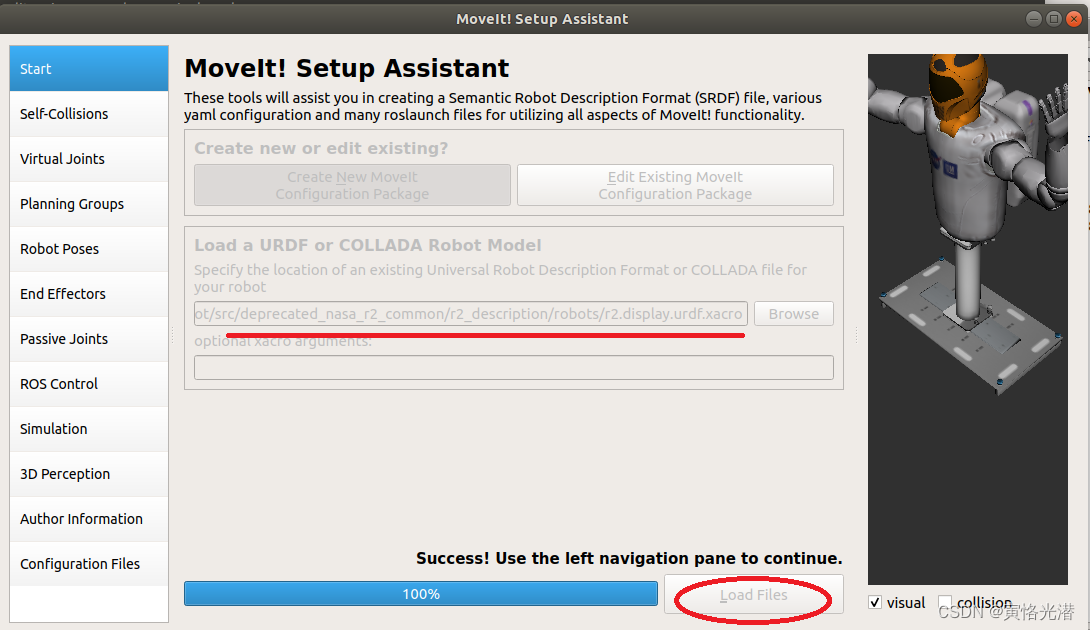
3.2、优化自碰撞检查
对碰撞的检查,禁用碰撞的部件对,可以减少运动规划的时间,如下图:
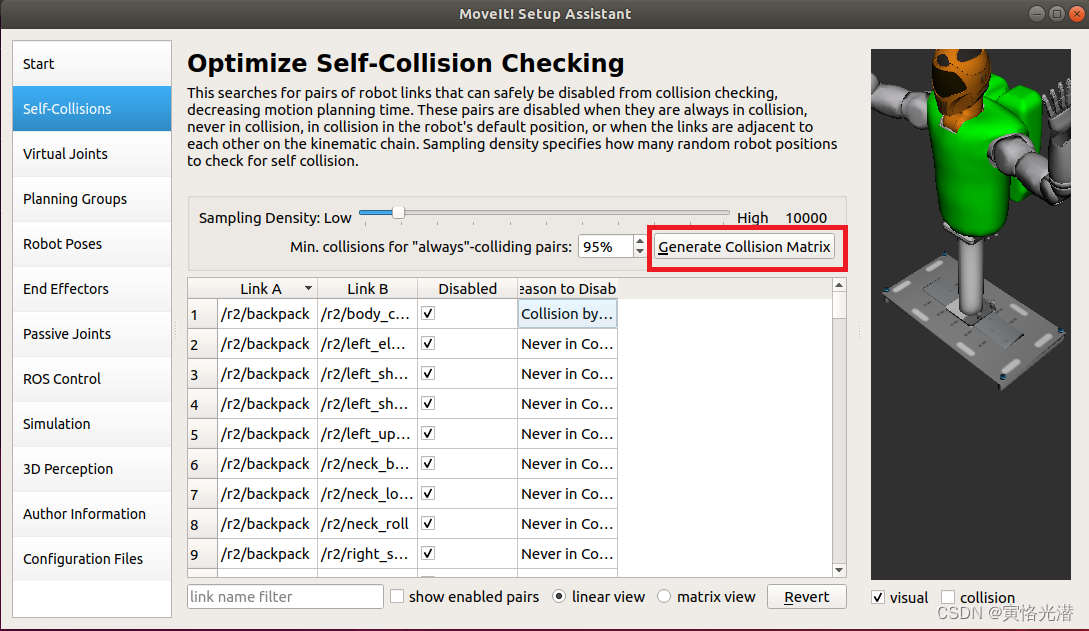 默认10000次检查即可,点击 Generate Collision Matrix 生成碰撞矩阵,红线有两种展示方式。
3.3、创建虚拟关节
虚拟关节是将机器人连接到世界(World)的。主要作用是把机器人固定在地面上别乱跑,如下图:

3.4、规划组
这里是最关键的一个地方了,将机器人的子集规划成一个一个的组,如下图:
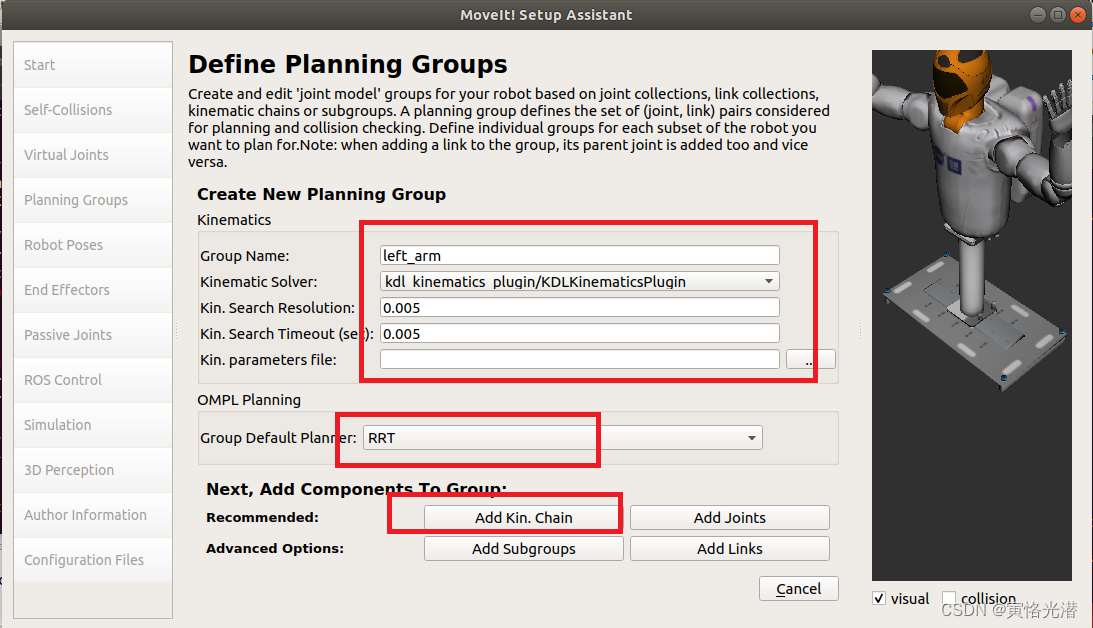
所以按照我们的双臂机器人,控制双臂运动,所以分别创建left_arm和right_arm
3.5、机器人位姿
这个可以定义机器人的位姿,对位姿进行分组,在经常去到一个点(比如返航充电的位姿),将这个位姿设置一个名称就比较方便,图略
类似下面这样,用home代替坐标的意思,这样更直观
arm.set_named_target('home')
arm.go()其余可选的还有,末端执行器:如果有夹具,吸盘之类的末端执行器就进行配置,可选
被动关节:就是不能主动控制的关节,也叫从动关节,可选
模拟文件:生成URDF文件,可选
3D感知传感器:这里可以选择点云或者深度图像,可选
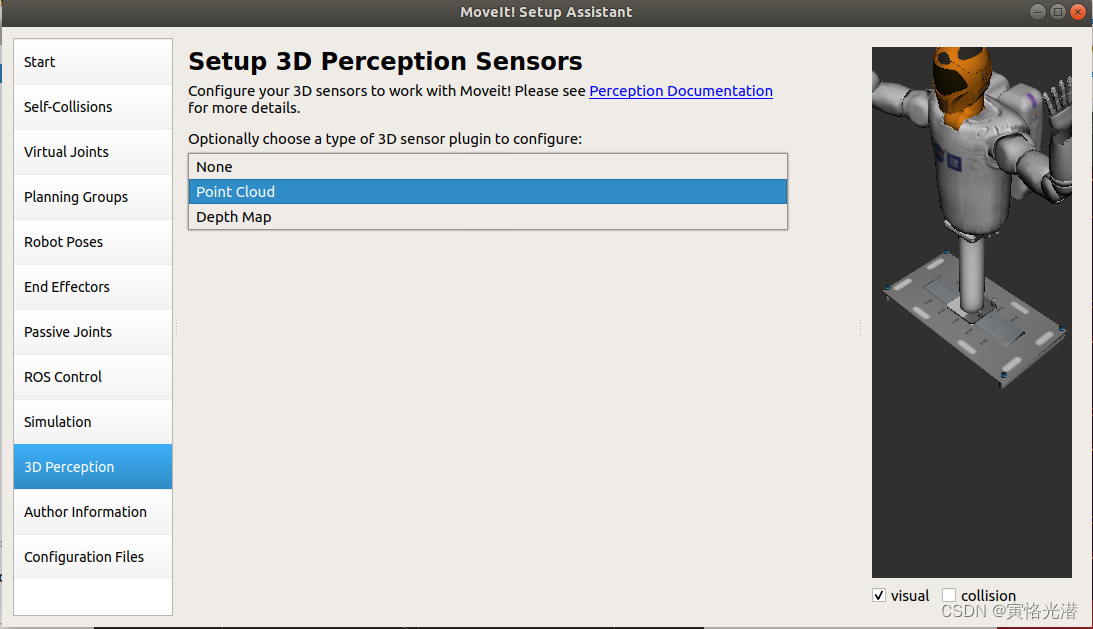
3.6、ROS控制器
可以直接点击 Auto Add FollowJointsTrajectory Controllers For Each Planning Group 自动为每个规划组添加控制器,用来规划路径的用途

3.7、作者信息
指定作者的名字和邮箱地址,这个可以随意填写,图略
3.8、配置文件
最后一步就是对上述这些操作,进行打包操作,将会生成两个文件以及两个目录(配置文件的目录和launch目录)
全部配置好了之后,先来看个demo,这里以右臂为例
cd ~/chessbot
source devel/setup.bash
roslaunch mybot demo.launch
如下图(实际是动态,这里就截图了):
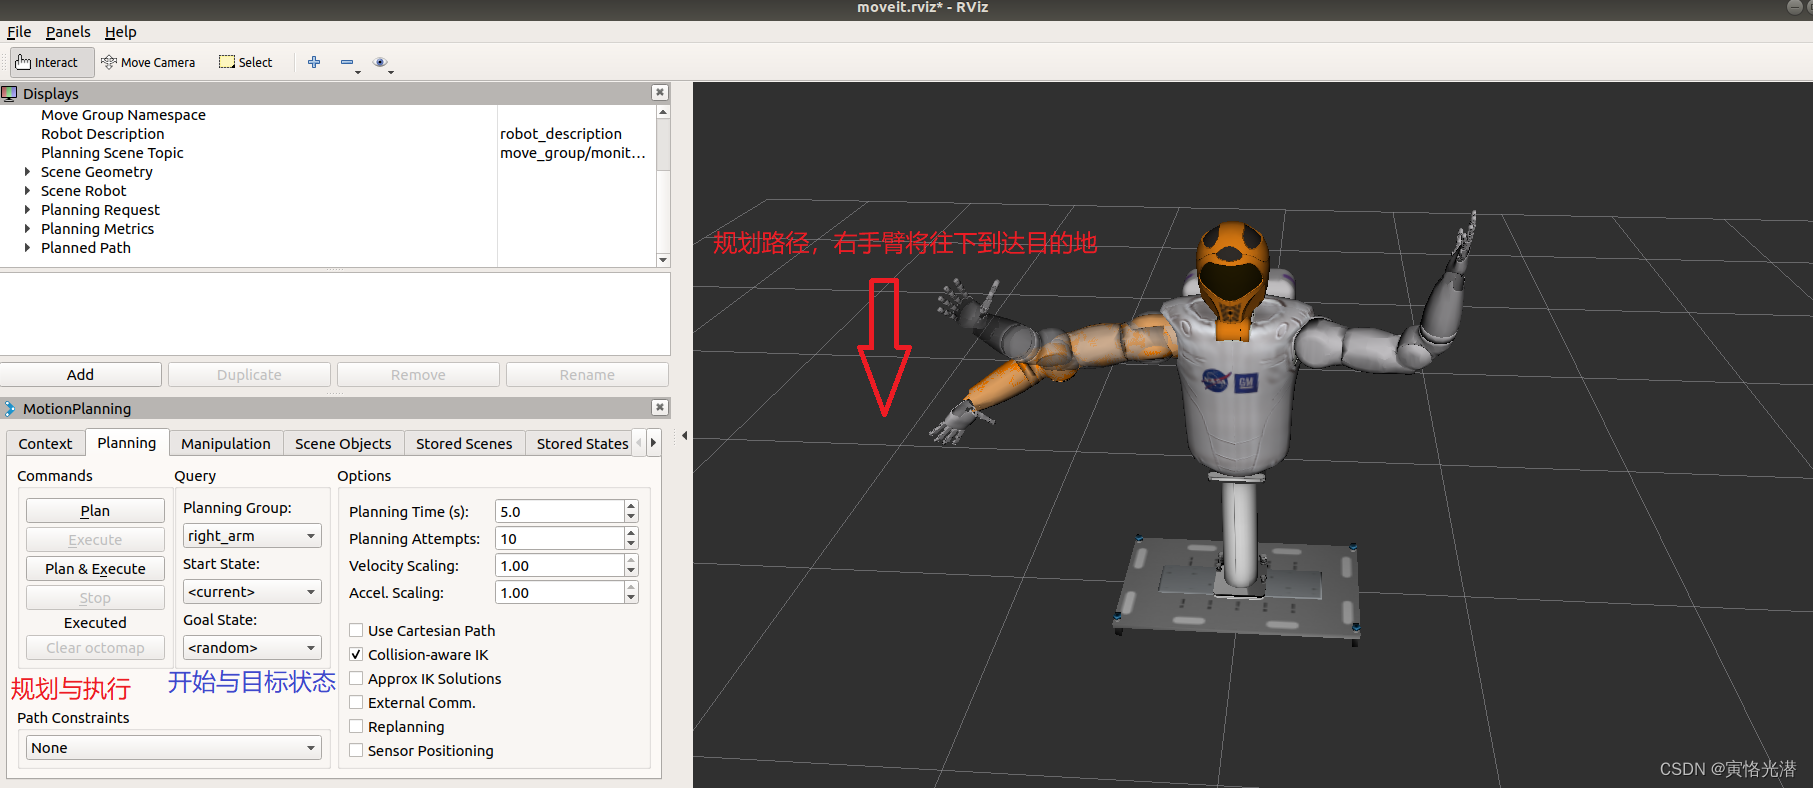
代码运行规划组:
cd ~/chessbot
source devel/setup.bash
roslaunch mybot move_group.launch
3.9、错误处理
重新开一个终端,我们运行上面那个代码文件:
cd ~/chessbot
source devel/setup.bash
cd ~/chessbot/src
./r2_move.py
报错如下:
[ERROR] [1702121793.117659791]: Could not initialize chain object
[ERROR] [1702121793.117758850]: Kinematics solver of type 'kdl_kinematics_plugin/KDLKinematicsPlugin' could not be initialized for group 'lef_arm'
[ERROR] [1702121793.117789067]: Kinematics solver could not be instantiated for joint group lef_arm.
[ERROR] [1702121793.118336454]: Could not initialize chain object
[ERROR] [1702121793.118389993]: Kinematics solver of type 'kdl_kinematics_plugin/KDLKinematicsPlugin' could not be initialized for group 'right_arm'
[ERROR] [1702121793.118409474]: Kinematics solver could not be instantiated for joint group right_arm.
[FATAL] [1702121793.119064673]: Group 'left_arm' was not found.
可能遇到这样的错误:
[ INFO] [1702174557.779660012]: Ready to take commands for planning group left_arm.
[ INFO] [1702174558.017795107]: Ready to take commands for planning group right_arm.
[ INFO] [1702174558.072099968]: ABORTED: Catastrophic failure
[ INFO] [1702174558.172742129]: ABORTED: Catastrophic failure
也可能会遇到这样的错误:ABORTED: Solution found but controller failed during execution
主要原因是运动学插件和关节类型的匹配问题。
4、话题解释
我们来查看下出现了哪些话题:rostopic list
/attached_collision_object
/clicked_point
/collision_object
/execute_trajectory/cancel
/execute_trajectory/feedback
/execute_trajectory/goal
/execute_trajectory/result
/execute_trajectory/status
/head_mount_kinect/depth_registered/camera_info
/head_mount_kinect/depth_registered/image_raw
/head_mount_kinect/depth_registered/points
/initialpose
/joint_states
/move_base_simple/goal
/move_group/camera_info
/move_group/cancel
/move_group/display_contacts
/move_group/display_planned_path
/move_group/feedback
/move_group/filtered_cloud
/move_group/filtered_cloud/compressed
/move_group/filtered_cloud/compressed/parameter_descriptions
/move_group/filtered_cloud/compressed/parameter_updates
/move_group/filtered_cloud/compressedDepth
/move_group/filtered_cloud/compressedDepth/parameter_descriptions
/move_group/filtered_cloud/compressedDepth/parameter_updates
/move_group/filtered_cloud/theora
/move_group/filtered_cloud/theora/parameter_descriptions
/move_group/filtered_cloud/theora/parameter_updates
/move_group/filtered_label
/move_group/filtered_label/compressed
/move_group/filtered_label/compressed/parameter_descriptions
/move_group/filtered_label/compressed/parameter_updates
/move_group/filtered_label/compressedDepth
/move_group/filtered_label/compressedDepth/parameter_descriptions
/move_group/filtered_label/compressedDepth/parameter_updates
/move_group/filtered_label/theora
/move_group/filtered_label/theora/parameter_descriptions
/move_group/filtered_label/theora/parameter_updates
/move_group/goal
/move_group/model_depth
/move_group/model_depth/compressed
/move_group/model_depth/compressed/parameter_descriptions
/move_group/model_depth/compressed/parameter_updates
/move_group/model_depth/compressedDepth
/move_group/model_depth/compressedDepth/parameter_descriptions
/move_group/model_depth/compressedDepth/parameter_updates
/move_group/model_depth/theora
/move_group/model_depth/theora/parameter_descriptions
/move_group/model_depth/theora/parameter_updates
/move_group/monitored_planning_scene
/move_group/ompl/parameter_descriptions
/move_group/ompl/parameter_updates
/move_group/plan_execution/parameter_descriptions
/move_group/plan_execution/parameter_updates
/move_group/planning_scene_monitor/parameter_descriptions
/move_group/planning_scene_monitor/parameter_updates
/move_group/result
/move_group/sense_for_plan/parameter_descriptions
/move_group/sense_for_plan/parameter_updates
/move_group/status
/move_group/trajectory_execution/parameter_descriptions
/move_group/trajectory_execution/parameter_updates
/pickup/cancel
/pickup/feedback
/pickup/goal
/pickup/result
/pickup/status
/place/cancel
/place/feedback
/place/goal
/place/result
/place/status
/planning_scene
/planning_scene_world
/rosout
/rosout_agg
/tf
/tf_static
/trajectory_execution_event
常见的话题有必要去熟悉它:
4.1、点击的坐标点
rostopic info /clicked_point
rosmsg show geometry_msgs/PointStamped
表示用户在图形界面上点击的坐标点,也可以表示从点云数据中提取的某个点的坐标信息。其中获取的消息类型是 geometry_msgs/PointStamped 表示一个带有时间戳的2D或3D点。它包含一个Point 类型(表示2D或3D坐标)和一个Header 类型(表示消息的时间戳和frame ID)
4.2、显示机器人状态
rostopic info /display_robot_state
rosmsg show moveit_msgs/DisplayRobotState
读取机器人的状态信息(比如位姿、关节角度、角速度等),并将其显示在ROS图形界面上,需要加载MoveIt软件包
4.3、初始位姿
rostopic info /initialpose
rosmsg show geometry_msgs/PoseWithCovarianceStamped对机器人进行定位,当从这个话题得到消息的时候,它会重置所有候选位姿(candidate pose),并生成一组服从正态分布的,以消息中提供的位姿为中心的候选位姿。比如,使用rviz设置初始位姿就是在这个话题上发布一条消息。
好的导航结果依赖好的机器人定位,改进初始位姿估计的一个办法是在rviz中查看传感器数据并确保它与地图相符,尤其是在有激光测距仪的时候,这个办法工作得很好,因为激光传感器的数据就像是一张本地的地图,不断改进初始位姿估计直到激光的数据与地图符合起来,你就得到了很好的位姿估计。想要让位姿估计更好一些,可以驾驶机器人到处走走,这将使候选集合很好地分布在实际位置周围,从而给出一个更好的估计。
随着机器人到处移动并用传感器测量环境数据,这些候选位姿逐渐接近机器人的真实位姿,在任意时刻,用于路径规划的机器人的真实位姿就是候选位姿中可信度最高的那个。需要注意的是,当使用导航系统驱动机器人前往某个特定位置的时候,最终很有可能靠得很近,但是不太可能完全重合,不过对于路径规划以及基于传感器的循迹算法来说,这通常足够精确了。
4.4、附加碰撞物体
该话题会侦听提供的AttachedCollisionObject消息,这些消息会决定将碰撞物体附加到机器人状态中的链接上,或者从链接上将物体分离开。
4.5、执行轨迹
execute_trajectory有五个话题服务(Action通信机制),对轨迹规划的执行操作,类似的话题还有pickup抓取和place放置操作。关于Action动作想要了解的可以查阅:ROS通信机制之动作(Action)服务的实践
4.6、move_group
这个是MoveIt的核心组件话题,为用户提供一系列的动作指令和服务,通过参数服务器提供三种信息,URDF\SRDF\Config一些配置和关节限位和运动学插件之类
5、更换运动学插件
上面默认的是KDL插件,速度慢,求解很容易失败,所以可以自己更换插件,比如trac-ik-kinematics-plugin运动插件:
sudo apt-get install ros-melodic-trac-ik-kinematics-plugin
sudo apt-get install ros-melodic-trac-ik将config的kinematics.yaml运动学的插件修改下
left_arm:kinematics_solver: trac_ik_kinematics_plugin/TRAC_IKKinematicsPluginkinematics_solver_search_resolution: 0.005kinematics_solver_timeout: 0.005
right_arm:kinematics_solver: trac_ik_kinematics_plugin/TRAC_IKKinematicsPluginkinematics_solver_search_resolution: 0.005kinematics_solver_timeout: 0.005因为已经安装好了,所以也可以在上面MoveIt的Moveit_setup_assistant可视化界面中的规划路径去选择。
最后想要查看整个机器人的结构,可以使用树形结构命令查看:rosrun rqt_tf_tree rqt_tf_tree
6、小结
总的来说这个R2机器人还是非常复杂,遇到问题网上资料都很少,相关问题也可能是其他机器人,最终的路径规划和执行是表面上没有出错了,查看轨迹也有信息,不是空,但是没有速度,也就是代码没有驱动机器人手臂运动(GUI界面可以运动),出现坐标变换不被识别的问题,修改代码如下:
cd ~/chessbot
source devel/setup.bash
import sys,rospy,tf,moveit_commander,random
from geometry_msgs.msg import Pose,Point,Quaternion
from math import pimoveit_commander.roscpp_initialize(sys.argv)
rospy.init_node('r2_wave_arm',anonymous=True)
robot = moveit_commander.RobotCommander()
group = moveit_commander.MoveGroupCommander("left_arm")
group.set_goal_position_tolerance(0.005)
group.set_goal_orientation_tolerance(0.005)
pose_target = Pose(Point(0.5,-0.5,1.3),Quaternion(*tf.transformations.quaternion_from_euler(pi,-pi/2,-pi/2)))
group.set_joint_value_target(pose_target,group.get_end_effector_link(),True)
plan1 = group.plan()
group.execute(plan1)#group.go()#相当于Plan and Execute
代码2:
import sys,rospy,tf,moveit_commander,random
import geometry_msgs.msg
from geometry_msgs.msg import Pose,Point,Quaternion
from math import pimoveit_commander.roscpp_initialize(sys.argv)
rospy.init_node('r2_wave_arm',anonymous=True)
#机器人接口
robot = moveit_commander.RobotCommander()
#所在环境接口
scene = moveit_commander.PlanningSceneInterface()
#控制对象接口
group = moveit_commander.MoveGroupCommander("left_arm")#允许最大的误差、速度、加速度
group.set_goal_position_tolerance(0.005)
group.set_goal_orientation_tolerance(0.005)
group.set_max_velocity_scaling_factor(0.5)
group.set_max_acceleration_scaling_factor(0.5)#pose_target = geometry_msgs.msg.Pose()
pose_target = geometry_msgs.msg.PoseStamped()
pose_target .header.frame_id = robot.get_planning_frame()
pose_target.pose.position.x = group.get_current_pose().pose.position.x+0.5
pose_target.pose.position.y = group.get_current_pose().pose.position.y
pose_target.pose.position.z = group.get_current_pose().pose.position.z-0.1
pose_target.pose.orientation = group.get_current_pose().pose.orientation
group.set_joint_value_target(pose_target,group.get_end_effector_link(),True)
#group.go(wait=True) plan1= group.plan()
group.execute(plan1)
这个问题也找遍了全网,估计是时间久,版本的问题了,另外资料很少没有解决,只能等后期会了再来处理这个问题,如果有大神遇到且能解决,还请大神留下解决方案,感谢。
这篇关于ROS仿真R2机器人之安装运行及MoveIt的介绍的文章就介绍到这儿,希望我们推荐的文章对编程师们有所帮助!


