本文主要是介绍DAMO-YOLO训练KITTI数据集,希望对大家解决编程问题提供一定的参考价值,需要的开发者们随着小编来一起学习吧!
1.KITTI数据集准备
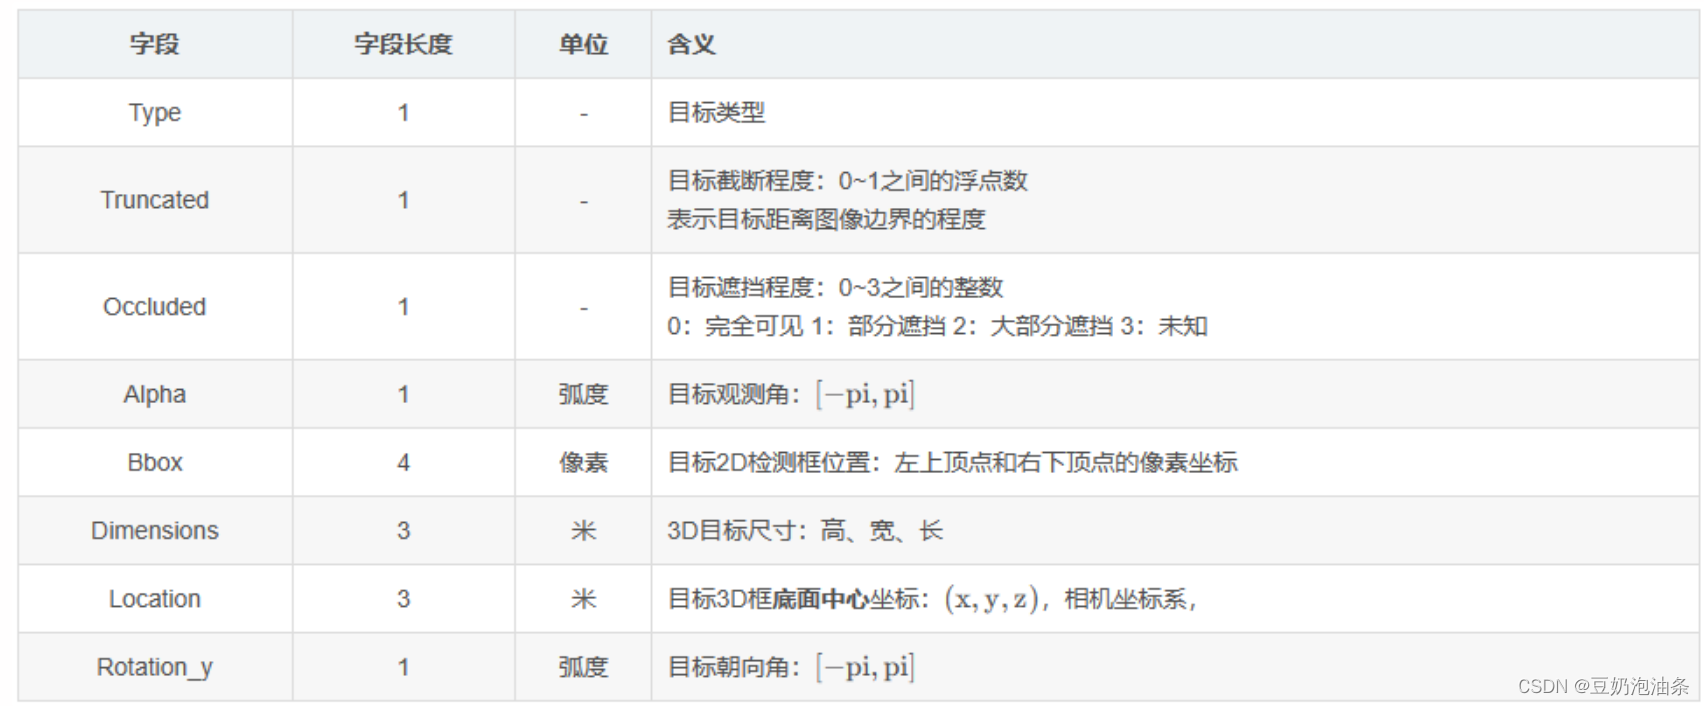
DAMO-YOLO支持COCO格式的数据集,在训练KITTI之前,需要将KITTI的标注转换为KITTI格式。KITTI是采取逐个文件标注的方式确定的,即一张图片对应一个label文件。下面是KITTI 3D目标检测训练集的第一个标注文件:000000.txt
Pedestrian 0.00 0 -0.20 712.40 143.00 810.73 307.92 1.89 0.48 1.20 1.84 1.47 8.41 0.01
就不一一解释了,引用一下KITTI 3D目标检测数据集解析(完整版)_kitti数据集结构-CSDN博客的表格,可以看一下该文章的详细解释
COCO格式就不再详细解释了,可以看一下这篇文章COCO数据集(目标检测任务json文件内容总结,总结一下COCO格式需要一个大的json文件,里面包含了每个图片的路径及注释,bbox由中心坐标和宽高的形式给出。
因此,KITTI格式转COCO,就是需要读取逐个的txt文件,进行坐标换算后写入json,代码如下,基于TXT 转成COCO jason格式的标注_D_galaxy的博客-CSDN博客修改:
import cv2
from math import *
import numpy as np
import os, random, shutil
import glob as gb
from time import sleep
import copy
import jsondef copyFile2Folder(srcfile, dstfolder):'''复制文件到指定文件夹,名字和以前相同Args:srcfile: '/home/wsd/***/yolov5/data/PCB_DATASET/labels/Spur/04_spur_06.txt' 文件的绝对路径dstfile: '/home/wsd/***/yolov5/data/PCB_DATASET/train/labels' 文件夹Returns:'''if not os.path.isfile(srcfile):print("%s not exist!" % (srcfile))else:src_fpath, src_fname = os.path.split(srcfile) # 分离文件名和路径if not os.path.exists(dstfolder):os.makedirs(dstfolder) # 创建路径dst_filedst_file = os.path.join(dstfolder, src_fname)shutil.copyfile(srcfile, dst_file) # 复制文件print("copy %s -> %s" % (srcfile, dst_file))return dst_fileclass cocoJsaon(object):'''coco 的json 的文件格式类'''def __init__(self, categories):self.info = {'description': 'PCB DATASET','url': 'DLH','version': '1.0','year': 2021,'contributor': 'DLHgroup','date_created': '2021-01-12 16:11:52.357475'}self.license = {"url": "none","id": 1,"name": "Attribution-NonCommercial-ShareAlike License"}self.images = Noneself.annotations = Noneself.category = categoriesself.cocoJasonDict = {"info": self.info, "images": self.images, "annotations": self.annotations,"licenses": self.license, 'categories': self.category}def getDict(self):'''Returns: 返回 格式的字典化'''self.cocoJasonDict = {"info": self.info, "images": self.images, "annotations": self.annotations,"licenses": self.license, 'categories': self.category}return self.cocoJasonDictif __name__ == '__main__':# 文件原本:'''root: /home/dlh/opt/***/PCB_DATASET------------------->labels/ # 原本的所有目标检测框的 *.txt------------------->images/ # *.jpg 所有的图片------------------->ImageSets/ # train.txt 和 val.txt------------------->annotations / 存放 labels 下所有对应的train.json最终:root: /home/dlh/opt/***/PCB_DATASET/PCB ------------------->images/ # *.jpg 所有的图片------------------->annotations / instances_train_set_name.json # 存放 labels 下所有对应的train.json/ instances_val_set_name.json # 存放 labels val.json'''# 写入的train 还是Val wrtie_str = 'train'train_path = '/home/wistful/Datasets/KITTI/training/'# 存放 train.txt 和 val.txt 的绝对地址 (修改)Imageset = '/home/wistful/Datasets/KITTI/ImageSets/' + wrtie_str + '.txt'# 存放 即将所有的原本图片 保存到 该地址 临时 (修改)tarset = '/home/wistful/Datasets/KITTI/training/image_2/' + wrtie_str + '_set_name'# 下面是更改 json 文件 的tempDir = Imageset.replace('txt', 'json')tempDir = tempDir.replace('ImageSets', 'annotations')jsonFile = tempDir.replace(wrtie_str, 'instances_' + wrtie_str + '_set_name')jasonDir, _ = os.path.split(jsonFile)# 告诉你 最新的Jason 文件保存到了那里print(f'jsonFile saved {jsonFile}')# 检查目标文件夹是否存在if not os.path.exists(tarset):os.makedirs(tarset)if not os.path.exists(jasonDir):os.makedirs(jasonDir)# images 段 的字典模板images = {"license": 3,"file_name": "COCO_val2014_000000391895.jpg","coco_url": "","height": 360, "width": 640, "date_captured": "2013-11-14 11:18:45","id": 0}# annotation 段 的字典模板an = {"segmentation": [],"iscrowd": 0,"keypoints": 0,"area": 10.0,"image_id": 0, "bbox": [], "category_id": 0,"id": 0}# categories 段 的字典模板cate_ = {'id': 0,'name': 'a',}# 用来保存目标类的 字典cate_list = []# 你的目标类有几个 (修改)className = ['Pedestrian', 'Car', 'Cyclist', 'DontCare']carName = ['Car', 'Van', 'Truck', 'Tram'] # 车的类型,最终会归一成carpersonName = ['Pedestrian', 'Person_sitting'] # 人员类型,最终归一为PedestriandontCare = ['Misc', 'DontCare'] # 杂物,归一为DontCaretemId = 0for idName in className:tempCate = cate_.copy()tempCate['id'] = temIdtemId += 1tempCate['name'] = idNamecate_list.append(tempCate)# print(cate_list)# 创建coco json 的类 实例js = cocoJsaon(cate_list)image_lsit = []annoation_list = []# 打开 train。txtwith open(Imageset, 'r') as f:lines = f.readlines()# print(f'imageset lines:{lines}')img_id = 0bbox_id = 0# 按值去打开图片for path in lines:# 我的train.txt 是按照绝对路径保存的,各位需要的根据自己的实际情况来修改这里的代码# 去出 \n 之类的空格path = path.lstrip().rstrip()# 得到图像文件路径img_path = train_path + 'image_2/' + path + '.png'# print(f'path:{path}')# 打开图片image = cv2.imread(img_path)# 将这个图片副知道新的文件夹 (以实际情况 修改)copyFile2Folder(img_path, tarset)# 得到宽高(height, width) = image.shape[:2]# (height, width) = 375, 1242# 得到文件名子_, fname = os.path.split(img_path)# print(f'_ and name:{_, fname}')# 图像对应的txt 文件路径txtPath = train_path + 'label_2/' + path + '.txt'# print(f'txtPath:{txtPath}')# 复制images 的字典的复制image_temp = images.copy()image_temp['file_name'] = fnameimage_temp['height'] = heightimage_temp['width'] = widthimage_temp['id'] = img_id# 将其放入到集合中image_lsit.append(image_temp)# 打开图片的对应的txt 目标文件的txt# print(f'txt path:{txtPath}')with open(txtPath, 'r') as re:txtlines = re.readlines()for txtline in txtlines:# 去出 \n 之类的空格temp = txtline.rstrip().lstrip().split(' ')# print(f'temp:{temp}')# 分别的到 目标的类 中心值 xy 和 该检测框的宽高if temp[0] in carName:classid = className.index('Car')elif temp[0] in personName:classid = className.index('Pedestrian')elif temp[0] in dontCare:classid = className.index('DontCare')else:classid = className.index('Cyclist')# classid = className.index(temp[0]) # 获取id# 计算宽高及中心w = float(temp[6]) - float(temp[4])h = float(temp[7]) - float(temp[5])x = (float(temp[6]) + float(temp[4]))/2y = (float(temp[7]) + float(temp[5]))/2iscrowd = int(temp[2])# 判断是否遮挡if iscrowd != 0:iscrowd = 1# 计算面积area = w * h# 复制annotation 的字典temp_an['area'] = areatemp_an = an.copy()temp_an['image_id'] = img_idtemp_an['bbox'] = [x, y, w, h]temp_an['iscrowd'] = iscrowdtemp_an['category_id'] = classidtemp_an['id'] = bbox_idbbox_id += 1 # 这个是 这个annotations 的id 因为一个图像可能对应多个 目标的idannoation_list.append(temp_an)# 图像的idimg_id += 1# print(js.getDict())# print('***********************************************************************\n\n')# 将json 的实例 中images 赋值js.images = image_lsit# 将json 的实例 annotations 赋值js.annotations = annoation_list# 写入文件json_str = json.dumps(js.getDict())with open(jsonFile, 'w+') as ww:ww.write(json_str)print('finished')上述代码,只需更改主函数开头的wrtie_str和train_path就行了,代码不难理解
2.修改DAMO-YOLO的配置文件
- 修改
damo/config/paths_catalog.py,将coco_2017_train、coco_2017_val的相关路径修改一下
# Copyright (c) Facebook, Inc. and its affiliates. All Rights Reserved.
# Copyright (C) Alibaba Group Holding Limited. All rights reserved.
"""Centralized catalog of paths."""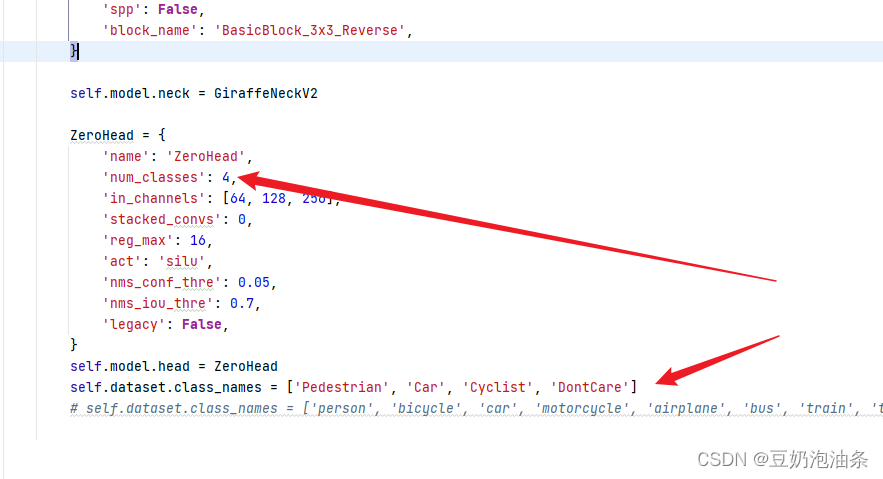
import osclass DatasetCatalog(object):DATA_DIR = 'datasets'DATASETS = {'coco_2017_train': {'img_dir': '/home/wistful/Datasets/KITTI/training/image_2','ann_file': '/home/wistful/Datasets/KITTI/annotations/instances_train_set_name.json' # 第一步生成的json文件},'coco_2017_val': {'img_dir': '/home/wistful/Datasets/KITTI/training/image_2','ann_file': '/home/wistful/Datasets/KITTI/annotations/instances_val_set_name.json'},'coco_2017_test_dev': {'img_dir': '/home/wistful/Datasets/KITTI/training/image_2','ann_file': '/home/wistful/Datasets/KITTI/annotations/instances_val_set_name.json'},}@staticmethoddef get(name):if 'coco' in name:data_dir = DatasetCatalog.DATA_DIRattrs = DatasetCatalog.DATASETS[name]args = dict(root=os.path.join(data_dir, attrs['img_dir']),ann_file=os.path.join(data_dir, attrs['ann_file']),)return dict(factory='COCODataset',args=args,)else:raise RuntimeError('Only support coco format now!')return None- 修改配置文件中的
ZeroHead及self.dataset.class_names
- 导入预训练权重及修改训练轮数,GitHub官方仓库里有,就不介绍了
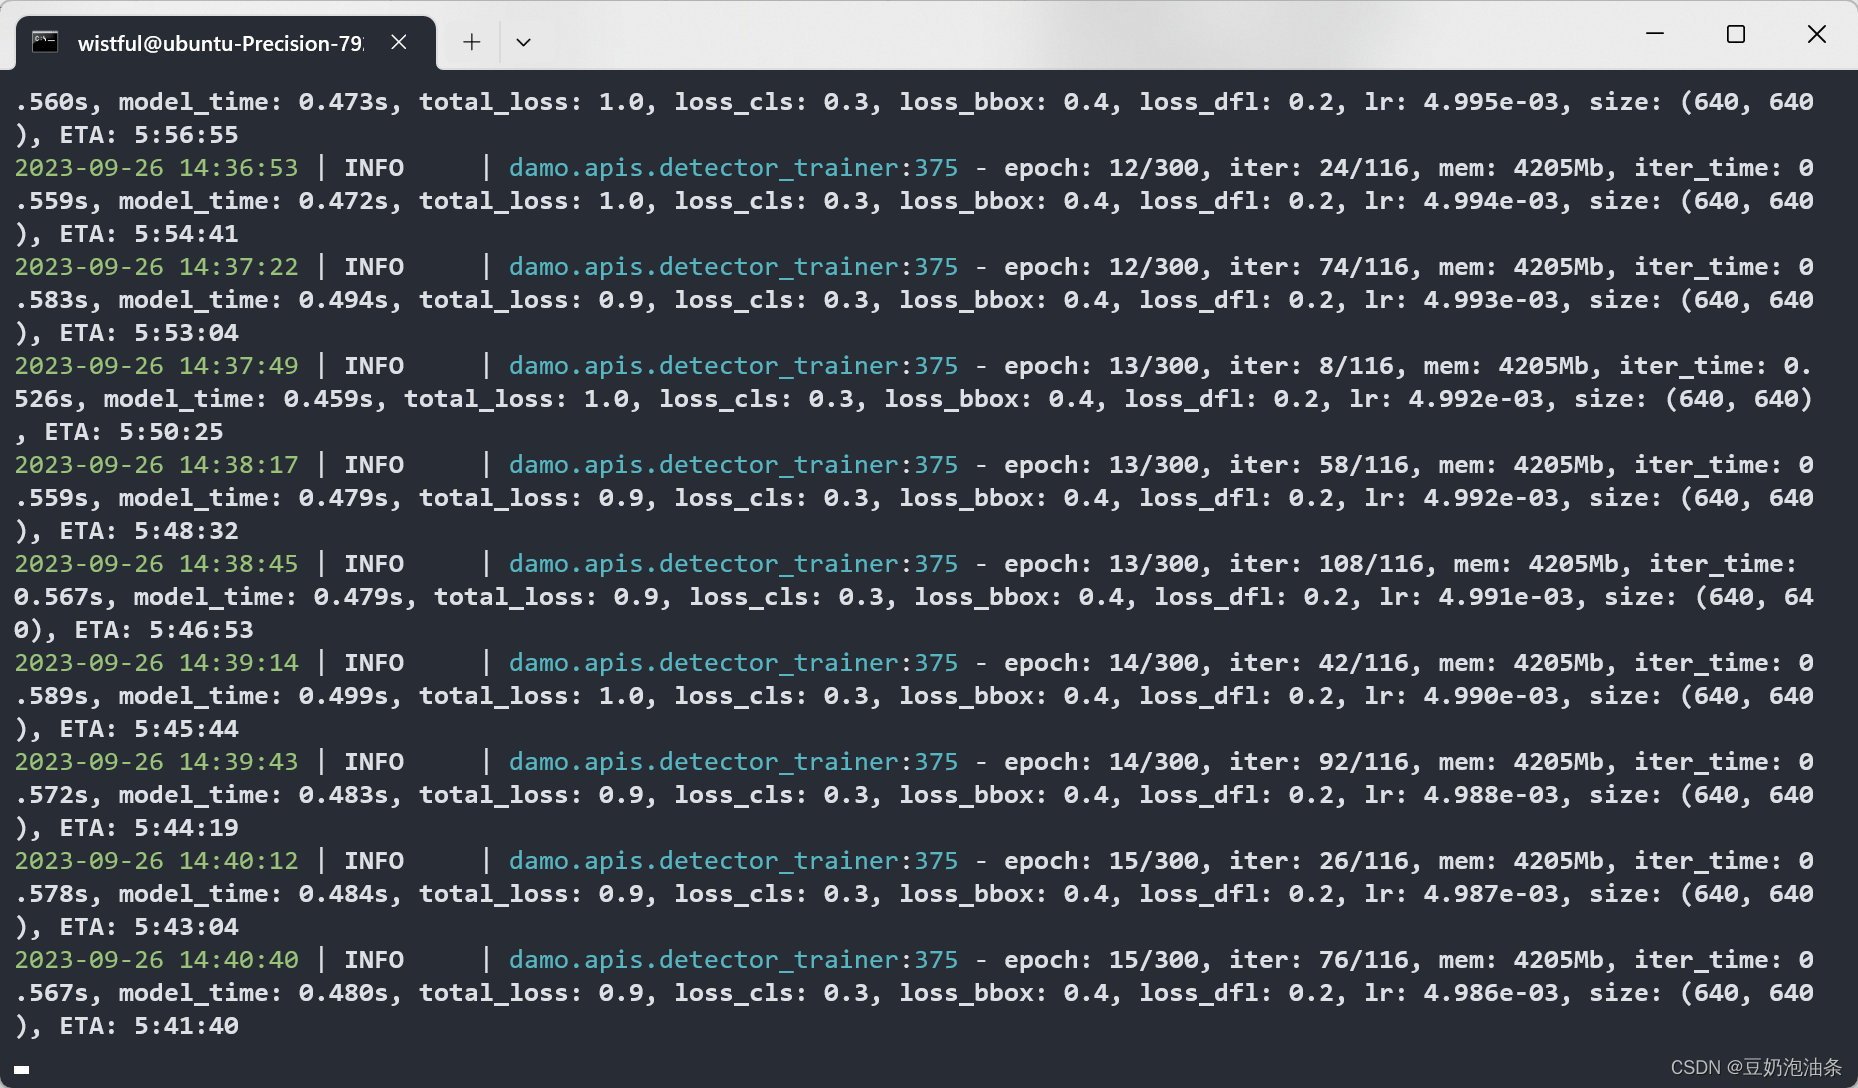
3.训练
python -m torch.distributed.launch --nproc_per_node=2 tools/train.py -f configs/damoyolo_tinynasL20_T.py
2指的是gpu个数,-f 后面是配置文件
这篇关于DAMO-YOLO训练KITTI数据集的文章就介绍到这儿,希望我们推荐的文章对编程师们有所帮助!


