本文主要是介绍在Unity里使用光线步进(Raymarching),希望对大家解决编程问题提供一定的参考价值,需要的开发者们随着小编来一起学习吧!

图中光滑球为光线步进产生,粗糙球为Unity的场景物体
概念
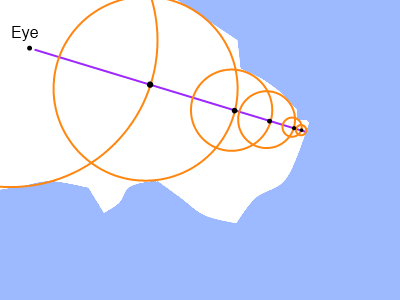
光线步进和光线投射类似,都是从屏幕发射射线,然后求射线和物体的焦点,但是光线投射是一次性算出交点,而光线步进是一步步的前进,不断的向交点趋近,光线步近中的物体使用一种距离场函数来表示(SDF,Signed-distance-field 有向距离场)。通过这个函数你可以知道当前点的位置位置和物体的最近距离,如果距离趋向于0,就说明到达了交点,
每次前进的步长等于计算的距离,这样可以更快的趋近与交点。

如图所示,射线一步步向前,最后到达近似于交点的位置。
光线步进可以看做一个屏幕特效,怎么让shader应用一个屏幕特效我就忽略了,另外shader创建一个Image Effect Shader即可,
直接在上面改就好了,基本的设置几乎不需要变。
射线方向
首先我们需要得到每个像素的射线发射方向,这里我共看到了两种
第一种比较方便,但是可能会比较耗性能,因为每个像素都要计算一次。 思路看这里
Ray CreateCameraRay(float2 uv){float2 p=uv*2.0f-1.0f;//内置的矩阵unity_CameraToWorld 左右手坐标系需要切换,所以要修改一下//tips:外部传入的_camera.cameraToWorldMatrix就是反的float4x4 negativeMat=float4x4(1,0,0,0,0,1,0,0,0,0,-1,0,0,0,0,1);float4x4 n_CameraToWorld=mul(unity_CameraToWorld,negativeMat);float3 origin=mul(n_CameraToWorld,float4(0.0f,0.0f,0.0f,1.0f)).xyz;float3 direction=mul(unity_CameraInvProjection,float4(p.xy,1.0f,1.0f)).xyz;direction=mul(n_CameraToWorld,float4(direction,0.0f)).xyz;direction=normalize(direction);return CreateRay(origin,direction);}值得一提的是在实际使用中我发现shader中内置的相机世界矩阵和外界传入的相机世界矩阵有所不同,内置的并没有包含左右手坐标系的转换,所以用的时候要么用外面传入的,要么修改一下内置的。如果直接用内置的,你以为的正面其实是背面。
第二种需要shader外的配合,核心思路就是预先计算好屏幕空间四个顶点的发射向量,然后通过插值器得到每个像素点的发射方向
在c#部分,我们预先计算好四个顶点的向量,打包成矩阵传入shader;
//返回一个矩阵,分别表示四个点的向量,在shader里插值后可以得到各像素点的方向Matrix4x4 CamFrustum(){Matrix4x4 mat=Matrix4x4.identity;float fov = Mathf.Tan(_camera.fieldOfView * 0.5f* Mathf.Deg2Rad) ;//得到向上向右的位移偏亮 进而推出屏幕面片四个点的发射方向 Vector3 up = Vector3.up * fov;Vector3 right = Vector3.right * _camera.aspect * fov;Vector3 TL = (-Vector3.forward + up - right);Vector3 TR = (-Vector3.forward + up + right);Vector3 BL = (-Vector3.forward - up - right);Vector3 BR = (-Vector3.forward - up + right);//顺序为左下,右下,左上,右上 不要乱mat.SetRow(0,BL);mat.SetRow(1,BR);mat.SetRow(2,TL);mat.SetRow(3,TR);return mat;}...
raymarchMat.SetMatrix("_CamFrustum",CamFrustum());
...在shader中我们通过需要获取每个顶点的向量,我们知道uv左下为(0,0)右上为(1,1)通过这一点我们让x乘1,y乘2,两者相加就可以得到我们想要的序列 即左下=0,右下=1,左上=2,右上=3。在顶点函数中计算好,通过插值我们就可以在片元函数中得到每个像素的方向了。(_CamToWorld是外界传入的相机-世界矩阵,原因方法一提到)
v2f vert (appdata v){v2f o;int index=(int)dot(v.uv,float2(1,2));v.vertex.z=0;o.vertex = UnityObjectToClipPos(v.vertex);o.uv = v.uv;o.rayDir= _CamFrustum[index].xyz;o.rayDir=mul(_CamToWorld,o.rayDir);return o;}光线步进算法
maxDist是射线的最远距离,maxItera是射线最多走几步。
bool RayMarching(Ray ray,float maxDist,int maxItera,inout float3 p){float t=0.0f;//光线走的长度for(int i=0;i<maxItera;i++){//最大边界if(t>maxDist) return false;p=ray.origin+t*ray.direction;//现在的位置float d=DistanceField(p);//当前点和物体的距离(要注意不一定是交点的距离,不然直接一步就到了)if(abs(d)<0.01) {return true;//找到了交点}t+=d;}return false;}距离场
前面的DistanceField(),其中就包含了多个物体的距离场 不同形状的距离场,以及形状之间的组合操作请看iq的这篇文章
我们可以尝试画一个最简单的球
float sdSphere( float3 p, float s ){return length(p)-s;
}
float4 DistanceField(float3 p){return sdSphere(p,3);
}
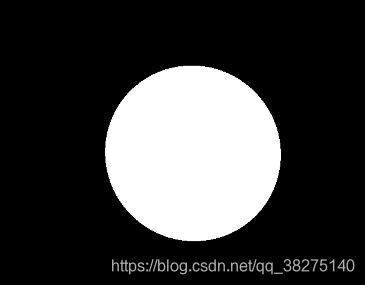
fixed4 frag (v2f i) : SV_Target {float2 uv=i.uv;float3 result=0.0f;Ray ray= CreateRay(_WorldSpaceCameraPos,normalize(i.rayDir));float3 hitPosition;bool hit=RayMarching(ray,_MaxDistance,_MaxIterations,hitPosition);if(hit){result=1.0f;}else{result=0.0f;}return float4(result,1.0f);}
法线计算
我们可以在此利用距离场计算交点位置的法线,法线也就是它的梯度。
float3 calcNormal( in float3 pos ){float2 e = float2(1.0,-1.0)*0.5773*0.0005;return normalize( e.xyy*DistanceField( pos + e.xyy ).x +e.yyx*DistanceField( pos + e.yyx ).x +e.yxy*DistanceField( pos + e.yxy ).x +e.xxx*DistanceField( pos + e.xxx ).x );/*float3 eps = float3( 0.0005, 0.0, 0.0 );float3 nor = float3(DistanceField(pos+eps.xyy).x - DistanceField(pos-eps.xyy).x,DistanceField(pos+eps.yxy).x - DistanceField(pos-eps.yxy).x,DistanceField(pos+eps.yyx).x - DistanceField(pos-eps.yyx).x );return normalize(nor);*/}让输出颜色为法线,结果如图
if(hit){result=calcNormal(hitPosition);
}

光照
有了法线就可以计算光照了。ps:文中所有"_"开头的都是外界传入的变量,自己按意思设置即可。
if(hit){float3 normal=calcNormal(hitPosition);result=_LightCol*saturate(dot(normal,-_LightDir));
}else{result=float3(0.2,0.2,0.3);
}
调整场景
我们先把渲染的部分合并到到单独的一个shade函数中
float3 Shade(float3 p,float3 normal){float3 diffuse=_LightCol*(saturate(dot(normal,-_LightDir))*0.5f+0.5f);return diffuse;
}
...
if(hit){float3 normal=calcNormal(hitPosition);result=Shade(hitPosition,normal);
}然后调整场景物体,下面就是文章开头图片的距离场 。opSmoothUnion是一个结合两个距离场的操作,他可以平滑的合并两者,更多操作请看前面提到的那篇文章。
float4 opSmoothUnion( float d1, float d2, float k ) {float h = clamp( 0.5 + 0.5*(d2-d1)/k, 0.0, 1.0 );return lerp( d2, d1, h ) - k*h*(1.0-h); }float DistanceField(float3 p){float d1=sdSphere(p-_Sphere01.xyz+float3(0,fmod(_Time.y*6, 10),0),_Sphere01.w*0.5);float d2=sdSphere(p-_Sphere01.xyz,_Sphere01.w);float plane=sdPlane(p,_Plane01);float comb01=opSmoothUnion(plane,opSmoothUnion(d1,d2,1),1);float d3=sdSphere(p-_Sphere02.xyz+float3(0,fmod(_Time.y*6, 9),0),_Sphere02.w*0.5);float d4=sdSphere(p-_Sphere02.xyz,_Sphere02.w);float comb02=opSmoothUnion(d3,d4,1);return opSmoothUnion(comb01,comb02,1);
}
阴影
阴影可以看这篇文章,可以分为硬阴影和软阴影。
硬阴影思路很简单,就是朝光线方向再来一次光线步进,如果撞到了物体就说明光线被该物体挡住了,自身位于阴影中。
float HardShadow(float3 ro,float3 rd,float mint,float maxt){for( float t=mint; t < maxt; ){float h = DistanceField(ro + rd*t);if( h<0.001f)return 0.0f;t += h;}return 1.0f;
}
软硬阴影则是在硬阴影基础上进一步拓展,就是让阴影附近能有一层过渡
float SoftShadow(float3 ro,float3 rd, float mint, float maxt, float k ){float res = 1.0f;//确保阴影衰减值不会大于1for( float t=mint; t < maxt; ){float h = DistanceField(ro + rd*t);if( h<0.001f )return 0.0f;res = min( res, k*h/t );t += h;}return res;
}
mint和maxt是最近和最远的阴影距离。

如图所示,t表示射线到目标步数走的路场,而h是每走一步和物体的距离,很明显,当两者垂直时,h/t的值最小。而随着光线的原理,h和t之间的差距越来越小,h/t趋向于1,1就是没有阴影的情况,k值是阴影的软化程度,在这里我们也可以知晓其实他就是加速h/t趋向于1,值越大,k*h/t就会越快的趋近1,阴影也就越锐利。
float3 Shade(float3 p,float3 normal){//控制在[0.5,1.0],这样可以用pow(,_ShadowIntensity)的方式对阴影浓度做进一步的调整float shadow=SoftShadow(p,-_LightDir,_ShadowDistance.x,_ShadowDistance.y,_ShadowPenumbra)*0.5+0.5;shadow=max(0.0,pow(shadow,_ShadowIntensity));float3 diffuse=_LightCol*(saturate(dot(normal,-_LightDir))*0.5f+0.5f);return diffuse*shadow;
}


硬阴影和软阴影
环境光遮蔽
float calcAO(float3 p,float3 normal){float step=_AoStepSize;//每次前进的步长,这里使用固定步长float ao=0.0;float dist;for(int i=0;i<=_AoIterations;i++){dist=step*i;//如果附近没有其他物体 dist<DistanceField 最终结果为负数并截为0 返回值=1 即无环境光遮蔽//如果附近有物体,那么法线步进就会靠近该物体 从而dist>DistanceField 结果大于0,返回值<1ao+=max(0.0f,(dist-DistanceField(p+normal*dist))/dist);}return (1.0f-ao*_AoIntensity);
}

如图所以,同等步长下,越是犄角疙瘩的地方,d值越有可能步dist值小,从而得到更高的ao值,因为ao值高的地方应该越暗,所以最后的返回值是1-ao,让高ao值的趋向于0.

和原有场景的合并
带目前为止我们都是完全丢弃了Unity原本渲染的内容,在这里我们要把它补回了,思路很简单,我们通过深度贴图得到深度,如果光线步进的长度超过这个值,就没必要继续计算了,直接返回false,因为就算在这个距离之后碰撞到了距离场物体,它按常理也是应该被Unity场景中的物体所遮挡的。
我们首先要利用深度贴图计算深度
float depth=LinearEyeDepth(tex2D(_CameraDepthTexture,uv).r);同时raymarching函数新增一个深度参数。
bool  RayMarching(Ray ray,float depth,float maxDist,int maxItera,inout float3 p){float t=0.0f;//光线走的长度for(int i=0;i<maxItera;i++){//注意这里,现在长度既不能超过规定的最大值也不能超过深度值if(t>maxDist||t>depth) return false;p=ray.origin+t*ray.direction;float d=DistanceField(p);if(abs(d)<0.01) {return true;}t+=d;}return false;
}
在frag函数中,如果是false,就返回原屏幕贴图的颜色, _MainTex一般你用Graphics.Blit()会默认传入原图像。
bool hit=RayMarching(ray,depth,_MaxDistance,_MaxIterations,hitPosition);
if(hit){float3 normal=calcNormal(hitPosition);result=Shade(hitPosition,normal);
}else{float3 texCol=tex2D(_MainTex,uv).rgb;result=texCol;
}
反射
1.场景物体的反射
场景物体的反射我们利用反射探针来完成,因为是imageEffect,所以内置的unity_SpecCube0无法正常配置,我们需要手动把光照探针的贴图传进去。
public ReflectionProbe ReflectionProbe;
...
raymarchMat.SetTexture("_SkyBox",ReflectionProbe.texture);
shader中就是简单的采样叠加
if(hit){float3 normal=calcNormal(hitPosition);result=Shade(hitPosition,normal);float3 reflectDir=reflect(ray.direction,normal);result=lerp(result,texCUBE(_SkyBox,reflectDir).rgb,_ReflectIntensity);
}
红黄色的球是场景中的静态物体,可以看到已经被渲染进了光照探针的立方体贴图中。
2. 距离场物体的反射
在开始计算距离场反射之前我们先让距离场物体能够有自己的颜色。
思路很简单,我们让距离场函数返回floa4类型,xyz存储颜色,w存储z
这里只展示主要的几个函数,要改动的地方其实有很多,首先所有调用DistanceField地方取值都要球改,还有距离场的各个操作函数也要适应flaot4类型。
 float3 Shade(float3 p,float3 normal,float3 hitColor){...float3 diffuse=_LightCol*hitColor*(saturate(dot(normal,-_LightDir))*0.5f+0.5f);...}bool  RayMarching(Ray ray,float depth,float maxDist,int maxItera,inout float3 p,inout float3 col){float t=0.0f;for(int i=0;i<maxItera;i++){if(t>maxDist||t>depth) return false;p=ray.origin+t*ray.direction;float4 d=DistanceField(p);if(abs(d.w)<0.01) {return true;}t+=d.w;col=d.rgb;}return false;
}fixed4 frag (v2f i) : SV_Target {...float3 hitPosition,hitColor;bool hit=RayMarching(ray,depth,_MaxDistance,_MaxIterations,hitPosition,hitColor);if(hit){float3 normal=calcNormal(hitPosition);result=Shade(hitPosition,normal,hitColor);...}
距离场物体的反射思路就是对反射方向进行光线步进。
//反射
result=lerp(result,texCUBE(_SkyBox,reflectDir).rgb,_ReflectIntensity);
if(_ReflectBounces>0){Ray rRay=CreateRay(hitPosition+0.01*normal,reflectDir);hit=RayMarching(rRay,_MaxDistance,_MaxDistance*0.5,_MaxIterations/2,hitPosition,hitColor);if(hit){normal=calcNormal(hitPosition);reflectDir=reflect(ray.direction,normal);//第一次的反射结果result+=Shade(hitPosition,normal,hitColor)*0.5f*_ReflectIntensity;if(_ReflectBounces>1){rRay=CreateRay(hitPosition+0.01*normal,reflectDir);hit=RayMarching(rRay,_MaxDistance,_MaxDistance*0.25,_MaxIterations/4,hitPosition,hitColor);if(hit){normal=calcNormal(hitPosition);reflectDir=reflect(ray.direction,normal);//第二次的反射结果result+=Shade(hitPosition,normal,hitColor)*0.25f*_ReflectIntensity;}}}
}
画圈部分就是绿色球对黄色球的反射
参考内容:
https://www.youtube.com/watch?v=oPnft4z9iJs&list=PL3POsQzaCw53iK_EhOYR39h1J9Lvg-m-g(推荐看这个系列的视频)
https://www.gamasutra.com/blogs/DavidArppe/20170405/295240/How_to_get_Stunning_Graphics_with_Raymarching_in_Games.php
http://9bitscience.blogspot.com/2013/07/raymarching-distance-fields_14.html
这篇关于在Unity里使用光线步进(Raymarching)的文章就介绍到这儿,希望我们推荐的文章对编程师们有所帮助!


