本文主要是介绍kubernetes集群编排——k8s存储(volumes,持久卷,statefulset控制器),希望对大家解决编程问题提供一定的参考价值,需要的开发者们随着小编来一起学习吧!
volumes
emptyDir卷
vim emptydir.yamlapiVersion: v1
kind: Pod
metadata:name: vol1
spec:containers:- image: busyboxplusname: vm1command: ["sleep", "300"]volumeMounts:- mountPath: /cachename: cache-volume- name: vm2image: nginxvolumeMounts:- mountPath: /usr/share/nginx/htmlname: cache-volumevolumes:- name: cache-volumeemptyDir:medium: MemorysizeLimit: 100Mikubectl apply -f emptydir.yamlkubectl get pod
kubectl exec vol1 -c vm1 -it -- sh/ # cd /cache/
/cache # curl localhost
/cache # echo www.westos.org > index.html
/cache # curl localhost
/cache # dd if=/dev/zero of=bigfile bs=1M count=200
/cache # du -h bigfile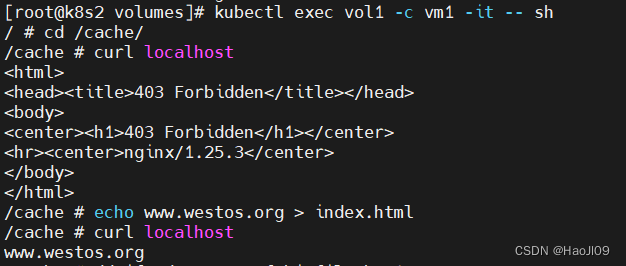

hostpath卷
vim hostpath.yamlapiVersion: v1
kind: Pod
metadata:name: vol2
spec:nodeName: k8s4containers:- image: nginxname: test-containervolumeMounts:- mountPath: /usr/share/nginx/htmlname: test-volumevolumes:- name: test-volumehostPath:path: /datatype: DirectoryOrCreatekubectl apply -f hostpath.yamlkubectl get pod -o wide
[root@k8s4 data]# echo www.westos.org > index.htmlcurl 10.244.106.152nfs卷
配置nfsserver
[root@k8s1 ~]# yum install -y nfs-utils
[root@k8s1 ~]# vim /etc/exports
/nfsdata        *(rw,sync,no_root_squash)[root@k8s1 ~]# mkdir -m 777 /nfsdata
[root@k8s1 ~]# systemctl  enable --now nfs
[root@k8s1 ~]# showmount -e
vim nfs.yamlapiVersion: v1
kind: Pod
metadata:name: nfs
spec:containers:- image: nginxname: test-containervolumeMounts:- mountPath: /usr/share/nginx/htmlname: test-volumevolumes:- name: test-volumenfs:server: 192.168.92.11path: /nfsdata
需要在所有k8s节点上安装nfs-utils软件包
yum install -y nfs-utils没有安装会有以下错误

kubectl apply -f nfs.yamlkubectl get pod -o wide
在nfsserver端创建测试页
[root@k8s1 ~]# cd /nfsdata/[root@k8s1 nfsdata]# echo www.westos.org > index.html

[root@k8s2 volumes]# curl 10.244.106.153
持久卷
配置nfs输出目录
[root@k8s1 ~]# cd /nfsdata/
[root@k8s1 nfsdata]# mkdir pv1 pv2 pv3
创建静态pv
vim pv.yamlapiVersion: v1
kind: PersistentVolume
metadata:name: pv1
spec:capacity:storage: 5GivolumeMode: FilesystemaccessModes:- ReadWriteOncepersistentVolumeReclaimPolicy: RecyclestorageClassName: nfsnfs:path: /nfsdata/pv1server: 192.168.92.11---
apiVersion: v1
kind: PersistentVolume
metadata:name: pv2
spec:capacity:storage: 10GivolumeMode: FilesystemaccessModes:- ReadWriteManypersistentVolumeReclaimPolicy: DeletestorageClassName: nfsnfs:path: /nfsdata/pv2server: 192.168.92.11---
apiVersion: v1
kind: PersistentVolume
metadata:name: pv3
spec:capacity:storage: 15GivolumeMode: FilesystemaccessModes:- ReadOnlyManypersistentVolumeReclaimPolicy: RetainstorageClassName: nfsnfs:path: /nfsdata/pv3server: 192.168.92.11
kubectl apply -f pv.yamlkubectl get pv
创建pvc
vim pvc.yamlapiVersion: v1
kind: PersistentVolumeClaim
metadata:name: pvc1
spec:storageClassName: nfsaccessModes:- ReadWriteOnceresources:requests:storage: 1Gi---
apiVersion: v1
kind: PersistentVolumeClaim
metadata:name: pvc2
spec:storageClassName: nfsaccessModes:- ReadWriteManyresources:requests:storage: 10Gi---
apiVersion: v1
kind: PersistentVolumeClaim
metadata:name: pvc3
spec:storageClassName: nfsaccessModes:- ReadOnlyManyresources:requests:storage: 15Gi
kubectl apply -f pvc.yamlkubectl get pvckubectl get pv

创建pod
vim pod.yamlapiVersion: v1
kind: Pod
metadata:name: test-pod1
spec:containers:- image: nginxname: nginxvolumeMounts:- mountPath: /usr/share/nginx/htmlname: vol1volumes:- name: vol1persistentVolumeClaim:claimName: pvc1---
apiVersion: v1
kind: Pod
metadata:name: test-pod2
spec:containers:- image: nginxname: nginxvolumeMounts:- mountPath: /usr/share/nginx/htmlname: vol1volumes:- name: vol1persistentVolumeClaim:claimName: pvc2---
apiVersion: v1
kind: Pod
metadata:name: test-pod3
spec:containers:- image: nginxname: nginxvolumeMounts:- mountPath: /usr/share/nginx/htmlname: vol1volumes:- name: vol1persistentVolumeClaim:claimName: pvc3kubectl apply -f pod.yamlkubectl get pod -o wide
在nfs输出目录中创建测试页
echo pv1 > pv1/index.html
echo pv2 > pv2/index.html
echo pv3 > pv3/index.html
[root@k8s2 pv]# curl 10.244.106.154[root@k8s2 pv]# curl 10.244.106.155[root@k8s2 pv]# curl 10.244.106.156
回收资源,需要按顺序回收: pod -> pvc -> pv
kubectl delete -f pod.ymlkubectl delete -f pvc.yml回收pvc后,pv会被回收再利用
kubectl get pv
pv的回收需要拉取镜像,提前在node节点导入镜像
containerd 导入镜像
[root@k8s3 ~]# ctr -n=k8s.io image import debian-base.tar[root@k8s4 ~]# ctr -n=k8s.io image import debian-base.tar回收
kubectl delete -f pv.yamlstorageclass
官网: GitHub - kubernetes-sigs/nfs-subdir-external-provisioner: Dynamic sub-dir volume provisioner on a remote NFS server.
上传镜像
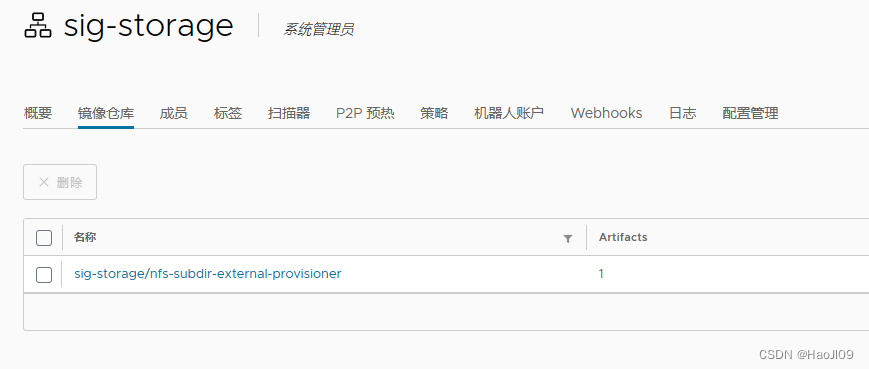
创建sa并授权
[root@k8s2 storageclass]# vim nfs-client.yamlapiVersion: v1
kind: Namespace
metadata:labels:kubernetes.io/metadata.name: nfs-client-provisionername: nfs-client-provisioner
---
apiVersion: v1
kind: ServiceAccount
metadata:name: nfs-client-provisionernamespace: nfs-client-provisioner
---
kind: ClusterRole
apiVersion: rbac.authorization.k8s.io/v1
metadata:name: nfs-client-provisioner-runner
rules:- apiGroups: [""]resources: ["nodes"]verbs: ["get", "list", "watch"]- apiGroups: [""]resources: ["persistentvolumes"]verbs: ["get", "list", "watch", "create", "delete"]- apiGroups: [""]resources: ["persistentvolumeclaims"]verbs: ["get", "list", "watch", "update"]- apiGroups: ["storage.k8s.io"]resources: ["storageclasses"]verbs: ["get", "list", "watch"]- apiGroups: [""]resources: ["events"]verbs: ["create", "update", "patch"]
---
kind: ClusterRoleBinding
apiVersion: rbac.authorization.k8s.io/v1
metadata:name: run-nfs-client-provisioner
subjects:- kind: ServiceAccountname: nfs-client-provisionernamespace: nfs-client-provisioner
roleRef:kind: ClusterRolename: nfs-client-provisioner-runnerapiGroup: rbac.authorization.k8s.io
---
kind: Role
apiVersion: rbac.authorization.k8s.io/v1
metadata:name: leader-locking-nfs-client-provisionernamespace: nfs-client-provisioner
rules:- apiGroups: [""]resources: ["endpoints"]verbs: ["get", "list", "watch", "create", "update", "patch"]
---
kind: RoleBinding
apiVersion: rbac.authorization.k8s.io/v1
metadata:name: leader-locking-nfs-client-provisionernamespace: nfs-client-provisioner
subjects:- kind: ServiceAccountname: nfs-client-provisionernamespace: nfs-client-provisioner
roleRef:kind: Rolename: leader-locking-nfs-client-provisionerapiGroup: rbac.authorization.k8s.io---
apiVersion: apps/v1
kind: Deployment
metadata:name: nfs-client-provisionerlabels:app: nfs-client-provisionernamespace: nfs-client-provisioner
spec:replicas: 1strategy:type: Recreateselector:matchLabels:app: nfs-client-provisionertemplate:metadata:labels:app: nfs-client-provisionerspec:serviceAccountName: nfs-client-provisionercontainers:- name: nfs-client-provisionerimage: sig-storage/nfs-subdir-external-provisioner:v4.0.2volumeMounts:- name: nfs-client-rootmountPath: /persistentvolumesenv:- name: PROVISIONER_NAMEvalue: k8s-sigs.io/nfs-subdir-external-provisioner- name: NFS_SERVERvalue: 192.168.92.11- name: NFS_PATHvalue: /nfsdatavolumes:- name: nfs-client-rootnfs:server: 192.168.92.11path: /nfsdata
---
apiVersion: storage.k8s.io/v1
kind: StorageClass
metadata:name: nfs-clientannotations:storageclass.kubernetes.io/is-default-class: "true"
provisioner: k8s-sigs.io/nfs-subdir-external-provisioner
parameters:archiveOnDelete: "false"
kubectl apply -f nfs-client.yamlkubectl -n nfs-client-provisioner get podkubectl get sc

创建pvc
vim pvc.yamlkind: PersistentVolumeClaim
apiVersion: v1
metadata:name: test-claim
spec:storageClassName: nfs-clientaccessModes:- ReadWriteManyresources:requests:storage: 1Gikubectl apply -f pvc.yamlkubectl get pvc
创建pod
vim pod.yamlkind: Pod
apiVersion: v1
metadata:name: test-pod
spec:containers:- name: test-podimage: busyboxcommand:- "/bin/sh"args:- "-c"- "touch /mnt/SUCCESS && exit 0 || exit 1"volumeMounts:- name: nfs-pvcmountPath: "/mnt"restartPolicy: "Never"volumes:- name: nfs-pvcpersistentVolumeClaim:claimName: test-claimkubectl apply -f pod.yamlpod会在pv中创建一个文件

回收
kubectl delete -f pod.yamlkubectl delete -f pvc.yaml设置默认存储类,这样在创建pvc时可以不用指定storageClassName
kubectl patch storageclass nfs-client -p '{"metadata": {"annotations":{"storageclass.kubernetes.io/is-default-class":"true"}}}'kubectl get scstatefulset控制器
vim headless.yamlapiVersion: v1
kind: Service
metadata:name: nginx-svclabels:app: nginx
spec:ports:- port: 80name: webclusterIP: Noneselector:app: nginxkubectl apply -f headless.yamlkubectl get svc
vim statefulset.yamlapiVersion: apps/v1
kind: StatefulSet
metadata:name: web
spec:serviceName: "nginx-svc"replicas: 3selector:matchLabels:app: nginxtemplate:metadata:labels:app: nginxspec:containers:- name: nginximage: nginxvolumeMounts:- name: wwwmountPath: /usr/share/nginx/htmlvolumeClaimTemplates:- metadata:name: wwwspec:storageClassName: nfs-clientaccessModes:- ReadWriteOnceresources:requests:storage: 1Gikubectl apply -f statefulset.yamlkubectl get pod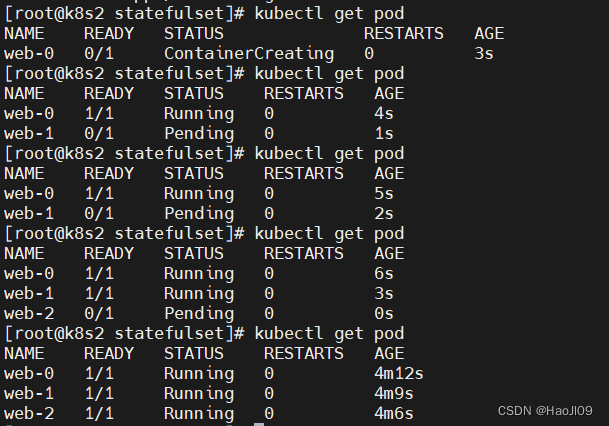
在nfs输出目录创建测试页

echo web-0 > default-www-web-0-pvc-8661e761-2aa9-4514-9a37-45be34af3196/index.html
echo web-1 > default-www-web-1-pvc-79b4afc4-c159-409f-8757-35635befa584/index.html
echo web-2 > default-www-web-2-pvc-ee2ae058-a2d9-4f94-b55c-d69ef2f3c0b6/index.html
kubectl run demo --image busyboxplus -it/ # curl web-0.nginx-svc/ # curl web-1.nginx-svc/ # curl web-2.nginx-svc

statefulset有序回收
kubectl scale statefulsets web --replicas=0kubectl delete -f statefulset.yamlkubectl delete pvc --all
mysql主从部署
官网:https://v1-25.docs.kubernetes.io/zh-cn/docs/tasks/run-application/run-replicated-stateful-application/
上传镜像
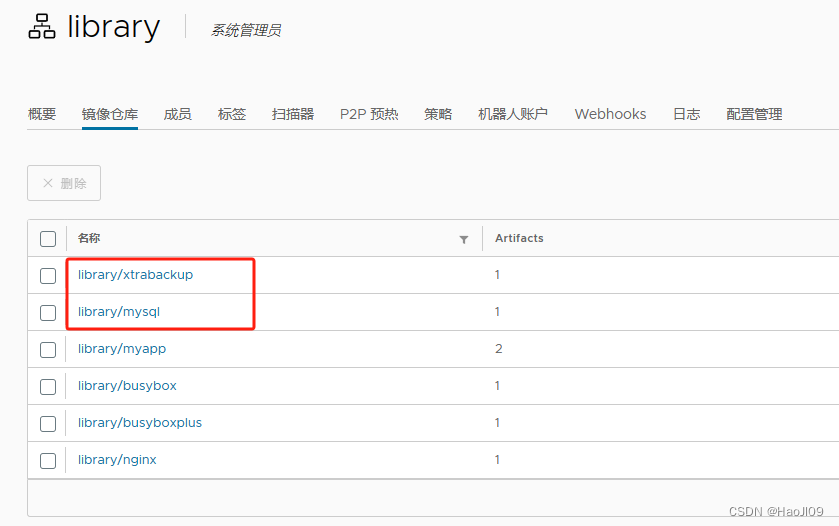
vim configmap.yamlapiVersion: v1
kind: ConfigMap
metadata:name: mysqllabels:app: mysqlapp.kubernetes.io/name: mysql
data:primary.cnf: |[mysqld]log-binreplica.cnf: |[mysqld]super-read-onlykubectl apply -f configmap.yamlkubectl get cm
vim svc.yamlapiVersion: v1
kind: Service
metadata:name: mysqllabels:app: mysqlapp.kubernetes.io/name: mysql
spec:ports:- name: mysqlport: 3306clusterIP: Noneselector:app: mysql
---
apiVersion: v1
kind: Service
metadata:name: mysql-readlabels:app: mysqlapp.kubernetes.io/name: mysqlreadonly: "true"
spec:ports:- name: mysqlport: 3306selector:app: mysqlkubectl apply -f svc.yamlkubectl get svc
vim statefulset.yamlapiVersion: apps/v1
kind: StatefulSet
metadata:name: mysql
spec:selector:matchLabels:app: mysqlapp.kubernetes.io/name: mysqlserviceName: mysqlreplicas: 3template:metadata:labels:app: mysqlapp.kubernetes.io/name: mysqlspec:initContainers:- name: init-mysqlimage: mysql:5.7command:- bash- "-c"- |set -ex# 基于 Pod 序号生成 MySQL 服务器的 ID。[[ $HOSTNAME =~ -([0-9]+)$ ]] || exit 1ordinal=${BASH_REMATCH[1]}echo [mysqld] > /mnt/conf.d/server-id.cnf# 添加偏移量以避免使用 server-id=0 这一保留值。echo server-id=$((100 + $ordinal)) >> /mnt/conf.d/server-id.cnf# 将合适的 conf.d 文件从 config-map 复制到 emptyDir。if [[ $ordinal -eq 0 ]]; thencp /mnt/config-map/primary.cnf /mnt/conf.d/elsecp /mnt/config-map/replica.cnf /mnt/conf.d/fivolumeMounts:- name: confmountPath: /mnt/conf.d- name: config-mapmountPath: /mnt/config-map- name: clone-mysqlimage: xtrabackup:1.0command:- bash- "-c"- |set -ex# 如果已有数据,则跳过克隆。[[ -d /var/lib/mysql/mysql ]] && exit 0# 跳过主实例(序号索引 0)的克隆。[[ `hostname` =~ -([0-9]+)$ ]] || exit 1ordinal=${BASH_REMATCH[1]}[[ $ordinal -eq 0 ]] && exit 0# 从原来的对等节点克隆数据。ncat --recv-only mysql-$(($ordinal-1)).mysql 3307 | xbstream -x -C /var/lib/mysql# 准备备份。xtrabackup --prepare --target-dir=/var/lib/mysqlvolumeMounts:- name: datamountPath: /var/lib/mysqlsubPath: mysql- name: confmountPath: /etc/mysql/conf.dcontainers:- name: mysqlimage: mysql:5.7env:- name: MYSQL_ALLOW_EMPTY_PASSWORDvalue: "1"ports:- name: mysqlcontainerPort: 3306volumeMounts:- name: datamountPath: /var/lib/mysqlsubPath: mysql- name: confmountPath: /etc/mysql/conf.dresources:requests:cpu: 500mmemory: 512MilivenessProbe:exec:command: ["mysqladmin", "ping"]initialDelaySeconds: 30periodSeconds: 10timeoutSeconds: 5readinessProbe:exec:# 检查我们是否可以通过 TCP 执行查询(skip-networking 是关闭的)。command: ["mysql", "-h", "127.0.0.1", "-e", "SELECT 1"]initialDelaySeconds: 5periodSeconds: 2timeoutSeconds: 1- name: xtrabackupimage: xtrabackup:1.0ports:- name: xtrabackupcontainerPort: 3307command:- bash- "-c"- |set -excd /var/lib/mysql# 确定克隆数据的 binlog 位置(如果有的话)。if [[ -f xtrabackup_slave_info && "x$(<xtrabackup_slave_info)" != "x" ]]; then# XtraBackup 已经生成了部分的 “CHANGE MASTER TO” 查询# 因为我们从一个现有副本进行克隆。(需要删除末尾的分号!)cat xtrabackup_slave_info | sed -E 's/;$//g' > change_master_to.sql.in# 在这里要忽略 xtrabackup_binlog_info (它是没用的)。rm -f xtrabackup_slave_info xtrabackup_binlog_infoelif [[ -f xtrabackup_binlog_info ]]; then# 我们直接从主实例进行克隆。解析 binlog 位置。[[ `cat xtrabackup_binlog_info` =~ ^(.*?)[[:space:]]+(.*?)$ ]] || exit 1rm -f xtrabackup_binlog_info xtrabackup_slave_infoecho "CHANGE MASTER TO MASTER_LOG_FILE='${BASH_REMATCH[1]}',\MASTER_LOG_POS=${BASH_REMATCH[2]}" > change_master_to.sql.infi# 检查我们是否需要通过启动复制来完成克隆。if [[ -f change_master_to.sql.in ]]; thenecho "Waiting for mysqld to be ready (accepting connections)"until mysql -h 127.0.0.1 -e "SELECT 1"; do sleep 1; doneecho "Initializing replication from clone position"mysql -h 127.0.0.1 \-e "$(<change_master_to.sql.in), \MASTER_HOST='mysql-0.mysql', \MASTER_USER='root', \MASTER_PASSWORD='', \MASTER_CONNECT_RETRY=10; \START SLAVE;" || exit 1# 如果容器重新启动,最多尝试一次。mv change_master_to.sql.in change_master_to.sql.origfi# 当对等点请求时,启动服务器发送备份。exec ncat --listen --keep-open --send-only --max-conns=1 3307 -c \"xtrabackup --backup --slave-info --stream=xbstream --host=127.0.0.1 --user=root"volumeMounts:- name: datamountPath: /var/lib/mysqlsubPath: mysql- name: confmountPath: /etc/mysql/conf.dresources:requests:cpu: 100mmemory: 100Mivolumes:- name: confemptyDir: {}- name: config-mapconfigMap:name: mysqlvolumeClaimTemplates:- metadata:name: dataspec:accessModes: ["ReadWriteOnce"]resources:requests:storage: 10Gi
kubectl apply -f statefulset.yamlkubectl get pod
连接测试
kubectl run demo --image mysql:5.7 -it -- bashroot@demo:/# mysql -h mysql-0.mysqlmysql> show databases;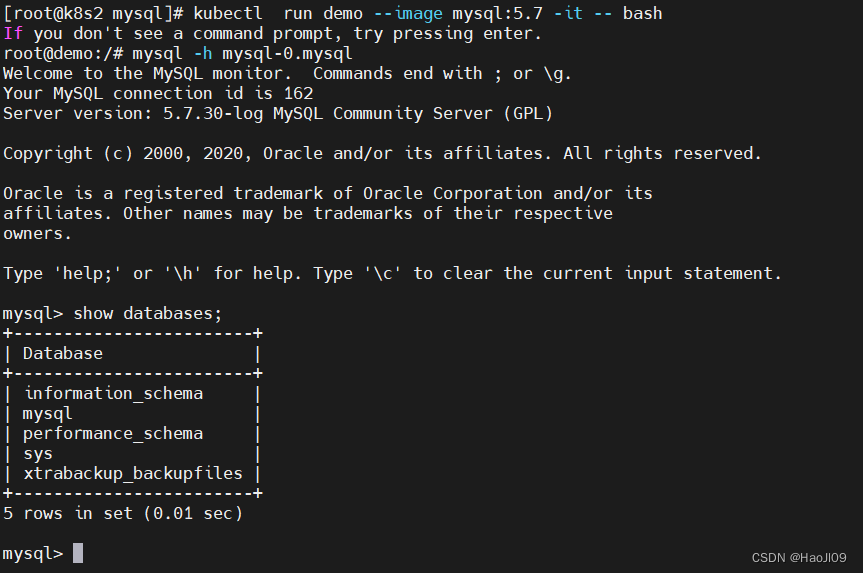
回收
kubectl delete -f statefulset.yaml
kubectl delete pvc --all
这篇关于kubernetes集群编排——k8s存储(volumes,持久卷,statefulset控制器)的文章就介绍到这儿,希望我们推荐的文章对编程师们有所帮助!


