本文主要是介绍基于Unity ARFoundation的传送门项目 - Augmented Reality Portal based on ARFoundation in Unity,希望对大家解决编程问题提供一定的参考价值,需要的开发者们随着小编来一起学习吧!
- ① 窗 Window
- 1. Unity组件 Components
- 2. 着色器 Shaders
- 1.DepthMask.shader
- ② 门 Door
- 1.组件 Components
- 1.AR Camera
- 2.InnerWorld
- 3.Door
- 4. 具有动画的门 Animated Door
- 5.里世界的天空 SkySphere
- 2. 着色器 Shaders
- 1.StencilMask.shader
- 2.StencilSpecular.shader
- 3.StencilMetallic.shader
- 4.Sky.shader
- 3. 脚本 Scripts
- 1.PortalManger.cs
- 2.PlaceOnPlaneOnce.cs
- ③ 更近一步 Go a step further
This page was last modified on 30 January 2020, I have adjusted the early method “window”, and a better soluation “Door” has been added which is recommended to read.
该页面的最新修改时间为2020年2月4日,新增门动画,调整最初方法“Window”,新增实现方法“Door”,推荐跳至“② Door"处。
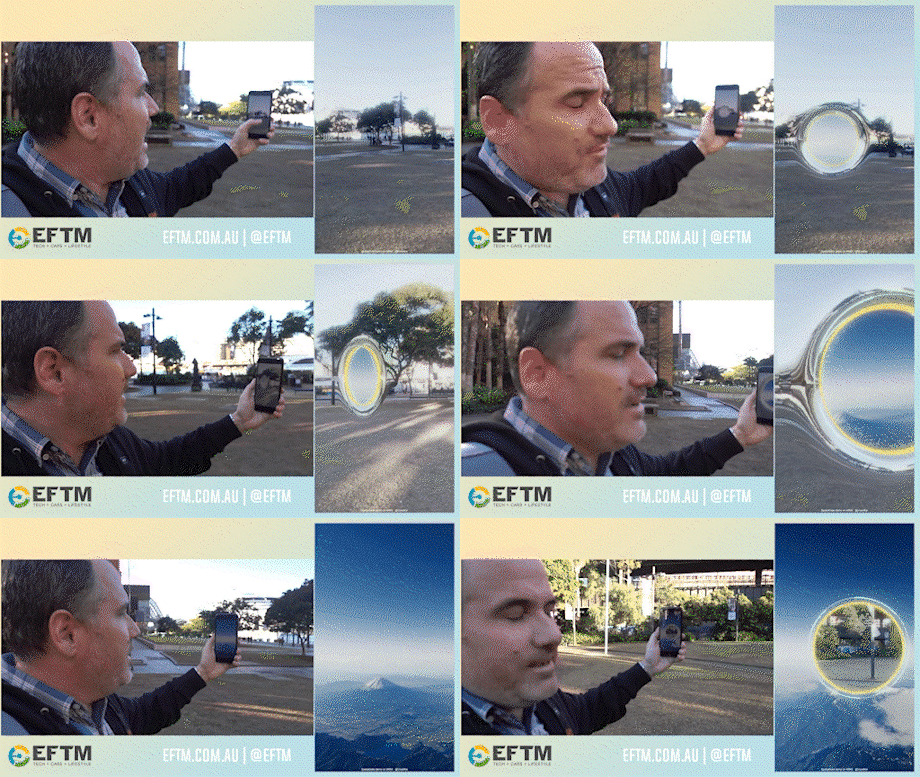
There is an ARKit demonstration named Portal created by Japanese developer Kei Wakizuka. By touching screen, the portal will appear in the real space in the screen with correct perspective and space distortion effect. Through the portal, there is a digital world, but is an immersive one because the audience can also enter the world, and the real world will be behind the portal.
2017年,一个名为Portal的ARKit演示,由日本开发者Kei Wakizuka发布。通过触摸屏幕,传送门将出现在屏幕中的真实空间中,具有正确的透视和空间失真效果。通过传送门,有一个数字世界,这是一个身临其境的世界,因为观众也可以进入世界,而现实世界将在传送门后面。
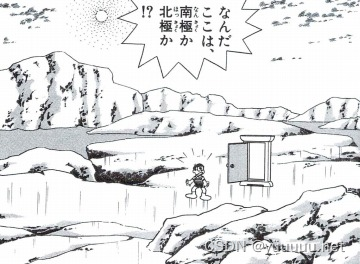
Now there is a variety of similar projects, and most of them are named as Dokodemo Door which is a magical tool in the Japanese manga Doraemon. In the manga, by the Dokodemo Door, Doraemon and his friends can go to anywhere.
现在有各种各样的类似项目,其中大多数被命名为传送门,这是日本漫画《哆啦A梦》中的神奇工具。在漫画中,通过传送门,哆啦A梦和他的朋友们可以去任何地方。
Most Dokodemo Door projects are based on SLAM technology, for example, ARKit, the reason is if the audience use Image-Recognization-based AR technology, it is not so easy to enter into the digital world because the audience has to hold the device aiming on the image which will be a terrible experience. But I will keep my experience on both technology, there must be more than one possibility as Dokodemo Door.
大多数Dokodemo Door项目都是基于SLAM技术的,例如ARKit,原因是如果观众使用基于图像识别的AR技术,进入数字世界并不容易,因为观众必须拿着设备瞄准图像,这将是一种可怕的体验。但是我会保留我在这两种技术上的经验,作为Dokodemo门,必须有不止一种可能性。
① 窗 Window
※ Now referencing https://www.youtube.com/watch?v=cHhxs12ZfSQ to upgrade this part.
My first try is using DepthMask shader. The idea is “a mask object using the Depth Mask shader. This object will be drawn just after regular opaque objects, and will prevent subsequent objects from being drawn behind it.”
我的第一次尝试是使用DepthMask着色器。这个想法是“使用深度蒙版着色器的蒙版对象。该对象将在常规不透明对象之后绘制,并将防止后续对象在其后面绘制。
You can get Unity example project here in Github (In this project I also attached a Post-processing function according to this tutorial)Updated in 2020.1
你可以在Github中获取Unity示例项目 (在这个项目中,我还根据本教程附加了一个后处理函数)于2020年1月最后更新

1. Unity组件 Components
It’s a tutorial for AR Portal, so please make sure you have set up an AR environment in Unity first, including installed ARFoundation, ARKit (or ARCore) in Package Manager, and have created AR Camera in the scene, and make sure you know how to use image tracking function.
这是增强现实的传送门的教程,因此请确保您已首先在Unity中设置了AR开发环境,包括在包管理器中安装了ARFoundation,ARKit(或ARCore),并在场景中创建了AR摄像机,并确保您知道如何使用图像跟踪功能。
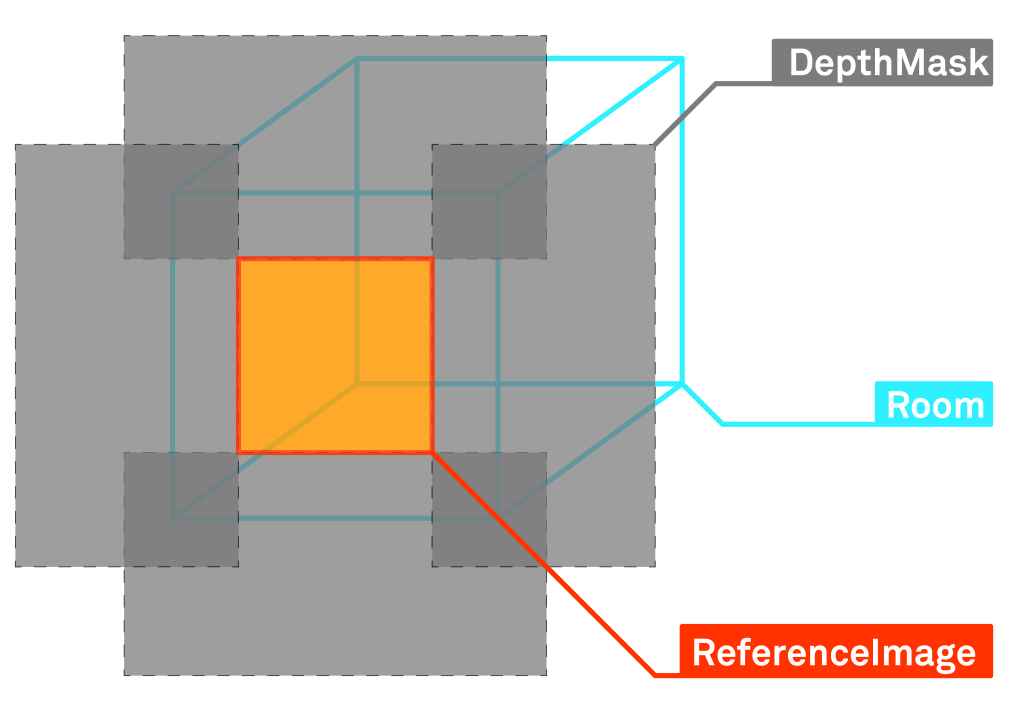
- 创建一个物理大小的游戏对象“plane”(提示:默认plane的大小为 10 米)并将其命名为“参考图像”。Create a physical-size gameobject “plane” (Tips: the size of a default plane is 10 meter) and name it as “ReferenceImage” ;
- 将带有参考图像的材质作为“参考图像”的纹理。Apply the material with your reference image as the texture for the base color on the ReferenceImage;
- 根据 ReferenceImage,创建4个名为“DepthMask”的游戏对象“平面”,并使用“DepthMask.shader”在其上应用材质。According to ReferenceImage, create 4 gameobjects “plane” named “DepthMask” and apply the material using “DepthMask.shader” on them;
- 创建房间,并将其移动到Depth Mask后面。Create your room, and move it behind the DepthMask.
2. 着色器 Shaders
1.DepthMask.shader
Shader "Custom/DepthMask" {SubShader {// Render the mask after regular geometry, //but before masked geometry and// transparent things.Tags {"Queue" = "Geometry-10" }// Don't draw in the RGBA channels; just the depth bufferColorMask 0ZWrite On// Do nothing specific in the pass:Pass {}}}
② 门 Door
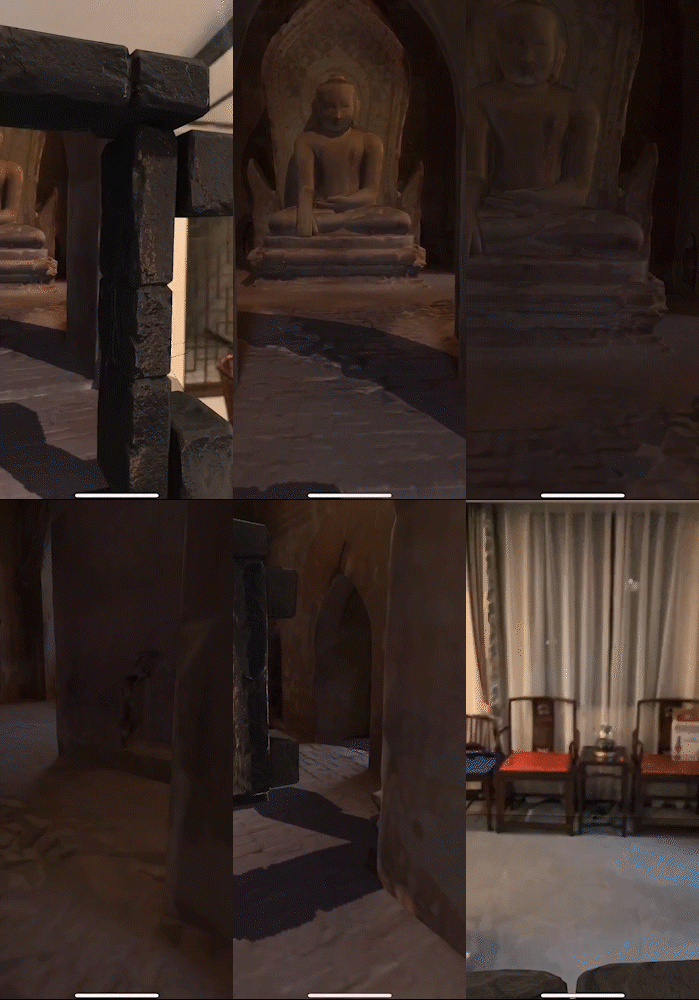
You can get Unity example project here in Github. Updated in 2020.1
你可以在Github中获取Unity 示例项目。2020.1 中更新
I learnt from these two tutorials:
以下两个教程帮助到我理解以上概念:
Guidev’s AR Portal Tutorial with Unity
Pirates Just AR’s How To Unity AR Portal
1.组件 Components
It’s a tutorial for AR Portal, so please make sure you have set up an AR environment in Unity first, including installed ARFoundation, ARKit (or ARCore) in Package Manager, and have created AR Camera in the scene.
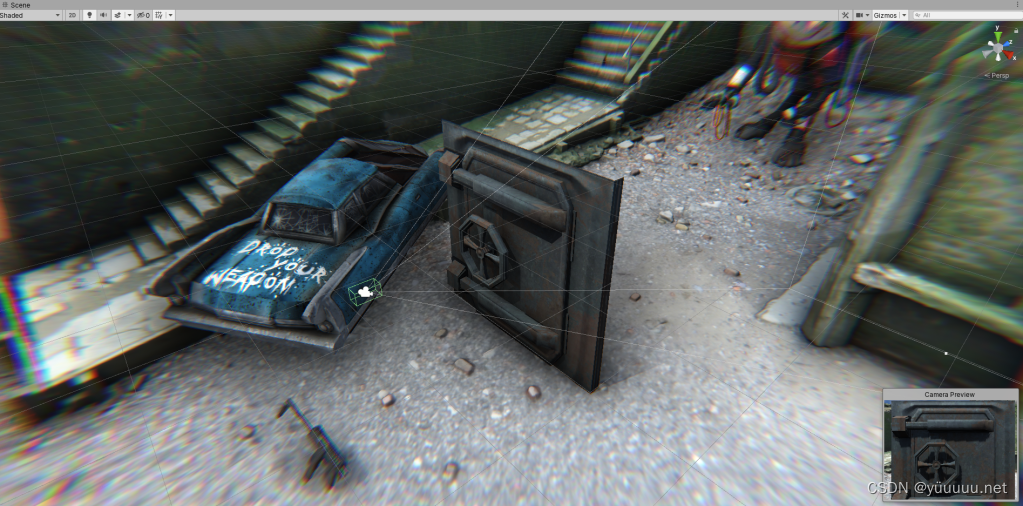
In the SampleScene, you might understand and check how it works.
在 SampleScene 中,您可以了解并检查它是如何工作的。
1.AR Camera

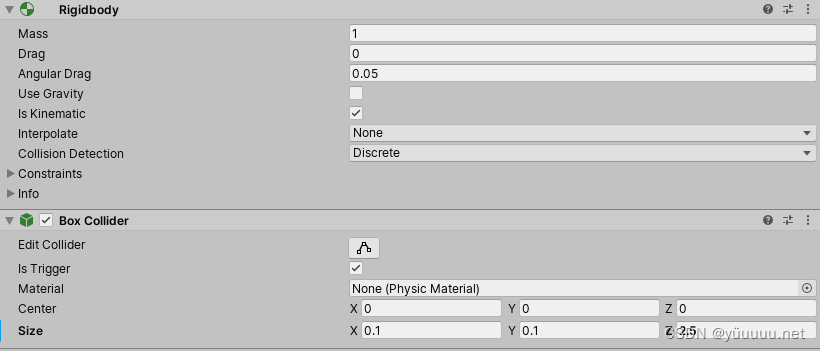
- 将组件“Rigidbody”和“Box Collider”添加到AR Camera。Add Component “Rigidbody” and “Box Collider” to AR Camera
- 取消选中“Use Gravity”,并在“Rigidbody”中选中“Is Kinematic”。Uncheck “Use Gravity” and check “Is Kinematic” in “Rigidbody”
- 选中“Box Collider”中的“Is trigger”。Check “Is trigger” in “Box Collider”
- 将“Box Collider”的大小设置为 x 0.1、y 0.1、z 2.5。Set “Box Collider”'s size to x 0.1, y 0.1, z 2.5
2.InnerWorld
- 像往常一样创建空对象。Create empty as usual
- 确保在InnerWorld中的任何游戏对象中使用的材质(天空或其他特殊对象除外)应使用着色器“SpecularStencilFilter.shader”,该着色器可在下面找到。Make sure the materials using in any gameobject in InnerWorld except Sky or other special objects, should use the shader “SpecularStencilFilter.shader” which can be found below.
※ If you do need the materials separate just go inside the importer settings of the object go the the materials tab and use under location “Use External Materials (Legacy)”
※如果需要使用对象上的现成材质,只需进入对象的导入器设置,转到材料选项卡并在“Use External Materials (Legacy)”位置下实现转换


3.Door

- 门的框架可以使用任何材料,但材质使用着色器“SpecularStencilFilter.shader”或“PortalDoor.shader”,您可以在下面找到。The frame of the door can use any materal but the materials using shader “SpecularStencilFilter.shader” or “PortalDoor.shader” which you can find below
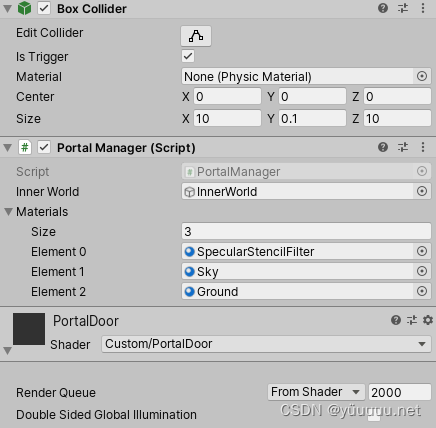
- 创建游戏对象平面或四面,并将其重命名为“Portal”。Create a gameobject Plane or Quad and rename it as “Portal”
- 在门户上添加组件“Box Collider”并调整大小。Add component “Box Collider” on Portal and adjust the size
- 选择Portal>Box Collider>Is Trigger。Select Portal>Box Collider>Is Trigger
- 添加组件“PortalManager”,可以在下面找到。Add component “PortalManager” which can be found below
- 将“InnerWorld”拖入Portal>PortalManager>Inner World。Drag “InnerWorld” into Portal>PortalManager>Inner World
- 调整Portal>PortalManager>Materials,并拖动“InnerWorld”中使用的每种材质到 Materials列表中。Adjust Portal>PortalManager>Materials, and drag every materials using in the “InnerWorld” into Materials list
- 将Portal材质的着色器调整为“PortalDoor.shader”。Add the material using Shader “PortalDoor.shader” on Portal
4. 具有动画的门 Animated Door
The door has an animator with animations, and the button on canvas is used for controlling the door, with a script names DoorController.cs to trigger the animations.
门有一个带 animation 的 animator 组件,界面上的按钮用于控制门,门上有一个脚本名为 DoorController.cs 来触发动画。
The method won’t be discussed here, since it’s not necessary for Portal, for further information, you can check this tutorial which I will recommended.
该方法不会在这里讨论,因为它对传送门不是必需的,有关更多信息,您可以查看我将推荐的教程。
5.里世界的天空 SkySphere
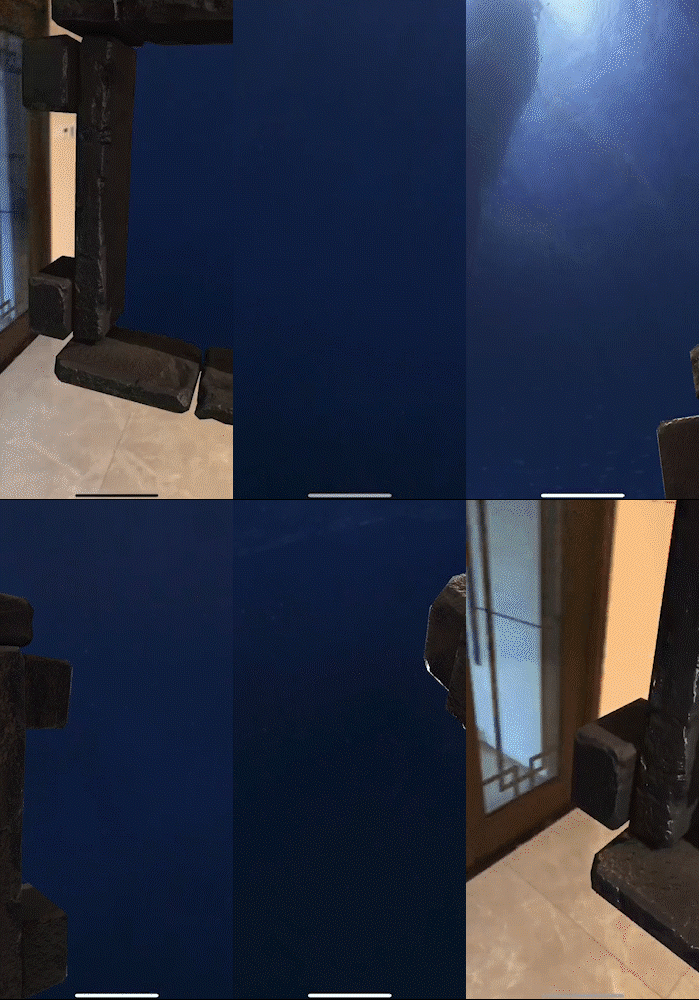
- 创建游戏对象“sphere”并重命名“SkySphere”。Create gameobject “sphere” and rename “SkySphere”
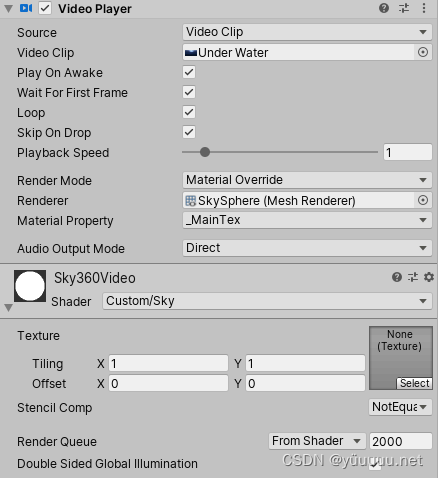
- 在SkySphere上添加组件“Video Player”,并将您的360度视频(可以在Vimeo中轻松找到)拖到SkySphere>Video Player>Video Clip中。Add component “Video Player” on SkySphere, and drag your 360 video (which can be easily found in Vimeo) into SkySphere>Video Player>Video Clip
- 在SkySphere的材质上使用着色器“Custom/Sky”。Add the material using Shader “Custom/Sky” on SkySphere
- 确保材质的Stencil Comp选择了“NotEqual”。Make sure the Stencil Comp of the material has been chosen “NotEqual”
2. 着色器 Shaders
1.StencilMask.shader
// (c) 2020 Tongzhou YuShader "Custom/StencilMask"
{SubShader{Tags { "RenderType" = "Opaque" }LOD 100Zwrite OffColorMask 0Cull offPass{Stencil{Ref 1Comp alwaysPass replace}// To further understand Stencil, check the link (EN):// https://docs.unity3d.com/Manual/SL-Stencil.html// or (CN)// https://blog.csdn.net/linjf520/article/details/94867519 CGPROGRAM#pragma vertex vert#pragma fragment frag#include "UnityCG.cginc"struct appdata{float4 vertex : POSITION;};struct v2f{float4 vertex : SV_POSITION;};v2f vert(appdata v){v2f o;o.vertex = UnityObjectToClipPos(v.vertex);return o;}fixed4 frag(v2f i) : SV_Target{return fixed4(0.0, 0.0, 0.0, 0.0);}ENDCG}}
}
2.StencilSpecular.shader
modification based on Unity’s Built-in Shaders
基于 Unity 内置着色器的修改
// (c) 2020 Tongzhou YuShader "Custom/StencilSpecular"
{Properties{[Enum(CompareFunction)] _StencilComp("Stencil Comp", Int) = 3_Color("Color", Color) = (1,1,1,1)_MainTex("Albedo", 2D) = "white" {}_Cutoff("Alpha Cutoff", Range(0.0, 1.0)) = 0.5_Glossiness("Smoothness", Range(0.0, 1.0)) = 0.5_GlossMapScale("Smoothness Factor", Range(0.0, 1.0)) = 1.0[Enum(Specular Alpha,0,Albedo Alpha,1)] _SmoothnessTextureChannel("Smoothness texture channel", Float) = 0_SpecColor("Specular", Color) = (0.2,0.2,0.2)_SpecGlossMap("Specular", 2D) = "white" {}[ToggleOff] _SpecularHighlights("Specular Highlights", Float) = 1.0[ToggleOff] _GlossyReflections("Glossy Reflections", Float) = 1.0_BumpScale("Scale", Float) = 1.0[Normal] _BumpMap("Normal Map", 2D) = "bump" {}_Parallax("Height Scale", Range(0.005, 0.08)) = 0.02_ParallaxMap("Height Map", 2D) = "black" {}_OcclusionStrength("Strength", Range(0.0, 1.0)) = 1.0_OcclusionMap("Occlusion", 2D) = "white" {}_EmissionColor("Color", Color) = (0,0,0)_EmissionMap("Emission", 2D) = "white" {}_DetailMask("Detail Mask", 2D) = "white" {}_DetailAlbedoMap("Detail Albedo x2", 2D) = "grey" {}_DetailNormalMapScale("Scale", Float) = 1.0[Normal] _DetailNormalMap("Normal Map", 2D) = "bump" {}[Enum(UV0,0,UV1,1)] _UVSec("UV Set for secondary textures", Float) = 0// Blending state[HideInInspector] _Mode("__mode", Float) = 0.0[HideInInspector] _SrcBlend("__src", Float) = 1.0[HideInInspector] _DstBlend("__dst", Float) = 0.0[HideInInspector] _ZWrite("__zw", Float) = 1.0}CGINCLUDE
#define UNITY_SETUP_BRDF_INPUT SpecularSetupENDCGSubShader{Tags { "RenderType" = "Opaque" "PerformanceChecks" = "False" }LOD 300Stencil{Ref 1Comp[_StencilComp]}// ------------------------------------------------------------------//  Base forward pass (directional light, emission, lightmaps, ...)Pass{Name "FORWARD"Tags { "LightMode" = "ForwardBase" }Blend[_SrcBlend][_DstBlend]ZWrite[_ZWrite]CGPROGRAM#pragma target 3.0// -------------------------------------#pragma shader_feature _NORMALMAP#pragma shader_feature_local _ _ALPHATEST_ON _ALPHABLEND_ON _ALPHAPREMULTIPLY_ON#pragma shader_feature _EMISSION#pragma shader_feature_local _SPECGLOSSMAP#pragma shader_feature_local _DETAIL_MULX2#pragma shader_feature_local _SMOOTHNESS_TEXTURE_ALBEDO_CHANNEL_A#pragma shader_feature_local _SPECULARHIGHLIGHTS_OFF#pragma shader_feature_local _GLOSSYREFLECTIONS_OFF#pragma shader_feature_local _PARALLAXMAP#pragma multi_compile_fwdbase#pragma multi_compile_fog#pragma multi_compile_instancing// Uncomment the following line to enable dithering LOD crossfade. Note: there are more in the file to uncomment for other passes.//#pragma multi_compile _ LOD_FADE_CROSSFADE#pragma vertex vertBase#pragma fragment fragBase#include "UnityStandardCoreForward.cginc"ENDCG}// ------------------------------------------------------------------//  Additive forward pass (one light per pass)Pass{Name "FORWARD_DELTA"Tags { "LightMode" = "ForwardAdd" }Blend[_SrcBlend] OneFog { Color(0,0,0,0) } // in additive pass fog should be blackZWrite OffZTest LEqualCGPROGRAM#pragma target 3.0// -------------------------------------#pragma shader_feature _NORMALMAP#pragma shader_feature_local _ _ALPHATEST_ON _ALPHABLEND_ON _ALPHAPREMULTIPLY_ON#pragma shader_feature_local _SPECGLOSSMAP#pragma shader_feature_local _SMOOTHNESS_TEXTURE_ALBEDO_CHANNEL_A#pragma shader_feature_local _SPECULARHIGHLIGHTS_OFF#pragma shader_feature_local _DETAIL_MULX2#pragma shader_feature_local _PARALLAXMAP#pragma multi_compile_fwdadd_fullshadows#pragma multi_compile_fog// Uncomment the following line to enable dithering LOD crossfade. Note: there are more in the file to uncomment for other passes.//#pragma multi_compile _ LOD_FADE_CROSSFADE#pragma vertex vertAdd#pragma fragment fragAdd#include "UnityStandardCoreForward.cginc"ENDCG}// ------------------------------------------------------------------//  Shadow rendering passPass {Name "ShadowCaster"Tags { "LightMode" = "ShadowCaster" }ZWrite On ZTest LEqualCGPROGRAM#pragma target 3.0// -------------------------------------#pragma shader_feature_local _ _ALPHATEST_ON _ALPHABLEND_ON _ALPHAPREMULTIPLY_ON#pragma shader_feature_local _SPECGLOSSMAP#pragma shader_feature_local _SMOOTHNESS_TEXTURE_ALBEDO_CHANNEL_A#pragma shader_feature_local _PARALLAXMAP#pragma multi_compile_shadowcaster#pragma multi_compile_instancing// Uncomment the following line to enable dithering LOD crossfade. Note: there are more in the file to uncomment for other passes.//#pragma multi_compile _ LOD_FADE_CROSSFADE#pragma vertex vertShadowCaster#pragma fragment fragShadowCaster#include "UnityStandardShadow.cginc"ENDCG}// ------------------------------------------------------------------//  Deferred passPass{Name "DEFERRED"Tags { "LightMode" = "Deferred" }CGPROGRAM#pragma target 3.0#pragma exclude_renderers nomrt// -------------------------------------#pragma shader_feature _NORMALMAP#pragma shader_feature_local _ _ALPHATEST_ON _ALPHABLEND_ON _ALPHAPREMULTIPLY_ON#pragma shader_feature _EMISSION#pragma shader_feature_local _SPECGLOSSMAP#pragma shader_feature_local _SMOOTHNESS_TEXTURE_ALBEDO_CHANNEL_A#pragma shader_feature_local _SPECULARHIGHLIGHTS_OFF#pragma shader_feature_local _DETAIL_MULX2#pragma shader_feature_local _PARALLAXMAP#pragma multi_compile_prepassfinal#pragma multi_compile_instancing// Uncomment the following line to enable dithering LOD crossfade. Note: there are more in the file to uncomment for other passes.//#pragma multi_compile _ LOD_FADE_CROSSFADE#pragma vertex vertDeferred#pragma fragment fragDeferred#include "UnityStandardCore.cginc"ENDCG}// ------------------------------------------------------------------// Extracts information for lightmapping, GI (emission, albedo, ...)// This pass it not used during regular rendering.Pass{Name "META"Tags { "LightMode" = "Meta" }Cull OffCGPROGRAM#pragma vertex vert_meta#pragma fragment frag_meta#pragma shader_feature _EMISSION#pragma shader_feature_local _SPECGLOSSMAP#pragma shader_feature_local _SMOOTHNESS_TEXTURE_ALBEDO_CHANNEL_A#pragma shader_feature_local _DETAIL_MULX2#pragma shader_feature EDITOR_VISUALIZATION#include "UnityStandardMeta.cginc"ENDCG}}SubShader{Tags { "RenderType" = "Opaque" "PerformanceChecks" = "False" }LOD 150Stencil{Ref 1Comp[_StencilComp]}// ------------------------------------------------------------------//  Base forward pass (directional light, emission, lightmaps, ...)Pass{Name "FORWARD"Tags { "LightMode" = "ForwardBase" }Blend[_SrcBlend][_DstBlend]ZWrite[_ZWrite]CGPROGRAM#pragma target 2.0#pragma shader_feature _NORMALMAP#pragma shader_feature_local _ _ALPHATEST_ON _ALPHABLEND_ON _ALPHAPREMULTIPLY_ON#pragma shader_feature _EMISSION#pragma shader_feature_local _SPECGLOSSMAP#pragma shader_feature_local _SMOOTHNESS_TEXTURE_ALBEDO_CHANNEL_A#pragma shader_feature_local _SPECULARHIGHLIGHTS_OFF#pragma shader_feature_local _GLOSSYREFLECTIONS_OFF#pragma shader_feature_local _DETAIL_MULX2// SM2.0: NOT SUPPORTED shader_feature_local _PARALLAXMAP#pragma skip_variants SHADOWS_SOFT DYNAMICLIGHTMAP_ON DIRLIGHTMAP_COMBINED#pragma multi_compile_fwdbase#pragma multi_compile_fog#pragma vertex vertBase#pragma fragment fragBase#include "UnityStandardCoreForward.cginc"ENDCG}// ------------------------------------------------------------------//  Additive forward pass (one light per pass)Pass{Name "FORWARD_DELTA"Tags { "LightMode" = "ForwardAdd" }Blend[_SrcBlend] OneFog { Color(0,0,0,0) } // in additive pass fog should be blackZWrite OffZTest LEqualCGPROGRAM#pragma target 2.0#pragma shader_feature _NORMALMAP#pragma shader_feature_local _ _ALPHATEST_ON _ALPHABLEND_ON _ALPHAPREMULTIPLY_ON#pragma shader_feature_local _SPECGLOSSMAP#pragma shader_feature_local _SMOOTHNESS_TEXTURE_ALBEDO_CHANNEL_A#pragma shader_feature_local _SPECULARHIGHLIGHTS_OFF#pragma shader_feature_local _DETAIL_MULX2// SM2.0: NOT SUPPORTED shader_feature_local _PARALLAXMAP#pragma skip_variants SHADOWS_SOFT#pragma multi_compile_fwdadd_fullshadows#pragma multi_compile_fog#pragma vertex vertAdd#pragma fragment fragAdd#include "UnityStandardCoreForward.cginc"ENDCG}// ------------------------------------------------------------------//  Shadow rendering passPass {Name "ShadowCaster"Tags { "LightMode" = "ShadowCaster" }ZWrite On ZTest LEqualCGPROGRAM#pragma target 2.0#pragma shader_feature_local _ _ALPHATEST_ON _ALPHABLEND_ON _ALPHAPREMULTIPLY_ON#pragma shader_feature_local _SPECGLOSSMAP#pragma shader_feature_local _SMOOTHNESS_TEXTURE_ALBEDO_CHANNEL_A#pragma skip_variants SHADOWS_SOFT#pragma multi_compile_shadowcaster#pragma vertex vertShadowCaster#pragma fragment fragShadowCaster#include "UnityStandardShadow.cginc"ENDCG}// ------------------------------------------------------------------// Extracts information for lightmapping, GI (emission, albedo, ...)// This pass it not used during regular rendering.Pass{Name "META"Tags { "LightMode" = "Meta" }Cull OffCGPROGRAM#pragma vertex vert_meta#pragma fragment frag_meta#pragma shader_feature _EMISSION#pragma shader_feature_local _SPECGLOSSMAP#pragma shader_feature_local _SMOOTHNESS_TEXTURE_ALBEDO_CHANNEL_A#pragma shader_feature_local _DETAIL_MULX2#pragma shader_feature EDITOR_VISUALIZATION#include "UnityStandardMeta.cginc"ENDCG}}// FallBack "VertexLit"//CustomEditor "StandardShaderGUI"
}
3.StencilMetallic.shader
modification based on Unity’s Built-in Shaders
基于 Unity 内置着色器的修改
// (c) 2020 Tongzhou YuShader "Custom/StencilMetallic"
{Properties{[Enum(CompareFunction)] _StencilComp("Stencil Comp", Int) = 3_Color("Color", Color) = (1,1,1,1)_MainTex("Albedo", 2D) = "white" {}_Cutoff("Alpha Cutoff", Range(0.0, 1.0)) = 0.5_Glossiness("Smoothness", Range(0.0, 1.0)) = 0.5_GlossMapScale("Smoothness Factor", Range(0.0, 1.0)) = 1.0[Enum(Metallic Alpha,0,Albedo Alpha,1)] _SmoothnessTextureChannel("Smoothness texture channel", Float) = 0[Gamma] _Metallic("Metallic", Range(0.0, 1.0)) = 0.0_MetallicGlossMap("Metallic", 2D) = "white" {}[ToggleOff] _SpecularHighlights("Specular Highlights", Float) = 1.0[ToggleOff] _GlossyReflections("Glossy Reflections", Float) = 1.0_BumpScale("Scale", Float) = 1.0[Normal] _BumpMap("Normal Map", 2D) = "bump" {}_Parallax("Height Scale", Range(0.005, 0.08)) = 0.02_ParallaxMap("Height Map", 2D) = "black" {}_OcclusionStrength("Strength", Range(0.0, 1.0)) = 1.0_OcclusionMap("Occlusion", 2D) = "white" {}_EmissionColor("Color", Color) = (0,0,0)_EmissionMap("Emission", 2D) = "white" {}_DetailMask("Detail Mask", 2D) = "white" {}_DetailAlbedoMap("Detail Albedo x2", 2D) = "grey" {}_DetailNormalMapScale("Scale", Float) = 1.0[Normal] _DetailNormalMap("Normal Map", 2D) = "bump" {}[Enum(UV0,0,UV1,1)] _UVSec("UV Set for secondary textures", Float) = 0// Blending state[HideInInspector] _Mode("__mode", Float) = 0.0[HideInInspector] _SrcBlend("__src", Float) = 1.0[HideInInspector] _DstBlend("__dst", Float) = 0.0[HideInInspector] _ZWrite("__zw", Float) = 1.0}CGINCLUDE
#define UNITY_SETUP_BRDF_INPUT MetallicSetupENDCGSubShader{Tags { "RenderType" = "Opaque" "PerformanceChecks" = "False" }LOD 300Stencil{Ref 1Comp[_StencilComp]}// ------------------------------------------------------------------//  Base forward pass (directional light, emission, lightmaps, ...)Pass{Name "FORWARD"Tags { "LightMode" = "ForwardBase" }Blend[_SrcBlend][_DstBlend]ZWrite[_ZWrite]CGPROGRAM#pragma target 3.0// -------------------------------------#pragma shader_feature_local _NORMALMAP#pragma shader_feature_local _ _ALPHATEST_ON _ALPHABLEND_ON _ALPHAPREMULTIPLY_ON#pragma shader_feature _EMISSION#pragma shader_feature_local _METALLICGLOSSMAP#pragma shader_feature_local _DETAIL_MULX2#pragma shader_feature_local _SMOOTHNESS_TEXTURE_ALBEDO_CHANNEL_A#pragma shader_feature_local _SPECULARHIGHLIGHTS_OFF#pragma shader_feature_local _GLOSSYREFLECTIONS_OFF#pragma shader_feature_local _PARALLAXMAP#pragma multi_compile_fwdbase#pragma multi_compile_fog#pragma multi_compile_instancing// Uncomment the following line to enable dithering LOD crossfade. Note: there are more in the file to uncomment for other passes.//#pragma multi_compile _ LOD_FADE_CROSSFADE#pragma vertex vertBase#pragma fragment fragBase#include "UnityStandardCoreForward.cginc"ENDCG}// ------------------------------------------------------------------//  Additive forward pass (one light per pass)Pass{Name "FORWARD_DELTA"Tags { "LightMode" = "ForwardAdd" }Blend[_SrcBlend] OneFog { Color(0,0,0,0) } // in additive pass fog should be blackZWrite OffZTest LEqualCGPROGRAM#pragma target 3.0// -------------------------------------#pragma shader_feature_local _NORMALMAP#pragma shader_feature_local _ _ALPHATEST_ON _ALPHABLEND_ON _ALPHAPREMULTIPLY_ON#pragma shader_feature_local _METALLICGLOSSMAP#pragma shader_feature_local _SMOOTHNESS_TEXTURE_ALBEDO_CHANNEL_A#pragma shader_feature_local _SPECULARHIGHLIGHTS_OFF#pragma shader_feature_local _DETAIL_MULX2#pragma shader_feature_local _PARALLAXMAP#pragma multi_compile_fwdadd_fullshadows#pragma multi_compile_fog// Uncomment the following line to enable dithering LOD crossfade. Note: there are more in the file to uncomment for other passes.//#pragma multi_compile _ LOD_FADE_CROSSFADE#pragma vertex vertAdd#pragma fragment fragAdd#include "UnityStandardCoreForward.cginc"ENDCG}// ------------------------------------------------------------------//  Shadow rendering passPass {Name "ShadowCaster"Tags { "LightMode" = "ShadowCaster" }ZWrite On ZTest LEqualCGPROGRAM#pragma target 3.0// -------------------------------------#pragma shader_feature_local _ _ALPHATEST_ON _ALPHABLEND_ON _ALPHAPREMULTIPLY_ON#pragma shader_feature_local _METALLICGLOSSMAP#pragma shader_feature_local _SMOOTHNESS_TEXTURE_ALBEDO_CHANNEL_A#pragma shader_feature_local _PARALLAXMAP#pragma multi_compile_shadowcaster#pragma multi_compile_instancing// Uncomment the following line to enable dithering LOD crossfade. Note: there are more in the file to uncomment for other passes.//#pragma multi_compile _ LOD_FADE_CROSSFADE#pragma vertex vertShadowCaster#pragma fragment fragShadowCaster#include "UnityStandardShadow.cginc"ENDCG}// ------------------------------------------------------------------//  Deferred passPass{Name "DEFERRED"Tags { "LightMode" = "Deferred" }CGPROGRAM#pragma target 3.0#pragma exclude_renderers nomrt// -------------------------------------#pragma shader_feature_local _NORMALMAP#pragma shader_feature_local _ _ALPHATEST_ON _ALPHABLEND_ON _ALPHAPREMULTIPLY_ON#pragma shader_feature _EMISSION#pragma shader_feature_local _METALLICGLOSSMAP#pragma shader_feature_local _SMOOTHNESS_TEXTURE_ALBEDO_CHANNEL_A#pragma shader_feature_local _SPECULARHIGHLIGHTS_OFF#pragma shader_feature_local _DETAIL_MULX2#pragma shader_feature_local _PARALLAXMAP#pragma multi_compile_prepassfinal#pragma multi_compile_instancing// Uncomment the following line to enable dithering LOD crossfade. Note: there are more in the file to uncomment for other passes.//#pragma multi_compile _ LOD_FADE_CROSSFADE#pragma vertex vertDeferred#pragma fragment fragDeferred#include "UnityStandardCore.cginc"ENDCG}// ------------------------------------------------------------------// Extracts information for lightmapping, GI (emission, albedo, ...)// This pass it not used during regular rendering.Pass{Name "META"Tags { "LightMode" = "Meta" }Cull OffCGPROGRAM#pragma vertex vert_meta#pragma fragment frag_meta#pragma shader_feature _EMISSION#pragma shader_feature_local _METALLICGLOSSMAP#pragma shader_feature_local _SMOOTHNESS_TEXTURE_ALBEDO_CHANNEL_A#pragma shader_feature_local _DETAIL_MULX2#pragma shader_feature EDITOR_VISUALIZATION#include "UnityStandardMeta.cginc"ENDCG}}SubShader{Tags { "RenderType" = "Opaque" "PerformanceChecks" = "False" }LOD 150Stencil{Ref 1Comp[_StencilComp]}// ------------------------------------------------------------------//  Base forward pass (directional light, emission, lightmaps, ...)Pass{Name "FORWARD"Tags { "LightMode" = "ForwardBase" }Blend[_SrcBlend][_DstBlend]ZWrite[_ZWrite]CGPROGRAM#pragma target 2.0#pragma shader_feature_local _NORMALMAP#pragma shader_feature_local _ _ALPHATEST_ON _ALPHABLEND_ON _ALPHAPREMULTIPLY_ON#pragma shader_feature _EMISSION#pragma shader_feature_local _METALLICGLOSSMAP#pragma shader_feature_local _SMOOTHNESS_TEXTURE_ALBEDO_CHANNEL_A#pragma shader_feature_local _SPECULARHIGHLIGHTS_OFF#pragma shader_feature_local _GLOSSYREFLECTIONS_OFF// SM2.0: NOT SUPPORTED shader_feature_local _DETAIL_MULX2// SM2.0: NOT SUPPORTED shader_feature_local _PARALLAXMAP#pragma skip_variants SHADOWS_SOFT DYNAMICLIGHTMAP_ON DIRLIGHTMAP_COMBINED#pragma multi_compile_fwdbase#pragma multi_compile_fog#pragma vertex vertBase#pragma fragment fragBase#include "UnityStandardCoreForward.cginc"ENDCG}// ------------------------------------------------------------------//  Additive forward pass (one light per pass)Pass{Name "FORWARD_DELTA"Tags { "LightMode" = "ForwardAdd" }Blend[_SrcBlend] OneFog { Color(0,0,0,0) } // in additive pass fog should be blackZWrite OffZTest LEqualCGPROGRAM#pragma target 2.0#pragma shader_feature_local _NORMALMAP#pragma shader_feature_local _ _ALPHATEST_ON _ALPHABLEND_ON _ALPHAPREMULTIPLY_ON#pragma shader_feature_local _METALLICGLOSSMAP#pragma shader_feature_local _SMOOTHNESS_TEXTURE_ALBEDO_CHANNEL_A#pragma shader_feature_local _SPECULARHIGHLIGHTS_OFF#pragma shader_feature_local _DETAIL_MULX2// SM2.0: NOT SUPPORTED shader_feature_local _PARALLAXMAP#pragma skip_variants SHADOWS_SOFT#pragma multi_compile_fwdadd_fullshadows#pragma multi_compile_fog#pragma vertex vertAdd#pragma fragment fragAdd#include "UnityStandardCoreForward.cginc"ENDCG}// ------------------------------------------------------------------//  Shadow rendering passPass {Name "ShadowCaster"Tags { "LightMode" = "ShadowCaster" }ZWrite On ZTest LEqualCGPROGRAM#pragma target 2.0#pragma shader_feature_local _ _ALPHATEST_ON _ALPHABLEND_ON _ALPHAPREMULTIPLY_ON#pragma shader_feature_local _METALLICGLOSSMAP#pragma shader_feature_local _SMOOTHNESS_TEXTURE_ALBEDO_CHANNEL_A#pragma skip_variants SHADOWS_SOFT#pragma multi_compile_shadowcaster#pragma vertex vertShadowCaster#pragma fragment fragShadowCaster#include "UnityStandardShadow.cginc"ENDCG}// ------------------------------------------------------------------// Extracts information for lightmapping, GI (emission, albedo, ...)// This pass it not used during regular rendering.Pass{Name "META"Tags { "LightMode" = "Meta" }Cull OffCGPROGRAM#pragma vertex vert_meta#pragma fragment frag_meta#pragma shader_feature _EMISSION#pragma shader_feature_local _METALLICGLOSSMAP#pragma shader_feature_local _SMOOTHNESS_TEXTURE_ALBEDO_CHANNEL_A#pragma shader_feature_local _DETAIL_MULX2#pragma shader_feature EDITOR_VISUALIZATION#include "UnityStandardMeta.cginc"ENDCG}}//FallBack "VertexLit"
//CustomEditor "StandardShaderGUI"
}
4.Sky.shader
modification based on Unity’s Built-in Shaders, should be applied on a Sphere gameobject used as the skybox, here is the documentation from Unity about how to cull front or back (normally, it is default to cull the back, so you can’t see anything inside a 3D object).
基于 Unity 内置着色器的修改,应用于用作天空盒的球体游戏对象,以下是 Unity 关于如何剔除正面或背面的着色器(通常,默认为剔除背面,因此您无法在 3D 对象中看到任何内容)。
// (c) 2020 Tongzhou Yu
Shader "Custom/Sky"
{Properties{_MainTex("Texture", 2D) = "white" {}[Enum(CompareFunction)] _StencilComp("Stencil Comp",Int) = 3}SubShader{Tags { "RenderType"="Opaque" }LOD 100Cull FrontPass{Stencil{Ref 1Comp[_StencilComp]}CGPROGRAM#pragma vertex vert#pragma fragment frag// make fog work#pragma multi_compile_fog#include "UnityCG.cginc"struct appdata{float4 vertex : POSITION;float2 uv : TEXCOORD0;};struct v2f{float2 uv : TEXCOORD0;UNITY_FOG_COORDS(1)float4 vertex : SV_POSITION;};sampler2D _MainTex;float4 _MainTex_ST;v2f vert (appdata v){v2f o;o.vertex = UnityObjectToClipPos(v.vertex);o.uv = TRANSFORM_TEX(v.uv, _MainTex);UNITY_TRANSFER_FOG(o,o.vertex);return o;}fixed4 frag (v2f i) : SV_Target{// sample the texturefixed4 col = tex2D(_MainTex, i.uv);// apply fogUNITY_APPLY_FOG(i.fogCoord, col);return col;}ENDCG}}
}
3. 脚本 Scripts
1.PortalManger.cs
should be applied on PortalDoor component.
应用于PortalDoor 组件。
-
确保场景中使用的摄像机的标签已设置为MainCamera。MAKE SURE the tag of the camera used in the scene has been set to MainCamera

-
在摄像机的检查器中, Clipping Planes 的“near应设置为与PortalManger.cs中的值相同的值:(if(camPostionInPortalSpace.y < 0.01f))。In the camera’s inspector, “near” of the Clipping Planes should be set to the same value as the one in PortalManger.cs (if(camPostionInPortalSpace.y < 0.01f))

-
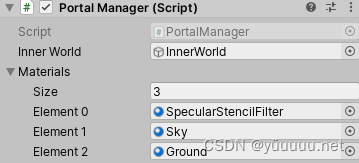
将您创建的Innerworld拖到PortalManager>InnerWorld中。Drag Innerworld which you created into PortalManager>InnerWorld
-
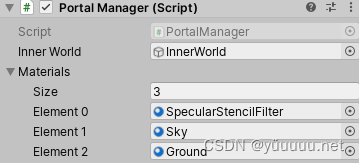
设置内部世界中使用的材质数量,并将材质拖到PortalManager>Materials中。Set the number of materials used in Innerworld and drag the materials into PortalManager>Materials
// (c) 2020 Tongzhou Yu
using System.Collections;
using System.Collections.Generic;
using UnityEngine;
using UnityEngine.Rendering;
public class PortalManager : MonoBehaviour
{public GameObject InnerWorld;//This materials matter needs to be optimizated!public Material[] materials;private Vector3 camPostionInPortalSpace;bool wasInFront;bool inOtherWorld;bool hasCollided;// Start is called before the first frame updatevoid Start(){SetMaterials(false);}void SetMaterials(bool fullRender){var stencilTest = fullRender ? CompareFunction.NotEqual : CompareFunction.Equal;foreach (var mat in materials){mat.SetInt("_StencilComp", (int)stencilTest);}}//Set bidirectional functionbool GetIsInFront(){GameObject MainCamera = GameObject.FindGameObjectWithTag("MainCamera");Vector3 worldPos = MainCamera.transform.position + MainCamera.transform.forward * Camera.main.nearClipPlane;camPostionInPortalSpace = transform.InverseTransformPoint(worldPos);return camPostionInPortalSpace.y >= 0 ? true : false;}private void OnTriggerEnter(Collider collider){GameObject MainCamera = GameObject.FindGameObjectWithTag("MainCamera");if (collider.transform != MainCamera.transform)return;wasInFront = GetIsInFront();hasCollided = true;}// Update is called once per framevoid OnTriggerExit(Collider collider){GameObject MainCamera = GameObject.FindGameObjectWithTag("MainCamera");if (collider.transform != MainCamera.transform)return;hasCollided = false;}void whileCameraColliding(){if (!hasCollided)return;bool isInFront = GetIsInFront();if ((isInFront && !wasInFront) || (wasInFront && !isInFront)){inOtherWorld = !inOtherWorld;SetMaterials(inOtherWorld);}wasInFront = isInFront;}private void OnDestroy(){SetMaterials(true);}private void Update(){whileCameraColliding();}
}
2.PlaceOnPlaneOnce.cs
recommanded to work with Portal.
建议挂载在Portal上。
using System.Collections.Generic;
using UnityEngine;
using UnityEngine.XR.ARFoundation;
using UnityEngine.XR.ARSubsystems;
/// <summary>
/// Listens for touch events and performs an AR raycast from the screen touch point.
/// AR raycasts will only hit detected trackables like feature points and planes.
///
/// If a raycast hits a trackable, the <see cref="placedPrefab"/> is instantiated
/// and moved to the hit position.
/// </summary>
[RequireComponent(typeof(ARRaycastManager))]
public class PlaceOnPlaneOnce : MonoBehaviour
{[SerializeField][Tooltip("Instantiates this prefab on a plane at the touch location.")]GameObject m_PlacedPrefab;/// <summary>/// The prefab to instantiate on touch./// </summary>public GameObject placedPrefab{get { return m_PlacedPrefab; }set { m_PlacedPrefab = value; }}/// <summary>/// The object instantiated as a result of a successful raycast intersection with a plane./// </summary>public GameObject spawnedObject { get; private set; }void Awake(){m_RaycastManager = GetComponent<ARRaycastManager>();}bool TryGetTouchPosition(out Vector2 touchPosition){
#if UNITY_EDITORif (Input.GetMouseButton(0)){var mousePosition = Input.mousePosition;touchPosition = new Vector2(mousePosition.x, mousePosition.y);return true;}
#elseif (Input.touchCount > 0){touchPosition = Input.GetTouch(0).position;return true;}
#endiftouchPosition = default;return false;}void Update(){if (!TryGetTouchPosition(out Vector2 touchPosition))return;if (m_RaycastManager.Raycast(touchPosition, s_Hits, TrackableType.PlaneWithinPolygon)){// Raycast hits are sorted by distance, so the first one// will be the closest hit.var hitPose = s_Hits[0].pose;if ((spawnedObject == null)){spawnedObject = Instantiate(m_PlacedPrefab, hitPose.position, hitPose.rotation);}}}static List<ARRaycastHit> s_Hits = new List<ARRaycastHit>();ARRaycastManager m_RaycastManager;
}
③ 更近一步 Go a step further
In the last example “Interactive Door Scene”, every elements to achieve production-quality have included, the whole user-flow is:
在最终示例“Interactive Door Scene”中,实现开箱即用的交互式传送门,整个体验流程是:
- 扫描地板并找到水平面。Scan the floor and locate the horizontal plane;
- 将门放在地板上,同时出现汽车。Place the door on the floor, with a car appearing in the same time;
- 通过图像跟踪功能拥有武器。Find a weapon by Image Tracking feature;
- 将武器放在汽车的后备箱上,在那里您可以找到“放下武器”,同时,门将打开.Put the weapon on the trunk of the car where you can find “Drop your weapon”, in the meantime, the door will open
- 穿过门,你会发现自己在另一个世界。Go through the door, you will find yourself in another world.
这篇关于基于Unity ARFoundation的传送门项目 - Augmented Reality Portal based on ARFoundation in Unity的文章就介绍到这儿,希望我们推荐的文章对编程师们有所帮助!


