本文主要是介绍机器视觉之产品包装缺陷检测(CNN神经网络),希望对大家解决编程问题提供一定的参考价值,需要的开发者们随着小编来一起学习吧!
作为大三学期的机器视觉这门课的课程设计,之前给自己挖下的坑,含着泪也要给补上
环境要求:anaconda tensorflow-1.12.0 opencv-4.1.2
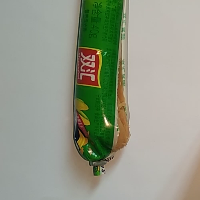
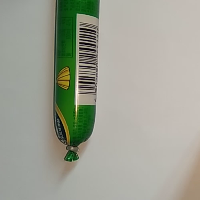
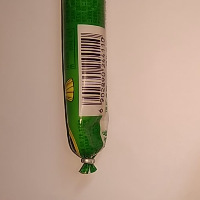
这次的任务是使用cnn神经网络对火腿肠的外包装进行缺陷检测,这里需要将火腿肠外包装情况使用cnn给分成三类,第一类是包装正常,第二类是包装缝合处破损,第三类是变形,本来应该还有一类是封口铁丝缺失的检测的,但拍照出来resize后连肉眼都难以区分,就没有加进去,这三类图片分别如下


首先是样本数据的采集,我使用手机摄像头在固定的高度下对火腿肠进行30帧每秒的录像,然后从视频里提取了每类大约两千多张的样本图片,后将其resize成200*200像素大小,代码如下:
import numpy as np
import cv2 as cv
import oscap = cv.VideoCapture("./video/malformation3.mp4")
frame_num=0while cap.isOpened():ret, frame = cap.read()if not ret:print("Can't receive frame (stream end?). Exiting ...")breakif cv.waitKey(1) == ord('q'):breakcropped=frame[100:600,200:700]resize_pic = cv.resize(cropped, (200, 200))cv.imshow('resize',resize_pic)cv.imwrite('./test/malformation'+str(frame_num)+'_test.png',resize_pic)frame_num=frame_num+1
cap.release()
得到训练数据后,根据其文件名称,给每张图打上标签,为后面做准备
import tensorflow as tf
import numpy as np
import os
import re
# np.set_printoptions(threshold=100000)'''
功能:获取训练数据地址,存储标签
参数:imagedir
imagedir: 训练数据地址
返回:imagelist, labellist
imagelist:图片位置列表
labellist:数据标签列表
'''def get_file(imagedir):images = []labels = []for root, dirs, files in os.walk("./train"):for filename in files:images.append(os.path.join(root, filename))  # 图片所在目录listfor prefolder in images:letter = prefolder.split('\\')[-1]#print(letter)if re.match('normal', letter):  # 匹配图片名称labels = np.append(labels, [0])elif re.match('notSuture', letter):labels = np.append(labels, [1])elif re.match('malformation', letter):labels = np.append(labels, [2])temp = np.array([images, labels])  # 将图片地址和标记存入矩阵中temp = temp.transpose()  # 转置np.random.shuffle(temp)  # 打乱元素np.random.shuffle(temp)  # 打乱元素np.random.shuffle(temp)  # 打乱元素imagelist = list(temp[:, 0])  # 第一列的所有元素labellist = list(temp[:, 1])labellist = [int(float(i)) for i in labellist]  # 将标记转化为整形# print(labellist)return imagelist, labellist'''
功能:获取训练数据地址,存储标签
参数:image_list, label_list, img_width, img_height, batch_size, capacity, channel
image_list: 图片位置列表
label_list:数据标签列表
img_width:训练图片size
img_height:训练图片size
batch_size:训练batch size
capacity:线程队列里面包含的数据数量
channel:输入数据通道数
返回:image_batch, label_batch
image_batch:图片batch
label_batch:数据标签batch
'''def get_batch(image_list, label_list, img_width, img_height, batch_size, capacity, channel):image = tf.cast(image_list, tf.string)label = tf.cast(label_list, tf.int32)input_queue = tf.train.slice_input_producer([image, label])label = input_queue[1]# 读入图片数据image_contents = tf.read_file(input_queue[0])# 解码图片为二进制image = tf.image.decode_jpeg(image_contents, channels=channel)# 统一图片数据尺寸image = tf.image.resize_images(image, (img_height, img_width))# 减均值 去除平均亮度值image = tf.image.per_image_standardization(image)# 随机队列image_batch, label_batch = tf.train.shuffle_batch([image, label],batch_size=batch_size,num_threads=2,min_after_dequeue=200,capacity=capacity)# 重构标签shapelabel_batch = tf.reshape(label_batch, [batch_size])return image_batch, label_batch
前期工作准备好了,接下来到了重头戏,搭建神经网络和训练神经网络,这里我使用的是12层深度的网络,前10层为隐含层,第11层为全连接层,经过第12层的softmax层后,最终输出各个类的得分,激活函数使用的是relu函数,损失函数为交叉熵损失函数,优化器选择自适应梯度下降方式,使用maxpool对数据进行下采样,为防止过拟合,加了一个dropout处理,keep_prob取0.9左右,也就是抛弃10%左右的神经元,学习率learning_rate = 0.00001,过大的学习率会导致发散现象,过小的学习率效率太低
import tensorflow as tf
import numpy as np
import matplotlib.pyplot as plt
import time
import markLabel
import os
import cv2 as cv
import tensorflow.contrib.layers as layers
import re
os.environ['TF_CPP_MIN_LOG_LEVEL'] = '2'# 输入数据尺寸
imw = 200
imh = 200
# 输入数据通道
cn = 3
# bn层flag 训练的时候True 测试的时候False
flg = True
batch_size = 100#学习率
learning_rate = 0.00001# 获取数据和标签list
X_train, y_train =markLabel.get_file("./train")
image_batch, label_batch = markLabel.get_batch(X_train, y_train, imw, imh, batch_size, 1000, cn)#定义输入的placeholder,xs=200*200*3,ys=3即分为3类
xs=tf.placeholder(tf.float32,[None,200,200,3])
ys=tf.placeholder(tf.float32,[None,3])#定义dropout的placeholder,防止过拟合
keep_prob=tf.placeholder(tf.float32)#图片大小200*200*3
x_image=tf.reshape(xs,[-1,200,200,3])#定义Weight变量
def weight_variable(shape): initial=tf.truncated_normal(shape,stddev=0.1) #产生随机变量来进行初始化return tf.Variable(initial)#定义bias变量
def bias_variable(shape): initial=tf.constant(0.1,shape=shape)   #产生随机变量来进行初始化return tf.Variable(initial)#输入图片x和卷积核W(也称权重W)
def conv2d(x,W):return tf.nn.conv2d(x,W,[1,1,1,1],padding='SAME')#池化的核函数大小为2x2,步长为2
def max_pool_2x2(x): return tf.nn.max_pool(x,ksize=[1,2,2,1],strides=[1,2,2,1],padding='SAME')def onehot(labels):n_sample = len(labels)n_class = 3onehot_labels = np.zeros((n_sample, n_class))onehot_labels[np.arange(n_sample), labels] = 1return onehot_labels# =============================================================================
# 第1层:convolutional layer1 + max pooling;
# 第2层:convolutional layer2 + max pooling;
# 第3层:convolutional layer3 + max pooling;
# 第4层:convolutional layer4 + max pooling;
# 第5层:convolutional layer5 + max pooling;
# 第6层:fully connected layer1 + dropout;
# 第7层:fully connected layer2 to prediction.
# =============================================================================#把xs的形状变成[-1,200,200,3],不考虑图片维度,图片尺寸200*200,三个通道
x_image=tf.reshape(xs,[-1,200,200,3])#第一层卷积核5*5,输入维度(图片维度)=3,输出32个featuremap,偏置为3个通道*32
W_conv1=weight_variable([5,5,3,32])
b_conv1=bias_variable([32])#第一个卷积层,激活函数使用relu(修正线性单元),输出大小就变成了200x200x32
h_conv1=tf.nn.relu(conv2d(x_image,W_conv1)+b_conv1)W_conv1_2=weight_variable([1,1,32,32])
b_conv1_2=bias_variable([32])#第一个卷积层,激活函数使用relu(修正线性单元),输出大小就变成了200x200x32
h_conv1_2=tf.nn.relu(conv2d(h_conv1,W_conv1_2)+b_conv1_2)#pooling处理,输出为100*100*32
h_pool1=max_pool_2x2(h_conv1_2)##第二层卷积核3*3,输入为上一层输出(32个特征),本层输出64个featuremap
W_conv2=weight_variable([3,3,32,32])
b_conv2=bias_variable([32])#激活函数使用relu(修正线性单元),输出的大小为100x100x64
h_conv2=tf.nn.relu(conv2d(h_pool1,W_conv2)+b_conv2)W_conv2_2=weight_variable([3,3,32,64])
b_conv2_2=bias_variable([64])#激活函数使用relu(修正线性单元),输出的大小为100x100x64
h_conv2_2=tf.nn.relu(conv2d(h_conv2,W_conv2_2)+b_conv2_2)W_conv2_3=weight_variable([1,1,64,64])
b_conv2_3=bias_variable([64])#激活函数使用relu(修正线性单元),输出的大小为100x100x64
h_conv2_3=tf.nn.relu(conv2d(h_conv2_2,W_conv2_3)+b_conv2_3)#pooling处理,输出为50*50*64
h_pool2=max_pool_2x2(h_conv2_3)##第三层卷积核3*3,输入为上一层输出(64个特征),本层输出128个featuremap
W_conv3=weight_variable([3,3,64,64])
b_conv3=bias_variable([64])#激活函数使用relu(修正线性单元),输出的大小为50x50x128
h_conv3=tf.nn.relu(conv2d(h_pool2,W_conv3)+b_conv3)W_conv3_2=weight_variable([3,3,64,128])
b_conv3_2=bias_variable([128])#激活函数使用relu(修正线性单元),输出的大小为50x50x128
h_conv3_2=tf.nn.relu(conv2d(h_conv3,W_conv3_2)+b_conv3_2)#pooling处理,输出为25*25*128
h_pool3=max_pool_2x2(h_conv3_2)##第四层卷积核3*3,输入为上一层输出(64个特征),本层输出192个featuremap
W_conv4=weight_variable([3,3,128,128])
b_conv4=bias_variable([128])#激活函数使用relu(修正线性单元),输出的大小为25x25x192
h_conv4=tf.nn.relu(conv2d(h_pool3,W_conv4)+b_conv4)W_conv4_2=weight_variable([3,3,128,128])
b_conv4_2=bias_variable([128])#激活函数使用relu(修正线性单元),输出的大小为25x25x192
h_conv4_2=tf.nn.relu(conv2d(h_conv4,W_conv4_2)+b_conv4_2)#pooling处理,输出为13*13*192
h_pool4=max_pool_2x2(h_conv4_2)##第五层卷积核3*3,输入为上一层输出(192个特征),本层输出256个featuremap
W_conv5=weight_variable([3,3,128,128])
b_conv5=bias_variable([128])#激活函数使用relu(修正线性单元),输出的大小为13x13x256
h_conv5=tf.nn.relu(conv2d(h_pool4,W_conv5)+b_conv5)W_conv5_2=weight_variable([3,3,128,128])
b_conv5_2=bias_variable([128])#激活函数使用relu(修正线性单元),输出的大小为13x13x256
h_conv5_2=tf.nn.relu(conv2d(h_conv5,W_conv5_2)+b_conv5_2)#pooling处理,输出为7*7*256
h_pool5=max_pool_2x2(h_conv5_2)# =============================================================================
# 建立全连接层
# =============================================================================#将三维矩阵为一维的数据,不考虑输入图片例子维度, 将上一个输出结果展平.
h_pool5_flat=tf.reshape(h_pool5,[-1,7*7*128])#输入为第三个卷积层展平了的输出,
W_fc1=weight_variable([7*7*128,1024])
b_fc1=bias_variable([1024])#将展平后的h_pool3_flat与本层的W_fc1相乘(非卷积)
h_fc1=tf.nn.relu(tf.matmul(h_pool5_flat,W_fc1)+b_fc1)#防止过拟合,加一个dropout
h_fc1_drop=tf.nn.dropout(h_fc1,keep_prob)#最后一层, 输入是1024,输出3个分类
W_fc2=weight_variable([1024,3])
b_fc2=bias_variable([3])#softmax分类器,输出各类的得分
prediction=tf.nn.softmax(tf.matmul(h_fc1_drop,W_fc2)+b_fc2)#交叉熵损失函数
cross_entropy=tf.reduce_mean(tf.nn.softmax_cross_entropy_with_logits(logits=prediction,labels=ys))#优化器,自适应梯度下降
train_step=tf.train.AdamOptimizer(learning_rate).minimize(cross_entropy)#评估模型
correct_pred = tf.equal(tf.argmax(prediction, 1), tf.argmax(ys, 1))
accuracy = tf.reduce_mean(tf.cast(correct_pred, tf.float32))
神经网络搭建好了,下面就该给这个网络feed数据了,受限于电脑的内存大小(8G),这里将7100多张图片分成71个批次进行训练,每批次100张图片,内存大的可以适当增大每批次的数据量
def train(opech, is_continnue_train=False):with tf.Session() as sess:sess.run(tf.global_variables_initializer())saver = tf.train.Saver() # 模型保存loss_temp = [] # loss值存数列表acc_temp = [] # 准确度存储列表# 启动线程coord = tf.train.Coordinator()threads = tf.train.start_queue_runners(coord=coord)for i in range(opech):str_ing = 'lr=' + str(learning_rate) + '迭代=' + str(opech)image, label = sess.run([image_batch, label_batch]) # 获取输入数据和标签labels = onehot(label) # 将标签转为one hot 格式sess.run(train_step, feed_dict={xs: image, ys: labels, keep_prob:0.95}) # 启动优化函数loss_record, acc, c1, c1_2, c2, c2_2, c2_3, c3, c3_2, c4, c4_2, c5, c5_2 = sess.run([cross_entropy,accuracy,h_conv1,h_conv1_2,h_conv2,h_conv2_2,h_conv2_3,h_conv3,h_conv3_2,h_conv4,h_conv4_2,h_conv5,h_conv5_2],feed_dict={xs: image, ys: labels, keep_prob:0.95})print("now the loss is %f " % loss_record)print("now the acc is %f " % acc)loss_temp.append(loss_record)acc_temp.append(acc)print("---------------%d onpech is finished-------------------" % i)print("Optimization Finished!")saver.save(sess, "./model")print("Model Save Finished!")coord.request_stop()coord.join(threads)plt.plot(loss_temp, 'b-', label='loss')plt.plot(acc_temp, 'r-', label='accuracy')plt.legend(loc='upper right')plt.xlabel('Iter')plt.ylabel('loss/acc')plt.title('lr=%f, ti=%d' % (learning_rate, opech))plt.tight_layout()plt.savefig('M2_' + str_ing + '.jpg', dpi=200)plt.show()train(71, is_continnue_train=True)
经过漫长的等待(一个小时左右,取决于电脑的配置),我这只能得到70%左右的精度

也就是说,这个模型只能识别其中的两个类别,估计也就是能区分正常和包装破损这两类,对于畸形的包装,由于和正常包装的区分度不高,导致模型没能识别出来,为此,笔者尝试增加网络的深度到19层来看下是否能够提高精度,但都是训练到一半意外停止,估计是电脑配置的问题,于是放弃了这个方法,现在在考虑使用attention机制来提高模型的准确度,也就是在不同区域训练出一个权值矩阵,对特别的区域增大其权值。比如对于封口铁丝的缺失,在封口附近提高其权重,使得模型注意该区域的特征。或者最近两年提出的细粒度分类对于包装的缺陷检测也是一个改进的方向。
这篇关于机器视觉之产品包装缺陷检测(CNN神经网络)的文章就介绍到这儿,希望我们推荐的文章对编程师们有所帮助!


